background image

52

5

EN

Menu setting method

Menu setting method

a


1

 Select [

Scene Select

] or

[

Scene Save

].

a


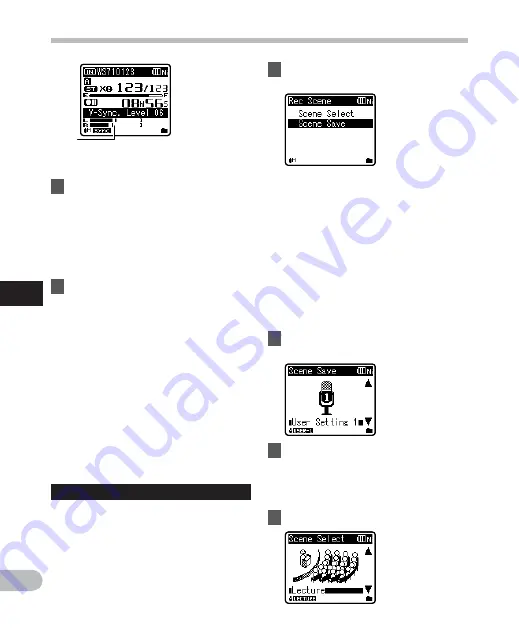
Voice sync level

 (moves to the 

right/left according to the set level)


3

 Press 

the 

REC 

(

s

) button again.

•  The recorder will go into standby. 

[

Standby

] will flash on the display 

and the recording indicator light will 
flash. 

•  When the input is at or above the 

voice sync level, recording will start 
automatically. 


4

  Voice sync recording stops 

automatically.

•  If sound at a volume below the voice 

sync level continues for the specified 
time, voice sync recording will end 
automatically, and the recorder 
will return to the standby mode of 
Step 3. Every time the recorder enters 
standby mode, the file will be closed 
and recording will continue in a 
different file. 

•  To stop the recorder during voice 

sync recording, press the 

STOP

 (

4

button.

• When 

[

VCVA

] is set to [

On

], 

[

V-Sync. Rec

] is disabled. To use this 

function, set [

VCVA

] to [

Off

] (

 P.50).

Rec Scene

The recording setting can be selected from 
the [

Lecture

], [

Conference

], [

Meeting

], 

[

Dictation

] templates to suit the recording 

scene or situation. You can also save a 
recording setting of your choice.

[

Scene Select

]: Select a recording 

scene from the templates to suit the 
recording scene and conditions. For 
details, see “

Template settings

” 

(

 P.53). Alternatively, select 

recording scene customized for a 
particular purpose.

[

Scene Save

]: You can save up to 3 sets 

of menu settings relating to a current 
recording.

  If you select [

Scene Select

], proceed 

to the operation of Step 4.

When [

Scene Save

] is selected:


2

  Set the recording settings 

according to your preferences.


3

  Specify a save destination.

  You can select the save destination 

from [

User Setting 1

], [

User Setting 2

and [

User Setting 3

].

When [

Scene Select

] is selected:


4

  Select the recording scene.

Summary of Contents for WS 700M

Page 1: ...structions for information about using the product correctly and safely Keep the instructions handy for future reference To ensure successful recordings we recommend that you test the record function...

Page 2: ...ty other than Olympus or an Olympus authorized service station or any other reason is excluded Trademarks and registered trademarks IBM and PC AT are the trademarks or registered trademarks of Interna...

Page 3: ...at playback 37 Changing the playback scene Play Scene 38 Erasing 39 Erasing files 39 Erasing a folder 39 4 About the FM radio For WS 710M only Using the FM radio 41 FM radio mode operations 42 Presett...

Page 4: ...o not disassemble repair or modify the unit yourself Do not operate the unit while operating a vehicle such as a bicycle motorcycle or go cart Keep the unit out of the reach of children Precautions re...

Page 5: ...kaline lithium or any other non rechargeable batteries Never use any batteries with a torn or cracked outer cover Keep batteries out of the reach of children If you notice anything unusual when using...

Page 6: ...nal microphone feature has been included that allows switching between broad stereo recording and recording with a highly directional quality For WS 710M only P 47 P 50 s Has recording scene setting a...

Page 7: ...ne R 3Recording indicator light 4EAR Earphone jack 5MIC Microphone jack 6Display LCD panel 7Built in speaker 8 button 9REC s Record button 09 button button LIST button ERASE button SCENE INDEX button...

Page 8: ...tor 2Folder name 3Recording media indicator 1 Music mode indicator Battery indicator 4Folder name 1 For WS 710M WS 700M only Folder list display File list display When Recorder mode is selected When M...

Page 9: ...edia indicator 1 File name Battery indicator 2Folder indicator Recording mode indicator 3During recording mode Remaining memory bar indicator During playback mode Playback position bar indicator 4Reco...

Page 10: ...name Artist name Album name Elapsed playback time EUPHONY indicator 1 Equalizer indicator 1 Current file number Total number of recorded files in the folder Erase lock indicator Speaker muting indica...

Page 11: ...and the batteries run out you will loose your currently recorded file because the file header will not be able to close It is crucial to change the batteries once you see only one Hash mark in the bat...

Page 12: ...re too weak s and Battery Low appears on the display and the recorder shuts down Battery settings Select to match the battery you are using 1 Replace the battery and switch on the recorder 2 Press the...

Page 13: ...ecorder to the AC adapter s USB port For WS 710M WS 700M 5 Charging is completed when battery indication becomes to Charging time approximately 3 hours It shows the approximate time when charging the...

Page 14: ...nd shorter battery life In order to prevent battery leakage or rust remove the rechargeable batteries from the products when you will not be using them for a long time and store them separately If USB...

Page 15: ...than one month It is recommended to fully charge the batteries then discharge repeatedly for 2 to 3 times When disposing rechargeable batteries always observe the local laws and regulations Contact yo...

Page 16: ...WER HOLD switch to the HOLD position After Hold appears on the display the recorder is set to HOLD mode Notes If you press any button in HOLD mode the clock display flashes for 2 seconds but it will n...

Page 17: ...and Day with a flashing point 2 Press the or button to set Follow the same steps by pressing the 9 or 0 button to select the next item and press the or button to set You can select between 12 and 24 h...

Page 18: ...4 Press the or button to select Time Date 1 While the recorder is during stop mode press and hold the OK MENU button The menu will appear on the display P 47 2 Press the or button to select Device Men...

Page 19: ...ay and insert it into the card slot as shown in the diagram Insert the microSD card keeping it straight Inserting the microSD card the wrong way or at an angle could damage the contact area or cause t...

Page 20: ...n the memory is selected to microSD Card it will automatically changed to Built in Memory Selected 3 Close the card cover securely Notes Releasing your finger quickly after pushing the microSD card in...

Page 21: ...er P 25 P 31 As well as an voice recorder and a music player you can also use the recorder as a radio For WS 710M only 2 Press the or button to select the mode When FM Radio is selected The recorder w...

Page 22: ...nching tree style and saved About the folders for voice recordings Folder A Folder E within the Recorder folder are the folders for voice recordings When recording with this recorder select any one of...

Page 23: ...files Up to 300 folders can be created under the Music folder including Music For WS 710M WS 700M When transferring music files to the device using Windows Media Player a folder is automatically creat...

Page 24: ...der or file selected in the list display and proceeds down one level The list display screen can be operated by the 9 button or button Select the folder or file Home display Allows the mode of the rec...

Page 25: ...ill appear on the display Turn the microphone in the direction of the source to be recorded aRecording mode bRemaining memory bar indicator cElapsed recording time dRemaining recording time eLevel met...

Page 26: ...50 Sets the directivity of the builtin stereo microphone Low Cut Filter P 47 P 50 This function can reduce noise from air conditioners projectors and other similar noises VCVA P 47 P 50 Sets the thre...

Page 27: ...rolled using the volume button When using the earphones do NOT set the volume too high Listening at very high volume may lead to hearing loss Do not place earphones near a microphone as this may cause...

Page 28: ...MP3 128kbps ormore WMA ST XQ Off Meetings and business negotiations with a small number of people MP3 128kbps WMA ST XQ Middle Dictation with a lot of background noise WMA HQ Low Music playing wild b...

Page 29: ...Compact zoom microphone unidirectional ME32 The microphone is integrated with a tripod making it suitable to place on a table and record conferences or lecture from a distance Highly sensitive noise c...

Page 30: ...cting to the audio output terminal earphone jack of the other device and the MIC jack of the recorder with the connecting cord KA333 optional for dubbing Note When you adjust the various sound quality...

Page 31: ...usic mode based on where you have transferred the file If you want to playback the file you recorded set the recorder to Recorder mode P 21 For WS 710M WS 700M The volume can be adjusted within a rang...

Page 32: ...suit different sound qualities and playback methods 1 Can be operated only in Recorder mode 2 Can be operated only in Music mode For WS 710M WS 700M Play Mode P 47 P 54 You can select the playback mod...

Page 33: ...e next file Forwarding While the recorder is during stop mode in the file display press and hold the 9 button Rewinding While the recorder is during stop mode in the file display press and hold the 0...

Page 34: ...on DRM9 but not with DRM10 Even if the file is a compatible format to playback on the recorder the recorder does not support every encoder Locating the beginning of the file While the recorder is duri...

Page 35: ...want to clear 2 Press the 9 or 0 button to select the index or temp mark to erase 3 While the index or temp number appears for approximately 2 seconds on the display press the ERASE button The index o...

Page 36: ...ncies the maximum fast playback speed is 2 times On the WS 600S the maximum fast playback is 2 times Notes As in normal playback mode you can stop playback cue a file or insert an index mark in slow p...

Page 37: ...flashing to find the end position P 33 P 36 When it reaches to the end of the file while w is flashing the point will become the end position and repeat playback will start 3 Press the REC s button a...

Page 38: ...repeat playback and fast forward and cue to the beginning of the next file dPress the 0 button Pressing the 0 button will release segment repeat playback and reverse to the beginning of the current f...

Page 39: ...ERASE button 3 Press the or button to select Erase in Folder or File Erase 6 Press the OK MENU button The display changes to Erase and erasing will start Erase Done is displayed when the file is erase...

Page 40: ...57 It may take over 10 seconds to complete processing Never perform operations such as the following while processing as they may damage the data In addition replace the battery with a new one in orde...

Page 41: ...tes Even within the broadcast region radio signals may be difficult to receive in tunnels or underground roads inside or in the shadow of buildings and apartment blocks covered with a concrete structu...

Page 42: ...usted within a range from 00 to 30 Settings relating to FM radio Auto preset P 43 Automatically adds receivable stations to the presets Scan sense P 47 P 59 Allows you to set the scan sensitivity for...

Page 43: ...Radio mode P 21 2 Press and hold the OK MENU button The menu will appear on the display P 47 4 Press the or button to select Auto preset 5 Press the OK MENUbutton Auto preset will appear on the displa...

Page 44: ...ception and fine tune the frequency 1 Perform Steps 1 through 3 from FM radio mode operations P 42 Preset call mode Press the 9 or 0 button to select a preset station a Preset number Auto Manual mode...

Page 45: ...t 2 Press the SCENE INDEXbutton Select Cancel and press the OK MENU button to return to the previous display Deleting a radio station 1Receive the preset station you wish to erase 2Press the ERASE but...

Page 46: ...s good certain reception conditions may cause noise once the recording has started To ensure that there are no mistakes with the recording make a test recording Also be sure to record in a location wi...

Page 47: ...enu display by moving the settings tab cursor 3 Press the OK MENU or 9 button to move the cursor to the item to set 4 Press the or button to move to the item you want to set 5 Press the OK MENU or 9 b...

Page 48: ...back the menu settings will be cancelled if 8 seconds elapse with no buttons being pressed 4 Setting menu during recording Function Setting Mic Sense To menu item options Zoom Mic 1 Low Cut Filter VCV...

Page 49: ...developed by the Microsoft Corporation in the US For WS 710M WS 700M only File Menu Erase Lock Locking a file keeps important data from being accidentally erased Locked files are not erased when you s...

Page 50: ...ntrol methods that allow you to switch to a single exclusive microphone Low Cut Filter The recorder has a Low Cut Filter function to minimize low frequency sounds and record voices more clearly This f...

Page 51: ...ecording starts when a voice louder than the voice sync level detection level is detected When the voice becomes quiet recording will automatically stop When voice sync recording is on and the input l...

Page 52: ...voice sync recording press the STOP 4 button When VCVA is set to On V Sync Rec is disabled To use this function set VCVA to Off P 50 Rec Scene The recording setting can be selected from the Lecture Co...

Page 53: ...is difficult to understand because of noisy surroundings adjust the Noise Cancel setting level High Low Enables the Noise Cancel function Noise will be reduced in the file when it s played back for be...

Page 54: ...n When EUPHONY is set to Power Wide or Natural slow high speed playback will not function To use these functions set EUPHONY to Off P 36 EUPHONY only works in Music mode When playing back using the bu...

Page 55: ...Select Scene Select or Scene Save Scene Select Select a playback scene customized to your preferences In Folder mode when the recorder comes to the end of the last file in the folder End flashes for...

Page 56: ...buttons and press the 9 button Press the 0 button to return to the Scene Select display LCD Sound Menu Backlight The display will remain lit for about 10 Initial setting seconds when a button on the r...

Page 57: ...the length of time before the power will be turned off Off Disables this function If any button is pressed the elapsed time count before the power turns off will start over again Battery Select to mat...

Page 58: ...ttings after setting reset initial settings Rec Menu Mic Sense Middle Rec Mode WMA ST XQ Zoom Mic 1 Off Low Cut Filter Off VCVA Off V Sync Rec Off Play Menu Noise Cancel 2 Off EUPHONY 3 Off Voice Filt...

Page 59: ...will be automatically set to ST HQ Auto preset Refer to Presetting radio stations automatically Auto preset P 43 Scan sense You change the scan sensitivity when scanning for radio stations with auto p...

Page 60: ...g recording times can be divide so that they are easier to manage and edit Only MP3 files and PCM files recorded on this recorder can be divided For WS 710M WS 700M only 1 Stop playback at the divide...

Page 61: ...ividing file This may damage the data 4 Press the OK MENU button Dividing will appear and file dividing will start File dividing is completed when File divide completed appears Changing the USB class...

Page 62: ...PC for charging or to the AC Adapter A514 optional Optional Setting to confirm the connection method each time a USB connection is made 5 Press the OK MENU button to complete the setting 7 Press the O...

Page 63: ...n of Step 5 2 Press the or button to select the recording media to format 3 Press the OK MENU or 9 button If you format the recorder all files will be removed and all function settings will return to...

Page 64: ...rocessing as they may damage the data In addition replace the battery with a new one in order to ensure that the battery will not run out while processing 1Disconnecting the AC Adapter while processin...

Page 65: ...an operational environment for saving the files recorded by this recorder to your PC with USB connection Even if operational environment is satisfied we do not support such as upgraded OS the multi bo...

Page 66: ...ecome unrecognizable Data can be written or uploaded to the recorder even though the attribute of the recorder drive is shown as Read only by the operating system of the PC As the noise may cause adve...

Page 67: ...e Storage is appeared on recorder if the USB cable is connected Notes Refer to the user s manual for your PC regarding the USB port on your PC Be sure to push the cable connector all the way in Otherw...

Page 68: ...the task bar located at the lower right corner of the screen Click Safely remove USB Mass Storage Device Macintosh 1 Move the drive icon for this recorder that is appear on the desktop to the garbage...

Page 69: ...y the drive name Removable Disk 1 3 Open the product name folder 4 Copy the data 5 Disconnect the recorder from the PC P 68 Macintosh 1 Connecting the recorder to your PC P 67 When you connect the rec...

Page 70: ...with this recorder It supports WAV MP3 and WMA format music files By using Windows Media Player music files from music CDs can be converted ripped P 71 and music files that you have bought from any m...

Page 71: ...kbar click Rip CD menu For Windows Media Player 11 Click Rip If Internet connectivity is available CD information is searched 3 Put a check mark on the music file that you want to copy 4 Click Start R...

Page 72: ...t the recorder product name from among the devices and click Properties Click on the Create folder hierarchy on device to check If you uncheck and syncronize the file it will be transfered under the f...

Page 73: ...u again to select DVR Advanced Options Set Up Sync and set as follows Click on Create folder hierarchy on device to check 1 2 4 Select the desired category from Library on the left and select music fi...

Page 74: ...B to dozens of MB depending on the music file sizes for the management file The more capacity for the management file will be necessary as the number of the music files increases 4 Select the desired...

Page 75: ...start Windows Media Player 2 From the Features taskbar click the Burn menu 3 Select the desired category from Library on the left and select voice files or albums to copy to the CD R RW and Drag Drop...

Page 76: ...start Windows Media Player 2 From the Features taskbar click Burn menu 3 Select the desired category from Library on the left and select voice files or albums to copy to the CD R RW and Drag Drop them...

Page 77: ...tton 9Browse button 0Disc eject button Window names Music files that have been imported to your computer from music CDs and acquired over the Internet can be transferred to and played back with this r...

Page 78: ...file format and bit rate for copying music files to your PC and click OK This recorder supports MP3 and WAV format music files P 34 For WS 710M WS 700M only Import Using Set the file format for copyin...

Page 79: ...you want to transfer The order of music pieces can be changed by Drag Drop of the music file in the play list displayed 3 Double click the corresponding drive with the recorder and open Music folder...

Page 80: ...RW into the CD R RW drive and start iTunes 2 Select the desired playlist and put a check mark on the voice files to copy to the CD R RW 3 Click Burn Disc 4 Set the CD format for copying voice files to...

Page 81: ...er window When you open My Computer it will be recognized by the drive name of the product name 3 Open the product name folder 4 Copy the data 5 Disconnect the recorder from the PC P 68 Macintosh 1 Co...

Page 82: ...ull Tempmark full The file is full of Tempmarks maximum of 16 marks Erase Tempmarks that are no longer required P 35 Folder Full Folder full The folder is full of files maximum of 200 files Erase unne...

Page 83: ...e Action Nothing appears on the display The batteries are not loaded properly Verify that the batteries polarities and are correct P 10 Battery power is getting low Charge the battery For WS 710M WS 7...

Page 84: ...uorescent lamp while recording or during playback Move the recorder Unable to erase the file The file is locked Unlock the file P 47 P 49 The file is read only Unlock the file or cancel the read only...

Page 85: ...k using the built in speaker set Output to Speaker P 47 P 59 Cannot recharge For WS 710M WS 700M only Battery is set to Alkaline When using the supplied rechargeable battery set the battery setting to...

Page 86: ...ng surrounding noise s Tie clip microphone omni directional ME15 Small concealing microphone with a tie clip s Telephone pickup TP7 Earphone type microphone can be plugged into your ear while phoning...

Page 87: ...50332 2 4 Recording medium Built in NAND FLASH memory WS 710M 8 GB WS 700M 4 GB WS 600S 2 GB microSD card For WS 710M WS 700M only 512 MB to 16 GB 4 Speaker Built in 18 mm round dynamic speaker 4 MIC...

Page 88: ...rophones 1 2 44 1 kHz 16 bit 3 18 h 18 h 128 kbps 18 h 30 min 18 h 30 min ST XQ 19 h 19 h LP 25 h 24 h 4 During voice file playback mode All Playback Mode Recording mode Built in speaker 1 2 44 1 kHz...

Page 89: ...16 h 30 min 33 h 4 WMA format Recording medium Recording mode ST XQ ST HQ ST SP HQ SP LP Built in memory WS 710M 8 GB 135 h 270 h 542 h 542 h 1067 h 2122 h WS 700M 4 GB 67 h 134 h 270 h 270 h 532 h 10...

Page 90: ...ST XQ approx 26 h 40 min ST HQ approx 26 h 40 min ST SP approx 53 h 40 min HQ approx 26 h 40 min SP approx 53 h 40 min LP approx 148 h 40 min 1 For WS 710M WS 700M only 2 For WS 600S only It is possi...

Page 91: ...ut in the Radio Interference Regulations of the Canadian Department of Communications Cet appareil num rique ne d passe pas les limites de la Cat gorie B pour les missions de bruit radio manant d appa...

Page 92: ...juku 2 chome Shinjyuku ku Tokyo 163 0914 Japan Tel 81 0 3 3340 2111 http www olympus com OLYMPUS IMAGING AMERICA INC 3500 Corporate Parkway P O Box 610 Center Valley PA 18034 0610 U S A Tel 1 888 553...

Reviews: