- 3 -
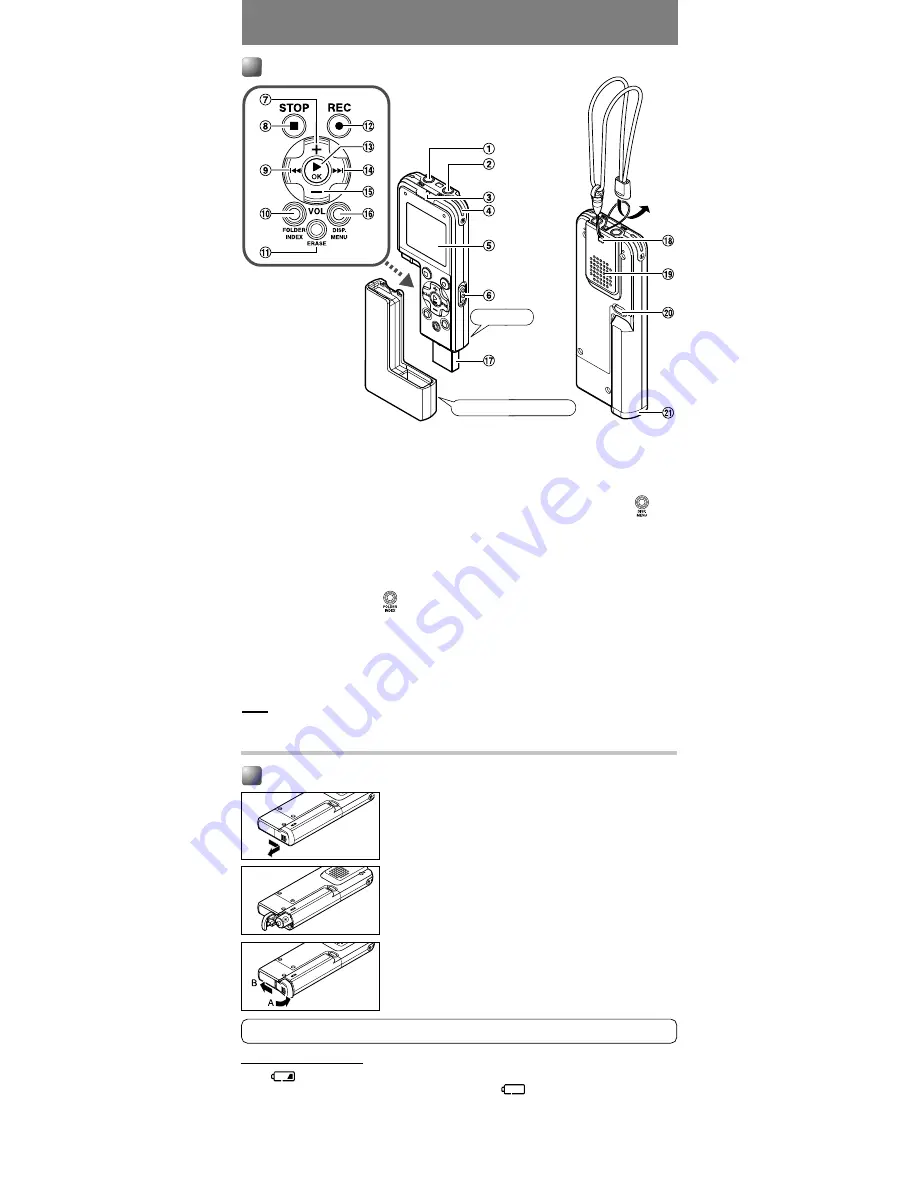
1
Lightly press down on the arrow and
slide the battery cover open.
2
Insert size-AAA alkaline battery,
observing the correct polarity.
3
Close the battery cover completely by
pressing to the direction A, then sliding
to the direction B.
When the HOLD switch is set to the direction of the arrow,
the display is turned off after “HOLD” is displayed. Follow
the next step without regard to it.
Inserting a Battery
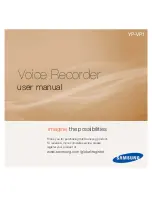
1
EAR (Earphone) jack
2
MIC (Microphone) jack
3
Record/Play indicator light
4
Built-in Microphone*
5
Display (LCD panel)
6
HOLD switch
7
VOL (
+
) button
8
STOP button (
5
)
9
REW (Rewind) button (
0
)
0
FOLDER/INDEX button (
)
!
ERASE button (
1
)
Getting Started
Identification of Parts
*The microphone built in the WS-110 is located only on one side, and the sound will be recorded
with mono.
s
The battery compartment can be detached from the main unit.
s
The main unit can be connected to a PC USB port or a USB hub.
s
Strap is not supplied. Use the optional accessory.
Note
Under no circumstances insert any other parts than the main unit into the battery compartment.
This may result in battery leakage, overheating, fire or explosion.
@
REC (Record) button (
4
)
#
PLAY/OK button (
t
)
$
FF (Fast Forward) button (
9
)
%
VOL (
–
) button
^
DISP.(Display)/MENU button (
)
&
USB terminal
*
Strap hole
(
Built-in speaker
)
Release button
-
Battery cover
An optional Ni-MH Rechargeable battery (BR401) from Olympus can be used for the recorder.
Replacing the Battery
When
appears on the display, replace the battery as soon as possible. Size-AAA alkaline
battery is recommended. When the battery is depleted,
appears on the display, and the
recorder shuts off.
s
To replace the battery, make sure that you set the HOLD switch to the opposite direction of the
arrow before replacing.
s
If it takes longer than 15 minutes to replace the dead battery, you may have to reset the time
when you load a fresh battery.
Main unit
Battery compartment