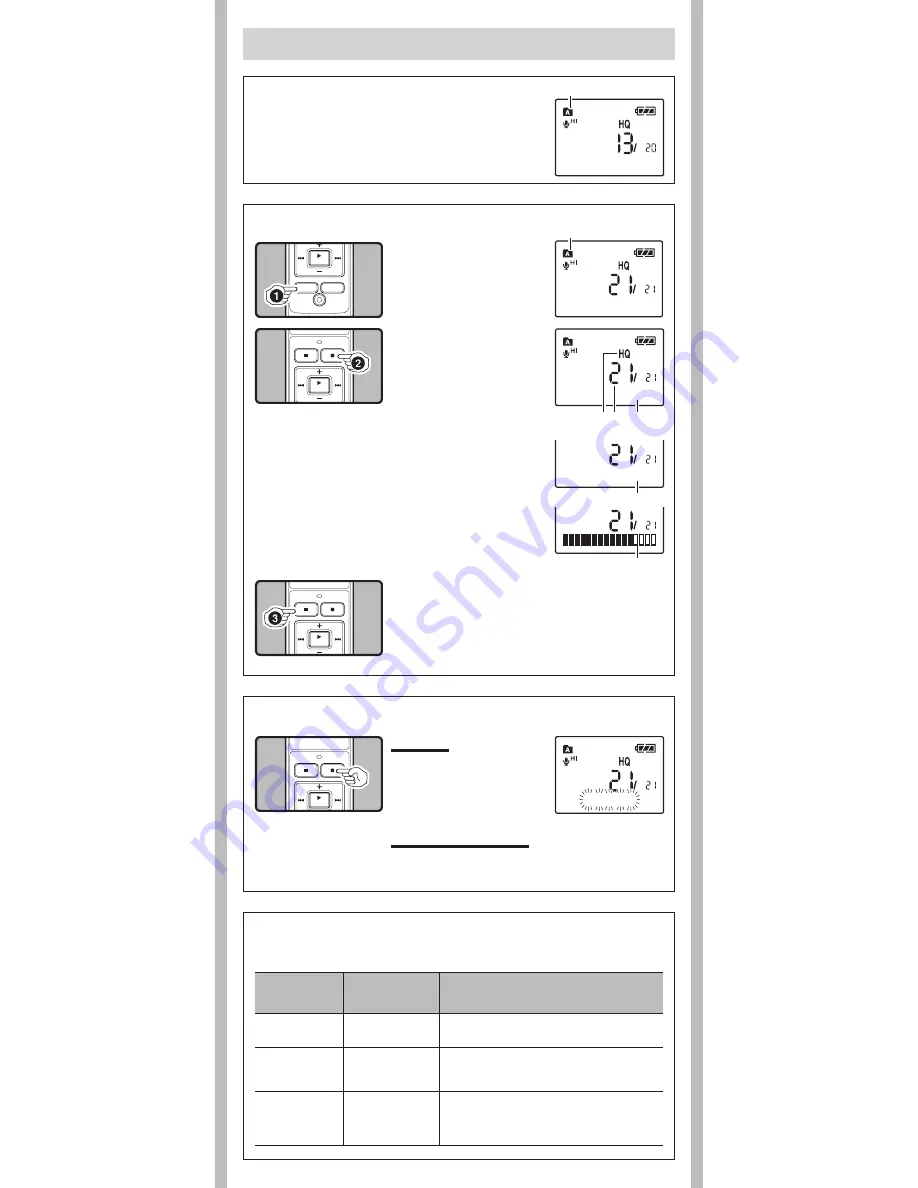
background image

4

- -

2

 Press the 

REC

 (

s

) but-

ton to start recording.

•   The record/play indicator light 

turns red, and recording starts.

•   If you start recording after in-

serting the earphone into the 

earphone jack on the recorder, 

you can hear the sound being 

recorded. The sound volume 

on the recording monitor can 

be adjusted by pressing the + 

or – button.

b

  Current recording mode

c

  Current file number

d

  Recording time

e

  Remaining recording time

f

  Recording level meter

3

 Press the 

STOP

 (

4

) button to stop record-

ing.

•  New recordings are saved as the last file in the folder.

State of the 

recorder

Operation

Display 

While in stop 

mode

Press and hold the 

STOP (

4

) button 

While holding the button down, “Remaining recording 

time” and “Remaining memory” are displayed.

While in record 

mode

Press the DISP/

MENU button

Each press switches the display in the order 

of “Recording elapsed time”, “Remaining 

recording time” and “Recording level meter”.

While in stop 

mode or 

playback mode

Press the DISP/

MENU button

Each press switches the display in the order of 

Playback elapsed time”, “Remaining playback 

time”, “Date of recording” and “Time at 

recording”.

Current folder

h

 Notes on the Folders

The recorder provides five folders, [

F

], [

G

], [

H

], [

I

] and [

W

]. To 

change the folder selection, press the FOLDER/INDEX button while 

the recorder is stopped.

Note:

•  Up to a total of 200 files can be recorded in each folder.

To Pause:

While  the  recorder  is  during 

recording mode, press the 

REC


(

s

) button.

•  [Rec Pause] appears on the display.

h

 LCD Display Information

Recording

1

 Press  the 

FO L D E R

/

INDEX

 button to select 

the desired folder.

a

   Current folder

You can select an option for the display of the recorder. This will help review and confirm different 

recorder settings and file information.

h

 To Pause Recording

h

 Recording

To Resume Recording:

Press the 

REC

 (

s

) button again.

•  Recording will resume at the point of interruption.

15m15s       14m15s

15m15s       14m15s

a

15m15s       14m15s

c

d

b

e

Remain  22h52m46s

f

Rec Pause

Summary of Contents for VN-7800PC

Page 1: ...ng to product names and model numbers The utmost care has been taken to ensure the integrity of the contents of this document In the unlikely event that a questionable item error or omission is found...

Page 2: ...playback indicator Segment repeat playback indicator AnoptionalNi MHRechargeableBattery BR401 from Olympus can be used for the recorder Getting Started hIdentification of Parts 1 Built in Microphone 2...

Page 3: ...corder is not in operation Standby Mode and Display Shut Off If the recorder is stopped for 5 minutes or longer during recording or playing it goes into Standby power save mode and the display shuts o...

Page 4: ...rding time and Recording level meter While in stop mode or playback mode Press the DISP MENU button Each press switches the display in the order of Playback elapsed time Remaining playback time Date o...

Page 5: ...being played back hCanceling Playback hForwarding and Rewinding Rewind While the recorder is during playback mode press and hold the 0 button When you release the 0 button the recorder will resume nor...

Page 6: ...me hHow to begin segment repeat playback For VN 7800PC VN 6500PC only 1 While the recorder is during playback mode press the REC s but ton at the point you want to start segment repeat playback Repeat...

Page 7: ...button for 1 second or longer to put the recorder in menu mode PLAY OK Go to the setting screen from the main menu or sub menu screen Confirm the item selected in the setting screen and go back to the...

Page 8: ...eset volume the built in Variable Control Voice Actuator VCVA starts recording automatically and stops it when the volume drops In Menu mode selection VCVA Off VCVA On The recording mode can be chosen...

Page 9: ...Files Lock Erase lock indicator Locking a file keeps important data from being accidentally erased Locked files are not erased when you choose to erase all files from a folder In Menu mode selection L...

Page 10: ...select the index mark to delete 3 Press the ERASE s button Notes Index marks cannot be placed on files created on machines other than Olympus IC recorders but temp marks can be placed instead to temp...

Page 11: ...corder on your PC Windows Operating System Microsoft Windows 2000 XP Vista Standard Installation Compatible PC s Windows PC s equipped with more than one free USB port Macintosh Operating System Mac O...

Page 12: ...ng the Recorder Format Before deleting the data please make a backup file of the PDF data of the manual Battery life is measured by Olympus It varies greatly according to the type of batteries used an...

Reviews: