background image

7

- -

Notes:

•  An erased fi le cannot be restored.
• The fi le set to erase lock will not be erased.
•  If operation is not executed for 8 seconds during the setting, it will return to the stop status.
•  Completion of erasing may take several seconds. Do not attempt to remove, replace battery 

or attempt any other functions on the voice recorder during this period because data may be 
corrupted.

h

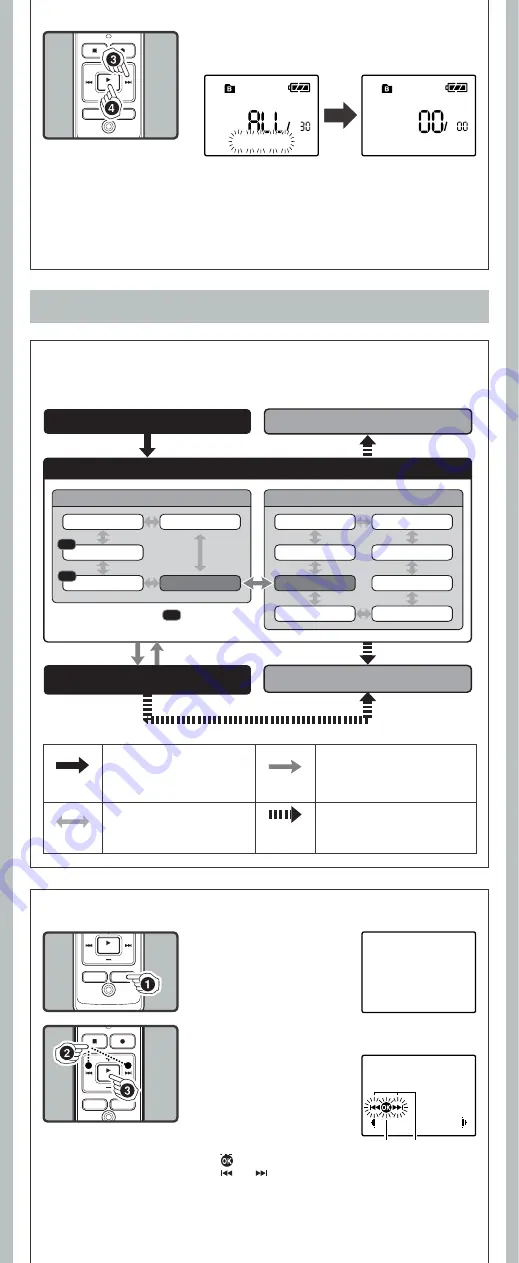
 The levels of the menu screen and the operation 

buttons [

Main Menu

/

Sub Menu

]

The setting can be switched by putting the recorder in menu mode.

Menu mode

3

 Press the 

9

 button to select [

Start

].

4

 Press the 

PLAY

/

OK

 (

`

) button.

1

 While the recorder is dur-

ing stop mode, press and 
hold the 

DISP

/

MENU


button for 1 second or 
longer.

h

 Basic Operation of the Menu Mode

a

  [

]: Press the 

PLAY

/

OK

 (

`

) button (Goes to the next screen).

b

  [

] or [

]: Press the 

9

 or 

0

 button (Changes the 

item).

3

 Press the 

PLAY

/

OK (

`

)

 button.

All Erase!

Erase Done

Main menu screen

Sub menu screen

Rec Mode

VCVA

Mic Sense

Lock

Language

LED

Contrast

Beep

Format

Main Menu

System

Time & Date

Sub Menu

The menu item with           mark can be
set even during recording.

REC

REC

REC

Step 1


Put the recorder in menu mode.

Step 2


Select the menu item in the main menu or sub menu screen.

Step 4


Complete the menu mode setting.

Step 3

Cancel the setting.

Select the setting item
in the setting screen.

DISP

/

MENU

Press and hold the button for 1 second 
or longer to put the recorder in menu 
mode.

PLAY

/

OK

 (

`

)

Go to the setting screen from the main 
menu or sub menu screen. Confirm the 
item selected in the setting screen, 
and go back to the main menu or sub 
menu screen.

0

 or 

9

Switch the items of the setting screen in 
the main menu or sub menu screen.

STOP

 (

4

) or 

REC

 (

s

)

Complete the menu mode set ting. 
(If pressed while the setting screen is 
displayed, the item being selected will 
not be set.)

Menu

Rec Mode

b

a

Guide icon: 

Tells you the next 

button to use by flashing.

2

 Press the 

9

 or 

0

 to 

select the menu item.

•  Go to the setting screen of the 

selected menu item.

•  To set the sub menu, select 

the [

Sub Menu

] from the main 

menu screen. And select and 
set the menu item from the 
sub menu screen in the same 
manner.

Summary of Contents for VN-3200PC

Page 1: ...r radio noise emissions from digital apparatus as set out in the Radio Interference Regulations of the Canadian Department of Communications Cetappareilnum riquened passepasleslimitesdelaCat gorieBpou...

Page 2: ...Corporation Macintosh is the trademark of Apple Inc Other product and brand names mentioned herein may be thetrademarksorregisteredtrademarksoftheirrespective owners hSafe and Proper Usage Beforeusin...

Page 3: ...r der shuts off To replace the battery make sure that you set the HOLD switch to the opposite direction of the arrow before replacing Poweron SlidetheHOLDswitchinthedirection opposite that indicated b...

Page 4: ...Folders The recorder provides five folders F G H I and To change the folder selection press the FOLDER INDEX button while the recorder is stopped Note Up to a total of 200 files can be recorded in eac...

Page 5: ...he STOP 4 button The recorder stops in the middle of the file being played Fast Forward Whiletherecorderisduringplaybackmode pressand hold the 9 button When you release the 9 button the recorder will...

Page 6: ...the changed playback speed will be retained The next playback will be at that speed You can easily erase unnecessary files Sequential file numbers are reassigned automatically 1 Press the FOLDER INDE...

Page 7: ...nguage LED Contrast Beep Format Main Menu System Time Date Sub Menu The menu item with mark can be set even during recording REC REC REC Step 1 Put the recorder in menu mode Step 2 Select the menu ite...

Page 8: ...time shown above is for one continuous file The available recording time may be shorter than specified if several files are recorded Use the remaining time and recorded time only as references The abo...

Page 9: ...ounds may be turned off In Menu mode selection Beep Off Beep On hLED LED You can set it so the Record Play indicator light does not turn on In Menu mode selection LED Off LED On hLCD Contrast Adjustme...

Page 10: ...ced instead to temporarily remember desired locations Temp marks are temporary markings so if you move to another file or connect the recorder to a computer they will be automatically erased Up to 16...

Page 11: ...ely Remove Hardware hUsing the recorder on your PC Windows Operating System Microsoft Windows 2000 XP Vista Standard Installation Compatible PC s Windows PC s equipped with more than one free USB port...

Page 12: ...Memory Full by pressing the REC s button Q4 The playback speed is too fast slow A4 The recorder may be set to fast slow Playback Troubleshooting Recording medium Built in flash memory Overall frequenc...

Reviews: