background image

2

- -

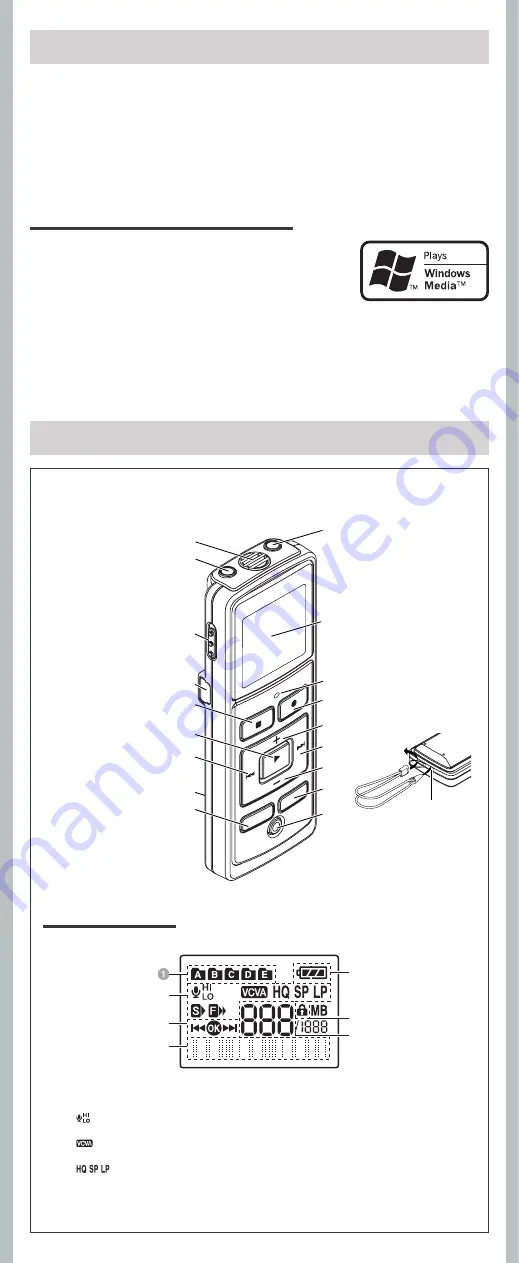
Display (LCD panel):

1

 Folder indicator

2

  [

]  Microphone sensitivity 

indicator


[

]  Variable Control Voice 

Actuator indicator


[

]  Record mode indicator


[

K

]  Fast playback indicator


[

J

]  Slow playback indicator

Introduction

•  The contents of this document may be changed in the future without advanced 

notice. Contact our Customer Support Center for the latest information relating to 
product names and model numbers.

•  The utmost care has been taken to ensure the integrity of the contents of this 

document. In the unlikely event that a questionable item, error, or omission is 
found, please contact our Customer Support Center.

•  Any liability for passive damages or damage of any kind occurred due to data loss 

incurred by a defect of the product, repair performed by the third party other 
than Olympus or an Olympus authorized service station, or any other reason is 
excluded.

Trademarks and registered trademarks:

• 

Microsoft, Windows and Windows Media are registered 
trademarks of Microsoft Corporation.

•  Macintosh is the trademark of Apple Inc.

Other product and brand names mentioned herein may be 
the trademarks or registered trademarks of their respective 
owners.

h

 Safe and Proper Usage

Before using your new recorder, read this manual carefully to ensure that you know how to operate 
it safely and correctly. Keep this manual in an easily accessible location for future reference.

•  The warning symbols indicate important safety related information. To protect yourself and others from 

personal injury or damage to property, it is essential that you always read the warnings and information 
provided.

Getting Started

h

 Identification of Parts

1

 Built-in Microphone

2


MIC

 (Microphone) 

jack

3


HOLD

 switch

4

 USB terminal

5


STOP

 (

4

) button

6


PLAY

/

OK

 (

`

button

7


0

 (Rewind) 

button

8

 Battery cover

9


FOLDER

/

INDEX


button

0


EAR

 (Earphone) 

jack

!

  Display (LCD panel)

@

 Record/play 

indicator light

#


REC

 (

s

) button

$


+

 button

%


9

 (Fast Forward) 

button

^


 button

&


DISP

/

MENU

 button

*


ERASE

 (

s

) button

(

 Strap hole

•  Strap is not supplied. Use 

the optional accessory.

1

1

1
2

3

5

6
7

4

8

1
2

3

5

4

6

7

9

0

!

#

$

%

^
&

*

@

(

3

 Guide indicator

Character information display


Recording level meter

Battery indicator

Erase lock indicator

Current file number

Summary of Contents for VN-3200PC

Page 1: ...r radio noise emissions from digital apparatus as set out in the Radio Interference Regulations of the Canadian Department of Communications Cetappareilnum riquened passepasleslimitesdelaCat gorieBpou...

Page 2: ...Corporation Macintosh is the trademark of Apple Inc Other product and brand names mentioned herein may be thetrademarksorregisteredtrademarksoftheirrespective owners hSafe and Proper Usage Beforeusin...

Page 3: ...r der shuts off To replace the battery make sure that you set the HOLD switch to the opposite direction of the arrow before replacing Poweron SlidetheHOLDswitchinthedirection opposite that indicated b...

Page 4: ...Folders The recorder provides five folders F G H I and To change the folder selection press the FOLDER INDEX button while the recorder is stopped Note Up to a total of 200 files can be recorded in eac...

Page 5: ...he STOP 4 button The recorder stops in the middle of the file being played Fast Forward Whiletherecorderisduringplaybackmode pressand hold the 9 button When you release the 9 button the recorder will...

Page 6: ...the changed playback speed will be retained The next playback will be at that speed You can easily erase unnecessary files Sequential file numbers are reassigned automatically 1 Press the FOLDER INDE...

Page 7: ...nguage LED Contrast Beep Format Main Menu System Time Date Sub Menu The menu item with mark can be set even during recording REC REC REC Step 1 Put the recorder in menu mode Step 2 Select the menu ite...

Page 8: ...time shown above is for one continuous file The available recording time may be shorter than specified if several files are recorded Use the remaining time and recorded time only as references The abo...

Page 9: ...ounds may be turned off In Menu mode selection Beep Off Beep On hLED LED You can set it so the Record Play indicator light does not turn on In Menu mode selection LED Off LED On hLCD Contrast Adjustme...

Page 10: ...ced instead to temporarily remember desired locations Temp marks are temporary markings so if you move to another file or connect the recorder to a computer they will be automatically erased Up to 16...

Page 11: ...ely Remove Hardware hUsing the recorder on your PC Windows Operating System Microsoft Windows 2000 XP Vista Standard Installation Compatible PC s Windows PC s equipped with more than one free USB port...

Page 12: ...Memory Full by pressing the REC s button Q4 The playback speed is too fast slow A4 The recorder may be set to fast slow Playback Troubleshooting Recording medium Built in flash memory Overall frequenc...

Reviews: