background image

5

EN

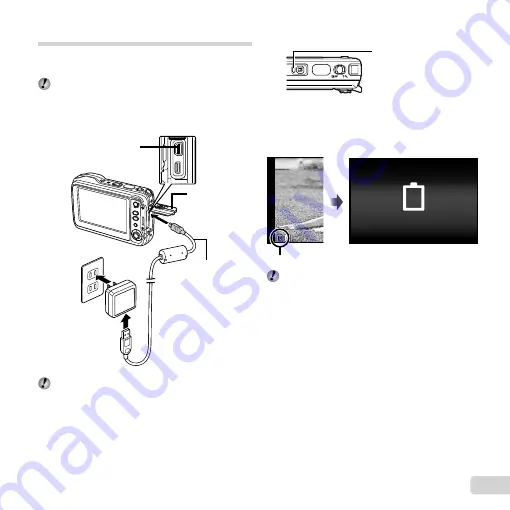
 Charging the battery

Connect the USB cable and USB-AC adapter to the 
camera and charge the battery.

  The battery is not fully charged at shipment. Before 

use, be sure to charge the battery until the indicator 
lamp turns off (up to 3 hours).

 Connecting the camera

 Connecting the camera

AC outlet

USB cable 
(supplied)

Connector cover

Multi-connector

  When using the camera, be sure to close and lock 

the connector cover.

Indicator lamp

Indicator lamp

Indicator lamp
On: Charging
Off: Charged

When to charge the batteries

When to charge the batteries

Charge the battery when the error message shown below 
appears.

Battery Empty

Error message

Flashes in red

  The included F-2AC USB-AC adapter (hereafter 

referred to as USB-AC adapter) differs depending 
on the region where you purchased the camera. If 
you received a plug-in type USB-AC adapter, plug it 
directly into AC outlet.

Summary of Contents for TG-625

Page 1: ...ns carefully to enjoy optimum performance and a longer service life Keep this manual in a safe place for future reference We recommend that you take test shots to get accustomed to your camera before taking important photographs In the interest of continually improving products Olympus reserves the right to update or modify information contained in this manual ...

Page 2: ...s of Parts 2 1 3 4 7 6 5 9 8 10 11 12 4 13 1 Connector cover 2 Strap eyelet 3 Connector cover latch 4 Lock knob 5 Multi connector 6 HDMI micro connector 7 Microphone 8 Flash 9 Self timer lamp LED illuminator AF illuminator 10 Lens 11 Battery card cover latch 12 Tripod socket 13 Battery card cover Other accessories not shown Warranty card Contents may vary depending on purchase location ...

Page 3: ...ting and playback 9 button 10 E button camera guide 11 Joystick INFO changing information display erase A button OK Attaching the camera strap Attaching the camera strap Pull the strap tight so that it does not come loose Joystick H left G down F up I right Press the joystick up down left right to operate it FGHI instruct to press the joystick up down left right ...

Page 4: ...ratches etc may produce heat or an explosion Slide the battery lock knob in the direction of the arrow to unlock and then remove the battery 3 Insert the card straight until it clicks into place Write protect switch Always use SD SDHC SDXC cards or Eye Fi card with this camera Do not insert other types of memory cards Using the card p 58 Do not touch the metallic parts of the card directly To remo...

Page 5: ...Multi connector When using the camera be sure to close and lock the connector cover Indicator lamp Indicator lamp Indicator lamp On Charging Off Charged When to charge the batteries When to charge the batteries Charge the battery when the error message shown below appears Battery Empty Error message Flashes in red The included F 2AC USB AC adapter hereafter referred to as USB AC adapter differs de...

Page 6: ...ging is complete or the playback ends For details on the battery see Battery Handling Precautions p 63 For details on the USB AC adapter see USB AC adapter p 64 If the indicator lamp does not light check the USB cable and USB AC adapter connections The battery can be charged while the camera is connected to the computer via USB The charging time varies depending on the performance of the computer ...

Page 7: ... select the year for Y X MENU Back Y M D Y M D Time 2012 Date and time setting screen 3 Press the joystick to I to save the setting for Y X MENU Back Y M D Y M D Time 2012 4 As in Steps 2 and 3 press the joystick to FGHI to set M month D day Time hours and minutes and Y M D date order and then press the A button For precise time setting press the A button as the time signal strikes 00 seconds 5 Pr...

Page 8: ...again sets the camera to the standby mode Using the camera guide Use the camera guide to look up camera operations 1 Press the E button in the standby mode screen or the playback screen Search by purpose Search by purpose Search for a solution Learn about the camera History Search by situation Search by keyword Exit Submenu 2 Application Search by purpose Functions or operating methods can be sear...

Page 9: ...lue The camera was unable to focus if the AF target mark flashes red Try focusing again 5 To take the picture gently press the shutter button all the way down while being careful not to shake the camera Press halfway Press fully Using the zoom Pressing the zoom lever adjusts the shooting range W side T side Image size Zoom bar 12M Optical zoom Other 1 1 Due to increased processing of the pixel cou...

Page 10: ... info 1 Shooting mode R R 2 Flash R R 3 Macro R R 4 Self timer R R R 5 Exposure compensation R R 6 White balance R R 7 ISO sensitivity R R 8 Drive R R 9 Image size still images R R 10 Recording with sound wind noise R R 11 Image size movies R R 12 Movie recording length R R 13 Movie recording icon R R 14 World time R 15 Image stabilization R 16 Metering R 17 Date stamp R R 18 Compression R R 19 Nu...

Page 11: ...ure Fragmented Dramatic p Panorama mode Auto Manual PC 1 When set to h Backlight HDR Image Size is limited to n or lower This is recommended for shooting a fixed subject List of settings available in each shooting mode p 53 List of settings p 54 List of P settings p 56 1 Press the joystick to HI in the standby mode screen to select the shooting mode To select the Q P and p submodes press the joyst...

Page 12: ...h Beauty Fix effects 1 Point the camera toward the subject Check the frame appearing around the face detected by the camera and then press the shutter button to take the picture 2 To save the image select OK on the review screen and press the Q button To retouch the image additionally select Beauty Fix OK Beauty Fix MENU Back Beauty Fix Beauty Fix 1 Use FGHI to select a retouching item and press t...

Page 13: ...hooting underwater In the M Snapshot submode you can press the A button to fix the focus distance AF lock Press the A button again to cancel the AF lock AF lock mark 0 0 0 0 AFLOCK AFLOCK 12M 4 4 00 34 00 34 NORM P P mode You can shoot with special effects Refer to the sample images displayed on the submode selection screen and select the desired submode The best shooting settings for each effect ...

Page 14: ...e next picture is to be connected Direction for combining frames MANUAL MANUAL 2 Press the shutter button to take the first frame 3 Compose the next shot so that the edge of the first frame displayed faintly on the screen overlaps the subject of the second frame and press the shutter button To combine only two frames press the A button 4 Repeat step 3 to take a third frame The camera automatically...

Page 15: ...ain to return to the shooting screen Index view and close up view Index view enables quick selection of a desired image Close up view up to 10 magnification allows checking of image details 1 Press the zoom lever 12 30 12 10 26 12 10 26 12 30 4 30 4 30 12 30 12 10 26 12 10 26 12 30 4 30 4 30 W T W T 12 10 26 12 30 Single image view Close up view Index view To select an image in index view To selec...

Page 16: ... 30 4 30 OK Replay 12 10 26 12 30 2 Press the A button Viewing area To control panorama image playback To control panorama image playback Stop playback Press the button Pause Press the A button Control while paused Press FGHI to scroll the image in the direction of the pressed button Press the zoom lever to enlarge shrink the image Press the A button to restart scrolling ...

Page 17: ... White balance R 18 File name R 19 Compression R 20 Recording date and time R R 21 Image size R 12 30 12 10 26 12 10 26 12 30 10 10 4 30 4 30 1 8 7 20 2 3 6 4 5 Still image Detailed 4 30 4 30 12M 2 0 2 0 1 1000 1 1000 100 0004 100 0004 AUTO WB AUTO WB 100 ISO 100 ISO NORM 1 MAGIC MAGIC 12 10 26 12 30 F3 9 F3 9 10 10 12M 2 0 2 0 F3 9 F3 9 1 1000 1 1000 100 0004 100 0004 AUTO WB AUTO WB 100 ISO 100 ...

Page 18: ...g playback Single image erase 1 Display the image you want to erase and press G MENU Erase Back Erase Cancel 4 30 4 30 2 Press FG to select Erase and press the A button Multiple images or all images can be erased at a time p 31 ...

Page 19: ...estart playback Fast forward Press I to fast forward Press I again to increase the fast forward speed Rewind Press H to rewind Press H again to increase the rewind speed Adjusting the volume Use FG to adjust the volume Operations while playback is paused Operations while playback is paused During pause 00 14 00 34 00 14 00 34 Elapsed time Total shooting time Cueing Use F to display the first frame...

Page 20: ... Macro 4 Exposure compensation 6 ISO sensitivity 8 Image Size Setup menu Setup menu 9 Camera Menu 1 p 25 Reset Compression Shadow Adjust AF Mode ESP n Digital Zoom Image Stabilizer Still images 0 Camera Menu 2 p 27 AF Illuminat Rec View Icon Guide Date Stamp Super Res Zoom a Movie Menu p 28 Image Size IS Movie Mode R Movie sound recording Wind Noise Reduction b Playback Menu p 29 Slideshow Edit Er...

Page 21: ...e function for shooting subjects at close distances Off Macro mode is deactivated Macro You can shoot the image at a range as close as 20 cm 7 9 in W to 50 cm 19 7 in T a Super Macro This enables shooting as close as 3 cm 1 2 in to the subject N S Macro LED The LED illuminator lights the area 7 to 20 cm 2 8 to 7 9 in from the lens while the shutter button is pressed halfway down Self timer 3 Sets ...

Page 22: ...the light when shooting Set a piece of white paper or other white object so that it fills the entire screen and press the button to set the white balance One Touch 2 ISO sensitivity 4 5 Sets the ISO sensitivity l ISO Auto The camera automatically sets the sensitivity with priority on image quality m High ISO Auto The camera automatically sets the sensitivity with priority on minimizing blur caused...

Page 23: ... c High Speed1 or d High Speed2 3 Auto Release appears only when mode is set to U Pet Mode Cat or t Pet Mode Dog 4 ISO sensitivity is limited to l ISO Auto when macro option is set to N S Macro LED 5 ISO sensitivity is limited to l ISO Auto when drive setting is set to c High Speed1 or d High Speed2 6 Image Size is limited to 3 or lower when drive setting is set to c High Speed1 or d High Speed2 R...

Page 24: ...n press the A button Once a setting is selected the display returns to the Submenu 1 There may be additional operations MENU Settings Menu 2 Back File Name Power Save Power Save On Pixel Mapping TV Out Reset English X 12 10 26 12 30 5 Press the button to complete the setting 1 Press the button The setup menu is displayed MENU Camera Menu 1 Back Reset Reset ESP On Image Stabilizer Compression Shado...

Page 25: ... Brightening the subject against Brightening the subject against backlight backlight z z Shadow Adjust Shadow Adjust Submenu 2 Application Auto Automatically On when a compatible shooting mode is selected Off The effect is not applied On Shoot with automatic adjustment to brighten an area that has become darker When set to Auto or On ESP n is automatically fixed to ESP Selecting the focusing area ...

Page 26: ...he brightness at the center of the screen When set to ESP the center may appear dark when shooting against strong backlighting Shooting at higher magnifications than Shooting at higher magnifications than optical zoom optical zoom z z Digital Zoom Digital Zoom Submenu 2 Application Off Disable digital zoom On Enable digital zoom Digital Zoom is not available when a Super Macro or N S Macro LED p 2...

Page 27: ...ef check of the image that was just taken Displaying icon guides Displaying icon guides z z Icon Guide Icon Guide Submenu 2 Application Off No icon guide is displayed On The explanation of the selected icon will be displayed when a shooting mode or function menu icon is selected position the cursor on the icon for a while to display the explanation Icon guide P P 0 0 0 0 AUTO WB AUTO WB AUTO ISO A...

Page 28: ...r displayed in red may appear grainy A Movie Menu Selecting the image size for movies Selecting the image size for movies A A Image Size Image Size Submenu 2 Application 1080p 720p VGA 640 480 Select the image quality based on the image size and frame rate Number of storable pictures still images Recording length movies in the internal memory and cards p 59 60 Reducing the blur caused by the Reduc...

Page 29: ...show During a slideshow press I to advance one frame H to go back one frame Changing the image size Changing the image size q q Q Q This saves a high resolution image as a separate image with a smaller size for use in e mail attachments and other applications Submenu 1 Submenu 2 Submenu 3 Edit Q 640 480 320 240 1 Use HI to select an image 2 Use FG to select an image size and press the A button The...

Page 30: ...nu 1 Submenu 2 Edit Beauty Fix Depending on the picture the editing may not be effective 1 Use HI to select an image and press the Q button 2 Use FG to select a retouching item and press the Q button 3 To save the image select OK on the review screen and press the Q button To retouch the image additionally select Beauty Fix The retouched image is saved as a separate image OK Beauty Fix MENU Back T...

Page 31: ... as a separate image Depending on the picture the editing may not be effective The retouching process may lower the image resolution Rotating images Rotating images q q y y Submenu 1 Submenu 2 Edit y 1 Use HI to select an image 2 Press the A button to rotate the image 3 If necessary repeat Steps 1 and 2 to make settings for other images and press the button The new picture orientations will be sav...

Page 32: ...Order Print Reservations p 46 Print reservation can be set only for still images that are recorded to the card Protecting images Protecting images q q R R Protected images cannot be erased by Erase p 18 31 Sel Image p 31 Erase Group p 31 or All Erase p 31 but all images are erased by Memory Format Format p 33 1 Use HI to select an image 2 Press the A button Press the A button again to cancel the s...

Page 33: ... images in the internal memory to the card to the card d d Backup Backup Submenu 2 Application Yes Backs up image data in the internal memory to the card No Cancels the backup Using an Eye Fi card Using an Eye Fi card d d Eye Fi Eye Fi Submenu 2 Application All Transfers all images Sel Image Transfers only selected image Off Disable Eye Fi communication When using an Eye Fi card read the Eye Fi ca...

Page 34: ...r On Power On Submenu 2 Application No The camera is not turned on To turn on the camera press the n button Yes Press and hold the q button to turn the camera on in the playback mode Saving the mode when the camera is Saving the mode when the camera is turned off turned off d d Keep Keepz zSettings Settings Submenu 2 Application Yes The shooting mode is saved when the camera is turned off and is r...

Page 35: ... useful for managing all image folder names and files names with sequential numbers 1 The number for the folder name is reset to 100 and the one for the file name is reset to 0001 Adjusting the image processing Adjusting the image processing function function d d Pixel Mapping Pixel Mapping This function has already been adjusted at factory shipping and no adjustment is needed right after purchase...

Page 36: ...ype Submenu 2 Submenu 3 Application NTSC PAL NTSC Connecting the camera to a TV in North America Taiwan Korea Japan and so on PAL Connecting the camera to a TV in European countries China and so on HDMI Out 480p 576p 720p 1080i Set the signal format to be given priority If the TV setting does not match it is changed automatically HDMI Control Off Operate with the camera On Operate with the TV remo...

Page 37: ...nging the input source of the TV refer to the TV s instruction manual When the camera and TV are connected by both an AV cable and an HDMI cable the HDMI cable will take priority Depending on the TV s settings the displayed images and information may become cropped To operate images with the TV remote control To operate images with the TV remote control 1 Set HDMI Control to On and turn off the ca...

Page 38: ...e setting press the A button as the time signal strikes 00 seconds To check the date and time To check the date and time Press the E button while the camera is turned off The current time is displayed for approx 3 seconds d Settings Menu 3 Choosing home and alternate time Choosing home and alternate time zones World Time zones World Time You will not be able to select a time zone using World Time ...

Page 39: ...uminator as an auxiliary light auxiliary light d d LED Illuminator LED Illuminator Submenu 2 Application Off Disables the LED illuminator On Enables the LED illuminator To use the LED illuminator To use the LED illuminator Press and hold the E button down until the LED illuminator lights up If you perform an operation when the LED illuminator is on it will illuminate up to approx 90 seconds LED il...

Page 40: ...P SP2 or later Windows Vista Windows 7 set to Storage Even if a computer has USB ports proper operation is not guaranteed in the following cases Computers with USB ports installed using an expansion card etc Computers without a factory installed OS and home built computers When the computer does not support SDXC cards a message may appear urging to format the internal memory or card Formatting wil...

Page 41: ...up window and then double click Launcher exe If a User Account Control dialog is displayed click Yes or Continue 2 Register your Olympus product Click the Registration button and follow the on screen instructions To register the camera must be connected to the computer Connecting the camera p 40 If nothing is displayed on the camera screen even after connecting the camera to the computer the batte...

Page 42: ...lick the Setup icon to display the Setup dialog 2 Install OLYMPUS Viewer 2 Check the system requirements before beginning installation Click the OLYMPUS Viewer 2 button and follow the on screen instructions to install the software You can register via Registration in OLYMPUS Viewer 2 Help OLYMPUS Viewer 2 Operating System Mac OS X v10 4 11 v10 7 Processor Intel Core Solo Duo 1 5 GHz or better RAM ...

Page 43: ...per types loading paper and installing ink cassettes refer to the printer s instruction manual In the setup menu set USB Connection to Print USB Connection p 34 Printing images at the printer s standard settings Easy Print 1 Display the image to be printed on the monitor Viewing images p 15 2 Turn on the printer and then connect the printer and camera USB cable supplied Connector cover Multi conne...

Page 44: ...ervations p 46 5 Use FG to select Size Submenu 3 and press I If the Printpaper screen is not displayed the Size Borderless and Pics Sheet are set to the printer s standard MENU Printpaper Size Borderless Back Standard Standard 6 Use FG to select the Borderless or Pics Sheet settings and press the A button Submenu 4 Application Off On 1 The image is printed with a border around it Off The image is ...

Page 45: ...HI to move the frame and then press the A button Cropping frame MENU Back 2 Use FG to select OK and press the A button 9 If necessary repeat Steps 6 and 7 to select the image to be printed make the detailed settings and set Single Print 10Press the A button Print Cancel MENU Print Back 11Use FG to select Print and press the A button Printing starts When Option Set is selected in All Print mode Pri...

Page 46: ...enu p 24 2 From the playback menu q select Print Order and then press the A button 3 Use FG to select and press the A button NORM 12 10 26 12 30 NORM 12M 0 12 30 Print 4 30 100 0004 4 30 100 0004 OK 12 10 26 Print Order 4 Use HI to select the image for print reservation Use FG to select the quantity Press the A button 5 Use FG to select the X date print screen option and press the A button Submenu...

Page 47: ... 4 Use HI to select the image with the print reservation you want to cancel Use FG to set the print quantity to 0 5 If necessary repeat Step 4 and then press the A button when finished 6 Use FG to select the X date print screen option and press the A button The settings are applied to the remaining images with the print reservation data 7 Use FG to select Set and press the A button ...

Page 48: ...o switch to the shooting mode Wait until flash charge stops blinking before taking pictures With prolonged camera use the internal temperature may increase resulting in automatic shutdown If this occurs remove the battery from the camera and wait until the camera has sufficiently cooled The camera s external temperature may also increase during use however this is normal and does not indicate malf...

Page 49: ...e image on a computer If the image still cannot be viewed the image file is corrupted Error message Corrective action The Image Cannot Be Edited Problem with selected image Use photo retouch software etc to edit the image on a computer Battery Empty Battery problem Charge the battery No Connection Connection problem Connect the camera and computer or printer correctly No Paper Printer problem Load...

Page 50: ...cture of a shadowy subject Using the AF illuminator makes focusing easier AF Illuminat p 27 Taking a picture of subjects where autofocus is difficult In the following cases after focusing on an object by pressing the shutter button halfway down with high contrast at the same distance as the subject compose the shot and take the picture Subjects with low contrast When extremely bright objects appea...

Page 51: ...ed for a face against backlight and the face is brightened Taking pictures using n for ESP n p 26 Brightness is matched with a subject in the center of the screen and the image is not affected by background light Taking pictures using Fill In p 21 flash A subject against backlight is brightened Taking pictures of a white beach or snow scene Select q Beach Snow in the scene mode p 11 Taking picture...

Page 52: ...ivity p 22 Batteries Making batteries last longer Set Power Save p 38 to On Playback Editing tips Playback Playing images in the internal memory and card Remove the card and display the images in internal memory Inserting and removing the battery and card p 4 Viewing images with high picture quality on a high definition TV Connect the camera to the TV using an HDMI cable sold separately Playing ba...

Page 53: ...Compression R R R R R Shadow Adjust R R AF Mode R 6 ESP n R R R Digital Zoom R R Image Stabilizer R R R R R AF Illuminat R R R R Rec View R R R R R Icon Guide R R R R R Date Stamp R R Super Res Zoom R 1 Redeye and Fill In cannot be set 2 Fill In cannot be set 3 a Super Macro and N S Macro LED cannot be set 4The Image Size of the retouched image is limited to n or lower When set to K Image Size is ...

Page 54: ... R R R R Shadow Adjust R R R R R R AF Mode R R R R R R R R ESP n R R R R R R R R Digital Zoom R R R R R R R Image Stabilizer R R R R R R R R R AF Illuminat R R R R R R R R R Rec View R R R R R R R R R Icon Guide R R R R R R R R R Date Stamp R R R R R R R R R Super Res Zoom R R R R R R R 1 Fill In cannot be set 2 a Super Macro and N S Macro LED cannot be set 3 Auto Release cannot be set 4 _ Flash A...

Page 55: ... R R R R AF Mode R R R 8 R ESP n R R R R R R R R Digital Zoom R R R R R R R Image Stabilizer R R R R R R R R AF Illuminat R R R R R Rec View R R R R R R R R Icon Guide R R R R R R R R Date Stamp R R R R R R R R Super Res Zoom 2 a Super Macro and N S Macro LED cannot be set 3 Auto Release cannot be set 5 Redeye and Fill In cannot be set 6 e WB Auto cannot be set 7The Image Size of the retouched ima...

Page 56: ...t Focus Punk Exposure compensation R R R R White balance R R R Image Size R 1 R 1 1 R Sparkle Watercolor Reflection Miniature Fragmented Dramatic Exposure compensation R R R R R R White balance R R R R R R Image Size 1 1 R R R R 1 Image Size is fixed to n or lower ...

Page 57: ...p water with pressing the button Monitor Wipe gently with a soft cloth Lens Blow dust off the lens with a commercial blower then wipe gently with a lens cleaner Do not use strong solvents such as benzene or alcohol or chemically treated cloth Mold may form on the lens surface if the lens is left dirty Battery USB AC adapter Wipe gently with a soft dry cloth Storage When storing the camera for exte...

Page 58: ...HC SDXC card write protect switch SD SDHC SDXC card write protect switch The SD SDHC SDXC card body has a write protect switch If you set the switch to the LOCK side you will not be able to write to the card delete data or format Return the switch to enable writing LOCK Format Format Cards must be formatted with this camera before first use or after being used with other cameras or computers Check...

Page 59: ...e The actual capacity varies with shooting conditions and the card used Still pictures Still pictures Image Size Compression Number of storable pictures Internal memory SD SDHC SDXC card 4GB 5 3968 2976 L 8 663 M 15 1 298 4 3264 2448 L 11 968 M 23 1 877 n 2560 1920 L 19 1 544 M 38 3 128 3 2048 1536 L 29 2 346 M 59 4 692 2 1600 1200 L 48 3 935 M 93 7 624 1 1280 960 L 74 5 809 M 139 11 087 7 640 480...

Page 60: ...damage such as scratches and dents are not covered under the warranty As with any electronic device proper care and maintenance are required to preserve the integrity and operation of your camera To maintain camera performance please take your camera to the nearest Olympus Authorized Service Center to have it inspected after any major impact In the event the camera is damaged as a result of neglig...

Page 61: ...r your local area The included accessories e g USB AC adapter do not offer shock or water resistance SAFETY PRECAUTIONS CAUTION RISK OF ELECTRIC SHOCK DO NOT OPEN CAUTION TO REDUCE THE RISK OF ELECTRICAL SHOCK DO NOT REMOVE COVER OR BACK NO USER SERVICEABLE PARTS INSIDE REFER SERVICING TO QUALIFIED OLYMPUS SERVICE PERSONNEL An exclamation mark enclosed in a triangle alerts you to important operati...

Page 62: ...t immediately and stop using it Then contact an authorized distributor or service center CAUTION Stop using the camera immediately if you notice any unusual odors noise or smoke around it Never remove the batteries with bare hands which may cause a fire or burn your hands Do not leave the camera in places where it may be subject to extremely high temperatures Doing so may cause parts to deteriorat...

Page 63: ...ly swallows a battery seek medical attention immediately If you cannot remove the battery from the camera contact an authorized distributor or service center Do not try to remove the battery by force Damage to the battery exterior scratches etc may produce heat or an explosion WARNING Keep batteries dry at all times To prevent batteries from leaking overheating or causing a fire or explosion use o...

Page 64: ...playback mode failure or damage to the monitor A strip of light may appear on the top bottom of the monitor but this is not a malfunction When a subject is viewed diagonally in the camera the edges may appear zigzagged on the monitor This is not a malfunction it will be less noticeable in playback mode In places subject to low temperatures the monitor may take a long time to turn on or its color m...

Page 65: ...stalled and used in accordance with the instructions may cause harmful interference to radio communications However there is no guarantee that interference will not occur in a particular installation If this equipment does cause harmful interference to radio or television reception which can be determined by turning the equipment off and on the user is encouraged to try to correct the interference...

Page 66: ...rs and ii make any internal or external design and or feature changes on or to its products without any liability to incorporate such changes on or to the Products WHAT IS NOT COVERED BY THIS LIMITED WARRANTY Excluded from this limited warranty and not warranted by Olympus in any fashion either express implied or by statute are a products and accessories not manufactured by Olympus and or not bear...

Page 67: ... upon Olympus unless reduced to writing and approved by an expressly authorized officer of Olympus This limited warranty is the complete and exclusive statement of warranty which Olympus agrees to provide with respect to the Products and it shall supersede all prior and contemporaneous oral or written agreements understandings proposals and communications pertaining to the subject matter hereof Th...

Page 68: ...us service station within the business area of Olympus Europa Holding GmbH as stipulated on the website http www olympus com During the one year period of the World Wide Guarantee the customer may turn the product in at any Olympus service station Please notice that not in all countries such Olympus service station exists 2 The customer shall transport the product to the dealer or Olympus authoriz...

Page 69: ...list on the web site http www olympus com for the authorized international Olympus service network For customers in Asia For customers in Asia Provisions of warranty 1 lf this product proves to be defective although it has been used properly in accordance with the written Handling Care and Operating instructions supplied with it during a period of up to one year from the date of purchase this prod...

Page 70: ...tware and in no event shall be liable for any implied warranty of merchantability or fitness for any particular purpose or for any consequential incidental or indirect damages including but not limited to damages for loss of business profits business interruption and loss of business information arising from the use of inability to use these written materials or software Some states do not allow t...

Page 71: ... Equivalent to 28 to 140 mm on a 35 mm film Photometric system Digital ESP metering spot metering system Shutter speed 4 to 1 2000 sec Shooting range Normal 0 6 m 2 0 ft to Macro mode 0 2 m 0 7 ft to W 0 5 m 1 6 ft to T Super macro mode 0 03 m 0 1 ft to 0 6 m 2 0 ft f 6 7 mm fixed Monitor 3 0 TFT color LCD display 460 000 dots Connector Multi connector DC IN jack USB connector A V OUT jack HDMI mi...

Page 72: ...argeable battery Model No LI 50BA LI 50BB Standard voltage DC 3 7 V Standard capacity 925 mAh Battery life Approx 300 full charges varies on usage Operating environment Temperature 0 C to 40 C 32 F to 104 F charging USB AC adapter F 2AC USB AC adapter F 2AC Model No F 2AC 1A F 2AC 2A F 2AC 1B F 2AC 2B Power requirements AC 100 to 240 V 50 60 Hz Output DC 5 V 500 mA Operating environment Temperatur...

Page 73: ......

Page 74: ...VMXXXX01 ...

Reviews: