background image

20


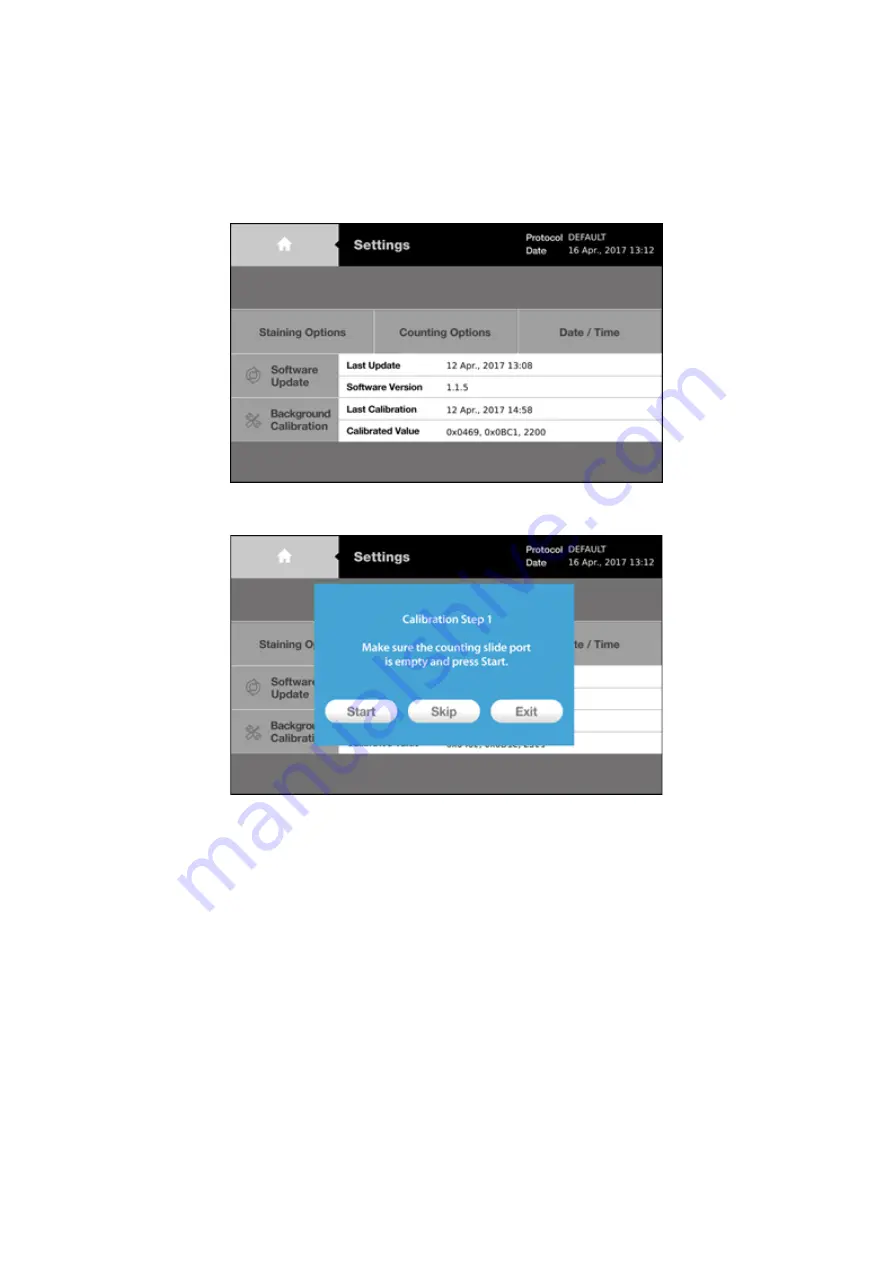
2.3.5 Settings: Background Calibration 

Background calibration adjusts for the specific shade of the trypan blue stain used for counting and is a 

prerequisite for the successful detection of cells. Users must recalibrate the background after each software 

update or when using a different brand or concentration of trypan blue. 

Press 

[Background Calibration]

 in the Settings screen.   


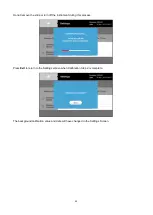
A window will appear with directions for Calibration Step 1.


The counting slide port should be empty for Calibration Step1. If there is a slide in the counting slide port, 

remove it from the instrument.   

Press 

Start

.   


Summary of Contents for R1

Page 1: ...timum performance and to familiarize yourself fully with the use of this product we recommend that you study this manual thoroughly before operating this product and always keep this manual at hand when operating this product Retain this instruction manual in an easily accessible place near the work desk for future reference Optical Measuring Instrument ...

Page 2: ... 15 of the FCC Rules These limits are designed to provide reasonable protection against harmful interference when the equipment is operated in a commercial environment This equipment generates uses and can radiate radio frequency energy and if not installed and used in accordance with the instruction manual may cause harmful interference to radio communications Operation of this equipment in a res...

Page 3: ...ns 15 2 3 2 Settings Counting Options 17 2 3 3 Settings Date Time 18 2 3 4 Settings Software Updates 19 2 3 5 Settings Background Calibration 20 Chapter 3 Protocol Settings 23 3 1 Protocol Parameters 23 3 2 Creating and Editing Protocols 24 3 3 Protocol Selection 26 Chapter 4 Counting Cells 27 4 1 Instrument Preparation 27 4 2 Sample Preparation 28 4 3 Slide Insertion 28 4 4 Focusing 29 4 4 1 Auto...

Page 4: ... Turn the instrument off before disconnecting the power cord and or moving the instrument 9 Disconnect the power cord after operation or in the case of abnormalities 10 This instrument complies with the emission and immunity requirements described in IEC61326 series 11 Do not disassemble the instrument in any event If the instrument is malfunctioning or broken please contact Olympus Disassembling ...

Page 5: ...t Current This system is applied with the requirements of standard IEC EN61326 1 concerning electromagnetic compatibility Emission Class A applied to industrial environment requirements Immunity Applied to industrial environment requirements Some interference may occur if this system is used in a domestic location Wear proper personal protective equipment PPE when handling trypan blue and cell sam...

Page 6: ...within three minutes of mixing samples with trypan blue for accurate cell viability measurements If necessary count your sample twice duplicate readings and take an average 3 As the R1 is calibrated before shipping recalibration before use is not necessary However if recalibration is needed please refer to Section 2 3 3 Settings Background Calibration Environmental Conditions for Operation Operati...

Page 7: ...osable precision cell counting slides that have been specifically designed for the R1 The Counting Slides are manufactured with T BOND technology to lower counting costs while maintaining the highest standard of cell counting accuracy 1 2 Key Features Key features Description Compact space efficient design Lightweight and compact the R1 maximizes space and may be used on a laboratory bench or in a...

Page 8: ... shipping The warranty does not cover damage that may occur during shipping and handling Any damage claims must be filed with the carrier The following components are not included in the product package and must be purchased separately before use Component Quantity R1 1 Power Cord with AC adapter 1 USB memory 1 Component Cell Counting Slides 50 Slides 100 Counts Trypan blue stain 0 4 Printer Paper...

Page 9: ...7 cells mL Cell Diameter Range 3 60 µm optimal range 8 30 µm Cell Viability Range 0 100 Image Resolution 5 MP Image Type TIFF Optimized for R1 only Software R1 software Documentation PDF Processing Time 10 manual focusing or 15 autofocusing seconds at 1 x 10⁶ cell mL Printer Paper Diameter 32 mm width 58 mm Cell Counting Slide Specifications Material Polystyrene Dimensions W x D x H 25 x 75 x 2 4 ...

Page 10: ...port for easy data transfer The right side of the R1 has a built in printer which allows for the immediate printing of results 1 5 2 Rear View of the R1 The rear of the R1 has an AC adapter dock cord hanger and a power inlet to connect the instrument to an electrical outlet Power button Touchscreen Counting slide port Printer USB port AC adapter dock USB port Power inlet Cord hanger ...

Page 11: ...nting Slide is a disposable polystyrene cell counting slide that consists of two chambers A and B The depth of each chamber is 100 µm The R1 counts the cells in 0 5 µL which is comparable to five 1 mm x 1 mm squares on a standard hemocytometer ...

Page 12: ... 1 3 Product Contents Contact Olympus if anything is missing When transporting the instrument carefully grip the touchscreen ledge with one hand and the bottom of the opposite side with the other hand as shown below Place the R1 on a clean and level surface Do not hold the instrument by the top of the instrument Do not install the instrument in a location that will expose the instrument to intense...

Page 13: ...ding and twisting Do not apply excessive force 2 1 3 Installation Connecting the AC adapter and power cord Place the AC adapter in the AC adapter dock Wind the adapter cord neatly around the cord hanger if necessary Insert the connector of the AC adapter into the power inlet of the instrument Connect the power cord to the AC adapter Connect the power cord to an electrical outlet after checking the...

Page 14: ... turn the instrument on The company logo will appear followed by the main menu The main menu has a power icon and four options count review protocol and settings For more detailed instructions on when and how to turn the instrument on or off see Section 6 1 Turning On Off ...

Page 15: ...nd values of the most recent calibration and the date and version of the latest software update Settings options 2 3 1 Staining Options Select for the presence or absence of trypan blue 2 3 2 Counting Options Select Auto Exposure mode to adjust light settings for each count 2 3 3 Date Time Adjust the date and time of your instrument for record keeping purposes 2 3 4 Software Updates Update Softwar...

Page 16: ...on this option and follow the directions in the message boxes Ensure that the dilution factor in your set protocol is set to 1 The R1 is optimized for use with trypan blue Low contrast from not using trypan blue may lead to suboptimal results The dilution factor will not change automatically Upon changing the Staining Options users must manually adjust the dilution factor accordingly Failure to ad...

Page 17: ...ollowing window will appear Press OK to select the desired staining option Otherwise press Cancel to close the window Press to return to the Settings screen Choose the appropriate protocol or adjust the dilution factor accordingly see Section 3 1 Protocol Parameters and Section 3 2 Creating and Editing Protocols ...

Page 18: ...ounting results regardless of the brand concentration and shade of trypan blue used Auto Exposure mode is especially important when using higher concentrations of trypan blue Press Counting Options in the Settings screen Select ON to activate Auto Exposure mode Select OFF to deactivate Auto Exposure mode The selected option will be highlighted in blue Press to return to the Settings screen ...

Page 19: ...st the settings to the local date and time for accurate record keeping Press Date Time in the Settings screen Select the desired field to delete the existing value Input the desired values with the number panel on the right Press Apply to save changes Press to return to the Settings screen ...

Page 20: ...lympus lifescience com into the root directory of a compatible USB memory Press Software Updates in the Settings screen Insert the USB memory with the downloaded file into the USB port Press Start Do not turn the instrument off during the update The date and version of the last software update will change automatically in the Settings screen Important Users must recalibrate the background after ea...

Page 21: ...lls Users must recalibrate the background after each software update or when using a different brand or concentration of trypan blue Press Background Calibration in the Settings screen A window will appear with directions for Calibration Step 1 The counting slide port should be empty for Calibration Step1 If there is a slide in the counting slide port remove it from the instrument Press Start ...

Page 22: ...or plain medium Put 10 µL of the diluted trypan blue stain into the chamber of a new Counting Slide A window will appear with directions for Calibration Step 2 when Calibration Step 1 is complete Insert the Counting Slide face up and sample side first into the counting slide port Do not insert the Counting Slide facedown Press Start ...

Page 23: ...the slide or turn off the instrument during this process Press Exit to return to the Settings screen when Calibration Step 2 is complete The background calibration value and date will have changed in the Settings Screen ...

Page 24: ...ined cells With lower noise reduction the instrument can detect objects with faint signals Adjusting this parameter will help optimize for different cell types as trypan blue staining can vary from cell to cell Live Cell Sensitivity Live cells with intact cell membranes exclude trypan blue Trypan blue forms annular shade around live cells and stain the cytoplasm of dead cells or cells with comprom...

Page 25: ...otocol from the main menu The Protocol screen includes a list of saved protocols The selected protocol is highlighted in blue The parameters of the selected protocol are displayed in the right panel The DEFAULT protocol cannot be modified or deleted ...

Page 26: ...fy the selected protocol This will activate the arrows for each parameter turning them a solid grey Press the arrows to adjust the values of each parameter as desired Press Save as Using the onscreen keyboard name the protocol and press Save The newly created protocol will appear in the list of protocols in the Protocol screen ...

Page 27: ...otocol screen Press Load to apply the selected protocol Now the instrument is ready to count cells with the selected protocol Important Merely selecting a protocol does not mean that it has been put into effect To apply the selected protocol make sure to press Load ...

Page 28: ... staining option set protocol date and time appear in the panel at the top of the Count screen To change the staining option see Section 2 3 1 Settings Staining Options To change the protocol see Section 3 3 Protocol Selection To change the date and time see Section 2 3 2 Settings Date Time ...

Page 29: ...2 µL of the cell sample into a sample chamber For easy and accurate loading hold the pipette at a 45 60 angle to the slide Be careful not to over load or under load the sample chamber 4 3 Slide Insertion Insert the Counting Slide face up and sample side first into the counting slide port of R1 The R1 can only analyze the inserted chamber Do not insert the Counting Slide facedown A live image of th...

Page 30: ...ocusing Press the circle next to Autofocused Counting The circle will turn blue when the autofocus is activated 4 4 2 Manual Focusing Users can adjust the focus manually by simply pressing the Focus arrow heads up or down with the autofocus function on or off 4 5 Cell Counting Use a finger or a stylus to navigate the image The red outer box in the top left corner of the image represents the entire...

Page 31: ...on a standard hemocytometer Counting time will vary with protocol cell size and cell concentration With the DEFAULT protocol cell samples with a concentration of 1 x 10⁶ cell mL will take at minimum 10 seconds to count without autofocusing or 15 seconds with autofocusing Cell count and viability results will appear ...

Page 32: ...t and viability data immediately 4 6 1 Results Image View Press Image to view the captured image of the analyzed cell sample Use a finger or a stylus to navigate the image The Tag and magnifier buttons are to the right of the image Press the magnifier button to zoom in and out of the saved image ...

Page 33: ...nction allows users to verify the instrument s counting accuracy immediately Press Tag to label what was counted as live cells with green circles and dead cells with red circles Press Tag again to remove the labels ...

Page 34: ...ead cells The Total on button indicates that live and dead cells are both represented Press Total on to change it to Live on and display the size distribution of only live cells Press Live on to change it to Dead on and display the size distribution of only dead cells The R1 provides a gating function that can be controlled by the gating bar on the bottom of the screen Select the desired light gre...

Page 35: ...nitoring co cultured cells with distinct sizes and the exclusion of noncellular particles Press Apply to set the size gating limits The count results will adjust accordingly Press Cell number to change the Y axis to Cell Concentration Press Cluster Map off to change it to Cluster Map on and show the distribution of cell clusters ...

Page 36: ... of total cells live and dead as the current concentration The current concentration options are Total Live Dead and Custom allowing users to set the current concentration to be the total cell concentration live cell concentration dead cell concentration or a custom cell concentration by pressing the black box below the Current Concentration value Input the values into the blanks for the desired f...

Page 37: ...nt in the Results screen The Save Print screen has three saving options Saving Options Description Analyzed Image Tagged image of live and dead cells Raw Image Untagged image of cells Report PDF report with count data and histograms Select the desired saving options The selected options will be marked with a blue ...

Page 38: ...en keyboard name the count as desired Users may add the date to the name by pressing the Add Date Time button Press Save to save to a USB memory A folder of the same name will be created to contain all the files generated ...

Page 39: ...38 HL 60 16042017_143541 pdf HL 60 16042017_143541_RAW tif HL 60 16042017_143541_TAG tif ...

Page 40: ...l details Cell Count Report File name HL 60 16042017_143541 Date 16 Apr 2017 14 35 Cell count results Total 1 04x10e6 cells mL Live 9 73x10e5 cells mL Dead 6 62x10e4 cells mL Viability 93 6 Avg size 16 5 µm Total 251 cells Live 235 cells Dead 16 cells Dil Factor 2 Protocol Protocol name DEFAULT Noise reduction 5 Live cell sensitivity 1 Roundness 60 Min cell size 3 Max cell size 60 Size gating 3 60...

Page 41: ...ns Review Files and Previous Counts Review Files brings up data from a USB memory and Previous Counts looks up data stored directly on the R1 Insert a USB memory to the USB port of the R1 Press Review Files to select an R1 generated folder from the USB memory The cell count results and corresponding image will appear on the right side of the screen ...

Page 42: ...d image will appear below the results The image may be magnified with the magnifier Press Previous Counts to see a list of up to 1000 previous counts and their summarized results Data can be exported to a USB memory as individual CSV files ...

Page 43: ...he power cable before cleaning Ensure that liquids do not enter any part of the instrument during cleaning Clean the surfaces of the instrument with a soft cloth dampened with distilled water Wipe dry immediately Do not pour or spray liquids directly onto the instrument Do not wet electrical wires or connections in order to avoid electrical shock or damage Clean the touchscreen with a soft cloth l...

Page 44: ...ecommend that you use the USB memory provided with this product Too many files in the USB memory Delete or transfer files Errors while updating or calibrating the instrument Freezing during background calibration If calibration takes more than 10 minutes reset the system by turning the power off and then on again Contact Olympus if calibration fails repeatedly Incompatible USB memory Some USB memo...

Page 45: ...g Table 1 Certified Cords A power cord should be certified by one of the agencies listed in the following table or comprised of cordage marked with an agency marking per Table 1 or marked per Table 2 The fittings are to be marked with at least one of the agencies listed in Table 1 In case you are unable to buy locally in your country the power supply cord which is approved by one of the agencies m...

Page 46: ...Cables BASEC BASEC HAR 10 10 30 N V KEMA KEMA KUER HAR 10 30 30 SEMKO AB Svenska Elektriska Materielkontrollanstalter SEMKO HAR 10 10 50 Österreichischer Verband für Elektrotechnik ÖVK ÖVK HAR 30 10 50 Danmarks Elektriske Materielkontrol DEMKO DEMKO HAR 30 10 30 National Standards Authority of Ireland NSAI NSAI HAR 30 30 50 Norges Elektriske Materiellkontroll NEMKO NEMKO HAR 10 10 70 Asociacion El...

Page 47: ...butedby OLYMPUSEUROPASE CO KG Wendenstrasse 14 18 20097 Hamburg Germany OLYMPUSCORPORATIONOFTHEAMERICAS 3500 Corporate Parkway P O Box 610 Center Valley PA 18034 0610 U S A OLYMPUSCORPORATIONOFASIAPACIFICLIMITED L43 Office Tower Langham Place 8 Argyle Street Mongkok Kowloon Hong Kong OLYMPUSAUSTRALIAPTYLTD 3 Acacia Place Notting Hill 3168 Australia ...

Reviews: