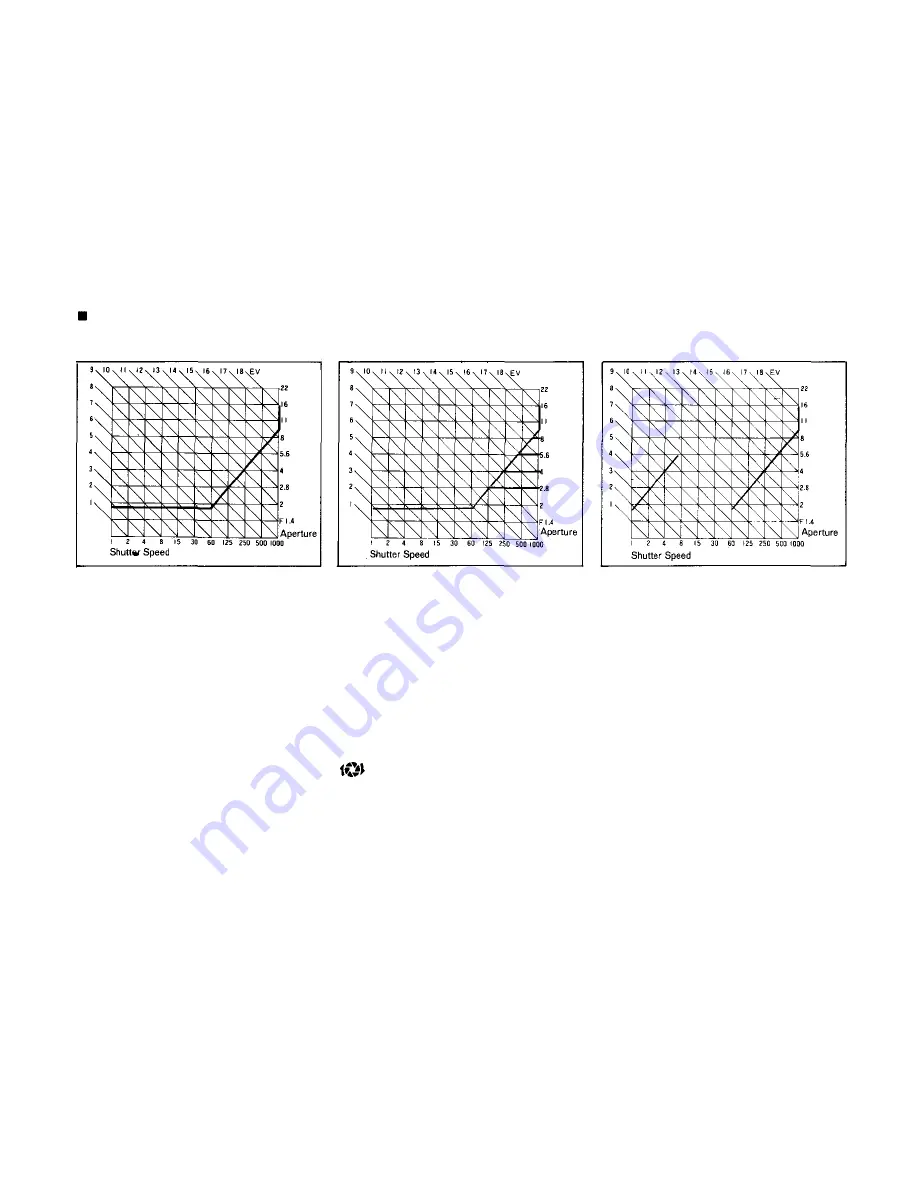
PROGRAM DIAGRAMS
Regular Program Diagram
Continuously Variable Program
Diagram
Program Diagram with Use of T
Series Flash Unit
This program shows the regular
program settings that will be
obtained with a 50mm F 1.8 lens
on the camera. From dim light
conditions up to a shutter speed
of 1/60 sec. the lens aperture
remains wide open. At faster
speeds than 1/60 sec. the shutter
speed and lens aperture settings
change in coordination at a ratio
of 6/5 as shown. Thus the pro-
gram is designed to assure
adequate shutter speeds and
minimize the risk of camera
shake spoiling the picture. With
still brighter subjects, the pro-
gram concentrates on closing
down the lens aperture suffi-
ciently to assure sharp and clear
depth of field effects.
The special OM-PC program
system also allows you to inten-
tionally set different lens aper-
tures for a continuously variable
program able to assure precise
depth of field effects, etc. For a
quick unexpected shot, the
program will assure a correct
exposure providing the shutter
speed you need is not over 1/
1000 sec. If the lens aperture
setting calls for a shutter speed
faster than 1/1000 sec., this
symbol and the 1000 in-
dicator in the viewfinder will
flash on and off, and will warn
you to reset the aperture to the
largest number.
The OM-PC assures you "OTF"
Program Auto flash perform-
ance when you use an OM
System T Series flash unit. The
flash will fire automatically at
program shutter speeds of 1/60
sec. or slower, whenever the
flash unit is switched ON. In
this situation the camera pro-
gram automatically shifts three
settings to the special Flash
Program. The final exposure is
made precisely accurate by the
camera computer, which shuts
off the flash the instant the right
amount of light has reached the
film.
42
Summary of Contents for OM-PC
Page 1: ......
Page 4: ...3 ...
Page 6: ...Remove the rear lens cap Remove the body cap 1 2 Mounting the Lens 5 ...
Page 24: ...Manual Exposure 1 Set the mode selector dial to the MANUAL position 2 Set the aperture 23 ...
Page 29: ... Other Operations 28 ...
Page 30: ...Using the Self Timer 1 2 Wind the film once Set the self timer lever 29 ...
Page 56: ...55 ...
Page 67: ...For Longer Service of Your Camera 66 ...
Page 68: ...Handling Care Take care in handling the camera Do not apply excessive force 67 ...


