background image

1

13

EN

Charging the ba

tt

er

y

Charging the battery

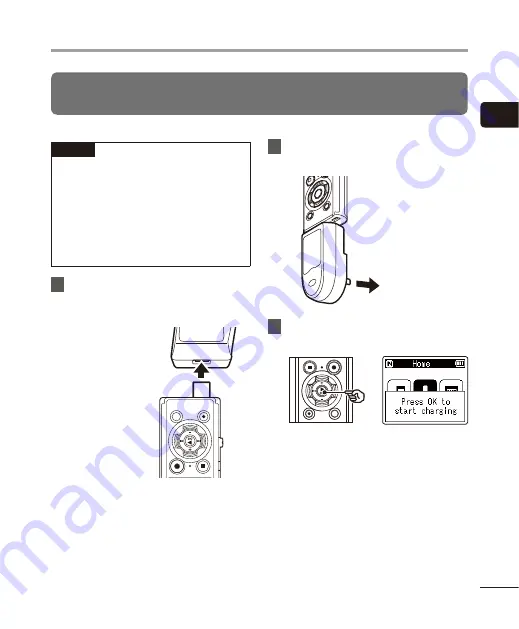
Charging the battery by connecting to an AC adapter with a USB connection 
(model A514; optional)

 NOTE

• 

Before connecting the AC adapter, 

select [

AC Adapter

] for the USB 

connection setting (

☞ 

P.85).

• 

Before charging the battery, insert the 

rechargeable battery provided and set 

[

Battery

] to [

Ni-MH

] (

 P.9, P.10).

• 

Use only the Olympus USB connecting 

AC adapter model provided (A514).


1

  Connect the voice recorder to 

the USB connector on the AC 

adapter.

To USB connector of 

AC adapter (model 

A514) 


2

  Connect the AC adapter to an AC 

power outlet.

To an AC power 

outlet


3

  Press the 

`

OK

 button to start 

charging.

• 

When [

Battery

] (

 P.68) is set t

[

Ni-MH

], [

Press OK to start charging

appears on the display. Press the 

`

OK


button while this message is blinking.

Summary of Contents for LS-P2

Page 1: ...1 Linear PCM Recorder USER MANUAL Thank you for purchasing an Olympus digital voice recorder Please read these instructions for information about using the product correctly and safely Keep the instru...

Page 2: ...35 3 Playback Playback 36 Basic playback procedure 36 Fast forwarding 37 Rewinding 37 Skipping to the beginning of a file 38 Playback through the earphones 39 Changing the playback speed 41 ABC repea...

Page 3: ...fo 71 Extracting the speaking portions of files of spoken word content Voice Detect 72 Moving copying files Move Copy 74 Dividing files File Divide 77 Partially erasing files Partial Erase 79 Trimming...

Page 4: ...stereo microphone R 9 Display 0 MENU SCENE button F2 button REC record s button Recording indicator light LED PEAK indicator light LED LED indicator light LED LIST button 0 button button 9 button OK b...

Page 5: ...k indicator Voice Detect indicator File lock indicator 8 Folder indicator 9 Voice recorder status indicator Recording indicator Recording pause indicator Stop indicator Playback indicator Fast playbac...

Page 6: ...or 9 Elapsed playback time 0 Voice recorder status indicator Stop indicator Playback indicator Fast playback indicator Slow playback indicator Fast forward indicator Fast rewind indicator Music title...

Page 7: ...incorrectly see Setting the time date Time Date P 69 2 1 3 6 4 7 5 1 Current time date 2 Recording media indicator 3 Recording format indicator 4 Indicator display area Rec Scene Noise Cancel Voice B...

Page 8: ...ing started 3 3 Selecting the battery setting Select the battery setting to match the inserted battery Select the setting for a nickel metal hydride rechargeable battery or the setting for an alkaline...

Page 9: ...rtment of the voice recorder 1 Press and hold the battery card cover lock button and then slide the battery card cover to open 2 Insert a AAA battery making sure its positive and negative terminals ar...

Page 10: ...ress the or button to select the type of battery you inserted Ni MH Select if you inserted an Olympus nickel metal hydride rechargeable battery model BR404 Alkaline Select if you inserted an alkaline...

Page 11: ...procedure to set the items entered so far and start the clock You can change the clock display format See Setting the time date Time Date P 69 for the procedure Setting the voice guidance Using this...

Page 12: ...e voice recorder 3 After making sure the voice recorder is stopped connect the USB connector to a USB port on a PC 4 Press the OK button to start charging the battery When Battery P 68 is set to Ni MH...

Page 13: ...rgeable battery provided and set Battery to Ni MH P 9 P 10 Use only the Olympus USB connecting AC adapter model provided A514 1 Connect the voice recorder to the USB connector on the AC adapter To USB...

Page 14: ...PC You cannot charge the battery if 1 or 2 is blinking Charge the battery in an ambient temperature of between 5 and 35 C 41 and 95 F 1 Ambient temperature is too low 2 Ambient temperature is too hig...

Page 15: ...4 to 86 F Use of a rechargeable battery outside the temperature ranges above may result in drops in battery performance or life When not using the voice recorder for an extended period remove the rec...

Page 16: ...s nickel metal hydride rechargeable battery model BR404 Even if the battery indicator is playback with the built in speaker at some volumes may result in a drop in battery output voltage causing the v...

Page 17: ...crookedly could damage its contact surface or cause it to jam in the slot A microSD card not inserted fully until it clicks into place might not record data 3 Close the battery card cover The recordi...

Page 18: ...e recognized properly For microSD card compatibility under Olympus verification please contact our customer support at http www olympusamerica com The Americas http www olympus europa com Europe Ocean...

Page 19: ...he POWER HOLD switch to the HOLD position Hold appears in the display and the recorder enters HOLD mode Releasing HOLD mode 1 Slide the POWER HOLD switch to position A shown below NOTE When any button...

Page 20: ...stop position at power OFF is stored in memory TIP Turning the power OFF whenever the voice recorder is not in use minimizes battery consumption Power Save mode When the voice recorder has been stoppe...

Page 21: ...t the desired mode 3 Press the OK button When Recorder is selected The voice recorder enters Recorder mode Audio can be recorded with the built in microphone Files recorded with the built in microphon...

Page 22: ...s Each folder can store up to 200 files Forward OK button Each press on the OK button opens the currently selected folder or file in the list moving forward to the next lower level in the folder hiera...

Page 23: ...reen Used to select the voice recorder mode P 21 List display Displays the folders and files recorded in the voice recorder Pressing the F2 FOLDER button changes the display to the list display of the...

Page 24: ...NOTE Do not use a spanner or other tool to strongly tighten when attaching the adapter to the voice recorder The voice recorder may be damaged Handling precautions for the adapter When operating the...

Page 25: ...en when attaching the adapter to the voice recorder Damage may result Do not attach other than a dedicated attachment The voice recorder may be damaged When attaching a tripod turn the screw of the tr...

Page 26: ...ecorder P 21 2 Press the OK button 3 Press the or button to select the folder to save the recording in Each new voice recording file is saved in the selected folder 4 Press the REC s button to prepare...

Page 27: ...button when you want to stop recording e e File length Sound files recorded with the voice recorder are automatically given a file name in the format below 151001_0001 MP3 1 2 3 1Date recorded Indica...

Page 28: ...ce recorder has no more available memory space You will need to delete unneeded files to record more P 47 When using a microSD card in the voice recorder be sure the desired recording media setting In...

Page 29: ...vel P 55 Sets the recording level Limiter P 56 Sets the correction method according to the sound input during recording Rec Mode P 56 Sets the recording sound quality Zoom Mic P 57 Sets the built in s...

Page 30: ...the or button to adjust the recording monitor volume The earphones are optional 1 Connect the earphones to the voice recorder s earphone jack To earphone jack Changing the volume will not affect the r...

Page 31: ...ea Meeting Suitable for recording meetings held in a small space and other sounds that are fairly close Dictation Suitable for recording your own voice and other sounds that are extremely close Music...

Page 32: ...een made To use these functions you must select Off for the Rec Scene setting Preregistered Rec Scene settings Lecture Rec Level High Rec Mode MP3 128 kbps Zoom Mic 6 Low Cut Filter On Mic Select Cent...

Page 33: ...Zoom Mic Off Low Cut Filter On Mic Select Central Mic Off VCVA Off V Sync Rec Off Music Rec Level Low Rec Mode PCM 44 1 kHz 16 bit Zoom Mic Off Low Cut Filter Off Mic Select Central Mic On VCVA Off V...

Page 34: ...To microphone jack 2 Start recording See Recording P 26 for descriptions of recording operations TIP See Accessories optional P 111 for the compatible external microphones NOTE Microphones with plug i...

Page 35: ...al device perform a test recording and adjust the output level of the connected device as needed Recording audio from this recorder with another device Audio from this recorder can be recorded to anot...

Page 36: ...er indicator File name b Elapsed playback time File length c Playback position bar indicator 3 Press the or button to adjust the volume to the desired level The volume can be adjusted to a setting bet...

Page 37: ...ing stops when the end of the file is reached Press and hold the 9 button again to fast forward from the beginning of the next file Rewinding Rewinding while the voice recorder is in stop mode 1 With...

Page 38: ...yback position is the beginning of the file To skip to the beginning of the previous file during playback press the 0 button twice consecutively NOTE If an index mark or temp mark is reached when skip...

Page 39: ...lecting from among three playback modes Equalizer 2 P 64 Adjusts the quality of sound as desired Skip Space P 65 A handy function for quickly moving the playback position and playing short segments re...

Page 40: ...g rate bit count and bit rate combinations supported for music file playback by the voice recorder are shown below File format Sampling rate Bit count bit rate WAV format 44 1 kHz 48 kHz 88 2 kHz 96 0...

Page 41: ...al playback speed set the setting to x1 0 Play 3 Press the OK button to finalize the setting Playback speed indicator TIP When changing the playback speed playback operations such as stopping playback...

Page 42: ...ending point of the segment B becomes the new starting point and playback continues 4 When the ending point C is selected repeat playback starts again 5 These steps can be repeated to re specify a ne...

Page 43: ...oints 4 Press the F1 CANCEL A button during ABC repeat playback Segment A B is canceled becomes the new start position and playback continues You can change the playback speed P 41 and fast forward re...

Page 44: ...arks during ABC repeat playback P 45 Canceling ABC repeat playback 1 Press the F2 CNCL ABC button If pressed when ABC repeat playback is stopped cancels ABC repeat playback If pressed during ABC repea...

Page 45: ...tomatically erased when you select a different file transfer the file to a PC or move the file on a PC You can write up to 99 16 index marks temp marks in a single file The message No more can be set...

Page 46: ...Press the OK button 4 Press the 9 or 0 button to select the desired date d a b c a Number of files saved recorded on selected date b Date file was recorded c Selected date d Today s date Dates on whic...

Page 47: ...voice recorder is in stop mode The voice recorder returns to the stopped mode if no operation is performed for 8 seconds 3 Press the or button to select All in folder or One file All in folder Erases...

Page 48: ...Internal memory or microSD card P 68 Locked files and read only files cannot be erased P 52 The voice recorder s default Recorder folders FolderA to FolderE and Music folder cannot be erased Music fol...

Page 49: ...hile the voice recorder is in stop mode press the MENU SCENE button TIP Some menus contain items that can be set during recording playback P 51 2 Press the or button to select the tab containing the i...

Page 50: ...g the 0 button instead of the OK button 8 Press the STOP 4 button to exit the menu screen When the menu screen is displayed during recording or playback press the MENU SCENE button to return to the pr...

Page 51: ...e set during recording Rec Level Zoom Mic Low Cut Filter VCVA Backlight LED 4 4 Menu items that can be set during Playback Property Noise Cancel 1 Voice Balancer 1 Play Mode Equalizer 2 Skip Space Bac...

Page 52: ...the file you want to lock P 22 Lock File is locked Unlock File lock is canceled Sorting files Sort by You can change the playback order of the files in a folder 1 Press the or button to select File n...

Page 53: ...ing A file can be trimmed down to just the required portion and then re saved See Trimming a file Trimming P 81 for the procedure LS P2 model only Increasingtheoverallvolumelevel ofafile Normalize Inc...

Page 54: ...1 If you selected a linear PCM format file the Bit Rate item displays the sampling frequency and bit count 2 If the file has no tag information UNKNOWN_ARTIST and UNKNOWN_ALBUM are displayed Folder i...

Page 55: ...cording to the volume of the input sound Suited to recording all sounds TIP To record the speaker s voice clearly set Rec Level to Low and place the voice recorder s built in microphone near the speak...

Page 56: ...is too loud noise may occur even if you set to Music or Voice Also in certain cases the PEAK indicator light which indicates loud input may not lit To ensure successful recording we recommend that yo...

Page 57: ...rding with a connected mono microphone records on the left channel only Selecting microphone directivity Zoom Mic The voice recorder s built in stereo microphone provides directivity ranging from broa...

Page 58: ...ion will make the battery deplete more quickly Reducing noise during recording Low Cut Filter The voice recorder s low cut filter function lets you make recordings that reduce humming sounds from air...

Page 59: ...level used for VCVA Off Turns VCVA Off Restores standard recording Adjusting the voice activation level for voice activated recording 1 Press the REC s button to start recording Recording pauses autom...

Page 60: ...ast the set detection time Off Recording is done normally Adjusting the voice sync level for voice sync recording 1 Press the REC s button to prepare for recording TIP Increasing the setting number in...

Page 61: ...2 Press the 9 or 0 button to adjust the voice sync level Voice sync level moves left right to match set level The voice synch level can be adjusted to a setting between 01 and 23 Increasing the setti...

Page 62: ...n Automatically skips the non voice portions of the file and plays only the speaking portions Off The voice playback function is disabled Reducing noise during playback Noise Cancel Use the Noise Canc...

Page 63: ...will make the battery deplete more quickly Selecting playback modes Play Mode Several playback modes are available for different listening styles 1 Press the or button to select Recorder or Music Whe...

Page 64: ...der When Playback Range is set to All after the last file in the current folder has been played the first file in the next folder is being played When playback reaches the end of the last file in the...

Page 65: ...ack after moving the playback position backward by the set amount 2 Press the or button to select a setting When Forward Skip was selected File Skip 10 sec Skip 30 sec Skip 1 min Skip 5 min Skip 10 mi...

Page 66: ...LED indicator light is switched on Off LED indicator light stays off TIP Even if you set the LED setting to Off the LED indicator light will flash while files are being transferred between the voice r...

Page 67: ...content of files LS P2 model only 3 sec 5 sec 10 sec Each time you select a file the beginning part will be played automatically Off Turns Intro Play off Selecting the speaker output Speaker You can s...

Page 68: ...ode Power Save The voice recorder turns Off automatically when a preset amount of time has elapsed with the voice recorder stopped after power On 5 min 10 min 30 min 1 hr Select the desired amount of...

Page 69: ...Press the OK button to finalize the setting TIP When setting the hour or minute each time you press the F2 button the display changes between the AM PM and 24 hour clock formats Example 10 38 PM 10 38...

Page 70: ...ry You can change the USB class setting as required by different USB applications See Setting the USB connection USB Settings P 85 for the procedure Restoring the default settings Reset Settings The R...

Page 71: ...cording media erases all existing files saved on it Be sure to transfer all important files to a PC before formatting See Formatting recording media Format P 87 for the procedure Checking recording me...

Page 72: ...the cursor into the list of setting items 3 Press the OK button 4 Press the or button to select File select or With recording File select Select a file for which you want to extract the speech portio...

Page 73: ...g a file before you can perform the process The voice recorder may not be able to properly extract non silent portions from files of non spoken word content such as recorded musical performances The v...

Page 74: ...files saved in the internal memory or inserted microSD card to a different folder in the internal memory Copy to memory Copies one or more files saved in the internal memory or inserted microSD card t...

Page 75: ...u can deselect a previously selected file by selecting it and pressing the OK button again 2 Repeat Step 1 to select all the files you want to move or copy then press the F2 button When All files was...

Page 76: ...ter being moved or copied NOTE Files cannot be copied if there is insufficient remaining memory Files cannot be moved or copied if there are over 200 files To prevent the risk of data damage never rem...

Page 77: ...e list of setting items 4 Press the or button to select File Divide 5 Press the OK button 6 Press the OK button and play the file to the desired division point P 36 You can change the playback speed P...

Page 78: ...half File name_2 NOTE File Divide can be performed only when the file list is displayed Files cannot be divided if there are 200 files in the folder Locked files P 52 cannot be divided It may not be...

Page 79: ...the file to the desired erasing point P 36 You can change the playback speed P 41 and fast forward rewind P 37 7 Press the F2 button at the partial erase start position TIP Playback continues while St...

Page 80: ...ter being erased so please check carefully before erasing a file Locked files and read only files cannot be erased P 52 Before erasing a file or folder charge or replace the battery to ensure it will...

Page 81: ...OK button to play the file to the desired trimming point P 36 You can change the playback speed P 41 and fast forward rewind P 37 7 Press the F2 button at the position where you want to start trimming...

Page 82: ...ime it may not be trimmed even if it is a PCM file Locked files and read only files cannot be trimmed P 52 Before trimming a file charge or replace the battery to ensure it will not run out before the...

Page 83: ...button 6 Press the or button to select On Off Speed or Volume On Off Switches voice guidance On Off Speed Sets the voice guidance speed Volume Sets the voice guidance volume 7 Press the OK button to...

Page 84: ...selected 1 Press the or button to select the voice volume Volume1 to Volume5 The greater the number the louder the beep sound 2 Press the OK button to exit the selection screen 8 Press the STOP 4 butt...

Page 85: ...vice Menu tab 3 Press the OK button to move the cursor into the list of setting items 4 Press the or button to select USB Settings 5 Press the OK button 6 Press the or button to select USB Connection...

Page 86: ...rder to an AC adapter model A514 optional Optional Select to confirm the connection method whenever making a USB connection 9 Press the OK button and go to Step When USB Class was selected 10 Press th...

Page 87: ...into the list of setting items 4 Press the or button to select Format 5 Press the OK button 6 Press the or button to select the recording media to be formatted 7 Press the OK button 8 Press the butto...

Page 88: ...over 10 seconds to complete To prevent the risk of damage to data never attempt to perform any of the following processes before a formatting process has finished 1Disconnecting the USB connection AC...

Page 89: ...plication on your smartphone you can operate record stop the voice recorder at a distance as long as you are within the range that a signal can be received For details see our website Bluetooth functi...

Page 90: ...ces including this voice recorder could generate noise in audio or video images When using the Bluetooth function battery life is consumed quickly Therefore when using a Bluetooth connection we recomm...

Page 91: ...or the application Using Google PlayTM formerly called Android MarketTM search for OLYMPUS Audio Controller BT 3 Select OLYMPUS Audio Controller BT and download and install An icon is added to the sma...

Page 92: ...nnect a Bluetooth device Pairing Use this method when connecting a device that is to be used for the first time or when the connection settings have been deleted Connection P 94 Use this method when c...

Page 93: ...ecome able to use the connected device 11 Press the STOP 4 button to exit the menu screen 4 4 About pairing Registering a device pair when connecting with a Bluetooth device is called pairing Once pai...

Page 94: ...while the voice recorder is in stop mode 3 Press the or button to select Device Menu tab 4 Press the OK button to move the cursor into the list of setting items 5 Press the or button to select Bluetoo...

Page 95: ...or each device If an operation such as turning the power off is performed after pairing with a Bluetooth device completes the Bluetooth connection will be disconnected To connect again perform this Co...

Page 96: ...or button to select Device Menu tab 3 Press the OK button to move the cursor into the list of setting items 4 Press the or button to select Bluetooth 5 Press the OK button 6 Press the or button to sel...

Page 97: ...ed for using a USB connection to save files recorded by the voice recorder on a PC Windows Operating system Microsoft Windows Vista 7 8 8 1 10 standard installation PC Windows PC with at least one ava...

Page 98: ...onnect the connector before the drive has stopped Do not format initialize the voice recorder s drive from a PC Formatting done from a PC will not be done correctly Use the voice recorder s Format men...

Page 99: ...lay when the USB connector is connected The voice recorder will not connect to the PC if AC Adapter was selected for the voice recorder s USB Connection setting Select PC for the USB Connection settin...

Page 100: ...e properly Connecting the voice recorder through a USB hub may result in unstable operation Do not use a USB hub if operation is unstable Use only a compatible Olympus USB extension cable Operation is...

Page 101: ...Check that the LED indicator light of the voice recorder has stopped blinking and then disconnect the USB cable Macintosh 1 Drag and drop the removable disk icon for the voice recorder shown on the de...

Page 102: ...RECORDER MUSIC FOLDER_A FOLDER_B FOLDER_C FOLDER_D FOLDER_E Windows Macintosh 001 002 003 200 microSD LS P2 Drive name Removable disk Folder names NO NAME Folder File Copy these files to the PC Recog...

Page 103: ...folder labeled with your voice recorder s model name 4 Copy the desired data to the PC 5 Disconnect the voice recorder from the PC P 101 Macintosh 1 Connect the voice recorder to the PC P 99 When the...

Page 104: ...r occurred Contact the Olympus Customer Support Center back cover Card error The microSD card was not recognized correctly Remove and reinsert the microSD card P 17 P 18 Memory full There is no remain...

Page 105: ...ed A file with the same name as a file being moved copied exists in the destination folder Select another file This file can t be divided An attempt was made to divide a file that is not an MP3 or WAV...

Page 106: ...ase unneeded files P 47 The maximum number of recordable files has been reached Select another folder P 22 Playback is inaudible The earphones are connected to the earphone jack To output the playback...

Page 107: ...t P 56 A positive value has been selected for Zoom Mic Select Off for Zoom Mic P 57 Missing audio file The file was recorded in a different folder Select another folder P 22 Noise during playback Obje...

Page 108: ...nly setting on a PC Unable to charge the battery Alkaline has been selected for Battery To use the rechargeable battery provided select Ni MH for Battery Do not use the rechargeable battery at higher...

Page 109: ...Bluetooth device and voice recorder is too far or there is an obstruction between them Place the Bluetooth device within 1 m of the voice recorder and then try configuring the settings again P 92 The...

Page 110: ...If the recorder is very dirty soak the cloth in mild soapy water and wring well Wipe the recorder with the damp cloth and then wipe it with a dry cloth s s Display Wipe gently with a soft cloth NOTE...

Page 111: ...p to three left and three right channel units Cascade connection enables the left right channel connections to be extended up to about 12 meters to capture sound from a broad range ME15 mono tie clip...

Page 112: ...f damages lost earnings or any claims from third parties resulting from improper use of the product Trademarks and registered trademarks IBM and PC AT are trademarks or registered trademarks of Intern...

Page 113: ...s from the voice recorder could affect electric medical devices and could cause accidents due to malfunction s s Keep a distance of at least 22cm from persons who have a pacemaker Electric waves from...

Page 114: ...t use the voice recorder in an atmosphere that might contain flammable or explosive gases It may cause fire or explosion s s Do not attempt to disassemble repair or modify the voice recorder It may ca...

Page 115: ...se fire or burns Remove the battery immediately taking care not to burn yourself Contact your place of purchase or an Olympus repair center or service center Do not touch the battery with bare hands w...

Page 116: ...ttery from the voice recorder as soon as the battery becomes unusable It may cause leakage s s Battery fluid in the eyes may cause blindness If battery fluid gets in eyes do not rub the eyes Instead r...

Page 117: ...tions Operating precautions Do not leave the voice recorder in hot or humid locations such as in direct sunlight inside a vehicle or on a beach during summer Do not store the voice recorder in humid...

Page 118: ...ture or cause thereof Recorded file precautions Note that Olympus will assume no liability for recorded files being erased or becoming unplayable due to voice recorder or PC failure Recording of copyr...

Page 119: ...displayed capacity 4 4 Bluetooth Specification 1 Standard Version 2 1 EDR Support Transmit Power Level Class2 Communication Distance Line of sight approx 10 m 2 max Operational Frequency Range 2 4 GHz...

Page 120: ...z 48 0 kHz 16 bits 20 Hz to 23 kHz 44 1 kHz 16 bits 20 Hz to 21 kHz 44 1 kHz mono 20 Hz to 21 kHz MP3 format 320 kbps 20 Hz to 21 kHz 128 kbps 20 Hz to 17 kHz 64 kbps mono 20 Hz to 13 kHz 4 4 When rec...

Page 121: ...approx MP3 format 320 kbps 31 hours approx 22 hours approx 128 kbps 35 hours approx 25 hours approx 64 kbps mono 39 hours approx 28 hours approx 4 4 During audio file playback all playback modes Durin...

Page 122: ...prox 128 kbps 30 hours approx 22 hours approx 64 kbps mono 31 hours approx 22 hours approx NOTE The battery life figures shown here were determined using an Olympus test method When Mic Select is set...

Page 123: ...rox 11 hours 30 minutes approx 44 1 kHz mono 22 hours 30 minutes approx 11 hours approx 96 hours approx 47 hours 30 minutes approx 23 hours 30 minutes approx 4 4 MP3 format Recording mode Internal mem...

Page 124: ...1 hour approx 48 0 kHz 16 bits 3 hours approx 44 1 kHz 16 bits 3 hours 20 minutes approx 44 1 kHz mono 6 hours 40 minutes approx 4 4 MP3 format Recording mode Recording time 320 kbps 29 hours 40 minut...

Page 125: ...t the applicable equipment to an external device or a power outlet FCC CAUTION Changes or modifications not expressly approved by the party responsible for compliance could void the user s authority t...

Page 126: ...ilable in your country for the disposal of this product This symbol crossed out wheeled bin Directive 2006 66 EC Annex II indicates separate collection of waste batteries in the EU countries Please do...

Page 127: ...nical Customer Support Please visit our homepage http www olympus europa com or call our TOLL FREE NUMBER 00800 67 10 83 00 for Austria Belgium Czech Republic Denmark Finland France Germany Luxemburg...

Page 128: ...ra Mont Kiara 50480 Kuala Lumpur Malaysia Tel 60 3 6411 0000 http www olympus com my OLYMPUS THAILAND CO LTD Imaging Products Division 23 112 Sorachai Building 27th Floor Soi Sukhumvit 63 Ekamai Sukhu...

Reviews: