background image

1

Us

ing t

he R

ec

ord

er o

n Y

ou

r P

C

5

Using the Recorder on Your PC

Operating Environment

Windows

Macintosh

Operating System:

  Microsoft  Windows  XP/Vista/7  (Standard 

Installation)

Compatible PC’s:

  Windows PC’s equipped with more than one 

free USB port

Operating System:

  Mac OS X 10.4.11 ~ 10.6 (Standard Installation)

Compatible PC’s:

  Apple  Macintosh  series  equipped  with  more 

than one free USB port

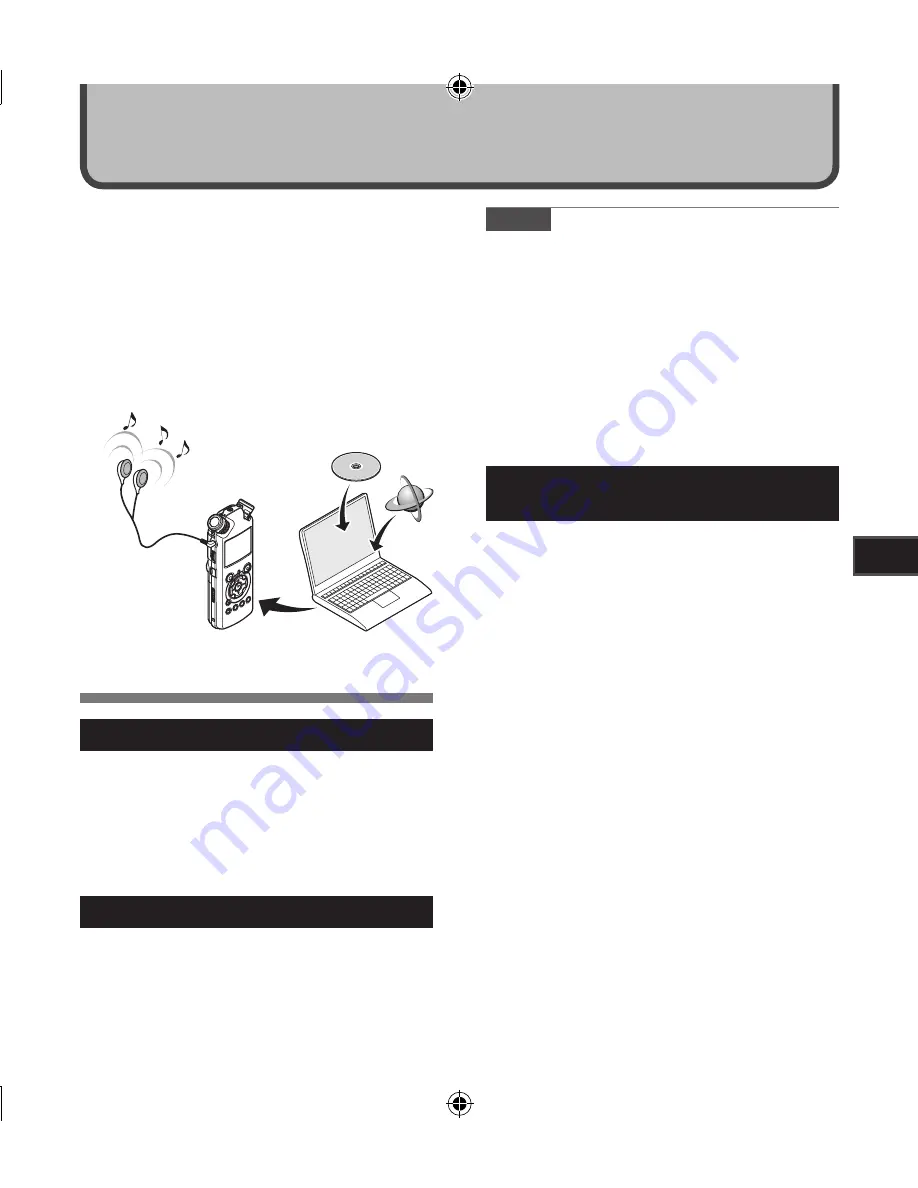
By being connected to a PC, the recorder enables 

you to do the following:

•  You  can  transfer  files  recorded  with  this 

recorder to a computer, play them back, and 

manage them by using Windows Media Player 

or iTunes (

☞ 

P.65, P.73).

•  In addition to its uses as an IC recorder and a 

music player, this recorder can also be used 

as external memory for a computer by storing 

data from a computer and reading it back out 

(

☞ 

P.64, P.77).

Precautions on using the recorder

connected to a PC

•  When  you  are  downloading  a  file  from  the 

recorder or uploading a file to the recorder, do 

not remove the USB cable even if the screen is 

indicating you can. Data is still being transferred 

while the [

PEAK

] indicator light is blinking. When 

removing  the  USB  cable,  be  sure  to  follow 

the description in 

 P.63. If the USB cable is 

removed before the drive is stopped, data may 

not be successfully transferred.

•  On a PC, do not format the drive of the recorder. 

Initialization  is  not  successfully  achieved  on 

a  PC.  For  initialization,  follow  the  instruc-

tions  in  the  [

Format

]  screen  of  the  recorder 

(

 P.51).

•  Folder  (directory)  names  appeared  by  file 

management tools such as Explorer attached 

to Microsoft Windows is different from the folder 

names that can be set with the recorder.

•  If  folders  or  files  stored  on  the  recorder  are 

moved or renamed by using a file management 

tool such as Explorer, the order of files may be 

changed or files may become unrecognizable

•  Data can be written or uploaded to the recorder even 

though the attribute of the recorder drive is shown 

as Read-only by the operating system of the PC.

•  As  the  noise  may  cause  adverse  effects  on 

electronics devices nearby the recorder, unplug 

the earphone when you connect the recorder to 

a PC.

  Notes

•  This is an operational environment for saving 

the files recorded by this recorder to your PC 

with USB connection.

•  To  check  the  operational  environment  of 

[

Olympus Sonority

] software, see a supplied 

separate sheet.

•  Even if operational environment is satisfied, we 

do not support such as 64-bits OS, the multi-

boot environment and self-modified PC’s.

•  Even if operational environment is satisfied, we 

do not support such as upgraded OS, the multi-

boot environment and self-modified PC’s.

Summary of Contents for LS-5

Page 1: ...asing an Olympus Digital Voice Recorder Please read these instructions for information about using the product correctly and safely Keep the instructions handy for future reference To ensure successful recordings we recommend that you test the record function and volume before use ...

Page 2: ...by the third party other than Olympus or an Olympus authorized service station or any other reason is excluded Trademarks and registered trademarks IBM and PC AT are the trademarks or registered trademarks of International Business Machines Corporation Microsoft Windows and Windows Media are registered trademarks of Microsoft Corporation Macintosh and iTunes are the trademarks of Apple Inc The SD ...

Page 3: ...1 2 3 4 5 6 Table of Contents P 4 Safe and Proper Usage P 6 Getting Started P 8 About Recording P 22 About Playback P 32 Menu Setting P 41 Using the Recorder on Your PC P 61 Other Information P 78 INDEX ...

Page 4: ... External Microphone or Other Devices 30 3 About Playback Playback 32 Playback Through Earphone 35 Setting an index mark or a temp mark 35 How to begin segment repeat playback 36 Erasing 38 Erasing One File at a Time 38 Erase All Files from a Folder 38 Partially erase a file 39 4 Menu Setting Menu Setting Method 41 Formatting the Recorder Format 51 Rearranging files Replace 54 Moving Files File Mo...

Page 5: ... 6 Other Information Alarm Message List 78 Troubleshooting 79 Technical Assistance and Support 81 Accessories optional 82 Specifications 83 Table of Contents ...

Page 6: ...cellular phones or other wireless equipment as they may cause interference and noise If you experience noise move to another place or move the recorder further away from such equipment Avoid sand or dirt These can cause irreparable damage Avoid strong vibrations or shocks Do not disassemble repair or modify the unit yourself Do not operate the unit while operating a vehicle such as a bicycle motor...

Page 7: ...water metal or flammable sub stances from getting inside the product Do not moisten the AC adapter or touch it with a wet hand Do not use the AC adapter in the vicinity of flammable gas includ ing gasoline benzine and lacquer thinner In case the internal parts of the AC adapter are exposed because it has been dropped or otherwise damaged the AC adapter is dropped in water or if water metal flamma ...

Page 8: ...ended recording times P 41 P 43 In addition when connected to an external device the recorder can encode incoming analog audio signals without a PC P 30 Supports high capacity recording media Starting with its 2 GB built in flash memory canalsorecordontoanSDCard commercially available P 17 Check the Olympus website regarding SD cards which are confirmed operation with this recorder P 81 Equipped w...

Page 9: ...crophone L 4LINE IN jack 5MIC jack 6REC LEVEL dial 7RECs button Recording indicator light LED 8MIC SENSE HIGH LOW switch 9LOW CUT ON OFF switch 0Strap hole Display LCD panel PEAKindicator light LED STOP4 button 2 button 9 button 3 button LIST button MENU button A B REPEAT button Fn button ERASE button 0 button q OK button wCard cover eEAR jack rVOLUMEdial tUSB terminal yPOWER HOLD switch uPower ja...

Page 10: ...playback or stop mode File length 8During recording mode Elapsed recording time During playback mode Elapsed playback time 9 EUPHONY indicator 0 Reverb indicator V Sync Rec indicator LowCutFilter indicator Limiter indicator Zoom Mic indicator File Display Folder List Display 1Root folder indicator Folder indicator Recording media indicator or folder indicator Root folder name Current file number T...

Page 11: ... rechargeable batteries B 01 4PE optional from Olympus can be used in the recorder Use them with the Olympus Ni MH Rechargeable Battery Charger B 90SU optional For U S A and Canada or BU 90SE optional For Europe P 81 Inserting Batteries 1 Press the battery cover release button and then slide the battery cover open while lightly pressing down on it 2 Insert two AA batteries with the cor rect and po...

Page 12: ...hanging batteries AA alkaline batteries or Olympus Ni MH Rechargeable Batteries are recommended Be sure to turn off power of the recorder before replacing the batteries P 13 Unloading the batteries while the recorder is in use may cause a malfunction such as corrupting the file etc If you are recording into a file and the batteries run out you will loose your currently recorded file because the fi...

Page 13: ... again until this function takes effect HOLD Set the recorder to HOLD mode Slide the POWER HOLD switch to the HOLD position After Hold appears on the display the recorder is set to HOLD mode When the recorder is not being used turn the power off to reduce battery consumption to a minimum Even if the power is turned off existing data mode settings and clock settings will be maintained If you bring ...

Page 14: ...ing playback record ing operation is disabled with the playback recording state unchanged When playback has ended and the recording has ended due to the remaining memory being used up it will stop The recorder can be effectively operated via its switch and dial as well as the connected exclusive remote control set RS30W optional even when it is in HOLD mode HOLD ...

Page 15: ...ate will appear When the hour is flash ing conduct the setup from Step 1 1 Press the 9 or 0 button to select the item to set 2 Press the 2 or 3 button to set Follow the same steps by pressing the 9 or 0 button to select the next item and press the 2 or 3 button to set You can select between 12 and 24 hour display by pressing the LIST button while setting the hour and minute Example 10 38 P M 10 38...

Page 16: ... If the Time and Date is not correct set it using the procedure below Note If you press the OK button during the setup operation the recorder will save the items that were set to that point 2 Press the 2 or 3 button to select Others tab You can change the menu display by mov ing the settings tab cursor 3Press the OK or 9 button to move the cursor to the item to set 5Press the OK or 9 button The ho...

Page 17: ...rt the card keeping it straight The card stops with a click when it is inserted all the way Inserting the card the wrong way or at an angle could damage the contact area or cause the card to jam If the card is not inserted all the way data may not be written to the card 3Close the card cover securely 4 When you are recording to a card press the 2 or 3 button and select Yes 5Press the OK button to ...

Page 18: ...rite protected SD Card Locked will appear The playback opera tion can be performed but the write protection must first be turned off when overwriting the contents on the card Cards that are not to SD standards such as multimedia cards may not be used 2 Push the card inward to unlock it and let it eject partially When the SD Card is write protected there will be a display reading SD Card Locked Bef...

Page 19: ...n the Folders The built in flash memory or the SD Card can be used for the recording media Regardless of the recording media voice files and music files are separated into folders for voice recordings and folders for music playback that are organized in a branching tree style and saved About the Folders for Voice Recordings Folder A Folder E are the folders for voice recordings When recording with...

Page 20: ...o the part A above Folder E First layer Second layer Save up to 200 files Up to 128 folders can be created under the Music folder including Music About the Folder for Music Playback When transferring music files to the device using Windows Media Player a folder is automatically created within the music playback folder which has a layered structure as shown in the diagram below Music files that are...

Page 21: ... 2 or 3 button Select the file File list display OK button Begin playback File display Operation of the folders for voice recordings Operation of the folders for music playback 2 or 3 button Folder list display Second layer 2 or 3 button Select the folder Folder list display 2 or 3 button Select the folder Folder list display Select the album folder Information of the selected file is displayed En...

Page 22: ...elect the recording format Recording can be performed through the linear PCM format as well as the WAV MP3 and WMA formats P 41 P 43 Turn the built in stereo microphone in the direction that you would like to record Placing the built in stereo microphone over the display is the proper position for performing stereo recording If it is below the display when recording then proper stereo recording ca...

Page 23: ...lect the recording folder P 19 to P 21 How to change folders 1 Pressing the LIST button at the file display while stopped will return you back one layer above Pressing the LIST button repeatedly will bring you to the folder list display 2 Pressing button 2 or 3 at the folder list display will select the folders for voice recordings Newly recorded audio will be saved as the last file in the selecte...

Page 24: ...e even if the volume of a single file exceeds 2 GB in the linear PCM format recording P 43 1 The file is saved every 2 GB in separate files It will be treated as multiple files when playing back 2 When the recording exceeds 2 GB the number of files in the folder may exceed 200 files The 201st file and later will not be recognized by the recorder so check by connecting the recorder to a PC When an ...

Page 25: ...o 30 or 10 seconds the light flashes faster Folder Full will appear when the folder capacity is full Delete any unnecessary files before recording any further P 38 MemoryFull will appear when the memory is full Change the recordable media or de lete any unnecessary files before recording any further P 38 P 41 P 46 When the recording button of the exclusive remote control RS30W optional is pressed ...

Page 26: ...e level meter Microphone sensitivity P 27 LOW HIGH Low Cut Filter P 27 OFF ON Rec Mode P 41 P 43 The recording level can be adjusted to suit the volume of the original sound Rec Level P 41 P 43 You can configure whether to adjust the recording level automatically or to adjust it manually When Rec Level is set to Manual you can configure the limiter function Zoom Mic P 41 P 43 The directivity of th...

Page 27: ...ng has started you can hear the sound being recorded through the earphone If the earphone is connected no sound will come from the speaker Notes Recording level cannot be controlled using the volume button When using the earphones do NOT set the volume too high Listening at very high volume may lead to hearing loss Do not place earphones near a microphone as this may cause feedback When the extern...

Page 28: ...ng the LIST button at the file display while stopped will return you back one layer above Pressing the LIST button repeatedly will bring you to the folder list display 2 Pressing button 2 or 3 at the folder list display will select the folders for voice recordings Newly recorded audio will be saved as the last file in the selected folder Adjusting the voice sync level for recording Voice sync reco...

Page 29: ... faintest sound will activate recording a Voice sync level moves to the right left according to the set level 4 Press the REC s button again Recording enters standby Standby flashes on the display and the recording indicator light flashes If input meets or exceeds the voice sync level recording starts automatically At this time the recording indicator light glows 5 Recording stops automatically If...

Page 30: ... conversation over the phone can be clearly recorded Recording with External Microphone Connect an external microphone to the MIC jack of the recorder When recording while an external monaural microphone is connected sound will only be recorded by the L channel Recording from External Microphone or Other Devices The external microphone and other devices can be connected and the sound can be record...

Page 31: ...en connecting to the audio output terminal earphone jack of the other device and the LINE IN jack of the recorder with the connecting cord KA334 included within for dubbing Notes When you adjust the various sound quality settings related to playback on the recorder the audio output signal sent out from the EAR jack will change as well P 41 P 45 In case of recording on other devices without a line ...

Page 32: ... the folder b File length c Elapsed playback time d Level meter About Playback 1 Select the folder which contains the files to be played back P 19 to P 21 How to change folders 1 Pressing the LIST button at the file display while stopped will return you back one layer above Pressing the LIST button repeatedly will bring you to the folder list display 2 Pressing button 2 or 3 at the folder list dis...

Page 33: ...96 kHz 16 bit or 24 bit MP3 format MPEG1 Layer3 32 kHz 44 1 kHz 48 kHz MPEG2 Layer3 16 kHz 22 05 kHz 24 kHz From 8 kbps up to 320 kbps WMA format 16 kHz 22 kHz 32 kHz 44 1 kHz 48 kHz From 16 kbps up to 256 kbps Variable bitrate MP3 files in which conversion bitrates can vary may not play properly For WAV files this recorder can only play back those in the linear PCM format WAV files other than the...

Page 34: ...art playback from where it was stopped While the recorder is during playback mode press and hold the 0 button When you release the 0 button the recorder will resume normal playback Ifthereisanindexmarkortempmarkinthemiddle of the file the recorder will stop at that location P 35 The recorder stops when it reaches the beginning of the file Continue pressing the 0 button to proceed with the review f...

Page 35: ...ting an index mark or a temp mark If index marks and temp marks are placed you can quickly find a location you want to listen to in fast forward and fast rewind and when cuing a file Index and temp marks can be added only during PCM recording with this recorder or to PCM files recorded using this recorder Index marks cannot be added to WMA files MP3 files or files made by recorders other than Olym...

Page 36: ...or temp mark to erase 3While the index or temp number ap pears for approximately 2 seconds on the display Press the ERASE button The index or temp mark is erased Index or temp numbers after the erased index or temp number will automatically move up Notes Index marks can be added during PCM record ing with this recorder or to PCM files recorded using this recorder Temp marks are temporary markings ...

Page 37: ... become the end position and repeat playback will start Cancel the segment repeat playback function a Press the STOP 4 button Pressing the STOP 4 button will release seg ment repeat playback and stop playback b Press the OK button Pressing the OK button will release segment repeat playback and stop playback c Press the 9 button Pressing the 9 button will release segment repeat playback and cue to ...

Page 38: ...display press the 9 or 0 button to select a file 3While the recorder is during stop mode press the ERASE button 5Press the OK button 1 Select the folder that you want to erase P 19 to P 21 4 Press the 2 button to select File Erase The display changes to File Erase and erasing will start Erase Done is displayed when the file is erased File numbers will be reassigned automatically Erase All Files fr...

Page 39: ...the recorder can be partially erased 1 Select the folder which contains the files you want to partial erase P 19 to P 21 2 In the File list display press the 2 or 3 button to select the file you want to partial erase In the File display press the 9 or 0 button to select a file 3Play the file you want to partial erase Forward a file to the position that shall be erased If the file is long use the 9...

Page 40: ... processing as they may damage the data In addition replace the batteries with two new ones in order to ensure that the batteries will not run out while processing 1Turning off the power while processing 2Removing the batteries while processing 3Remove the SD Card during processing when SD Card is being used as the record ing media Performing any of these operations may dam age the data You cannot...

Page 41: ...3 button to move to the tab that contains the item you want to set 3Press the OK or 9 button to move the cursor to the item to set 4 Press the 2 or 3 button to move to the item you want to set 5Press the OK or 9 button Items in menus are categorized by tabs so select a tab first and move to a desired item to quickly set it You can set each menu item as follows Moves to the setting of the selected ...

Page 42: ...revious screen 8Press the MENU button to close the menu screen When in the menu screen during recording or playback pressing the 0 or MENU but ton will allow you to return to the playback screen without interrupting recording or playback Notes The recorder will stop if you leave it idle for 3 minutes during a menu setup operation when a selected item is not applied When entering menu settings duri...

Page 43: ...set to Manual you can configure the limiter function Auto Recording is performed by automatically adjusting the recording level This is useful for when you will be recording right away 2 Select the Limiter setting This recorder is equipped with a limiter function that corrects the recording level down to an appropriate range in cases where a loud noise is suddenly picked up This prevents distortio...

Page 44: ...icrophone Select this when external microphones supported by plug in power are connected P 30 Off Disables this function Select this when external microphones not supported by plug in power are connected Turn the plug in power function to Off when an external microphone not supported by plug in power is connected as there is the risk that noise may be generated while recording Phantom power cannot...

Page 45: ... be converted downward from 96 kHz to 48 kHz and 24 bit to 16 bit respectively This function is only available during playback This recorder cannot perform recording by using the playback results When you adjust the various sound quality settings related to playback on the recorder the audio output signal sent out from the EAR jack will change as well EUPHONY This recorder is equipped with EUPHONY...

Page 46: ...record to either the built in flash memory or to the SD Card P 14 Setting Built in Memory Built in flash memory SD Card SD Card When attempting to perform operations such as rewriting the contents of an SD Card in cases where the card has been write protected SDCardLocked will appear The playback operation can be performed but the write protection must first be turned off when overwriting the cont...

Page 47: ...vide P 59 AutoPowerOff Forgetting to turn the power off can be prevented If the recorder remains in stop mode for over 10 minutes Initial setting while the power is turned on the power will be turned off Setting 5 minutes 10 minutes 30 minutes 60 minutes Set the length of time before the power will be turned off Off Disables this function If any button is pressed the elapsed time count before the ...

Page 48: ...ly When the RecLevel is set to Manual you can configure the limiter function Zoom Mic Off Wide Standard Narrow Zoom Play Mode File File Repeat Folder Folder Repeat All All Repeat Reverb Normal Studio Club Hall Dome EUPHONY Normal Natural Wide Power MemorySelect Built in Memory SD card Property File and folder information can be confirmed from the menu screen Each time the Fn button is pressed the ...

Page 49: ... Rec Monitor On Plug inPower On V Sync Rec Off 4 Play Menuu Play Mode File Reverb Normal EUPHONY Normal 4 LCD Sound Menuu Backlight 10 seconds Contrast 06 LED On 4 Memory Menuu MemorySelect Built in Memory 4 Others AutoPowerOff 10 minutes USB Settings Storage Fn Setting Off System Info You can check the recorder s information on the menu screen ModelName Version and Serial Number appears on the di...

Page 50: ...Level Zoom Mic Rec Monitor Plug inPower LCD Sound Menu LED Backlight To menu item options Play Menu LED Backlight To menu item options Rec Menu Play Menu hSetting menu during recording hSetting menu during playback Play Mode Reverb EUPHONY LCD Sound Menu Menu Setting Method ...

Page 51: ...ill appear on the display P 41 Format will appear on the display 5Press the OK or 9 button Formatting the Recorder Format 4 Press the 2 or 3 button to select Format 2 Press the 2 or 3 button to select Memory Menu tab You can change the menu display by moving the settings tab cursor 3Press the OK or 9 button to move the cursor to the item to set Memory Menu will appear on the display 6Press the 2 o...

Page 52: ...tents on the card P 18 Never perform operations such as the following while processing as they may damage the data In addition replace the batteries with two new ones in order to ensure that the batteries will not run out while processing 1Turning off the power while processing 2Removing the batteries while processing 3Remove the SD Card during processing when SD Card is being used as the record i...

Page 53: ... functions to their initial settings use Menu Reset P 41 P 49 Formatting on the recorder will be Quick Format If you format the SD card information of file management is refreshed and the data inside the SD card is not deleted completely When handing over and disposing the SD card be careful about the data leakage from the SD card We recommend the SD card to be destroyed when you dispose the SD ca...

Page 54: ...order P 17 to P 21 2 While the recorder is during stop mode press the MENU button The menu will appear on the display P 41 3Press the 2 or 3 button to select Others tab 6Press the OK or 9 button 4 Press the OK or 9 button to move the cursor to the item to set 5 Press the 2 or 3 button to select Replace Others will appear on the display 7 Press the 2 or 3 button to select the file you want to move ...

Page 55: ...ked will appear The playback opera tion can be performed but the write protection must first be turned off when overwriting the contents on the card P 18 8Press the OK or 9 button The cursor will flash to confirm that the file can be moved 10Press the OK button to complete the setting If there are more files to move repeat Steps 7 through 10 Pressing the 0 button without pressing the OK button wil...

Page 56: ... button to select the file you want to move or copy 5Press the OK or 9 button to move the cursor to the item to set 4 Press the 2 or 3 button to select Others tab You can change the menu display by mov ing the settings tab cursor Others will appear on the display 6 Press the 2 or 3 button to select File Move 3While the recorder is during stop mode press the MENU button The menu will appear on the ...

Page 57: ...he SD card Copy to SD Card Copy a file in the built in memory or SD card to another folder in the SD card 10Press the 2 or 3 button to select the folder you want to move or copy the file to 11 Press the OK button to complete the setting 7 Press the OK or 9 button File Move will appear on the display A Move or Copy folder selection screen is displayed 12Press the MENU button to close the menu scree...

Page 58: ...file exists or Cannot copy Same name file exists is displayed The file will not be overwritten When the operation is cancelled during moving or copying the move or copy is cancelled Files which are locked will remain so even after they are moved or copied If you attempt to rewrite the contents in the SD card when the SD card is write protected SD Card Locked will appear The playback opera tion can...

Page 59: ...ou want to split the file 2 While the recorder is during stop mode press the MENU button The menu will appear on the display P 41 Splitting Files File Divide Files with the recording mode of 96kHz 88 2kHz 48kHz or 44 1kHz arefilesrecorded in the PCM format a Recording mode 4 Press the OK or 9 button to move the cursor to the item to set 3Press the 2 or 3 button to select Others tab You can change ...

Page 60: ...be done when the file list is displayed The recorder cannot split files when the number of files in the folder exceeds 199 Locked files P 41 P 47 cannot be split After a file has been split the original file will be renamed File name_1 WAV and the new file will be named File name_2 WAV After a file has been split the resulting files retain the same creation date and modification date as the origin...

Page 61: ...before the drive is stopped data may not be successfully transferred On a PC do not format the drive of the recorder Initialization is not successfully achieved on a PC For initialization follow the instruc tions in the Format screen of the recorder P 51 Folder directory names appeared by file management tools such as Explorer attached to Microsoft Windows is different from the folder names that c...

Page 62: ...recorder you need to use appropriate methods such as Windows Media Player Copying the music files with DRM purchased from online music distribu tion service to a portable device such as this recorder may be restricted Note This recorder is compatible with Microsoft Corporation DRM9 but not with DRM10 Connecting to Your PC 1 Boot the PC 2 Connect the USB connecting cable to the USB port of the PC 3...

Page 63: ...ve icon for this recorder that is appear on the desktop to the garbage bin by Drag Drop it When you connect the recorder to a Mac OS it will be recognized by the drive name LS_5 on the desktop When an SD card is inserted it will be recognized by the drive name Untitled 2 Disconnect the USB cable Notes NEVER disconnect the USB while the PEAK indicator light is flashing If you do the data will be de...

Page 64: ...drive name Untitled 2 Double click on LS_5 icon on the desktop 3Copy the data 4 Disconnecting the recorder to your PC P 63 Notes While transmitting data Busy is appeared and the PEAK indicator light flashes NEVER disconnect the USB while the PEAK indicator light is flashing If you do the data will be destroyed In the Windows operational environment 24 bit WAV format files cannot be played back Whe...

Page 65: ... to the recorder to play P 68 The files recorded on the recorder can be transferred to your PC and can be copied to CD P 71 It supports WAV MP3 and WMA format music files Window Names 1Features taskbar 2Seek slider 3Shuffle button 4Repeat button 5Stop button 6Previous button 7Play button 8Next button 9Mute button 0Volume slider 1Features taskbar 2Seek slider 3Shuffle button 4Repeat button 5Stop bu...

Page 66: ...rt Windows Media Player 2 From the Features taskbar click Rip CD menu If Internet connectivity is available CD information is searched 3Put a check mark on the music file that you want to copy 4 Click Start Rip Files copied to a PC are stored in WMA format Music files copied are categorized by artist album genre etc and added to the play list 2 3 4 ...

Page 67: ...k ViewAlbum Info for Windows Media Player 10 as necessary If Internet connectivity is available CD information is searched 3Put a check mark on the music file that you want to copy 4 Click Start Rip For Windows Media Player 10 Click Rip Music Files copied to a PC are stored in WMA format Music files copied are categorized by artist album genre etc and added to the play list Using Windows Media Pla...

Page 68: ... Options At the Options dialog box click the Devices tab 2 3From the Devices list select LS_5 Next click Properties Click on the Create folder hierarchy on device to check 1 2 The folder with artist name or album name is automatically created This will make you find the file you want to listen to more easily 1 If Create folder hierarchy on device is checked by default click to uncheck the box once...

Page 69: ...Set Up Sync and set as follows Click on the Create folder hierarchy on device to check 1 2 The folder with artist name or album name is automatically created This will make you find the file you want to listen to more easily 4 Select the desired category from Library on the left and select music files or albums to transfer to the recorder and Drag Drop them in Sync List on the right 5Click Start S...

Page 70: ...rder s display In such a case erase the files to make free space hundreds of KB to dozens of MB depending on the music file sizes for the management file The more capacity for the management file will be necessary as the number of the music files increases 5 4 4 Select the desired category from Library on the left and select music files or albums to transfer to the recorder and Drag Drop them in S...

Page 71: ...he CD R RW drive and start Windows Media Player 2 From the Features taskbar click the Burn menu 3 Select the desired category from Library on the left and select voice files or albums to copy to the CD R RW and Drag Drop them in BurnList on the right 5 4 2 3 4 Click Burn tab and select Data CDorDVD or AudioCD When Audio CD is selected A file is converted and copied in CD in order to play it by the...

Page 72: ... 3 Select the desired category from Library on the left and select voice files or albums to copy to the CD R RW and Drag Drop them in BurnList on the right Windows Media Player 11 5 3 2 4 4 Click Burn menu again and select AudioCD or DataCD When Audio CD is selected A file is converted and copied in CD in order to play it by the audio equipment which can play CD R RW When Data CD is selected Copyi...

Page 73: ...e button 8Disc create button 9Genius button 0Genius side button Window Names 4567 8 9 2 1 3 0 By using iTunes music files from music CDs or language study CDs can be imported to your PC P 74 and music files that you have bought from any music distribution sites can be easily transferred to the recorder to play P 75 The files recorded on the recorder can be transferred to your PC and can be copied ...

Page 74: ...format and bit rate for copying music files to your PC and click OK This recorder is compatible with music files in the MP3 and WAV formats P 33 Import Using Set the file format for copying music file from a CD Please select MP3 or WAV Setting Set the bit rate for copying music file from a CD You can select a bit rate between 128 160 and 192 5 Put a check mark on the music files that you want to c...

Page 75: ... be changed by Drag Drop of the music file in the play list displayed 3 Double click the corresponding drive with the recorder and open Music folder When you connect the recorder to a Mac OS it will be recognized by the drive name LS_5 on the desktop When an SD card is inserted it will be recognized by the drive name Untitled Copy to Music folder of the recorder when transferring the music file Yo...

Page 76: ... RW into the CD R RW drive and start iTunes 2 Select the desired playlist and put a check mark on the voice files to copy to the CD R RW 3 Click BurnDisc 2 3 4 To set the CD format for copying voice files to CD R RW and click OK When Audio CD is selected A file is converted and copied in music CD in order to play it by the audio equipment which can play CD R RW When MP3 CD is selected Copying in M...

Page 77: ...r it will be recognized by the drive name LS_5 Built in flash memory and RemovableDisk SD card The drive letter will differ depending on the PC being used 4 Copy the data 5Disconnect the USB connection cable P 63 1 Connecting the recorder to your PC P 62 When you connect the recorder to a Mac OS it will be recognized by the drive name LS_5 on the desktop When an SD card is inserted it will be reco...

Page 78: ... SD card then put it again P 17 to P 18 Licence Mismatch Illegally copied file The music files copied illegally Erase the file P 38 Memory Full Zero remaining memory No remaining memory Erase unnecessary files P 38 No File No file No files were found in the folder Select another folder P 19 to P 21 SD Card Locked Card Locked The SD Card is set to write protection Undo the SD Card s write protectio...

Page 79: ...etach the connecting cord from the recorder An external microphone supported by plug in power is connected but Plug in Power is set to Off Set Plug inPower to On when an external microphone supported by plug in power is connected P 41 P 44 No playback tone heard The earphone is connected Unplug the earphones to use the internal speaker The volume level is set to 0 Adjust the volume level P 32 Reco...

Page 80: ... microphone not supported by the plug in power function is connected turn the Plug inPower setting to Off P 41 P 44 Unable to erase The file is locked Unlock the file P 41 P 47 The file is read only Cancel the read only setting of the file on the PC Unable to hear any sound from the earphone through the recording monitor The Rec Monitor is set to Off Turn the Rec Monitor setting to On P 41 P 44 No...

Page 81: ...er Support E mail address in the U S and Canada distec olympus com s Technical Hotline Number in Europe Toll free number 00800 67 10 83 00 available for Austria Belgium Denmark Finland France Germany Italy Luxemburg Netherlands Norway Portugal Spain Sweden Switzerland United Kingdom Charged numbers for the Rest of Europe 49 180 567 1083 49 40 23773 4899 s User Support E mail address in Europe dss ...

Page 82: ...hone can be clearly recorded Ni MH rechargeable battery and charger set B 90SU For U S A and Canada BU 90SE For Europe B 90SU or BU 90SE comes with an Ni MH rechargeable battery charger and 4 Ni MH rechargeable batteries B 01 4PE as a pack This charger can quick charge Olympus AA or AAA Ni MH rechargeable batteries Ni MH rechargeable battery B 01 4PE Europe only 4 Ni MH rechargeable batteries B 01...

Page 83: ...LR6 or Two Ni MH rechargeable batteries External power supply AC adapter 5 V 4 External dimensions 131 5 mm 48 mm 22 4 mm without protrusions 4 Weight 165 g including alkaline batteries 4 LINE IN Jack During recording or playback mode Linear PCM format Recording mode Overall frequency response 96 kHz 20 Hz to 44 kHz 88 2 kHz 20 Hz to 42 kHz 48 kHz 20 Hz to 23 kHz 44 1 kHz 20 Hz to 21 kHz 44 1 kHz ...

Page 84: ... 1 h 2 h 4 h 10 min 8 h 15 min 16 h 45 min 88 2 kHz 16 bit 1 h 35 min 20 min 45 min 1 h 30 min 3 h 5 min 6 h 15 min 12 h 30 min 25 h 15 min 48 kHz 24 bit 1 h 55 min 25 min 55 min 1 h 50 min 3 h 50 min 7 h 40 min 15 h 31 h 48 kHz 16 bit 2 h 55 min 40 min 1 h 25 min 2 h 50 min 5 h 45 min 11 h 30 min 23 h 46 h 30 min 44 1 kHz 24 bit 2 h 5 min 30 min 1 h 2 h 4 h 10 min 8 h 20 min 16 h 30 min 33 h 45 m...

Page 85: ...otes The above values are strictly rough guides Variations in the available recording time will arise as there may be differences in the available memory depending on the card Caution is required since the differences in the available recording time will increase when the bit count and bit rate are low Available recording time may be shorter if many short recordings are made The displayed availabl...

Page 86: ...MEMO ...

Page 87: ...traitement et de collecte disponibles dans votre pays Produit applicable LS 5 La marca CE indica que este producto cumple con los requisitos europeos en materia de seguridad salud medio ambiente y protección al consumidor Este símbolo un contenedor de basura tachado con una X en el Anexo IV de WEEE indica que la recogida de basura de equipos eléctricos y electrónicos deberá tratarse por separado e...

Page 88: ...pus europa com OLYMPUS EUROPA HOLDING GMBH Shinjuku Monolith 3 1 Nishi Shinjuku 2 chome Shinjyuku ku Tokyo 163 0914 Japan Tel 81 0 3 3340 2111 http www olympus com OLYMPUS IMAGING CORP 3500 Corporate Parkway P O Box 610 Center Valley PA 18034 0610 U S A Tel 1 888 553 4448 http www olympusamerica com OLYMPUS IMAGING AMERICA INC E1 BS0495 02 AP1003 ...

Reviews: