background image

16

1

EN

%

1

4

2

3

5 678 90!@ #

$

4

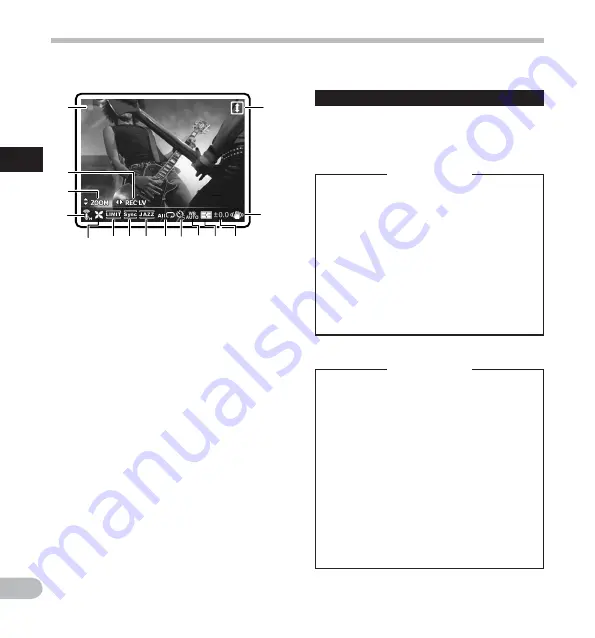
 Icon display:

1

 Shooting mode (

s

) (

n

)

2

 Recording Level (

i

)

3

 Zoom (

h

)/ Volume (

g

)

Microphone Sensitivity (

q

)(

r

)

5

 Low Cut Filter (

c

)

Limiter (

[

)

7

 Voice Sync (

Z

)

Equalizer (

]

) (

^

) (

_

) (

)

Playback Mode (

Y

) (

X

) (

W

)

Self timer (

j

)(

k

)

White balance (

{

)(

;

)(

<

)(

:

)(

=

)(

|

)

Metering (

u

)(

v

)

Exposure compensation (

y

)

Image stabilization (

I

)

Reverse Angle Recording (

o

)

About the two LCD displays

The recorder has two displays, the main LCD and 
the sub LCD, utilized differently depending on 
mode and function.

A

 mode 

n

 mode 

During shooting or playback:

During shooting or playback:

••

  During shooting or playback, both 

  During shooting or playback, both 

the main LCD and sub LCD are on. 

the main LCD and sub LCD are on. 
However, when the [

However, when the [

Main LCD 

Main LCD 

Display

Display

] setting of [

] setting of [

Recording 

Recording 

Settings

Settings

] is set to [

] is set to [

Off

Off

], both the LCDs 

], both the LCDs 

are  off during shooting.

are  off during shooting. (

 P.71).

When operation is stopped:

When operation is stopped:

••

  When operation is stopped, both the 

  When operation is stopped, both the 

main LCD and sub LCD are on.

main LCD and sub LCD are on.

Menu settings:

••

  When you switch to the menu 

  When you switch to the menu 

settings, both the main LCD and sub 

settings, both the main LCD and sub 
LCD are on.

LCD are on.

During recording or playback:

During recording or playback:

••

  During recording or playback, the 

  During recording or playback, the 

main LCD is off and only the sub LCD is 

main LCD is off and only the sub LCD is 
on.

on.

When operation is stopped:

When operation is stopped:

••

  When operation is stopped, both the 

  When operation is stopped, both the 

main LCD and sub LCD are on.

main LCD and sub LCD are on.

Menu settings:

••

  When you switch to the menu 

  When you switch to the menu 

settings, both the main LCD and sub 

settings, both the main LCD and sub 
LCD are on.

LCD are on.

Identification of parts

Id

en
tif
ic

a

tion

 of
 par

ts

Summary of Contents for LS-20M

Page 1: ...ctly and safely Keep the instructions handy for future reference To ensure successful recordings we recommend that you test the record function and volume before use Register your product on www olympus consumer com register and get additional benefits from Olympus EN LINEAR PCM RECORDER LS 20M Linear PCM Recorder DETAILED INSTRUCTIONS ...

Page 2: ...egistered trademarks of Microsoft Corporation Macintosh Mac OS and Quick Time are the trademarks of Apple Inc SD and SDHC are the trademarks of SD Card Association HDMI the HDMI Logo and High Definition Multimedia Interface are trademarks or registered trademarks of HDMI Licensing LLC MPEG Layer 3 audio coding technology licensed from Fraunhofer IIS and Thomson This product is licensed under the A...

Page 3: ...2 3 4 5 6 INDEX Table of contents P 4 Safety precautions P 5 Getting started P 10 About recording shooting P 34 About playback P 48 Menu setting P 65 Using the recorder on your PC P 92 Other information P 100 ...

Page 4: ...or other devices 40 Before shooting movies n 42 Point the lens toward the subject 42 Shooting movies n 43 3 About playback Playback A 48 Setting an index mark A 52 Playing movies n 53 To play back movies on a TV 56 How to begin segment repeat playback A n 57 Erasing A n 58 Erasing files 58 Erasing all files in a folder 59 Partially erasing a file 61 Trimming files A n 63 4 Menu setting Menu settin...

Page 5: ...temperatures and or humidity are high or go through extreme changes Direct sunlight beaches locked cars or near other heat sources stove radiator etc or humidifiers In sandy or dusty environments Near flammable items or explosives In wet places such as bathrooms or in the rain When using products with weatherproof designs read their manuals as well In places prone to strong vibrations Never drop t...

Page 6: ...insert another type of card into the recorder contact an authorized distributor or service center Do not try to remove the card by force Do not operate the unit while operating a vehicle such as a bicycle motorcycle or car f Caution Stop using the recorder immediately if you notice any unusual odors noise or smoke around it Never remove the batteries with bare hands which may cause a fire or burn ...

Page 7: ...r eyes immediately with clear cold running water and seek medical attention immediately f Warning Keep batteries dry at all times If rechargeable batteries have not been recharged within the specified time stop charging them and do not use them Do not use a battery if it is cracked or broken Never subject batteries to strong shocks or continuous vibration If a battery leaks becomes discolored or d...

Page 8: ... adapter are exposedbecauseithasbeendroppedor otherwise damaged the AC adapter is dropped in water or if water metal flammable substances or other foreign objects get inside it you notice anything unusual when using the AC adapter such as abnormal noise heat smoke or a burning odor 1do not touch any of the exposed parts 2immediately disconnect the power supply plug from the power outlet and 3cally...

Page 9: ...hing is covering it such as a blanket This may cause fire explosion leakage or overheating LCD monitor The LCD used for the monitor is made with high precision technology However black spots or bright spots of light may appear constantly on the LCD Monitor Due to its characteristics or the angle at which you are viewing the monitor the spot may not be uniform in color and brightness This is not a ...

Page 10: ... sound for various purposes including recording the practicing of a musical instrument s You can playback WAV and MP3 format files transferred from a computer in addition to files recorded by the device itself This allows you to use this recorder as a music player s Using the visualizer 5 types of video patterns can be displayed on the LCD while playing back voice files recorded with the recorder ...

Page 11: ...thium ion battery LI 42B Warranty card Contents may vary depending on purchase location Warranty differs depending on purchase location Warranty card may not be included USB AC adapter F 3AC USB cable Instructions Note Be sure to use the included dedicated USB cable and AC adapter If any other company s cable is used it may lead to malfunction of the recorder Also never use this dedicated cable wi...

Page 12: ...on A B REPEAT button button Fn button ERASE button 0 button STOP 4 button Card cover Mode switch A n Strap hole MIC Microphone jack MIC LINE IN qEAR Earphone jack wPOWER HOLD switch eREMOTE jack Connect the receiver for the exclusive remote control set RS30W optional This enables operation of the start and stop recording shooting functions through the remote control rConnector cover tHDMI micro co...

Page 13: ...der mode display File display 1Battery indicator 2Current file number Total number of recorded files in the folder 3Remaining recording time File length 4Recorder status indicator K Record indicator Pause indicator L Stop indicator Play indicator ß Forwarding indicator Rewinding indicator 5Levelmeter 6Elapsed recording time Elapsed playback time Folder list display Identification of parts ...

Page 14: ...display 1Battery indicator 2Current file number Total number of recorded files in the folder 3File length 4Recorder status indicator L Stop indicator Play indicator ß Forwarding indicator Rewinding indicator 5Levelmeter 6Elapsed playback time List display 1 When there are files and folders in the folder When there are only files in the folder Identification of parts Identification of parts ...

Page 15: ...or 2Icon display 3Battery indicator 4Current file number Total number of recorded files in the folder 5Remaining shooting time File length 6Recorder status indicator K Shooting indicator Pause indicator L Stop indicator Play indicator ß Forwarding indicator Rewinding indicator 7Levelmeter 8Elapsed shooting time Elapsed playback time Folder list display Identification of parts Identification of par...

Page 16: ...the LCDs both the LCDs are off during shooting are off during shooting P 71 When operation is stopped When operation is stopped When operation is stopped both the When operation is stopped both the main LCD and sub LCD are on main LCD and sub LCD are on Menu settings When you switch to the menu When you switch to the menu settings both the main LCD and sub settings both the main LCD and sub LCD ar...

Page 17: ...y sliding in direction A while pushing down in direction B Be careful of the direction of the battery when inserting it 3 Close the battery cover by pressing in direction A and sliding in direction B 4 Completely close the battery cover by sliding its lock button in the direction indicated by the arrow Verify that the battery lock cover button is locked The supplied rechargeable battery is not ful...

Page 18: ... recorder for an extended period of time When replacing rechargeable battery be sure to use lithium ion battery LI 42B specified by Olympus The use of other manufacturers products can damage the recorder and should be avoided Lithium ion battery is self discharging After unpacking this product charge the supplied lithium ion battery before using the recorder for the first time Power supply Power s...

Page 19: ...nnecting terminal on the bottom of the recorder To the USB connector 4 Press the OK button to start charging While Press OK to start charging is flashing press the OK button If a button other than the OK button is pressed the recorder enters the normal stop mode The animation of the battery indicator is displayed on the sub LCD and the PEAK LED indicator light turns on When the battery is charged ...

Page 20: ... is displayed on the main LCD and the PEAK LED indicator light turns on 6 Charging is completed when Battery Full is displayed Charging time approximately 2 hours It shows the approximate time when charging the rechargeable battery fully from no remaining power at the room temperature The charging time will be changed depending on the remaining amount and the state of battery Before connecting the...

Page 21: ...ew ones Be sure to push the USB connector all the way in Otherwise the recorder may not operate properly Selecting PC Camera in the USB connection settings will prevent the recorder to charge via USB Select Storage class in the USB connection settings if you would like to charge P 88 In case you would like to charge using the PC Camera setting select Optional in the USB connection settings then co...

Page 22: ... discharge repeatedly for 2 to 3 times When disposing rechargeable battery always observe the local laws and regulations Contact your local recycling center for proper disposal methods If lithium ion battery is not fully discharged protect against short circuiting e g by taping the contacts before disposing For customers in Germany Olympus has a contract with the GRS Joint Battery Disposal Associa...

Page 23: ...ill be turned off The resume function remembers the stop position before the power is turned off Auto Power Off mode Turning off the power Slide the POWER HOLD switch to the direction of the arrow and hold it for 0 5 seconds or longer If the recorder is stopped not used for over 10 minutes default while the power is turned on the power will be turned off P 78 If the power is turned off by the Auto...

Page 24: ...e recorder is set to HOLD mode Notes If you press any button in HOLD mode the clock display lights for 2 seconds but it will not operate the recorder If HOLD is applied during operation of the recorder operation is disabled and the operation state is preserved if playback has ended or recording or shooting has ended due to the remaining memory being used up the recorder will enter the stopped stat...

Page 25: ...e recorder stores the time information automatically with the recording When you use the recorder for the first time when you insert the battery after the recorder has not been used for a long time or when the clock is not set Set Time Date appears When Hour flashes perform the setup from Step 1 1 Press the 9 or 0 button to select the item to set Select the item from the Hour Minute Year Month and...

Page 26: ...elow button OK button MENU button 2 Press the or button to select Device Menu tab You can change the menu display by moving the settings tab cursor 3 Press the OK button to move the cursor to the item to set Device Menu will appear on the display 4 Press the or button to select Time Date 5 Press the OK button Time Date will appear on the display The Hour will flash on the display indicating the st...

Page 27: ...ngle could damage the contact area or cause the SD card to jam If the SD card is not inserted all the way data may not be written to the SD card 3 Close the card cover securely Note In some cases SD cards which have been formatted initialized by another device such as a computer may not be recognized Be sure to format SD cards with this recorder before using them P 90 Inserting and ejecting an SD ...

Page 28: ...nce reduces in an SD card when you repeat writing and deleting In this case format the SD card P 90 There is no guarantee that all SD cards work with the recorder About the SD Card When the SD card is write protected there will be a display reading SD card is locked Before inserting the card turn off the write protection function If the write protection switch is facing the LOCK direction recordin...

Page 29: ...er File Each folder can store up to 999 files The SD card can be used for the recording media Voice files movie files and music files are sorted and saved into their respective folders organized in a tree structure About the folders for voice recordings Folder A Folder E within the Root folder are the folders for voice recordings When recording with this recorder select any one of the five folders...

Page 30: ...the LS 20M are stored into folders Each folder can store up to 9999 files First layer Second layer When you divide a file a new number is assigned to it and it is saved into the Edit folder Notes on the folders Notes on the folders Note Only the Movie100 folder is created after a format Whenever each of the folders will exceed 9999 files the next folder is created automatically ...

Page 31: ...ing Windows Media Player a folder is automatically created within the music playback folder which has a layered structure as shown in the diagram below Music files that are in the same folder can be rearranged in preferential order and replayed P 82 First layer Each folder can store up to 999 files Second layer Third layer Up to 128 folders can be created under the Music folder including Music Not...

Page 32: ...yer File list display Folder list display A mode Operation of the folders for voice recordings Moving through the levels Return LIST button Each time you press this it returns up one level The 0 button can also serve as the LIST button on a list display Proceed OK button Each time you press this it opens the folder or file selected in the list display and proceeds down one level The 9 button can a...

Page 33: ...u recorded with the recorder Music files transferred to the Music folder of the recorder can also be played P 29 P 31 When the switch is at the n position You can shoot movies and save the data to the DCIM folder dedicated to movie files and play the movie files you shot P 30 About the icons used in this manual A Indicates an operation or setting that is possible when the mode switch is at the voi...

Page 34: ...important to ensure high quality recording Whenrecordingwiththebuilt inmicrophone Point the built in stereo microphone toward the sound source with the LCD facing upward Ïòéçéîáì óïõîä óïõòãå The extension of the microphone sensitivity can be adjusted by changing the Mic Sense setting to High or Low P 67 About the built in stereo microphone RecLevel canbeadjustedby Manual or Auto Adjustingtherecor...

Page 35: ...elect a folder among Folder A to Folder E These five folders can be selectively used to distinguish the kind of recording for example Folder Folder A might be used to store private information while Folder Folder B might be dedicated to holding business information 2 Press the REC s button to prepare recording The level can be adjusted from 00 to 30 The higher the number the higher the level and t...

Page 36: ... further P 58 If the REC s button is pressed when a function other than the record function is specified Cannot record in this folder is displayed Select a folder from Folder A through Folder E and start recording again Depending on the sound recording mode and the status of record media the data transfer to the media cannot be done in time during recording and the skipped sound may be recorded In...

Page 37: ...as been set on the Digital Voice Recorder 2File number A file number is consecutively assigned 3Extension These are the file name extensions for the recording format when recording with this device Linear PCM format WAV MP3 format MP3 LS20 0001 WAV 1 2 3 Recording A We recommend formatting the record media in the recorder before recording P 90 Pressing once the recording button of the optional exc...

Page 38: ... for the recording monitor or turn Rec Monitor to Off while recording P 69 To EAR jack Settings relating to Recording Mic Sense P 67 Sets the recording sensitivity Rec Mode P 67 Sets the recording rate for each recording format Rec Level P 68 You can configure whether to adjust the recording level automatically or to adjust it manually Low Cut Filter P 68 This function can reduce noise from air co...

Page 39: ...nfigure the limiter function Rec Monitor P 69 Select whether or not to output the recording monitor sound from the EAR jack Plug inPower P 69 Select whether or not to use the plug in power function according to the external microphone connected to the MIC jack When Rec Level is set to Auto the recording level will be adjusted automatically When this happens the recording level adjustment function ...

Page 40: ...ace on a table and record conferences or lecture from a distance Highly sensitive noise cancellation monaural microphone unidirectional ME52W This microphone is used to record sound at a distance while minimizing surrounding noise Tie clip microphone omni directional ME15 Small concealing microphone with a tie clip Telephone pickup TP7 Earphone type microphone can be plugged into your ear while ph...

Page 41: ... s EAR jack to the other device s audio input terminal MIC jack using the connecting cord KA334 optional for dubbing When connecting to another device with no LINE IN jack but only a MIC IN use the connecting cord KA333 optional equipped with a resistance attenuator for dubbing To EAR jack To audio input terminal of other devices Recording the sound of other devices with this recorder The sound ca...

Page 42: ...ng using the main LCD While shooting high quality sound can be recorded using the built in stereo microphone On mounting Accurate adjustments of the microphone s angle and the like can be made when the device is affixed to a commercially available tripod used for cameras Subject Select the image quality Set the movie resolution and recording format according to the content you want to shoot and it...

Page 43: ...r 0 button to adjust the recording level of sound P 35 STOP 4 button REC s button The recording shooting indicator light will flash and will appear on the sub LCD Image Quality cannot be changed in the shooting standby mode or while shooting Configure this while the recorder is stopped P 71 aShooting mode Shooting paused state bRemaining shooting time cFile number dLevel meter changes according to...

Page 44: ... may not be able to be transferred in time to the recording media while shooting This may result in sound skipping In such a case Data Write Error may appear during shooting and recording may stop After transferring the data to a PC format the recording media We recommend formatting the record media in the recorder before shooting P 90 Pressing once the recording button of the optional exclusive r...

Page 45: ...he OK button during shooting to change the function of the and buttons aZoom indicator 2 Press the or button during shooting to adjust the shooting range Switches to telephoto screen Switches to wide angle screen When you start using the zoom the zoom bar is displayed on the main LCD Shooting movies n Zoom bar Note The default setting for the and buttons at the start of shooting is zoom adjustment...

Page 46: ... White Balance P 72 Set the white balance according to the shooting scene Exposure Comp P 73 Set an appropriate exposure High ISO Mode P 73 Set the shooting sensitivity Shooting movies n Shooting using the recorder upside down This function is useful while recording in an environment where there are many people around you or where it is difficult to fit the subject in the viewfinder when shooting ...

Page 47: ...on according to the external microphone connected to the MIC jack Input Jack P 70 Select whether to connect an external device to the MIC jack to use it as a LINE IN jack for recording or to connect an external microphone for recording Recording from external microphone You can connect an external microphone to record sound Do not plug or unplug a device into from the recorder s jack during shooti...

Page 48: ...hines you need to transfer copy it from a computer button OK button STOP 4 button 3 Press the or button to adjust to a comfortable listening volume The volume can be adjusted within a range from 00 to 30 a c b d 4 Press the STOP 4 button at any point you want to stop playback L will appear on the sub LCD This will stop the file being played back midway When the resume function is activated the sto...

Page 49: ...rt the earphone after turning down the volume level When you listen with the earphone during playback do not raise the volume too much It may cause hearing impairment and decrease in hearing ability To EAR jack While the recorder is during playback mode press and hold the 9 button When you release the 9 button the recorder will resume normal playback If there is an index mark in the middle of the ...

Page 50: ...e While the recorder is during playback mode press the 9 button The recorder skips to the beginning of the next file While the recorder is during playback mode press the 0 button The recorder skips to the beginning of the current file While the recorder is during playback mode press the 0 button twice The recorder skips to the beginning of the previous file Notes When you skip to the beginning of ...

Page 51: ...quency Bit rate WAV format 44 1 kHz 48 kHz 88 2 kHz 96 kHz 16 bit or 24 bit MP3 format MPEG1 Layer3 32 kHz 44 1 kHz 48 kHz MPEG2 Layer3 16 kHz 22 05 kHz 24 kHz From 8 kbps up to 320 kbps Variable bit rate MP3 files in which conversion bit rates can vary may not be played back properly For WAV files this recorder can only play back those in the linear PCM format WAV files other than these cannot be...

Page 52: ...ark 1 Play the file containing the index mark you wish to erase 2 Press the 9 or 0 button to select the index mark to erase during playback 3 While the index number is displayed for approximately 2 seconds on the sub LCD press the ERASE button The index mark is erased Index numbers after the erased index number will be automatically decreased by 1 Notes During recording or playback the main LCD is...

Page 53: ...joy high definition movies on a large screen button OK button STOP 4 button 3 Press the or button to adjust to a comfortable listening volume The volume can be adjusted within a range from 00 to 30 4 Press the STOP 4 button at any point you want to stop playback L will appear on the sub LCD Notes Movies shot with a device other than the recorder or movie files imported from a PC may not play corre...

Page 54: ...he end of the file Continue pressing the 9 button to proceed with the cue from the beginning of the next file Forwarding Playing movies n Playing movies n While the recorder is during playback mode press the OK button Playback on the main LCD pauses will appear on the sub LCD Pause To resume playback Press the OK button again Playback will resume from the point where you last paused it ...

Page 55: ... the beginning of a file While the recorder is during playback mode press the 9 button The recorder skips to the beginning of the next file While the recorder is during playback mode press the 0 button The recorder skips to the beginning of the current file While the recorder is during playback mode press the 0 button twice The recorder skips to the beginning of the previous file Playing movies n ...

Page 56: ...es the HDMI micro connector on the recorder and the HDMI connector on the TV Depending on the TV s settings the displayed images and information may become cropped It is not possible to record sound and shoot movies while the recorder is connected via HDMI cable Do not connect the recorder to another HDMI output device Doing so may result in a malfunction When the recorder is connected to the comp...

Page 57: ...on again at the position where you want to end segment repeat playback The recorder continuously plays back the segment until the segment repeat playback is canceled Pressing any of the following buttons will release the segment repeat playback aPress the OK or STOP 4 button Pressing the OK or STOP 4 button will release segment repeat playback and stop playback bPress the 9 button Pressing the 9 b...

Page 58: ...32 3 Press the or button to select File Erase 2 While the recorder is during stop mode in the file list display press the ERASE button button OK button ERASE button 4 Press the OK button If an action is not selected within 8 seconds the recorder will return to stop mode 5 Press the button to select Start Erasing A n ...

Page 59: ...reassigned automatically Erasing all files in a folder All files in a folder can be erased simultaneously 1 Select the folder you want to erase P 32 button OK button ERASE button 2 While the recorder is during stop mode in the folder list display press the ERASE button If an action is not selected within 8 seconds the recorder will return to stop mode Erasing A n ...

Page 60: ... to select Erase in Folder 4 Press the OK button 5 Press the button to select Start 6 Press the OK button The display changes to Erase and erasing will start Erase Done is displayed when the folder is erased Erasing A n Erasing A n ...

Page 61: ... point and End point on the sub LCD flash alternatively The display will switch to Partial erasing and start the partial erase The deletion is completed when Partial erase completed is displayed Playback will stop at the end location of the partial erase If you do not press the ERASE button within 8 seconds the partial erase operation will be canceled and the recorder will return to stop mode Eras...

Page 62: ...and files set as read only cannot be erased P 76 If there is a file that cannot be recognized by the recorder that file will not be erased Please connect the recorder to your PC to erase The process may take some time Verify the battery level and avoid to run out of battery during the process by connecting the AC adapter beforehand While processing doing the following may cause data damage 1Discon...

Page 63: ...yback function procedure P 57 to trim a file 1 Press the ERASE button during segment repeat playback ÛTrimmingÝ will appear on the display 2 Press the button to select Start If an action is not selected within 8 seconds the recorder will return to stop mode button OK button ERASE button 3 Press the OK button Being trimmed will be displayed on the Main LCD and trimming will start When Out of the se...

Page 64: ...position may be offset by up to approximately 1 second Locked and read only files cannot be trimmed The process may take some time Verify the battery level and avoid to run out of battery during the process by connecting the AC adapter beforehand While processing doing the following may cause data damage 1Disconnecting the AC Adapter 2Removing the battery 3Removing the SD card To trim a voice file...

Page 65: ...he item you want to set 5 Press the OK or 9 button Moves to the setting of the selected item Items in menus are categorized by tabs so select a tab first and move to a desired item to quickly set it You can set each menu item as follows button OK button MENU button 2 Press the or button to move to the tab that contains the item you want to set You can change the menu display by moving the settings...

Page 66: ...ressing the 0 button without pressing the OK button will cancel the settings and return you to the previous screen 8 Press the MENU button to close the menu screen Note The recorder will stop if you leave it idle for 3 minutes during a menu setup operation when a selected item is not applied Menu setting method Menu setting method ...

Page 67: ... 96 kHz 24 bit to 44 1 kHz 16 bit When MP3 is selected 320 kbps or 256 kbps Notes When the recording format is set to the MP3 formats the sampling rate will be encoded and processed at 44 1 kHz When a high recording rate setting is used the file capacity will increase Make sure that the amount of memory remaining is sufficient before recording When the recorder is in movie mode the Rec Mode settin...

Page 68: ...er the recording level has been adjusted change the setting for microphone sensitivity P 67 and adjust the recording level again If too big sound is input the noise may occur even if Rec Level is set to Auto or Limiter ON The level can be adjusted from 00 to 30 The higher the number the higher the level and the larger the indicator position on the level meter Menu setting method Menu setting metho...

Page 69: ...he Beep setting is set to Off beep does not sound during self timer operation After the time set for the self timer elapses recording or shooting starts automatically P 77 Rec Monitor A n Select whether or not to output audio from the earphone jack while recording On Enables the recording monitor function Sound will be output from the EAR jack Off Disables this function Sound will not be output fr...

Page 70: ...xternal device Microphone Set this when connecting an external microphone Line Set this when connecting an external device to use the jack as a LINE IN Note When the Input Jack setting is set to Line the Low Cut Filter function is disabled P 68 V Sync Rec A See Voice sync recording V Sync Rec A P 80 Menu setting method Menu setting method ...

Page 71: ...is sufficient before recording It is recommended to set the resolution to 640 480 30fps and MP3 format when uploading to video sites During movie mode n the sound is recorded at the recording rate set in Image Quality The setting configured in Rec Mode under Rec Menu will not be reversed P 67 Main LCD Display n Set whether to turn on the main LCD during shooting depending on the location and envir...

Page 72: ...ded for shooting when the recorder is fixed in place on a tripod or other stable surface Note Images may not be stabilized if recorder shake is too severe Metering n The recorder is equipped with multi zone metering and spot metering Set the proper metering according to the scene to be shot Multi zone Metering Shoots to obtain a balanced brightness over the entire screen Meters the brightness at t...

Page 73: ...vity Normal The recorder automatically adjusts the sensitivity according to the shooting scene High ISO The recorder uses a higher sensitivity compared to Normal to minimize blur caused by a moving subject or by recorder shake Note If you set the sensitivity to High ISO the amount of image noise may increase depending on the shooting environment When Quick Operation is selected 1Point the lens at ...

Page 74: ...ile in the next folder When it comes to the end of the last file in the recorder End flashes for two seconds on the sub LCD and the recorder stops at the start of the first file in the recorder Equalizer A n If you change the equalizer setting you can enjoy the music with your favorite sound quality 1 Select the desired equalizer characteristics Off Disables the equalizer function ROCK POP JAZZ En...

Page 75: ... Set the skip space When Forward Skip is selected File Skip 10sec Skip 30sec Skip 1min Skip 5min Skip 10min Skip When Reverse Skip is selected File Skip 10sec Skip 30sec Skip 1min Skip 5min Skip 10min Skip Forward Reverse Skip Playback 1 Press the OK button to start playback 2 Press the 9 or 0 button The recorder will skip forward or reverse skip rewind a set space and start playing back Note If t...

Page 76: ...lace A n P 82 File Move Copy A n See Moving Copying files File Move Copy A n P 83 File Divide A n See Dividing files File Divide A n P 85 Property A n File and folder information can be confirmed from the menu screen When a file is selected Name Date Size File Length and File Format will appear on the display When a folder is selected Name and Date will appear on the display Note Select a file for...

Page 77: ...set it so the PEAK LED indicator light and recording shooting indicator light does not turn on On LED light will be set Off LED light will be canceled Note When the LED setting is set to Off the LED of the Self Timer function does not light Beep A n The recorder beeps to alert you to button operations or warn you of errors System sounds may be turned off On Enables the Beep function Off Disables t...

Page 78: ...ority for HDMI output However if this setting does not match the input setting of the TV the signal format is changed first to 720p and then to 480p 576p For details on changing the input setting of the TV refer to the TV s instruction manual When the recorder is connected to the computer by the USB cable do not connect the HDMI cable to the recorder The main LCD will be off when an HDMI cable is ...

Page 79: ... Fn setting Off USB Settings USB Connect PC USB Class Storage class HDMI 1080i Format A n See Formatting the recorder Format A n P 90 Memory Info A n The recordable capacity remaining and overall capacity of the recording media can be seen from the menu The recorder will use some capacity of the memory to keep the management file For SD card the remaining capacity will be shown less than the total...

Page 80: ...t detection time the recorder will stop the current operation create a new file and switch to standby mode Adjusting the voice sync level for recording 1 Press the REC s button and prepare to record If the Rec Level setting is set to Auto proceed to Step 4 If the Rec Level setting is set to Manual Check rec level flashes 2 Press the 9 or 0 button to adjust the recording level The level can be adju...

Page 81: ...y 6 Voice sync recording stops automatically If sound at a volume below the voice sync level continues for the specified time voice sync recording will end automatically and the recorder will return to the standby mode of Step 5 Every time the recorder enters standby mode the file will be closed and recording will continue in a different file To stop the recorder during voice sync recording press ...

Page 82: ...ace A n You can move a file in a folder to change the order of playback First select the folder file for which you want to change the playback order 1 Select the folder for which you would like to rearrange the file order P 32 2 Select Replace from the menu on the File Menu For details on how to enter the menu settings see Menu setting method P 65 3 Press the or button to select the file you want ...

Page 83: ...ove Copy from the menu on the File Menu For details on how to enter the menu settings see Menu setting method P 65 3 Press the or button to select the position to move or copy the file to button OK button MENU button 4 Press the OK button 5 Press the or button to select the folder you want to move or copy the file to 6 Press the OK button File move or file copy will start if Moving or Copying appe...

Page 84: ...ill exceed 9999 Do not remove the battery during moving or copying This may damage the data A file cannot be moved or copied to the same folder Files which are locked will remain so even after they are moved or copied P 76 Files cannot be moved or copied directly under the Root folder In movie mode n files can be moved or copied to the Movie and Edit folders directly under the DCIM folder In voice...

Page 85: ...yback mode press and hold the 9 or 0 button to fast forward or rewind It is useful to set index marks on marking in advance at the divide position P 52 2 Select File Divide from the menu on the File Menu For details on how to enter the menu settings see Menu setting method P 65 3 Press the or button to select Start 5 Press the MENU button to complete the setting 4 Press the OK button Dividing will...

Page 86: ...ile will be named as File name_2 MP3 After a file is divided a new file number is assigned to each of the movie files and then the files are saved to the Edit folder under the DCIM folder The original file is deleted automatically If a file has an extremely short recording time it may not be divided even if it is a PCM file Do not remove the battery and SD card while dividing a file This may damag...

Page 87: ...own custom equalizer settings Property File and folder information can be confirmed from the menu screen Light On Off By pressing the Fn button you can turn the backlight of the sub LCD on or off Image Quality The image quality resolution and recording rate can be configured Magic Movie On ROCK POP PIN HOLE SKETCH WATERCOLOR Off White Balance Auto Sunny Cloudy Fluorescent Incandescent Quick Operat...

Page 88: ...nu on the Device Menu For details on how to enter the menu settings see Menu setting method P 65 2 Press the or button to select USB Connect or USB Class button OK button MENU button When USB Connect is selected 4 Press the or button to change the setting PC Setting for when the recorder is connected to the PC and used as a storage device or composite device Connected as storage or composite AC Ad...

Page 89: ... connect the recorder to your PC as an external storage device the driver for the recorder will be automatically installed in your PC The PC cannot recognize when the recorder is connected to the PC when setting for the USB Connect is set to AC Adapter When the recorder is not recognized by the PC as an external storage device change the USB Class setting to Storage class When PC Camera is set the...

Page 90: ...for two seconds Start and Cancel will turn on If you format the recorder all files will be removed and all function settings will return to defaults except date and time settings Transfer any important files to a computer before formatting the recorder button OK button Format Done appears when formatting ends 4 Press the button again to select Start 5 Press the OK button Formatting begins and Form...

Page 91: ...out of battery during the process by connecting the AC adapter beforehand While processing doing the following may cause data damage 1Disconnecting the AC Adapter 2Removing the battery 3Removing the SD card Formatting on the recorder will be Quick Format If you format the SD card information of file management is refreshed and the data inside the SD card is not deleted completely When handing over...

Page 92: ...e covered under the operational warranty The recorder may not operate properly depending on your PC environment Olympus Sonority optional does not support movie files Operating System Microsoft Windows XP Service Pack 2 3 Microsoft Windows XP Professional x64 Edition Service Pack 2 Microsoft Windows Vista Service Pack 1 2 32bit 64bit Microsoft Windows 7 32bit 64bit CPU 32 bits x86 of 1GHz or above...

Page 93: ...e description in P 95 If the USB cable is removed before the drive is stopped data may not be successfully transferred On a PC do not format the drive of the recorder Initialization is not successfully achieved on a PC For initialization follow the instructions in the Format display of the recorder P 90 Folder directory names displayed by file management tools such as Explorer in Microsoft Windows...

Page 94: ...ng an SD card will allow you to use it as Removable Disk Macintosh When you connect the recorder to Mac OS it will be recognized by the drive name of the product name on the desktop If an SD card is inserted NO NAME will be displayed Notes Before connecting the USB cable exit HOLD mode Refer to the user s manual for your PC regarding the USB port on your PC Be sure to push the cable connector all ...

Page 95: ...remove hardware window appears close the window 2 Confirm that the recorder PEAK LED indicator light is gone before disconnecting the USB cable Macintosh 1 Drag and drop the drive icon for this recorder displayed on the desktop to the Recycle Bin icon Note NEVER disconnect the USB cable while the PEAK LED indicator light is flashing If you do the data will be destroyed 2 Confirm that the recorder ...

Page 96: ...e PC P 95 4 Drive names and folder names when a PC is connected SD card Notes While transmitting data Busy is displayed and the PEAK LED indicator light flashes NEVER disconnect the USB cable while the PEAK LED indicator light is flashing If you do the data will be destroyed In a Windows standard environment 24 bit wav format files cannot be played Use Quick Time or Olympus Sonority Optional for p...

Page 97: ...k Time The control screen of Quick Time Player is visualized 3 Select Open File from the File menu The Open A File dialog box appears 4 At the dialog screen set the File location File type and File name for the file you want to play When selecting a voice file recorded with the recorder set File type to Audio Files Select a file and then click Open 5 Play the voice file Click the button in the con...

Page 98: ...he Open A File dialog box appears 4 At the dialog screen set the File location File type and File name for the file you want to play When selecting a movie file shot with the recorder set File type into Movies Select a file and then click Open 5 Play the movie file Click the button in the controls of Quick Time Player to start playback 4 3 Using Quick Time Using Quick Time 5 ...

Page 99: ... distributed Just audio cannot be distributed When you use the recorder as a PC camera the camera can shoot 30 frames per second but the actual number of frames may be inferior depending on the connection and or the PC processing speed When the recorder is used as PC camera resolution size will be set to 640x480 30fps and the sound to PCM format 16kHz When the recorder is used as PC camera Rec Mon...

Page 100: ...y Erase unnecessary files P 58 No File No file No files were found in the folder Select another folder P 32 Format Error Formatting error There was an error while formatting the recorder s memory Reformat the memory P 90 Can t make the system file Connect to PC and delete unnecessary file The management file cannot be created The file for management cannot be created due to a shortage of capacity ...

Page 101: ...cording and shooting are not possible because the circuit temperature has risen Please wait until the circuit temperature has become lower Sound rec stopped Recording is not possible Recording was stopped because the circuit temperature has risen Please wait until the circuit temperature has become lower Movie rec stopped Shooting is not possible Shooting was stopped because the circuit temperatur...

Page 102: ...nnected Detach all external microphones and external devices connected to the MIC jack P 40 Unable to record through an external microphone An external microphone supported by plug in power is connected but Plug in Power is set to Off Set Plug inPower to On when an external microphone supported by plug in power is connected P 69 Input Jack is set to Line Set Input Jack to Microphone P 70 No playba...

Page 103: ...ophone do not correspond to those of the recorder When a microphone not supported by the plug in power function is connected turn the Plug inPower setting to Off P 69 Unable to hear any sound from the earphone through the recording monitor Rec Monitor is set to Off Set Rec Monitor to On P 69 Unable to erase the file The file is locked Unlock the file P 76 The file is read only Unlock the file or c...

Page 104: ...ing of the file on the PC The file is MP3 format An index cannot be set for files in MP3 format Cannot recharge Contains battery other than the specified battery Please insert the chargeable battery provided The recorder has become hot The back of the recorder could become hot when shooting movies This is not a malfunction If the recorder becomes abnormally hot please contact the Olympus Customer ...

Page 105: ...thium ion rechargeable battery is manufactured by Olympus It is best paired with the LI 41C battery charger s Connecting cord KA333 Connecting cord which has stereo mini plugs ø3 5 with resistance at both ends Use to connect from the earphone jack output of the recorder to the microphone input jack when recording Converting plug adapters PA331 PA231 which convert to the monaural mini plug ø3 5 or ...

Page 106: ...44 1 kHz 4 Maximum headphone output â 150 mV according to EN 50332 2 4 Speaker Built in ø 16 mm round dynamic speaker 4 MIC jack Input Jack Microphone ø 3 5 mm mini jack impedance 2 2 kΩ Input Jack Line ø 3 5 mm mini jack impedance 39 kΩ 4 EAR jack ø 3 5 mm mini jack impedance 16 Ω or more 4 Connector USB connector HDMI micro connector type D 4 Maximum working output 270 mW 8 Ω speaker 4 Input pow...

Page 107: ... 320 kbps 44 1 kHz 4h 4h 30min 4h 35min 256 kbps 44 1 kHz 4h 4h 30min 4h 35min Movie mode Built in stereo microphone During shooting mode Built in speakers During playback mode Earphone Playback 1920 1080 30fps Linear PCM format 96 kHz 24 bit 1h 5min 2h 2h 88 2 kHz 24 bit 1h 5min 2h 2h 48 kHz 16 bit 1h 5min 2h 2h 44 1 kHz 16 bit 1h 5min 2h 2h 1280 720 30fps Linear PCM format 96 kHz 24 bit 1h 10min...

Page 108: ...n 105h 216h 256 kbps 44 1 kHz 8h 30min 16h 32h 67h 131h 270h Notes Available recording time may be shorter if many short recordings are made The displayed available recording time and recorded time are approximate indications Variations in the available recording time will arise as there may be differences in the available memory depending on the SD card Guide to shooting times The following value...

Page 109: ...ootings are made The displayed available shooting time and recorded time are approximate indications Variations in the available shooting time will arise as there may be differences in the available memory depending on the SD card Maximum recording time per file The maximum size of a single file is limited to approx 4 GB for MP3 format and approx 2 GB for PCM format Regardless of the memory remain...

Page 110: ...ound recording time per file is restricted to the following value 1920 1080 30fps 96 kHz 24 bit approx 30 min 88 2 kHz 24 bit approx 30 min 48 kHz 16 bit approx 35 min 44 1 kHz 16 bit approx 35 min 1280 720 30fps 96 kHz 24 bit approx 45 min 88 2 kHz 24 bit approx 45 min 48 kHz 16 bit approx 1 h 44 1 kHz 16 bit approx 1 h 640 480 30fps 320 kbps 44 1 kHz approx 2 h 256 kbps 44 1 kHz approx 2 h Speci...

Page 111: ... Technical assistance and support CE mark indicates that this product complies with the European requirements for safety health environment and customer protection For customers in Europe This symbol crossed out wheeled bin WEEE Annex IV indicates separate collection of waste electrical and electronic equipment in the EU countries Please do not throw the equipment into the domestic refuse Please u...

Page 112: ...kway P O Box 610 Center Valley PA 18034 0610 U S A Tel 1 888 553 4448 http www olympusamerica com OLYMPUS EUROPA HOLDING GMBH Premises Goods delivery Wendenstrasse 14 18 20097 Hamburg Germany Tel 49 0 40 237730 Letters Postfach 10 49 08 20034 Hamburg Germany http www olympus europa com OLYMPUS IMAGING AUSTRALIA PTY LTD 82 Waterloo Rd North Ryde NSW 2113 Australia TEL 61 2 9886 3999 http www olympu...

Reviews: