background image

32

2

Erasing

Erasing

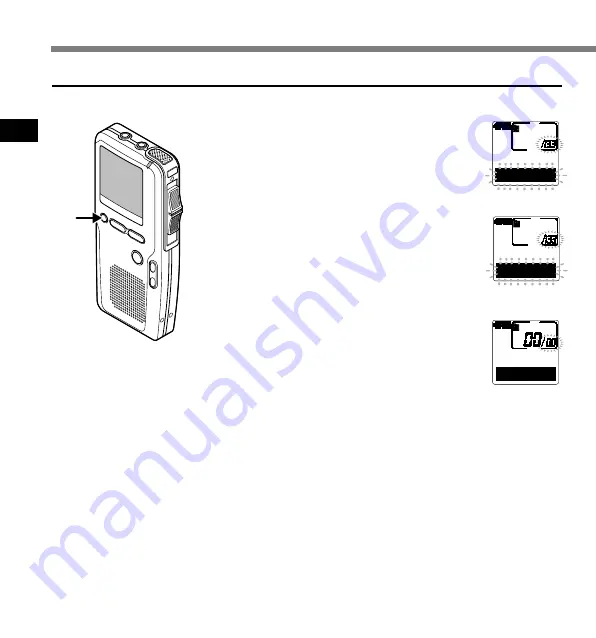
Erasing All Files in a Folder

All files in a folder can be erased simultaneously, except for locked files (

 P.37).

1

Select any file in the folder, then
press and hold the 

ERASE

 button for

3 seconds or longer.

“ALL ERASE ?” flashes on the display for
approximately 8 seconds.

2

Press the 

ERASE

 button once more

while “ALL ERASE ?” is flashing.

The display changes to “ALL ERASE !” and
erasing will start.

“ERASE DONE” is displayed when the files
are erased. Any locked files in the folder will
be reassigned new file numbers in ascending
order.

FOLDER   A

 ALL ERASE ?

FOLDER   A

 ALL ERASE !

FOLDER   A

ERASE   DONE

{

.........................................................................................................

Notes

• If the ERASE button is not pressed within the 8 seconds after “ALL

ERASE ?” starts flashing, the recorder will revert to the stop status.

• The erasing process may take up to 10 seconds. Do not interrupt this

process! Data will be destroyed.

1,2

Summary of Contents for DS-4000

Page 1: ... instructions for information about using the product correctly and safely Keep the instructions handy for future reference To ensure successful recordings we recommend that you test the record function and volume before use ONLINE INSTRUCTIONS EN DIGITALVOICE RECORDER DS 4000 ...

Page 2: ...ting and Ejecting a Card 21 2 Basic operations Recording 23 Using the Variable Control Voice Actuator VCVA 27 Hands free Recording 28 Recording Monitor 28 Playing 29 Erasing 31 3 Other functions Menu List 35 Learning to Use the Menu 36 Locking Files LOCK 37 Index Marks 38 LCD Display Information 39 Setting Priority Levels 42 Setting Job Data 43 Setting Option Item 45 Formatting the Card FORMAT 46 ...

Page 3: ...le Comments 64 Using Voice Recognition Software Optional 65 USB Microphone USB Speaker USB AUDIO 69 Sending Dictation Files Receiving Document Files 70 Setting E mail FTP Service 75 5 Using the Recorder as a Reader Writer Using the Recorder as a Reader Writer 82 6 Other Information Alarm Message List 83 1 2 3 4 5 6 7 Troubleshooting 84 Accessories Optional 85 Specifications 86 Technical Assistance...

Page 4: ...d this manual carefully to ensure that you know how to operate it safely and correctly Keep this manual in an easily accessible location for future reference Important Safety Precautions Certain symbols are used in the user s manual and on this product to help protect users their surroundings and their property from possible injury or damage Please familiarize yourself with the following definitio...

Page 5: ... unit malfunction or during repair work It is recommended to back up and save important content to other media such as a computer hard disk Batteries Rechargeable Battery Pack BR402 Danger Do not solder lead wires or terminals directly onto a battery or modify it Do not connect the and terminals together This may cause fire overheating or electric shock When carrying or storing the battery BR402 b...

Page 6: ...ries to water Do not allow water to contact the terminals Do not remove or damage the battery insulating sheet Do not use the batteries if you find something wrong with them such as leakage color change or deformity Unplug the charger if the charging is still incomplete after the specified time it should take Should any battery liquid get on skin or clothing promptly wash it off with clean water K...

Page 7: ...ing unusual when using the AC adapter such as abnormal noise heat smoke or a burning odor Do not insert metal wires or similar objects This may cause fire overheating or electric shock Keep out of the reach of children Do not let children use this product without adult supervision Caution Do not charge continuously for more than 3 hours This may cause explosion fire leakage or overheating of batte...

Page 8: ...of the exposed parts 2 immediately disconnect the power supply plug from the power outlet and 3 call your dealer or local Olympus representative for servicing Continued use of the AC adapter under these circumstances could result in electric shock fire or injury If something appears to be wrong with the charger unplug the charger from the outlet and consult your nearest service center Using the ch...

Page 9: ...e docking station for recharging of Ni MH Rechargeable Battery Pack BR402 P 13 1 and for downloading data from the recorder to a PC P 58 Two Programmable buttons A and B P 18 Recording and storing voice in DSS format Two recording modes SP Standard Playback mode or LP Long Playback mode P 35 Five folders and up to 199 files folder for a maximum of 995 recordings P 23 Built in Variable Control Voic...

Page 10: ...ording time may be shorter if many short recordings are made 2 Total recording time of two files The maximum recording time per file is 99 hours xD Picture Card Notes When initializing formatting a card confirm that no necessary data is stored on the card beforehand Initialization completely erases the existing data on the card Cards used in a recorder must be formatted in the same recorder first ...

Page 11: ...ton 8 Built in speaker 9 MENU button 0 B button Programmable A button Programmable ERASE button Display LCD panel Record Play indicator lamp POWER ON OFF switch VOLUME button VOLUME button Card cover lock Card cover Battery cover PC USB terminal Cradle attachment point Identification of Parts Identification of Parts 1 2 3 4 5 6 7 8 9 0 ...

Page 12: ... number of recorded files in the folder 6 Erase lock indicator 7 Character Information display 8 Microphone sensitivity display 9 VCVA Variable Control Voice Actuator indicator 0 Record mode indicator Display LCD Panel Identification of Parts 1 2 3 4 5 6 7 0 9 8 Identification of Parts ...

Page 13: ...y charge the batteries as soon as possible When the battery is too weak the recorder shuts down and BATTERY LOW appears on the display Notes Removing the battery pack while the recorder is in use may corrupt the file If you are recording into a file and the battery run out you will lose your currently recorded file since the file header will not be written It is crucial to charge the batteries onc...

Page 14: ...recorder before replacing the batteries Removing the batteries while the recorder is in use may corrupt the card If you are recording into a file and the batteries run out you will lose your currently recorded file since the file header will not be written It is crucial to replace the batteries when one hash mark in shown in the battery icon Be sure to replace both batteries at the same time Never...

Page 15: ... If you charge the battery right after charging is complete it will take only few minutes to charge the battery The PC must be ON when charging battery via the USB cable connection Charging battery via the USB cable connection may not be successful depending on the power supply capacity of your PC Use the AC adapter instead If you change the recorder to AUDIO device while charging battery only via...

Page 16: ...se dead batteries always observe the laws and regulations regarding the disposing of such items If Ni MH rechargeable batteries are not fully discharged protect against short circuiting e g by taping the contacts before disposing For customers in Germany Olympus has a contract with the GRS Joint Battery Disposal Association in Germany to ensure environmentally friendly disposal Discharging Batteri...

Page 17: ...h on the back of the recorder is in the OFF position none of the buttons or switch on the recorder will be active Slide the power switch to the ON position to activate the recorder PowerSaveMode When the recorder is ON but not in use for 10 minutes by default it will switch to power save mode automatically To reactivate the recorder again press any of the buttons on the recorder POWER ON OFF ...

Page 18: ...rammable button Dealer Option Items Some additional options can be set by your Olympus Professional Dealer For details on the functions and operation of dealer optional items consult your Olympus dealer Setting for beep sound Setting for NEW button operation Setting for REC button operation Setting for Splash screen Adding removing of user defined fields Switching the display languages Changing th...

Page 19: ...our 1 Press the FF button or REW button to set the hour 2 Press the MENU button to accept the hour You can choose between 12 and 24 hour display by pressing the A button while setting the hour and minute Example 5 45 P M 5 45 PM 17 45 Initial setting 2Set the minute 1 Press the FF button or REW button to set the minute 2 PresstheMENUbuttontoaccepttheminute 3Set the year 1 Press the FF button or RE...

Page 20: ...n STOP mode the recorder will save the items that were set to that point You can set the time and date from your PC using DSS Player software P 48 1Press the MENU button The menu appears P 35 2Press the FF or REW button until TIME DATE flashes on the display 3Press the MENU button Time Date screen appears The hour indicator flashes indicating the start of the Time Date setup process Follow the sam...

Page 21: ...If the card is not inserted all the way data may not be written to the card 3Close the card cover securely Card inserted fully into the slot The recorder sounds beeps and the message PLEASE WAIT on the display flashes for seconds Card not inserted fully into the slot When the card cover is closed the message INSERT CARD on the display flashes for a few seconds Pressing any button will sound beeps ...

Page 22: ...y The power is switched off automatically 2Push the card inward to unlock it and let it eject partially The card is visibly out of the slot and can be removed safely 3Hold the card straight and pull it out Note Releasing your finger quickly after pushing the card inward may cause it to eject forcefully out of the slot Inserting and Ejecting a Card Inserting and Ejecting a Card ...

Page 23: ...d Appends the recording to the end of the current file Insert Inserts the recording at the current position in the file Overwrite Overwrites the recording starting at the current position in the file 1Press the NEW button to create a new file a Current recording mode b New file number c Selected Author ID 2Move the slide switch to the REC position to start recording The record play indicator lamp ...

Page 24: ...rther P 31 or transfer dictation files to your computer using DSS Player Software P 55 You cannot select a different recording mode SP or LP than that of the original file when appending recording Move the slide switch to the REV position while recording then move the slide switch to the PLAY position when you want to start playback The recorder plays up to the end of file then stops You can overw...

Page 25: ...icator lamp glows red 3Move the slide switch to the STOP position to stop overwriting Overwrite Recording You can overwrite a previously recorded file from any point within the file Note that the overwritten recordings will be erased 14M00S AUTHOR A 10M25S Note You cannot select a different recording mode SP LP than that of the original file before overwrite recording 1 2 3 Recording ...

Page 26: ...ion to stop inserting the additional recording Insert Recording Additional recording can be inserted into previously recorded file Notes If you place the slide switch in the STOP position for more than two seconds while moving the slide switch from the PLAY position to the REC position the Insert recording will be canceled The recording time and date of the file is updated to the time and date of ...

Page 27: ...y and STANDBY flashes on the display The record play indicator lamp glows when recording starts and flashes when recording pauses Adjust the Start StopActuation Level Press the FF or REW button to adjust the actuation level during recording TheVCVAlevelcanbesettoanyof15differentvalues Thehigherthevalueis themoresensitivetherecorder can react to sounds At the highest value even the faintest sound w...

Page 28: ...itch RS25 26 is sold separately Move the slide switch of the recorder to the STOP position before connecting it to the cradle for hands free recording It is possible to monitor your recording by listening to the recording while recording is in progress Insert the earphone plug into the earphone jack and use the VOLUME button to control the volume level Recording Monitor Default settings VOLUME but...

Page 29: ...nt playback time b Total recording time of the file being played 2Press the VOLUME or VOLUME button to adjust the volume The display shows the volume level You can choose between 0 to 30 3Move the slide switch to the STOP position at any point you want to stop the playback You can start playing a file at any point FOLDER A 00M05S LENGTH 27M58S a b 2 1 3 ...

Page 30: ...to the beginning of the previous file Playback functions Fast Forward FF Rewind REW Cue CUE Review REV Operation Press the FF button once while stopped Press the REW button once while stopped Hold the FF button while stopped or playing a file Hold the REW button while stopped or playing a file Move the slide switch to the REV position How to Cancel Move the slide switch to a position other than th...

Page 31: ...DONE is displayed when the file is erased File numbers will be reassigned automatically FOLDER A F I LE ERASE FOLDER A F I LE ERASE FOLDER A ERASE DONE Notes If the ERASE button is not pressed within the 8 seconds after FILE ERASE starts flashing the recorder will revert to the stop status An erased file cannot be restored Locked files cannot be erased P 37 Erasing a File Erasing or deleting a fil...

Page 32: ... while ALL ERASE is flashing The display changes to ALL ERASE and erasing will start ERASE DONE is displayed when the files are erased Any locked files in the folder will be reassigned new file numbers in ascending order FOLDER A ALL ERASE FOLDER A ALL ERASE FOLDER A ERASE DONE Notes If the ERASE button is not pressed within the 8 seconds after ALL ERASE starts flashing the recorder will revert to...

Page 33: ...ally 2Press the ERASE button at the point to start erasing While playback continues PARTIAL ERASE and the file length will alternate on the display AUTHOR A 5M01S START ERASE AUTHOR A 45M32S END ERASE 3Press the ERASE button at the point to end erasing The erase starting point time set in step 2 and the ending point time set in this step will alternate on the display for 8 seconds 1 2 3 ...

Page 34: ...he stop status An erased file cannot be restored Locked files cannot be partially erased P 37 Erasing 4Press the ERASE button to confirm erase The display changes to PARTIAL ERASE and erasing will start When ERASE DONE appears on the display partial erase is complete AUTHOR A 5M01S ERASE DONE Erasing 4 AUTHOR A 5M01S PART I AL ERASE ...

Page 35: ...er software P 48 Time Date setting Hour minute year month and day P 19 Recorder formatting P 46 LCD contrast adjustment Select the level from 1 to 12 System sounds setting Select ON enabled or OFF disabled Backlight setting Select ON enabled or OFF disabled Press the MENU button Press the FF button or REW button Menu List VCVA setting P 27 Select ON enabled or OFF disabled Microphone sensitivity s...

Page 36: ...u appears P 35 2Press the FF or REW button to highlight a menu item you want to modify change 3Press the MENU button to select that menu item The possible options for the menu item will be in view 4Press the FF or REW button to highlight an option or setting 5Press the MENU button The highlighted option will be selected and the new setting saved 6Press and hold the MENU button for 1 second or long...

Page 37: ... in SUB MENU flashes on the display 3Press the MENU button The file locking setup process begins 4Press the FF or REW button to choose between ON and OFF ON Locks the file and prevents it from being edited or erased OFF Unlocks the file and allows it to be edited or erased a Erase lock indicator Notes You cannot append overwrite or insert recordings into locked files P 25 26 You cannot set index m...

Page 38: ...ay Locating an Index Mark 2Hold the FF or REW button while playing a file The recorder stops for 1 second when it reaches the index mark Clearing an Index Mark 3Locate the index mark you want to clear 4PresstheERASE buttonwhiletheindex number appears for approximately 2 seconds on the display The index mark is erased Notes Up to 16 index marks can be set in a file Attempting to set more index mark...

Page 39: ...HOR A 00M00S REMAIN 1H50M12S AUTHOR A TIME DATE 3M16D2004Y 12 00AM 1 File length Shows how long a file is 2 Time stamp Shows the year month and date that the file was recorded 3 Time stamp Shows the time that the file was recorded 7 Current time and date Shows the current time and date During the playback operation the TIME DATE or the counter appears 5 Memory remaining Shows the remaining recordi...

Page 40: ...25M01S 2H33M25S 2 Remaining memory bars Displays the remaining time available for recording in bar mode and countdown mode While Recording in VCVAMode Display 1 and 2 will alternate 1 VCVA recording level meter Displays the sound input level graphically and the remaining time available for recording in countdown mode STANDBY appears if the VCVA actuation level isn t reached 2 Remaining memory bars...

Page 41: ...C AUTHOR A 1H25M01S I NSERT REC E F 2 Remaining memory bars Displays the remaining time available for recording in bar mode and the current time and length of the file While in Insert Record Mode Display 1 and 2 will alternate 1 Recording level meter Displays flashing INSERT REC the sound input level graphically and the current recording time 2 Remaining memory bars Displays flashing INSERT REC th...

Page 42: ...and NORMAL To Set a Priority Level on an Existing File AUTHOR A LENGTH 00M00S 27M58S Setting Priority Levels 1Press the NEW button A new file is created 2Press the PRIORITY button to choose between HIGH and NORMAL To Set a Priority on a New File AUTHOR A NEW F I LE REMA I N 2H33M12S Note Priority level cannot be changed on a locked filed P 37 AUTHOR A 00M00S LENGTH 27M58S AUTHOR A NEW F I LE REMA ...

Page 43: ...rder By default the Author ID is set to DS4000 1Turn ON the recorder When more than one Author ID exist on the recorder the ID list will be displayed 2Press the FF or REW button to select the Author ID that you want to assign to the recorder from the ID list 3Press the MENU button to set the ID All recordings made by the author during the session will include the set ID as part of the header infor...

Page 44: ...2Press the FF or REW button to highlight a Work Type from the Work Type ID list 3Press the MENU button to select the Work Type All recordings made with the new Work Type ID will have the new WorkType as part of the header information Type List Type 1 Type 2 Type 3 Type 10 WORKTYPE A WORKTYPE B WORKTYPE C WORKTYPE D Setting Job Data Setting Job Data 3 1 2 ...

Page 45: ...aracter Press and hold the MENU button Finish entering ID Press the ERASE button Erase the characters being entered If multiple Option Items are programmed into the recorder each Option Item ID is entered in the same way described above When entering the final ID is done the recorder switches to NEW mode Notes Each Option Item ID field can accept up to 20 characters maximum If more than one Work T...

Page 46: ...utton to confirm START selection DATA WILL BE CLEARED appears for approximately 2 seconds Cards that have been used on non Olympus devices or cards that are not recognized by the recorder must be formatted before they can be used with the recorder The Olympus xD Picture Card included with the recorder is preformatted and ready for use To familiarize yourself with the formatting process read the st...

Page 47: ...depending on the capacity of cards For example formatting may take about 1 minute for 512 MB card Do not interrupt the formatting process by opening the card cover or the battery cover Doing so will damage the data or card When the recorder is formatted all the stored data including locked files are erased If an unformatted card is inserted the recorder automatically displays the format option in ...

Page 48: ...r Minimum Requirement The DSS Player is a fully featured software tool that provides a simple to use but sophisticated method of managing your recordings Some of the features of the DSS Player are Automatic download and backup of recordings from the recorder to a PC Automatic distribution of recordings by e mail or FTP to transcriptionists or other users Automatic retrieval of typed documents via ...

Page 49: ... recognition function with the recorder use Windows 98SE or later versions of the OS P 65 66 Macintosh version does not support voice recognition software Power Mac G3 233 MHz class processor or faster iMac iBook eMac Power Mac PowerBook The computer must support a standard USB port Mac OS 9 0 9 2 2 10 1 10 3 64 MB or more 128 MB or more is recommended 50 MB or more 2x or faster CD ROM CD R CD RW ...

Page 50: ...g to the instructions on the screen Windows Before you connect your recorder to your PC you must first install the DSS Player software Make sure to exit all running applications eject the floppy disk if you are using one and logon as administrator if you are running Windows 2000 XP Professional only or Mac OS X on the network Macintosh 1Insert Olympus DSS Player CD into the CD ROM drive 2Double cl...

Page 51: ...location OS X Macintosh HD User Library Preferences OS 9 x Macintosh HD System Folder Preferences 3Delete the Executable file Delete the DSS Player for Mac file in the location where you installed the file For OS X users uninstalling has been completed For OS 9 x users proceed to step 4 4Delete the Driver file Delete the following files in the following location System folder Function Enhancement ...

Page 52: ...Help menu Contents While DSS Player is running press F1 on the keyboard While DSS Player is running select DSS Player for Mac Help from the Help menu Windows Macintosh Using Online Help For information on the DSS Player usage and features refer to the online Help To start online Help Note Online Help is available after the DSS Player is installed ...

Page 53: ...ng a USB hub to connect the recorder always use a self powered AC adapter USB hub Make sure to push the cable connector all the way in Otherwise the recorder may not operate properly Once you connect the recorder to your PC the recorder will be powered through the USB cable The batteries and or AC adapter will not be in use Be sure to install the DSS Player software before connecting the recorder ...

Page 54: ... PC Using the Cradle Connecting Recorder to PC Disconnecting Recorder from PC Never touch the contact points at the bottom of the cradle as that may cause bad connection With a PC connected the recorder cannot be operated with the foot switch RS25 26 When connecting the recorder to a PC via the cradle remove the foot switch To avoid data corruption or loss make sure that the recorder s record play...

Page 55: ... application 2Click DSS Player Pro The check mark on DSS Player Pro disappears Manual start 1Start Windows 2Click the start button then select All Programs All program menu will be displayed 3Select OlympusDSSPlayerPro thenclick Dictation Module Note If you connect the recorder before installing DSS Player the Add New Hardware Wizard dialog box will open If this happens click Cancel to exit the wi...

Page 56: ...uctions see Connecting to Your PC Using the USB Cable P 53 3Double click the DSS Player for Mac folder The DSS Player for Mac folder opens 4Double click DSS Player DSS Player for Mac launches 3 4 Running DSS Player Note DSS Player for Mac does not have the automatic start function Running DSS Player ...

Page 57: ...of the DSS WAVE Windows only and AIFF Macintosh only format files stored on your PC s hard disk 3 Device Tree View Displays the directory structure of the folders in the recorder 4 Dictation List View Displays the dictation files in the folder selected in 2 and 3 Main screen is displayed when DSS Player is started 1 4 2 3 1 4 2 3 Window Names Macintosh Windows ...

Page 58: ...d Files For explanations of Download Folders and Download All refer to Online Help Download Selected Files 1Select the folder From the Device Tree View select the folder that contains the dictation file you would like to download The illustration shows that Folder A is selected 2Select the dictation file Select the dictation file you would like to download from the Dictation List View To select mo...

Page 59: ...he size of the dictation file and your PC it may take some time to download the files The downloaded files will be stored in the download tray folder that corresponds to the folder in the recorder Example A dictation file downloaded from Folder A will be stored in download tray A on your PC If a dictation file already exists on your PC with the same name date and time recorded the new file will no...

Page 60: ...hor ID The ID that has been set on the recorder The default ID is DS4000 The Author ID can be modified with DSS Player P 63 1 3 2 File Name Format File names are assigned in the following manner Other playback control bar such as Rewind Fast Forward Stop Speed Control Volume Control Time Axis and Index Skip are also available on the Playback Control Bar The DSS Player can playback voice through th...

Page 61: ...er on the recorder When the folder list box appears select the folder then click the OK button 2 1 Uploading from PC to Recorder Uploading from PC to Recorder 4Upload complete Once the transmission screen closes and the record play indicator lamp on the recorder is NOT upload is completed As a shortcut you can drag and drop files from the Dictation List View to the recorder s folders displayed in ...

Page 62: ... back to storage class device displayed as a removable drive You cannot edit WAV files For DSS Player for Mac the editing functions are partially limited The maximum recording time per file is 99 hours Direct Recording Editing on PC Mac Windows Macintosh Editing existing files 1From the DSS Player main window select the file you want to edit from the Dictation List View 2Click the File menu then s...

Page 63: ...t Create Send Job Data The Create Send Job Data window appears Enter your user ID in the field indicated by the arrow 2Click the Transfer button The new user ID will be transferred to the recorder Note NEVER remove the card or disconnect the USB cable while the record play indicator lamp is flashing If you do the data on the card will get destroyed 1 2 Changing User ID Author ID Windows Macintosh ...

Page 64: ...your DSS Player to create edit comments then transfer them from the PC to the recorder You can also edit file comments imported from the recorder to a PC Click the Tools menu then select Edit Comment File comments can use up to 100 alphanumerical characters and symbols Editing File Comments Note NEVER remove the card or disconnect the USB cable while the record play indicator lamp is flashing If y...

Page 65: ...t is recommended that you train your voice recognition software first to learn the characteristics of the speaker s voice and the recorder s built in microphone for maximum accuracy Using Voice Recognition Software Optional Audio set up 4From the IBM ViaVoice VoiceCenter select ViaVoice Tool then Analyze My Voice The ViaVoice User Wizard window appears 5Fromthe Device listbox select Olympus DSS Fi...

Page 66: ...h the AUDIO Setup according to the instruction on screen During audio setup enrollment please input voice data from the recorder Notes Windows 98SE or later OS is required when using voice recognition function with the recorder DSS Player for Mac is not compatible with IBM ViaVoice on Macintosh It is recommended that you enroll while in your normal surrounding environment settings This will help i...

Page 67: ...Click the icon The voice recognition software window appears and voice recognition starts Noise Canceling Function Check Use Noise Cancel in the Voice Recognition menu to output voice using the noise canceling function to the voice recognition software Check the voice recognition software operating manual for voice recognition functions such as modifying converted characters The DSS Player provide...

Page 68: ...quiet environment Have the recorder microphone 3 to 4 inches away from your chin Speak normally It is recommended to use the noise cancellation microphone ME12 when recording Dictation files recorded under the following conditions cannot be processed by voice recognition because their recognition accuracy rates will be very low A conference or meeting where many voices are recorded Seminar or lect...

Page 69: ...the recorder does not function as Storage device and it is not displayed as a removable drive USB Microphone USB Speaker USB AUDIO The recorder can be used as a USB speaker or microphone when connected to a PC If you use the recorder as a USB speaker you can output voice through the recorder instead of using the PC speaker When used as a microphone you can record voice on your PC using you favorit...

Page 70: ...he E mail FTP service in P 75 81 Setting the Auto Sending Function To send downloaded dictation files automatically follow these steps to set the auto sending function This function can be individually set for the folders in the Dictation Tree View 1From the Tools menu select Options then click the Send tab in the Option dialog box 2Check Enable auto sending function 3Select a folder to set the au...

Page 71: ...heAddress Book Setting the FTP destination 1Click the FTP button The FTP destination dialog box appears 2Click the To button The FTP Profiles dialog box appears 3Select a profile from the list One profile can be selected Click the OK button to finish If the correct profile does not exist select the E mail FTP tab in the Option dialog box and add the profile file for the FTP connection Setting the ...

Page 72: ...e setting is not configured configure the setting in reference to P 75 4Register the format of a document file to receive When using E mail to receive a document file the recorder receives the attached file if it is in the registered file format When using FTP to receive a document file the recorder receives the attached file stored in the folder ofdestinationserverifitisintheregisteredfileformat ...

Page 73: ...ceiving Document Files Manually Windows According to the profile set the application establishes a connection to the server and receives document files The received document files are saved to the Documents folder in the Dictation Tree View Clicking the Display Dictations Documents icon in the toolbar displays dictation files and document files at the same time By dragging and dropping a document ...

Page 74: ...mail select the file from the Message folder The Message folder location can be found by selecting Options from the Download menu 1From the Tools menu select Options then click the General tab in the Option dialog box 2Check Auto send receive and enter the time interval of automatic attempts of sending and receiving 3Set the auto sending function and the document file retrieve function according t...

Page 75: ... E mail FTP service in the DSS Player to match that of the E mail FTP program you have configured on your PC Please consult with you system administrator if you need help with setting your E mail FTP service Windows 3Select a profile When the setting is complete click the OK button to enable the setting When E mail is used to send and or receive files select the type of E mail service used on your...

Page 76: ...icon is present in the Control Panel If the icon exists the MAPI subsystem has already been installed on your computer Go to the Activating Send Mail Function Create a Profile section in this manual P 80 If the icon does not exist install the MAPI subsystem The MAPI subsystem will be installed when Microsoft Exchange Client or Microsoft Outlook is installed Microsoft Outlook is included in the Mic...

Page 77: ... window appears click the Next button 2Select Corporate or Workgroup and click the Next button 3Adialog box for setting up Microsoft Outlook appears This is the wizard for creating a profile For information on creating a profile check step 3 in the Activating Send Mail Function P 80 Setting E mail FTP Service ...

Page 78: ...ct Additional Server Types click the Next button to continue If you are going to use an internet standard E mail account select POP3 server click the Next button and skip to step 7 Installing Microsoft Outlook XP 2003 1After installing Outlook XP double click the Mail icon in the Control Panel and then click the Show Profiles button 2Click the Add button 3Type the profile name and click the OK but...

Page 79: ...3 you will see the following dialog box Enter the necessary information and click the More Settings button Click the Connection tab in the following dialog box and make sure the appropriate connection method is selected 8After the setup is completed click the Tools menu select Options then click the E mail FTP tab Select the MAPI profile name you have created Setting E mail FTP Service ...

Page 80: ...you want to set up a dialup connection through an internet service provider select Internet E mail in the list If you want to set up to use a LAN within your company also select Internet E mail in the list Note The Send Mail function does not work with AOL or internet service providers that cannot open POP3 server addresses Activating Send Mail Function Create a Profile The Profile is the group of...

Page 81: ...mplete it returns to the profile in the Option Setting dialog box Setting E mail FTP Service Please make sure that the profile name you have created using the Setup Wizard is displayed in the Option Setting dialog box If a different profile name is displayed switch to the profile you have created ...

Page 82: ...ed Example Copying Data from PC to Card Using Explorer or Finder 1Start Windows 2Connecting the recorder to your PC For connection procedure refer to Connecting to Your PC Using the USB Cable P 53 3Open Windows Explorer or Finder window The recorder will appear as a removable drive icon 4Copy data to card While the data are being written or copied the record play indicator lamp on the recorder wil...

Page 83: ... ERROR MEMORY FULL FORMAT ERROR SYSTEM ERROR INSERT CARD CARD COVER IS OPEN Action Charge the batteries or replace with new batteries P 13 15 Unlock the file P 37 Erase index marks that are no longer required P 38 Erase unnecessary files P 31 Erase unnecessary files P 31 Insert a compatible card Erase files that are no longer required or insert another card Reformat the card P 46 This is a malfunc...

Page 84: ...P Symptom Nothing appears on the display Won t start Unable to record No playback tone heard Unable to erase Noise heard during playback Recording level too low Unable to set index marks Cannot find the recorded voice Cannot connect to PC Cannot connect to a PC using a cradle Action Verify polarity is correct P 13 14 Replace with new batteries P 14 Turn the recorder ON P 17 Turn the recorder ON P ...

Page 85: ...to clothing Used to record your own voice or people near you PC Transcription kit AS 4000 The AS 4000 transcription kit sold separately provides you with a PC footswitch a headset and DSS Player Pro Transcription Module for easy transcription of DSS recordings Foot switch RS25 26 Connect to the serial or USB port of your PC for hands free transcription convenience USB Reader Writer MAUSB 10 Dual S...

Page 86: ...rs Speaker Built in ø28 mm round dynamic speaker MIC EAR jack ø3 5 mm mini jack impedance MIC 2 kΩ EAR 8 Ω or more Maximum working output 3 V DC 180 mW or more 8 Ω speaker Input power requirement Rated voltage 3 V Batteries Ni MHRechargeableBatteryPack BR402 or Two AAA batteries LR03 or R03 or Two Ni MH rechargeable batteries BR401 Specifications External dimensions 110 2 x 50 0 x 16 9 mm without ...

Page 87: ...u may be having with this system If you encounter problems using your DS 4000 we recommend that you contact your Olympus Professional Dealer that sold you the system If your dealer cannot fix your problem please call our technical hotline number or send an E mail For customers in the U S and Canada Phone 1 888 553 4448 E mail distec olympus com For customers in Europe E mail dss support olympus eu...

Page 88: ...ssepasleslimitesdeCatégorieBpourlesémissionsdebruitradioémanantd appareils numériques telqueprévudanslesRèglementssurl InterférenceRadioduDépartementCanadiendesCommunications P2 8023 01 AP0403 CE mark indicates that this product complies with the European requirements for safety health environment and customer protection Shinjuku Monolith 3 1 Nishi Shinjuku 2 chome Shinjuku ku Tokyo 163 0914 Japan...

Reviews: