background image

43

43

4

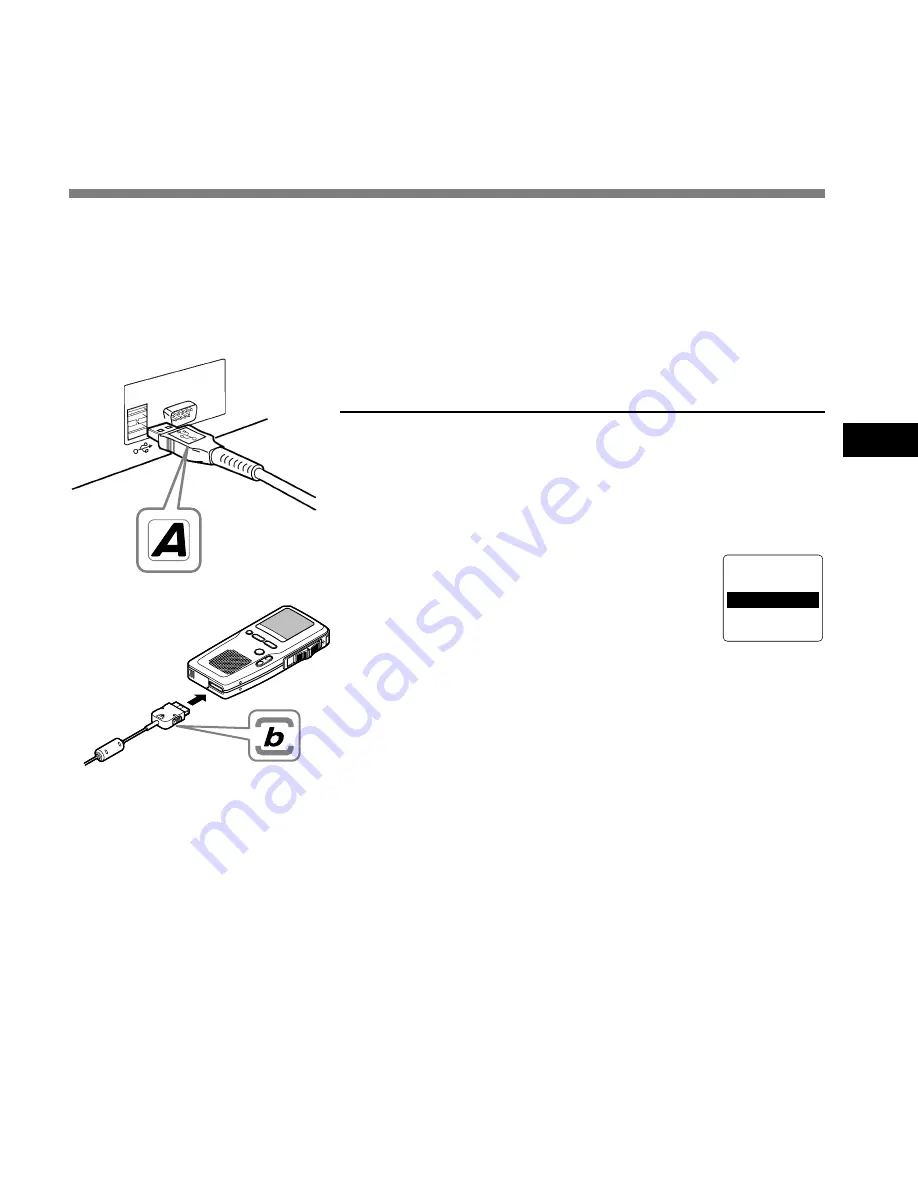
Connecting Recorder to PC

1

Turn ON the recorder (

 P.16).

2

Insert end A of the USB cable to
your PC’s USB port or USB hub.

3

Make sure the recorder is in 

STOP

mode before attaching end b of the
USB cable to the terminal port of
the recorder.

If “REMOTE” is displayed on the recorder,
it indicates proper connections.

R E M O T E

R E M O T E

.................................................................................................................................................................

Notes

• NEVER remove the card or disconnect the USB cable while the record/play indicator lamp is flashing. If you

do, the data on the card will get destroyed.

• Some PCs and USB hubs may not supply sufficient power and the recorder fails to connect. Refer to your

PC User’s Manual regarding the USB port or USB hub on your PC.

• When using a USB hub to connect the recorder, always use a self-powered (AC adapter) USB hub.
• Make sure to push the cable connector all the way in. Otherwise, the recorder may not operate properly.

Once you connect the recorder to your PC, the recorder will
be powered through the USB cable. The batteries and/or AC
adapter will not be in use.

Be sure to install the DSS Player software before connecting the recorder to a PC. However, if
you do connect the recorder before or during the software installation, the “Add New Hardware
Wizard” appears. In this case, cancel the wizard by pressing the [Cancel] button in the wizard
screen and then install or continue the installation of DSS Player software.
You can directly connect the recorder’s USB terminal to your PC, or use the cradle included in
the package (desktop holder).

Connecting to Your PC Using the USB
Cable

Connecting Recorder to PC

Summary of Contents for DS-4000

Page 1: ...ion about using the product correctly and safely Keep the instructions handy for future reference To ensure successful recordings we recommend that you test the record function and volume before use E...

Page 2: ...g a Card 19 2 Basic operations Recording 21 Playing 25 Erasing 27 3 Other functions Menu List 31 Learning to Use the Menu 32 Setting Priority Levels 33 Setting Job Data 34 Formatting the Card FORMAT 3...

Page 3: ...ll Programs then OLYMPUS DSS Player Pro then click DS 4000 Instructions You can read more about the items listed below Dealer Option Items 18 A B Programmable Buttons 18 Using the Variable Control Voi...

Page 4: ...operate it safely and correctly Keep this manual in an easily accessible location for future reference Important Safety Precautions Certain symbols are used in the user s manual and on this product t...

Page 5: ...unit malfunction or during repair work It is recommended to back up and save important content to other media such as a computer hard disk Batteries Rechargeable Battery Pack BR402 Danger Do not solde...

Page 6: ...ies to water Do not allow water to contact the terminals Do not remove or damage the battery insulating sheet Do not use the batteries if you find something wrong with them such as leakage color chang...

Page 7: ...ng unusual when using the AC adapter such as abnormal noise heat smoke or a burning odor Do not insert metal wires or similar objects This may cause fire overheating or electric shock Keep out of the...

Page 8: ...f the exposed parts 2 immediately disconnect the power supply plug from the power outlet and 3 call your dealer or local Olympus representative for servicing Continued use of the AC adapter under thes...

Page 9: ...ion cradle docking station for recharging of Ni MH Rechargeable Battery Pack BR402 P 13 1 and for downloading data from the recorder to a PC P 48 Two Programmable buttons A and B Recording and storing...

Page 10: ...ing time may be shorter if many short recordings are made 2 Total recording time of two files The maximum recording time per file is 99 hours xD Picture Card Notes When initializing formatting a card...

Page 11: ...on 8 Built in speaker 9 MENU button 0 B button Programmable A button Programmable ERASE button Display LCD panel Record Play indicator lamp POWER ON OFF switch VOLUME button VOLUME button Card cover l...

Page 12: ...number of recorded files in the folder 6 Erase lock indicator 7 Character Information display 8 Microphone sensitivity display 9 VCVA Variable Control Voice Actuator indicator 0 Record mode indicator...

Page 13: ...wer When appears on the display charge the batteries as soon as possible When the battery is too weak the recorder shuts down and BATTERY LOW appears on the display Notes Removing the battery pack whi...

Page 14: ...first use Notes Charge the battery often for first few uses Battery performs better after several full charge discharge cycles Batteries other than the supplied battery cannot be charged If you charg...

Page 15: ...s before disposing For customers in Germany Olympus has a contract with the GRS Joint Battery Disposal Association in Germany to ensure environmentally friendly disposal Discharging Batteries self dis...

Page 16: ...on the back of the recorder is in the OFF position none of the buttons or switch on the recorder will be active Slide the power switch to the ON position to activate the recorder Power Save Mode When...

Page 17: ...ur 1 Press the FF button or REW button to set the hour 2 Press the MENU button to accept the hour You can choose between 12 and 24 hour display by pressing the A button while setting the hour and minu...

Page 18: ...STOP mode the recorder will save the items that were set to that point You can set the time and date from your PC using DSS Player software P 38 1Press the MENU button The menu appears P 31 2Press th...

Page 19: ...f the card is not inserted all the way data may not be written to the card 3Close the card cover securely Card inserted fully into the slot The recorder sounds beeps and the message PLEASE WAIT on the...

Page 20: ...The power is switched off automatically 2Push the card inward to unlock it and let it eject partially The card is visibly out of the slot and can be removed safely 3Hold the card straight and pull it...

Page 21: ...owing settings Append Appends the recording to the end of the current file Insert Inserts the recording at the current position in the file Overwrite Overwrites the recording starting at the current p...

Page 22: ...ther P 27 or transfer dictation files to your computer using DSS Player Software P 45 You cannot select a different recording mode SP or LP than that of the original file when appending recording Move...

Page 23: ...cator lamp glows red 3Move the slide switch to the STOP position to stop overwriting Overwrite Recording You can overwrite a previously recorded file from any point within the file Note that the overw...

Page 24: ...on to stop inserting the additional recording Insert Recording Additional recording can be inserted into previously recorded file Notes If you place the slide switch in the STOP position for more than...

Page 25: ...t playback time b Total recording time of the file being played 2Press the VOLUME or VOLUME button to adjust the volume The display shows the volume level You can choose between 0 to 30 3Move the slid...

Page 26: ...o the beginning of the previous file Playback functions Fast Forward FF Rewind REW Cue CUE Review REV Operation Press the FF button once while stopped Press the REW button once while stopped Hold the...

Page 27: ...E DONE is displayed when the file is erased File numbers will be reassigned automatically FOLDER A F I LE ERASE FOLDER A F I LE ERASE FOLDER A ERASE DONE Notes If the ERASE button is not pressed withi...

Page 28: ...le ALL ERASE is flashing The display changes to ALL ERASE and erasing will start ERASE DONE is displayed when the files are erased Any locked files in the folder will be reassigned new file numbers in...

Page 29: ...lly 2Press the ERASE button at the point to start erasing While playback continues PARTIAL ERASE and the file length will alternate on the display AUTHOR A 5M01S START ERASE AUTHOR A 45M32S END ERASE...

Page 30: ...the stop status An erased file cannot be restored Locked files cannot be partially erased Erasing 4Press the ERASE button to confirm erase The display changes to PARTIAL ERASE and erasing will start...

Page 31: ...Player software P 38 Time Date setting Hour minute year month and day P 17 Recorder formatting P 36 LCD contrast adjustment Select the level from 1 to 12 System sounds setting Select ON enabled or OFF...

Page 32: ...appears P 31 2Press the FF or REW button to highlight a menu item you want to modify change 3Press the MENU button to select that menu item The possible options for the menu item will be in view 4Pre...

Page 33: ...H and NORMAL To Set a Priority Level on an Existing File AUTHOR A LENGTH 00M00S 27M58S Setting Priority Levels 1Press the NEW button A new file is created 2Press the PRIORITY button to choose between...

Page 34: ...der By default the Author ID is set to DS4000 1Turn ON the recorder When more than one Author ID exist on the recorder the ID list will be displayed 2Press the FF or REW button to select the Author ID...

Page 35: ...display 2Press the FF or REW button to highlight a Work Type from the Work Type ID list 3Press the MENU button to select the Work Type All recordings made with the new WorkType ID will have the new Wo...

Page 36: ...tton to confirm START selection DATA WILL BE CLEARED appears for approximately 2 seconds Cards that have been used on non Olympus devices or cards that are not recognized by the recorder must be forma...

Page 37: ...epending on the capacity of cards For example formatting may take about 1 minute for 512 MB card Do not interrupt the formatting process by opening the card cover or the battery cover Doing so will da...

Page 38: ...Minimum Requirement The DSS Player is a fully featured software tool that provides a simple to use but sophisticated method of managing your recordings Some of the features of the DSS Player are Auto...

Page 39: ...ice recognition function with the recorder use Windows 98SE or later versions of the OS Macintosh version does not support voice recognition software Power Mac G3 233 MHz class processor or faster iMa...

Page 40: ...to the instructions on the screen Windows Before you connect your recorder to your PC you must first install the DSS Player software Make sure to exit all running applications eject the floppy disk i...

Page 41: ...ocation OS X Macintosh HD User Library Preferences OS 9 x Macintosh HD System Folder Preferences 3Delete the Executable file Delete the DSS Player for Mac file in the location where you installed the...

Page 42: ...elp menu Contents While DSS Player is running press F1 on the keyboard While DSS Player is running select DSS Player for Mac Help from the Help menu Windows Macintosh Using Online Help For information...

Page 43: ...g a USB hub to connect the recorder always use a self powered AC adapter USB hub Make sure to push the cable connector all the way in Otherwise the recorder may not operate properly Once you connect t...

Page 44: ...PC Using the Cradle Connecting Recorder to PC Disconnecting Recorder from PC Never touch the contact points at the bottom of the cradle as that may cause bad connection With a PC connected the recorde...

Page 45: ...application 2Click DSS Player Pro The check mark on DSS Player Pro disappears Manual start 1Start Windows 2Click the start button then select All Programs All program menu will be displayed 3Select Ol...

Page 46: ...ctions see Connecting to Your PC Using the USB Cable P 43 3Double click the DSS Player for Mac folder The DSS Player for Mac folder opens 4Double click DSS Player DSS Player for Mac launches 3 4 Runni...

Page 47: ...f the DSS WAVE Windows only and AIFF Macintosh only format files stored on your PC s hard disk 3 Device Tree View Displays the directory structure of the folders in the recorder 4 Dictation List View...

Page 48: ...Files For explanations of Download Folders and Download All refer to Online Help Download Selected Files 1Select the folder From the Device Tree View select the folder that contains the dictation fil...

Page 49: ...e size of the dictation file and your PC it may take some time to download the files The downloaded files will be stored in the download tray folder that corresponds to the folder in the recorder Exam...

Page 50: ...ed by the recorder Author ID The ID that has been set on the recorder The default ID is DS4000 The Author ID can be modified with DSS Player P 51 1 3 2 File Name Format File names are assigned in the...

Page 51: ...Create Send Job Data The Create Send Job Data window appears Enter your user ID in the field indicated by the arrow 2Click the Transfer button The new user ID will be transferred to the recorder Note...

Page 52: ...P service in reference to the online manual Setting the Auto Sending Function To send downloaded dictation files automatically follow these steps to set the auto sending function This function can be...

Page 53: ...thesettinginreferencetotheonlinemanual 4Register the format of a document file to receive When using E mail to receive a document file the application software receives the attached file if it is in t...

Page 54: ...nd Receive files icon Receiving Document Files Manually Windows According to the profile set the application establishes a connection to the server and receives document files The received document fi...

Page 55: ...e by attaching it to e mail select the file from the Message folder The Message folder location can be found by selecting Options from the Download menu 1From the Tools menu select Options then click...

Page 56: ...MORY ERROR MEMORY FULL FORMAT ERROR SYSTEM ERROR INSERT CARD CARD COVER IS OPEN Action Charge the batteries or replace with new batteries P 13 14 Unlock the file Erase index marks that are no longer r...

Page 57: ...ing Windows XP Symptom Nothing appears on the display Won t start Unable to record No playback tone heard Unable to erase Noise heard during playback Recording level too low Unable to set index marks...

Page 58: ...o clothing Used to record your own voice or people near you PC Transcription kit AS 4000 The AS 4000 transcription kit sold separately provides you with a PC footswitch a headset and DSS Player Pro Tr...

Page 59: ...hours Speaker Built in 28 mm round dynamic speaker MIC EAR jack 3 5 mm mini jack impedance MIC 2 k EAR 8 or more Maximum working output 3 V DC 180 mW or more 8 speaker Input power requirement Rated vo...

Page 60: ...may be having with this system If you encounter problems using your DS 4000 we recommend that you contact your Olympus Professional Dealer that sold you the system If your dealer cannot fix your prob...

Reviews: