background image

11

<98/98 SE/Me

Operation>

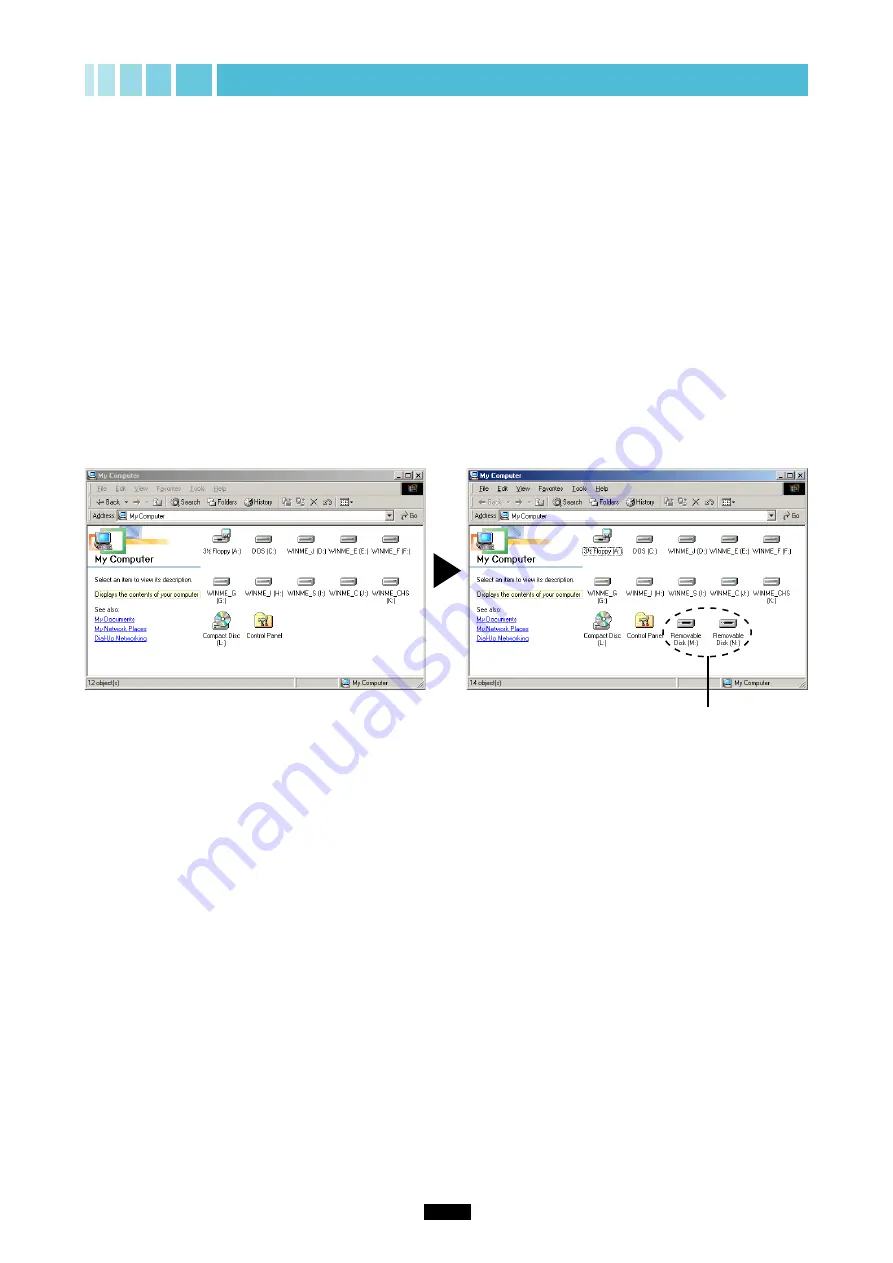
When the MAUSB-10 is connected to your computer, it is recognized as a “Removable Disk”.

You can see two “Removable Disk” icons by opening “My Computer” from the desktop.

[Drive letters]

The drive letters for the two “Removable Disk” icons appear in alphabetical order, with the xD-Picture Card first
and the SmartMedia second.

e.g. When the Removable Disks are recognized as (F:) and (G:) by a computer

(F:)

¥

 xD-Picture Card

(G:)

¥

 SmartMedia

[Note]

When labeling the “Removable Disk” icons, the computer may skip a drive letter if other devices are connected to
the computer [e.g. (D:) xD-Picture Card, (E:) other device, (F:) SmartMedia]. Check the drive letters for the two
“Removable Disk” icons after connecting this product.

Before connecting

After connecting

* In this example, the Removable Disks are recognized as the M

and N drive. The drive letters (e.g. “M:”, “N:”, etc.) used by
your computer may differ depending on your computer and/or
connected optional devices.

MAUSB-10

Summary of Contents for Comedia MAUSB-10

Page 1: ...USB Reader Writer REFERENCE MANUAL ...

Page 2: ... Easy card inserting removing Inserting and removing cards is just as easy and convenient as with floppy disks or magneto optical disks MO Copyright 2002 OLYMPUS OPTICAL CO LTD Trademarks IBM is a registered trademark of International Business Machines Corporation Microsoft and Windows are registered trademarks of Microsoft Corporation Macintosh is a registered trademark of Apple Computer Inc Smar...

Page 3: ...ing files from a card 27 5 Formatting a card 28 6 Disconnecting the MAUSB 10 29 How to uninstall the device driver 30 Macintosh OS 8 6 9 2 How to install 1 Turn on the computer 32 2 Load the CD ROM 32 3 Install the device driver 33 Operating the MAUSB 10 1 Connecting to the computer 35 2 Inserting a card 36 3 Removing a card 37 4 Copying files from a card 38 5 Formatting a card 38 6 Disconnecting ...

Page 4: ...ble Quick start guides Precautions document MAUSB 10 Card cover The card s is recognized when this cover is closed Card slot for SmartMedia Insert SmartMedia card here Card slot for xD Picture Card Insert xD Picture Card here Status lamp green Lights when the card cover is closed with the card s inserted Blinks when reading writing to a card CD ROM Device driver Reference manual this manual CAMEDI...

Page 5: ...pgraded from Windows 3 1 95 or Windows 2000 upgraded from Windows 95 NT 4 0 NT 3 51 may not work properly In this case you may need to reinstall your OS If you are using an iMac M6709J A M6709J B you must install iMac Update 1 1 on your computer not required for Mac OS 8 6 or later For more information visit Apple s Web site at http www apple com Opening the card cover removing a card or disconnec...

Page 6: ...ppears automatically 4 Refer to Operating the MAUSB 10 in each OS chapter for more details USB 1 1 compatible Getting started The installation procedure varies depending on the operating system you are using on your computer Follow the correct procedure for your operating system Check OS 1 Windows 98 98 SE Me 墌 p 7 Check OS 1 Windows 2000 XP 墌 p 18 Check OS Mac OS 8 6 9 2 墌 p 32 Check OS Mac OS X ...

Page 7: ...gnized the InstallShield setup window is displayed for a few seconds Then the installation window appears automatically 3 Click the Next button If the window at right does not appear refer to If the installation window does not appear when the CD ROM is loaded 墌 p 9 If you want to cancel the installation click Cancel Note Do NOT connect the MAUSB 10 to the com puter until installation of the devic...

Page 8: ...ht appears Click the Finish button The device driver is now installed Once the driver has been installed the MAUSB 10 will be recognized automatically whenever it is plugged into the computer Remove the CD ROM from the CD ROM drive and store it in a safe place 6 The window at right appears Select Yes I want to restart my computer now if you are ready then click Finish The computer restarts ...

Page 9: ... 墌 p 15 2 Click the Cancel button 3 Place the CD ROM into the CD ROM drive Follow the instructions in Install the device driver 墌 p 7 If the installation window does not appear when the CD ROM is loaded Follow the steps below to specify the file and start installing When the Add New Hardware Wizard window appears If you connect the MAUSB 10 to the computer before installing the device driver the A...

Page 10: ...computer You can plug in the USB connector while the computer is in use Notes Be sure to connect the MAUSB 10 to your computer AFTER installing the device driver Make sure the connector is fully inserted When inserting the connector make sure it is oriented correctly refer to the pictures below Inserting the connector incorrectly may damage the connector and or the computer s USB port USB port Typ...

Page 11: ... recognized as F and G by a computer F xD Picture Card G SmartMedia Note When labeling the Removable Disk icons the computer may skip a drive letter if other devices are connected to the computer e g D xD Picture Card E other device F SmartMedia Check the drive letters for the two Removable Disk icons after connecting this product Before connecting After connecting In this example the Removable Di...

Page 12: ...rd in diagonally may damage the card and or the MAUSB 10 MAUSB 10 will not be able to recognize the card s if the card cover is open The status lamp blinks every two seconds if the card is not recognized correctly If this happens remove the card s from the MAUSB 10 wipe the contact area with a dry cloth and insert the card s again If the problem persists the card may be damaged Card slot for xD Pi...

Page 13: ...o malfunction Status lamp green 1 Double click My Computer on the desktop 2 To remove a card Right click the corre sponding Removable Disk icon then click Eject in the pop up menu To remove one card both cards with two cards inserted Right click the both Remov able Disk icons then click Eject in each pop up menu You must right click BOTH Removable Disk icons even if you want to remove only one car...

Page 14: ... from the desktop 3 To view the contents of a card double click the corresponding Removable Disk icon For information about how to locate the files you want to copy refer to the manual for the product used to record them In this example the Removable Disks are recognized as the M and N drive The drive letters e g M N etc used by your computer may differ depending on your computer and or connected ...

Page 15: ...lect Full under Format type then click the Start button After formatting is complete the card is ready for use Before formatting the card If a card is going to be used with a digital camera be sure to format it with the camera you are using Cards formatted by the computer using the MAUSB 10 may not be recognized by the digital camera Formatting a SmartMedia card is not possible when a write protec...

Page 16: ... MAUSB 10 is disconnected from the computer s USB port then follow the steps below On screen displays or messages may vary depending on the version of Windows you are using 1 Click the Start button then select Settings Control Panel 2 Double click Add Remove Programs 3 Select OLYMPUS USB Reader Writer then click the Add Remove button ...

Page 17: ...pears Click OK 5 The InstallShield Wizard window appears 6 The window at right appears Click the Finish button 7 The window at right appears Select Yes I want to restart my computer now if you are ready then click Finish The computer restarts The device driver is no longer installed ...

Page 18: ... If the window at right does not appear refer to If the installation window does not appear when the CD ROM is loaded 墌 p 20 If you want to cancel the installation click Cancel 1 Disconnect the MAUSB 10 from the computer 墌 p 29 2 Click the Cancel button 3 Place the CD ROM into the CD ROM drive Follow the instructions from Install the device driver this page When the Found New Hardware Wizard windo...

Page 19: ... installation of the device driver is complete the window at right appears Click the Finish button The device driver is now installed Remove the CD ROM from the CD ROM drive and store it in a safe place 6 The window at right appears Select Yes I want to restart my computer now if you are ready then click Finish The computer restarts ...

Page 20: ...Double click SETUP The OLYMPUS USB Reader Writer InstallShield Wizard window appears Start installing by following Install the device driver 墌 p 18 If the installation window does not appear when the CD ROM is loaded Follow the steps below to specify the file and start installing 3 Double click MAUSB_10 ...

Page 21: ... USB port has a mark over it Installing the new hardware The first time the MAUSB 10 is connected to your computer the Found New Hardware Wizard window appears Log on with the user name Administrator or use a user name with administrator privileges then follow the steps under Installing the hardware on the next page Once the driver is installed you only need to perform step 6 on the next page For ...

Page 22: ... automatically Go to step 6 if there is no error message on the screen 2 The searching window appears 4 The Found New Hardware Wizard window appears 3 The Hardware Installation window appears Go to step 4 if this window does not appear This window displays the progress of the logo test that verifies compatibility between MAUSB 10 and Windows XP The MAUSB 10 did not pass the Microsoft Corporation l...

Page 23: ...irm that two Removable Disk icons have been added by opening My Computer from the desktop The drive letters e g D E etc used by your computer may differ depending on your computer and or connected optional devices The icons used by your computer may differ depending on your computer and or connected optional devices 墌 p 24 ...

Page 24: ...movable Disk icons by opening My Computer from the desktop Drive letters The drive letters for the two Removable Disk icons appear in alphabetical order with the xD Picture Card first and the SmartMedia second e g When the Removable Disks are recognized as F and G by a computer F xD Picture Card G SmartMedia Note When labeling the Removable Disk icons the computer may skip a drive letter if other ...

Page 25: ... in diagonally may damage the card and or the MAUSB 10 MAUSB 10 will not be able to recognize the card s if the card cover is open The status lamp blinks every two seconds if the card is not recognized correctly If this happens remove the card s from the MAUSB 10 wipe the contact area with a dry cloth and insert the card s again If the problem persists the card may be damaged Card slot for xD Pict...

Page 26: ...t click the corre sponding Removable Disk icon then click Eject in the pop up menu To remove one card both cards with two cards inserted Right click the both Remov able Disk icons then click Eject in each pop up menu You must right click BOTH Removable Disk icons even if you want to remove only one card The status lamp goes off when this step is per formed correctly The card will not be ejected wh...

Page 27: ...om a floppy disk It is also possible to move files to another folder erase files or write data from another folder Data cannot be written to or erased from a SmartMedia card which has a write protect seal affixed to it Drag Drop To perform a drag and drop press and hold the left mouse button over the selected file s then move the mouse drag and release the button at the place where you want to cop...

Page 28: ...or erase data on a SmartMedia card which has a write protect seal affixed to it For more details refer to the SmartMedia card s instruction manual Formatting erases all data in the card All important data should be copied to a hard disk or floppy disk in advance Double clicking the Removable Disk icon will display the directory and the list of image files on the inserted card 1 Double click My Com...

Page 29: ...s XP the message box at right appears when the balloon help is on The MAUSB 10 is ready to be disconnected from your computer Unplug or Eject Hardware In this example the Removable Disks are recognized as the J and K drive 4 Click the OK button 5 Unplug the USB connector from the computer Do not pull the cable when disconnecting Doing so could damage the MAUSB 10 or the cable You can unplug the MA...

Page 30: ...B 10 is disconnected from the computer s USB port then follow the steps below On screen displays or messages may vary depending on the version of Windows you are using 1 Click the Start button then select Settings Control Panel 2 Double click Add or Remove Programs 3 Select OLYMPUS USB Reader Writer then click the Change Remove button ...

Page 31: ...ars Click OK 5 The InstallShield Wizard window appears The device driver is no longer installed 6 The window at right appears Click the Finish button 7 The window at right appears Select Yes I want to restart my computer now if you are ready then click Finish The computer restarts ...

Page 32: ...edia or the SmartMedia formatted on a digital camera File Exchange provided with Mac OS must be installed Select Control Panels from the Apple Menu to check if File Exchange is installed on your computer Refer to Mac OS Help for more details Note that the windows shown below may look different on your computer depending on how your operating system is configured To identify your Mac OS version Sel...

Page 33: ...is loaded properly All applications are closed The MAUSB 10 is NOT connected to the computer s USB port Then follow the steps below to install the driver on your computer Note that the windows shown below may look different on your computer depending on how your operating system is configured Note Be sure not to connect the MAUSB 10 to the computer until installation of the device driver is comple...

Page 34: ...art button The device driver is now installed Remove the CD ROM from the CD ROM drive and store it in a safe place 5 When the Mac OS 8 x 9 x installer starts up the window at right appears Confirm Install Location then click the Install button ...

Page 35: ...e computer is in use Notes Be sure to connect the MAUSB 10 to your computer AFTER installing the device driver Make sure the connector is fully inserted When inserting the connector make sure it is oriented correctly refer to the pictures below Inserting the connector incorrectly may damage the connector and or the computer s USB port In the example the MAUSB 10 is connected to the USB port of an ...

Page 36: ...he card is not recognized correctly If this happens remove the card s from the MAUSB 10 wipe the contact area with a dry cloth and insert the card s again If the problem persists the card may be damaged MAUSB 10 Card slot for xD Picture Card Status lamp green Card cover Contact area Card slot for SmartMedia Status lamp Lights when a card is inserted and the card cover is closed Blinks when a card ...

Page 37: ... one card both cards with two cards inserted Drag drop both card icons onto the Trash icon You must drag drop BOTH card icons even if you want to remove only one card The status lamp goes off when this step is performed correctly Drag Drop To perform a drag and drop press and hold the mouse button over the selected file s then move the mouse drag and release the button at the place where you want ...

Page 38: ...at the status lamp is NOT on If the status lamp is on drag drop the card icon s onto the Trash 墌 p 37 2 Open the card cover and remove the card 墌 p 37 3 Unplug the MAUSB 10 from the computer Before formatting the card If a card is going to be used with a digital camera be sure to format the card with the camera you are using Cards formatted by the computer using the MAUSB 10 may not be recognized ...

Page 39: ... icon Drag Drop 5 Restart the computer to confirm uninstallation of the device driver 2 Double click System Folder 3 Double click Extensions 4 Delete the 2 files installed previously shown at right Drag and drop the files onto the Trash icon Drag Drop To perform a drag and drop press and hold the mouse button over the selected file s then move the mouse drag and release the button at the place whe...

Page 40: ...2 1 To use a DOS Windows formatted SmartMedia or the Smartmedia formatted on a digital camera File Exchange provided with Mac OS must be installed Select Control Panels from the Apple Menu to check if File Exchange is installed on your computer Refer to Mac OS Help for more details Note that the windows shown below may look different on your computer depending on how your operating system is confi...

Page 41: ...r computer is turned on The provided CD ROM is loaded properly All applications are closed The MAUSB 10 is NOT connected to the computer s USB port Then follow the steps below to install the driver on your computer Note that the windows shown below may look different on your computer depending on how your operating system is configured Notes Be sure not to connect the MAUSB 10 to the computer unti...

Page 42: ... OS X Install 6 Enter the administrator s name and the pass word then click the OK button 7 Click the Continue button 8 Click the Continue button 9 Select the disk to install on then click the Continue button ...

Page 43: ... Upgrade button 11 Click the Continue Installation button 12 The window at right appears during the installation 13 Click the Restart button The device driver is now installed Remove the CD ROM from the CD ROM drive and store it in a safe place ...

Page 44: ...omputer is in use Notes Be sure to connect the MAUSB 10 to your computer AFTER installing the device driver Make sure the connector is fully inserted When inserting the connector make sure it is oriented correctly refer to the pictures below Inserting the connector incorrectly may damage the connector and or the computer s USB port In the example the MAUSB 10 is connected to the USB port of an iMa...

Page 45: ...card is not recognized correctly If this happens remove the card s from the MAUSB 10 wipe the contact area with a dry cloth and insert the card s again If the problem persists the card may be damaged MAUSB 10 Card slot for xD Picture Card Status lamp green Card cover Contact area Card slot for SmartMedia Status lamp Lights when a card is inserted and the card cover is closed Blinks when a card is ...

Page 46: ...e card both cards with two cards inserted Drag drop both card icons onto the Trash icon You must drag drop BOTH card icons even if you want to remove only one card The status lamp goes off when this step is performed correctly Drag Drop To perform a drag and drop press and hold the mouse button over the selected file s then move the mouse drag and release the button at the place where you want to ...

Page 47: ... the card icon s onto the Trash 墌 p 46 2 Open the card cover and remove the card 墌 p 46 3 Unplug the MAUSB 10 from the computer Before formatting the card If a card is going to be used with a digital camera be sure to format the card with the camera you are using Cards formatted by the computer using the MAUSB 10 may not be recognized by the digital camera Formatting a SmartMedia card is not possi...

Page 48: ...oblem with the card A write protect seal is affixed to the card Make sure that the card s is inserted correctly Close the card cover properly If you are using a USB hub it may not function properly with the MAUSB 10 Connect the MAUSB 10 directly to the computer Replace the card s with a new one s Click Cancel to close the window then disconnect the MAUSB 10 from the PC and install the device drive...

Page 49: ... Make sure that the card s is inserted correctly Close the card cover properly If you are using a USB hub it may not function properly with the MAUSB 10 Connect the MAUSB 10 directly to the computer Replace the card s with a new one s Try to install the driver again referring to the instructions Make sure that the card s is inserted correctly You must have File Exchange provided with Mac OS to rea...

Page 50: ...B Specification Ver 1 1 Operating voltage 5V 10 Powered via USB port Power consumption 0 1A Max Main unit only Operating environment Temperature 0 C 40 C 41 F 104 F Humidity 20 80 No condensation Storage environment 20 C 60 C 4 F 140 F Dimensions L x W x H Main unit 105 x 72 x 21 26 mm 4 1 x 2 8 x 0 8 1 0 Not including the USB cable Weight Main unit 120 g 4 2 oz Supported computers Any of the foll...

Page 51: ...at each OS uses different formats and that format ting a memory device will erase the data currently stored on it A small graphical image used to represent a file or folder created by the user or an installed application Clicking or double clicking an icon will open the file or folder or launch the application Copies a new application to the computer and automatically configures it for use Related...

Page 52: ...OLYMPUS OPTICAL CO LTD VT398703 ...

Reviews: