background image

Be sure to fully insert the SmartMedia card until it "locks" into place. 

To eject a SmartMedia card, gently push the card "in" and then release.

Insert the CompactFlash card into the slot with the label facing to the right.

For Macintosh users, be sure to drag the "Untitled" disk icon to the trash icon 
before removing the media.

Transferring Files and Folders

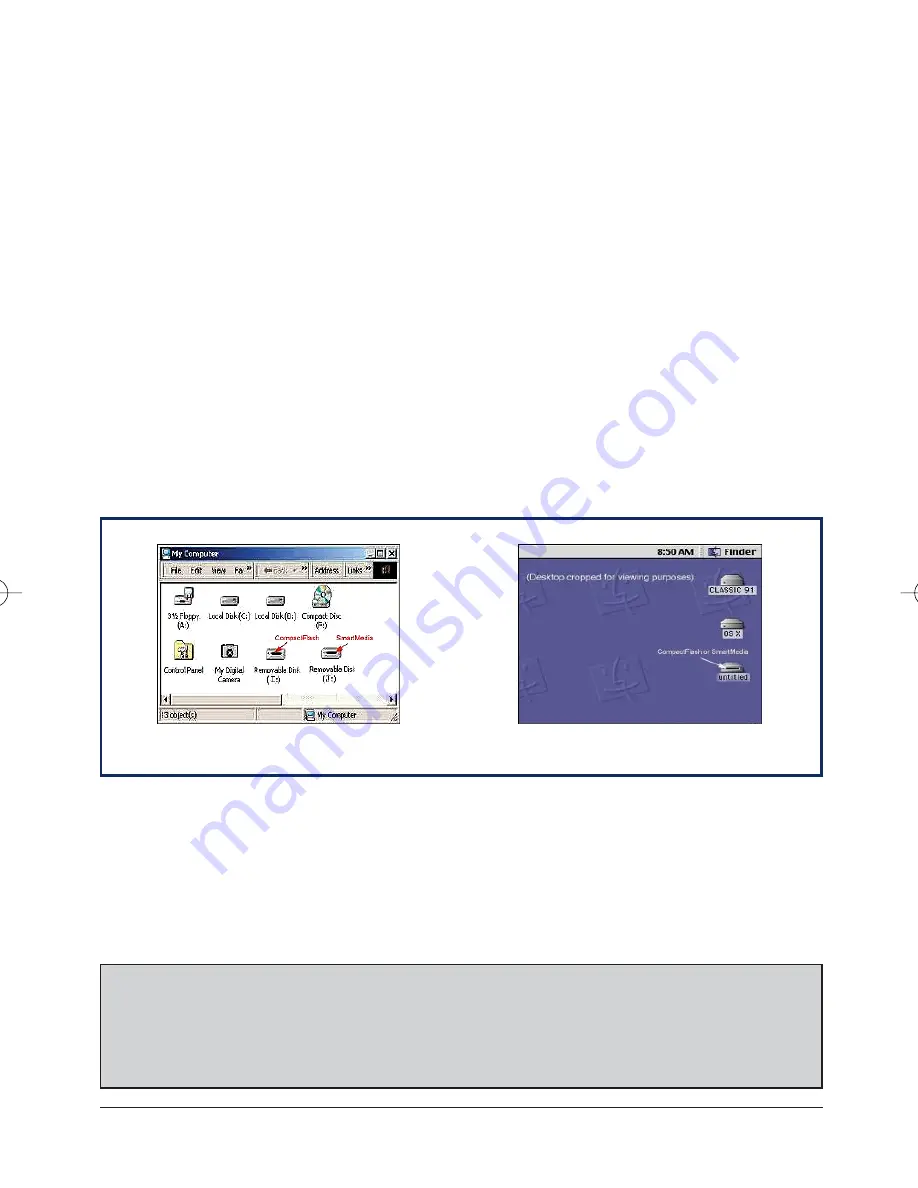
After you have successfully installed your Olympus CAMEDIA USB Dual-Slot
Reader/Writer for Windows, two removable disk icons will appear under "My
Computer" (See screen-shot below).  For Macintosh, a drive icon labeled "Untitled"
or "No Name" will appear on the desktop after you insert the media (See screen-shot
below).  To access your Olympus USB Reader/Writer, please follow these steps:

1. Insert the media into the appropriate slot on your Olympus USB Reader/Writer.  

(Please refer to icons on front of the MAUSB-5W for proper insertion.)

2.  For a Windows-based PC, open "My Computer" on the desktop; for a Macintosh 

computer, start on the desktop.

(For Windows XP, "My Computer" may be listed in the "Start" menu.)

3.  Double-click the removable drive icon representing the SmartMedia or 

CompactFlash.  (For Windows, the CompactFlash slot is generally assigned the 
first removable drive letter.)

4.  Double-click the folder/s to access the images.
5.  To copy the pictures, start by selecting the desired pictures.  To select a single 

picture, single-click on the desired filename.  To select multiple pictures, hold 
down the <Ctrl> key (or the <Shift> key on a Macintosh) and click on the desired 
filenames.  To select all pictures, go to Edit > Select All.

6.  Drag-and-drop the pictures to the desired folder on the computer hard disk or 

other storage device.  Please refer to your operating system or computer user’s 
guide for instructions on creating a new folder.

CAMEDIA USB Dual-Slot Reader/Writer

3

(Windows "My Computer")

(Macintosh "Desktop")

WARNING

The two lights located on the front of the Olympus USB Reader/Writer flash
if a file transfer is in progress.  Removal of the media during a file transfer
can result in data loss or file corruption.  Wait for the green status light/s on
the front of your Olympus USB Reader/Writer to stop flashing before
removing the media.  When a transfer is finished, the lights are solid green.  

OlympusUserGuide  4/9/02  5:35 PM  Page 5

Summary of Contents for Camedia MAUSB-5W

Page 1: ...USB Dual Slot Reader Writer For CompactFlash and SmartMedia Model MAUSB 5W User Guide ...

Page 2: ...1 Windows Me Windows XP 2 Mac OS 8 6 9 x 2 Mac OS X 10 1 2 2 Operating Instructions Hardware 2 Installing CAMEDIA Master 4 0 Software 4 Windows Software Installation 4 Macintosh Software Installation 6 Download Instructions CAMEDIA Master 4 0 Software 7 CAMEDIA USB Dual Slot Reader Writer Table of Contents ...

Page 3: ... in the CD ROM drive and open the CD ROM icon located under My Computer 2 Open the folder MAUSB5W and then open the folder that matches your operating system Windows 98 or Windows 2000 3 Double click Setup exe in the selected folder and follow on screen prompts to proceed with the installation 4 When installation is finished restart the operating system 5 After the operating system boots up insert...

Page 4: ...USB5W and double click the installer icon Follow on screen prompts to complete the installation 3 When installation is finished restart your computer 4 You are now ready to start using your Olympus USB Reader Writer For operating instructions please proceed to the next section 1 After the operating system boots up connect the USB cable to your Olympus USB Reader Writer Connect the square end of th...

Page 5: ...y be listed in the Start menu 3 Double click the removable drive icon representing the SmartMedia or CompactFlash For Windows the CompactFlash slot is generally assigned the first removable drive letter 4 Double click the folder s to access the images 5 To copy the pictures start by selecting the desired pictures To select a single picture single click on the desired filename To select multiple pi...

Page 6: ...at you can use the Internet with your computer 1 Click the Get Pro Version in the main menu The Registration dialog box appears 2 Click Get The web browser starts and the web page for upgrade to the Pro version appears 3 Follow the directions on the web page to purchase a license number Be sure to write down the purchased license number before leaving the web site 4 In the Registration dialog box ...

Page 7: ...ppears telling you that the installation is complete click Close to finish QuickTime installation Check the marks if you would like to view the README files and launch QuickTime Player 13 The installation screen of CAMEDIA Master will appear Installing CAMEDIA Master 4 0 1 When the installation screen of CAMEDIA Master appears click Next to bring up the licensing agreement Click Yes to accept the ...

Page 8: ...tomatically appears on your desktop Note If not locate the Olympus icon on your desktop and double click it 5 Open the CAMEDIA Master4 folder and double click the folder that matches your operating system 6 Select an installation language icon 7 Double click the CAMEDIA Master Installer icon 8 A screen with the licensing agreement appears Click Agree to accept the terms of the licensing agreement ...

Page 9: ...ation of CAMEDIA Master software is completed its manual is also installed automatically 1 Follow steps 1 to 6 of the CAMEDIA Master installation procedure and then double click the Acrobat Reader Installer icon 2 The Acrobat Reader 4 0 installation window appears Click Continue 3 Choose a destination for the software The setup program will automatically install Acrobat Reader in the folder shown ...

Page 10: ...g box select the My Album tab and select Album 5 Select an album from the list of albums or create a new album to hold the images and select that album 6 Click the Get Images button This copies all images to the destination album or folder When all of the images have been transferred the Getting Images message box displays the message Getting images complete Select Browse images now to display the...

Page 11: ... s and related Olympus accessories individually a Product and collectively the Products will be free from defects in materials and workmanship under normal use and service for a period of one 1 year from the date of purchase If any Product proves to be defective within the one year warranty period the customer must return the defective Product to an Olympus Service Center listed below See WHERE TO...

Page 12: ...REPRESENTATION AS TO THE SUITABILITY DURABILITY DESIGN OPERATION OR CONDITION OF THE PRODUCTS OR ANY PART THEREOF OR THE MERCHANTABILITY OF THE PRODUCTS OR THEIR FITNESS FOR A PARTICULAR PURPOSE OR RELATING TO THE INFRINGEMENT OF ANY PATENT COPYRIGHT OR OTHER PROPRIETARY RIGHT USED OR INCLUDED THEREIN IF ANY IMPLIED WARRANTIES APPLY AS A MATTER OF LAW THEY ARE LIMITED IN DURATION TO THE LENGTH OF ...

Page 13: ...umber on the Product 3 A detailed description of the problem 4 Sample digital prints or files on disk if available and related to the problem When service is completed the Product will be returned to you postage prepaid WHERE TO SEND PRODUCT FOR SERVICE OLYMPUS SERVICE CENTERS Olympus America Inc Consumer Products Group 400 Rabro Drive Hauppauge NY 11788 4258 1 800 622 6372 Olympus America Inc Con...

Page 14: ...ence to radio or television communications However there is no guarantee that the interference will not occur in a particular installation If this equipment does cause harmful interference to radio or television reception which can be determined by turning the equipment off and on the user is encouraged to try to correct the interference by one or more of the following measures Reorient or relocat...

Page 15: ...er Drive Melville NY 11747 3157 U S A Tel 631 844 5000 Technical Support USA 24 7 online automated help http support olympusamerica com Phone customer support 1 888 553 4448 Toll free Our phone customer support is available from 8am 10pm Monday to Friday ET E mail distec olympus com Olympus software updates can be obtained at http olympus com digital OLYMPUS AMERICA INC ...

Reviews: