background image

En

37

En

J

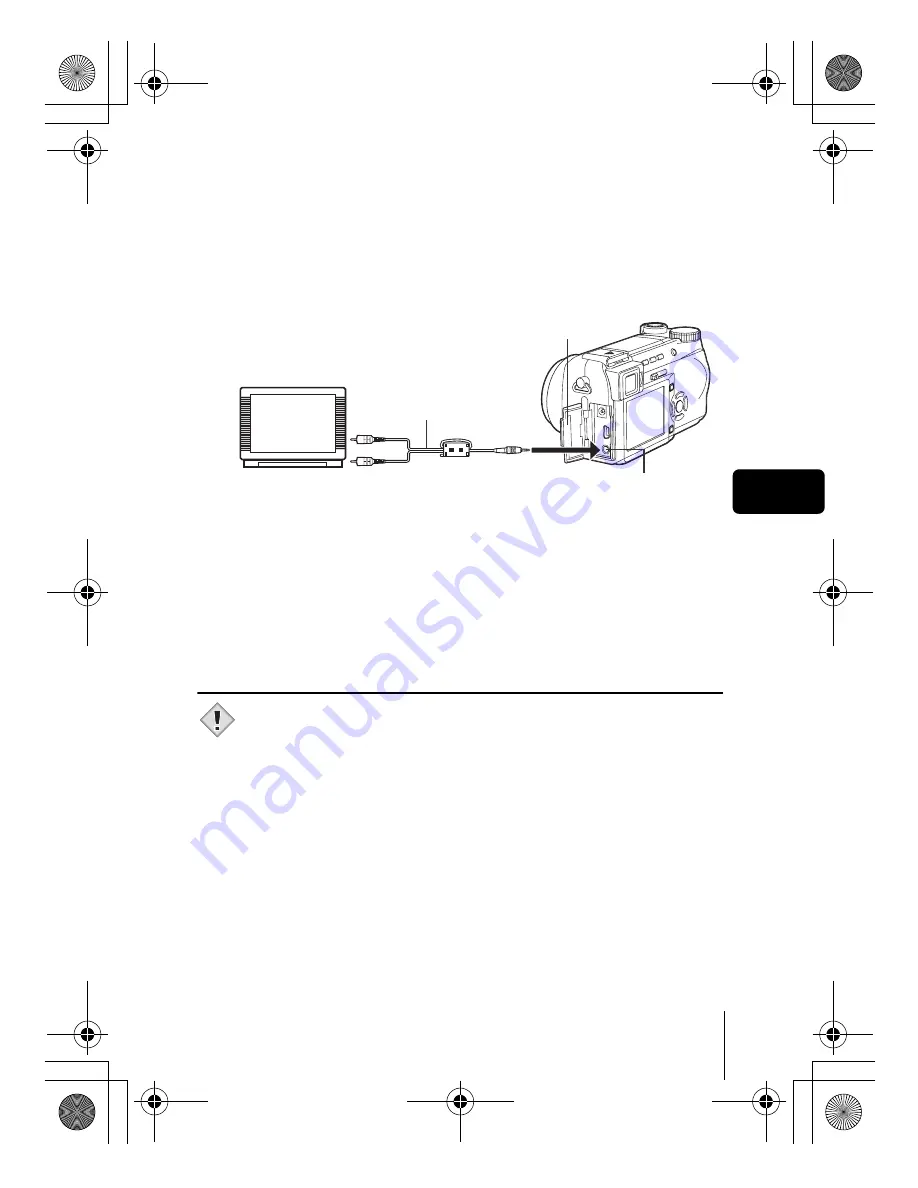
PLAYBACK ON A TV

Use the AV cable provided with the camera to play back recorded images on 
your TV.

1

Make sure that the TV and camera are turned off. 
Connect the A/V OUT jack on the camera to the video 
input terminal on the TV using the AV cable.

2

Turn the TV on and set it to the video input mode.

• For details of switching to video input, refer to your TV’s instruction 

manual.

3

Slide the power switch to 

q

 to turn the camera on.

• The last picture taken is displayed on the TV. Use the arrow pad to 

select the picture you want to display.

• The close-up playback, index display and slideshow functions can also 

be used on a TV screen.

• You are recommended to use the optional AC adapter when using 

the camera with a TV.

• Make sure that the camera’s video output signal type is the same as 

the TV’s video signal type.

Connect to the TV’s video input (yellow) 
and audio input (white) terminals.

AV cable

A/V OUT jack (MONO)

Connector cover

Note

basic_e_d4209_7.fm  Page 37  Thursday, December 25, 2003  1:36 PM

Summary of Contents for CAMEDIA C-770 Ultra Zoom

Page 1: ...PHOTO NUM RIQUE DIGITALKAMERA C MARA DIGITAL C 770 Ultra Zoom BASIC MANUAL MANUEL DE BASE EINFACHE ANLEITUNG MANUAL B SICO ENGLISH 2 FRAN AIS 44 DEUTSCH 86 ESPA OL 128 basic_e_d4209_7 fm Page 1 Tuesda...

Page 2: ...OTING 31 PLAYBACK 33 Playing back still pictures 33 Viewing movies 34 Protecting pictures 35 Erasing pictures 36 Formatting CARD SETUP 36 Playback on a TV 37 PRINT RESERVATION DIRECT PRINT 38 DOWNLOAD...

Page 3: ...ing two conditions 1 This device may not cause harmful interference 2 This device must accept any interference received including interference that may cause undesired operation For customers in Canad...

Page 4: ...r Remote control lamp Microphone DC IN jack Flash A V OUT jack MONO USB connector Connector cover Mode dial Shutter button Zoom lever W T GU Remote control receiver Hot shoe Speaker Strap eyelet basic...

Page 5: ...pad acbd OK Menu button e Monitor Flash mode button Diopter adjustment dial Self timer Remote control button Z Protect button 0 Rotation button y Flash button Battery compartment card cover Tripod soc...

Page 6: ...0 3 0 5 Battery check e f 6 Green lamp 7 Flash stand by Camera movement warning Flash charge Lights Blinks 8 Macro mode Super macro mode Manual focus MF 9 Noise reduction O 10 Flash mode SLOW1 HSLOW1...

Page 7: ...ill pictures Time remaining 30 00 36 19 AE lock AE memory B C 20 Spot metering n 21 ISO ISO50 ISO100 ISO200 ISO400 22 White balance 5 3 1 w x y V 23 White balance adjustment B1 B7 R1 R7 24 Saturation...

Page 8: ...0 9 Shutter speed 15 1 1000 10 Exposure compensation 2 0 2 0 11 White balance WB AUTO 5 3 1 w x y V 12 ISO ISO50 ISO100 ISO200 ISO400 13 Date and time 04 06 17 15 30 14 File number Frame number Playi...

Page 9: ...the camera is turned on or while the camera is in use 2288 1712 2288 1712 HQ HQ Memory gauge Battery check Before shooting Gauge is off No more pictures can be taken Fully lit Wait until the gauge re...

Page 10: ...ils read the charger s instructions provided 1 Make sure that the and terminals of the battery shown in the illustration on the right are correctly oriented when loading the battery into the charger T...

Page 11: ...ttery Align the battery as shown and insert it into the battery compartment until the battery is locked in position with the battery lock knob Removing the battery Slide the knob in the direction of t...

Page 12: ...ing the card Push the card all the way in to unlock it then let it return slowly The card is ejected a short way and then stops Hold the card straight and pull it out 4 Close the battery compartment c...

Page 13: ...a shooting mode n For recording movies Playback mode q For displaying the pictures you have taken 3 To turn the camera off slide the power switch to OFF In n or q mode there is no need to set the mod...

Page 14: ...Press d on the arrow pad to select MODE MENU 4 Press ac to select the SETUP tab then press d 5 Press ac to select W then press d The green frame moves to the selected item 6 Press ac to select a langu...

Page 15: ...n press d to move to the month setting To move back to the previous setting press b The first two digits of the year are fixed 8 Repeat this procedure until the date and time are completely set The ti...

Page 16: ...exit the menu and return to shooting status MODE MENU ESP Take you directly to the setting screens Display operational buttons at the bottom of the screen The functions registered in the shortcut menu...

Page 17: ...quality and resolution from TIFF SHQ HQ SQ1 and SQ2 Used to take pictures of a close subject Selects OFF or Sets the date and time Formats a card Extends the maximum optical zoom making possible up t...

Page 18: ...itor Selects ALL to display all images or 0 to display only protected images CAMERA tab ESP 5 Selects the metering method ESP 5 or MULTI Used to take pictures of a close subject Selects OFF m MOVIE PL...

Page 19: ...al zoom up to approximately 40 magnification FULLTIME AF Keeps the image in focus at all times without having to press the shutter button halfway AF MODE Selects the auto focus method iESP or SPOT PAN...

Page 20: ...es on the monitor while saving them to a card SLEEP Sets the sleep timer MY MODE SETUP Customizes settings which are activated in the r mode FILE NAME Changes how file names are assigned PIXEL MAPPING...

Page 21: ...to the white balance SHARPNESS This function adjusts the sharpness of the image CONTRAST This function adjusts the contrast of images SATURATION Adjusts the level of color depth without changing the t...

Page 22: ...b 1 Stores the necessary information on the card to allow you to print the pictures taken u Displays a histogram showing the luminance distribution R Adds sound to a still picture already taken 1 The...

Page 23: ...is turned on and off s Adjusts the brightness of the viewfinder or monitor X Sets the date and time VIDEO OUT Selects NTSC or PAL according to your TV s video signal type TV video signal types differ...

Page 24: ...ra on h Full auto shooting Allows you to take still pictures using no special functions or manual adjustments The camera sets the optimal focusing and exposure This is the simplest of all shooting mod...

Page 25: ...sed and without details In the Night Scene shooting mode the true appearance of the street is captured The camera automatically selects the optimal settings for this type of shooting condition Since t...

Page 26: ...gs as your own personal mode and use these customized settings when taking pictures Current settings can also be saved for retrieving by this mode The available settings vary depending on the mode J T...

Page 27: ...CK When the subject cannot be focused on you can focus the camera on another point at roughly the same distance focus lock and take the picture as explained below 1 Position the AF target mark on the...

Page 28: ...space in the card memory the remaining recording time is displayed and the camera is ready to shoot During movie recording the flash and manual focus MF are disabled It takes longer to store movies t...

Page 29: ...n below when all modes are available To prevent the flash from firing press down on the top of the flash to retract it 3 Press the shutter button halfway In conditions where the flash will fire lights...

Page 30: ...imer This function is useful for taking pictures with yourself included in the photograph Remote control Shooting is possible using the remote control device sold separately in some regions This is us...

Page 31: ...is individually locked for each frame The AF sequential shooting speed is slower than for normal sequential shooting BKT When auto bracketing is set the exposure is changed automatically for each fram...

Page 32: ...e focusing is performed quickly When the optical zoom lever is at the maximum wide position and you are as close as 7 cm 2 8 to your subject you can fill the entire frame with your subject J SUPER MAC...

Page 33: ...ting quickly 1 Press the QUICK VIEW button in the shooting mode 2 Press the QUICK VIEW button again to return to the shooting mode Close up playback Pictures displayed on the monitor can be enlarged 1...

Page 34: ...y it back one frame at a time or save selected frames as still pictures capture 1 Use the arrow pad to display the picture with n you want to play back 2 Press e The top menu is displayed 3 Press a to...

Page 35: ...revious frame The movie can be played continuously in reverse by holding the button down e Displays the MOVIE PLAYBACK menu If you selected CAPTURE Play back the movie one frame at a time until the fr...

Page 36: ...select R ALL ERASE then press e 3 Press a to select YES then press e All the pictures are erased J FORMATTING CARD SETUP This function lets you format a card Formatting prepares cards to receive data...

Page 37: ...power switch to q to turn the camera on The last picture taken is displayed on the TV Use the arrow pad to select the picture you want to display The close up playback index display and slideshow fun...

Page 38: ...d number of prints Resetting the print reservation data This function allows you to reset all the print reservation data for pictures stored on the card J DIRECT PRINT PictBridge By connecting the cam...

Page 39: ...indows 95 Mac OS 8 6 or lower except Mac OS 8 6 equipped with USB MASS Storage Support 1 3 5 installed at the factory Data transfer is not guaranteed on a home built PC system or PCs with no factory i...

Page 40: ...g the provided USB cable Does your computer have a USB interface The USB port is indicated by a mark Check that the port has the mark Does your computer have a built in PC card slot Consult your neare...

Page 41: ...re pictures movies or information such as print reservations can be recorded Replace the card or erase unwanted pictures Before erasing download important images to a PC NO PICTURE There are no pictur...

Page 42: ...TIFF SQ1 1600 1200 pixels TIFF SQ1 1280 960 pixels TIFF SQ1 1024 768 pixels TIFF SQ2 640 480 pixels TIFF SQ2 No of storable pictures when using a 16 MB card without sound Approx 1 frame TIFF 2288 1712...

Page 43: ...ystem 2000 up to 2099 Operating environment Temperature 0 C to 40 C 32 F to 104 F operation 20 C to 60 C 4 F to 140 F storage Humidity 30 to 90 operation 10 to 90 storage Power supply Only an Olympus...

Page 44: ...any Tel 49 40 23 77 3 0 Fax 49 40 23 07 61 Letters Postfach 10 49 08 20034 Hamburg Germany European Technical Customer Support Please visit our homepage http www olympus europa com or call our TOLL FR...

Reviews: