background image

45

EN

Adjust the settings for the functions while referring to “Using the Menu” (p. 3).

Selecting the video signal system to match your TV [VIDEO OUT]

E

 SETUP 

X

 VIDEO OUT

  The TV video signal system varies depending on the countries and regions. Before viewing camera 

images on your TV, select the video output according to your TV’s video signal type.

Submenu 2

Application

NTSC

Connecting the camera to a TV in North America, Taiwan, Korea, Japan, and so on

PAL

Connecting the camera to a TV in European countries, China, and so on

  The factory default settings differ according to the region where the camera is sold.

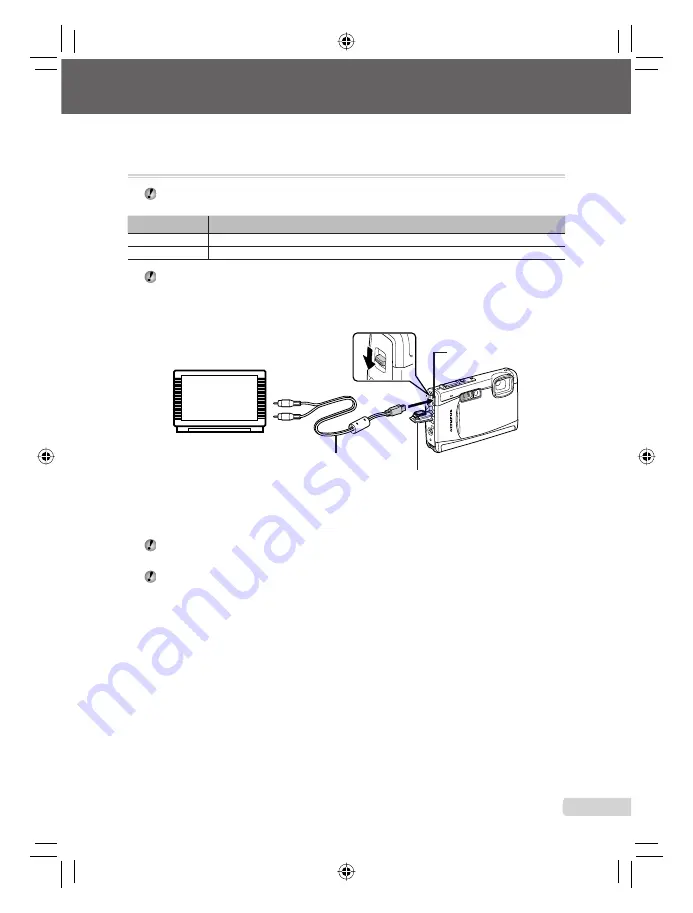
To play back camera images on a TV

Connect the TV and camera.

Connect to the TV video 
input jack (yellow) and 
audio input jack (white).

Multi-connector

AV cable (supplied)

Connector cover

Use the camera to select the same video signal system as the one of connected TV ([NTSC]/
[PAL]).

Turn on the TV, and change “INPUT” to “VIDEO (an input jack connected to the camera).”

  For details on changing the input source of the TV, refer to the TV’s instruction manual.

4

 Set the mode dial to 

q

, and use 

ABCD


to select the image for playback.

  Depending on the TV’s settings, the displayed images and information may become cropped.

Summary of Contents for 226730 - Stylus Tough 6000 Digital Camera

Page 1: ...w to Use the Camera Four Types of Setting Operations p 3 Printing Direct printing PictBridge p 48 Print Reservations DPOF p 51 Shooting and Playing Back Images Shooting Viewing and Erasing p 15 Preparing the Camera Preparing the Camera p 10 Names of Parts 6 Preparing the Camera 10 Shooting Viewing and Erasing 15 Using Shooting Modes 18 Using Shooting Functions 20 Using Playback Features 25 Menus f...

Page 2: ...w to Use the Camera Four Types of Setting Operations p 3 Printing Direct printing PictBridge p 48 Print Reservations DPOF p 51 Shooting and Playing Back Images Shooting Viewing and Erasing p 15 Preparing the Camera Preparing the Camera p 10 Names of Parts 6 Preparing the Camera 10 Shooting Viewing and Erasing 15 Using Shooting Modes 18 Using Shooting Functions 20 Using Playback Features 25 Menus f...

Page 3: ...on to complete the setting Four Types of Setting Operations E button Using the Menu Using the Menu Various camera settings can be accessed through the menus including functions used during shooting and playback and the date time and screen display There may be unavailable menus depending on the other related settings or the selected mode p 31 1 2 ISO OFF ON CAMERA MENU AUTO o FINE ZOOM DIGITAL ZOO...

Page 4: ...on to complete the setting Four Types of Setting Operations E button Using the Menu Using the Menu Various camera settings can be accessed through the menus including functions used during shooting and playback and the date time and screen display There may be unavailable menus depending on the other related settings or the selected mode p 31 1 2 ISO OFF ON CAMERA MENU AUTO o FINE ZOOM DIGITAL ZOO...

Page 5: ... B CAMERA MENU WB p 28 ISO p 28 DRIVE p 28 FINE ZOOM p 29 DIGITAL ZOOM p 29 ESP n p 29 AF MODE p 29 R Sound recording p 30 IMAGE STABILIZER Still images DIS MOVIE MODE Movies p 30 SHADOW ADJ p 30 3 O SCENE MODE p 31 4 N PANORAMA p 32 5 D RESET p 34 6 E SETUP MEMORY FORMAT FORMAT p 40 BACKUP p 40 W Language p 40 PW ON SETUP p 41 MENU COLOR p 41 SOUND SETTINGS p 42 REC VIEW p 42 FILE NAME p 43 PIXEL...

Page 6: ...i connector p 45 48 54 3 Connector cover p 45 48 54 66 4 Strap eyelet p 10 5 Speaker 6 Battery card compartment cover p 11 57 66 Camera unit 1 2 3 4 6 5 8 7 9 10 7 Lens p 61 8 Self timer lamp LED illuminator p 22 31 46 9 Flash p 20 10 Tripod socket ...

Page 7: ...ange menu guide date and time check LED illuminator p 3 13 22 7 Shutter button p 15 56 8 Mode dial p 3 5 15 16 18 9 q button playback p 16 10 o button OK FUNC p 3 23 11 o D button panorama tap control Shadow Adjustment Technology multi window erase p 17 24 12 Arrow pad p 3 4 12 F button exposure compensation p 21 button macro p 21 Y button self timer p 22 button flash p 20 ...

Page 8: ... stabilization movies p 30 5 Macro super macro S macro LED mode p 21 6 Shadow Adjustment Technology p 30 7 AF lock p 18 8 Tap control p 4 32 46 9 Battery check p 10 57 10 Flash standby camera shake warning flash charge p 56 11 AF target mark p 15 12 Sound record p 19 30 13 Dual time p 44 14 Number of storable still pictures remaining recording time p 15 19 63 15 Current memory p 62 16 Self timer p...

Page 9: ...15 15 11 16 9 10 12 3 4 6 1 13 14 5 5 Still image Movie 1 Silent mode p 47 2 Print reservation number of prints p 51 p 50 3 Sound record p 19 30 38 60 4 Protect p 37 5 Tap control p 4 32 46 6 Battery check p 10 57 7 Aperture value p 15 8 Exposure compensation p 21 9 White balance p 28 10 Image size p 27 11 File number p 43 12 Frame number Elapsed time total recording time p 17 13 Current memory p ...

Page 10: ...ge the battery Charge the battery when the error message shown below appears BATTERY EMPTY Monitor top right Error message Flashes in red Attaching the camera strap Pull the strap tight so that it does not come loose Charging the battery The included battery charger AC cable type or plug in type differs depending on the region where you purchased the camera If you received a plug in type battery c...

Page 11: ... Notch Index area Loading the battery and the xD Picture Card sold separately into the camera Do not insert anything other than an xD Picture Card or the microSD Attachment into the camera 1 2 The battery has front side and back side Insert the battery in the correct direction as illustrated If the battery is not inserted correctly the camera does not operate Insert the battery while sliding the b...

Page 12: ...touch the contact area on the microSD Attachment and microSD card Arrow pad and operation guide The symbols 1243 displayed on various setting and movie playback screens indicate that arrow pad are used 2009 08 26 2009 08 26 12 30 12 30 100 0004 100 0004 00 14 00 34 00 14 00 34 IN 2008 08 26 12 30 OK X Y M D TIME MENU CANCEL SET Y Y M M D D 0 0 0 0 0 3 0 3 0 7 0 7 1 0 1 0 EXPOSURE COMP Arrow pad 4 ...

Page 13: ...and the o button to set M month D day and TIME hours and minutes and Y M D date order For precise time setting press the o button as the time signal strikes 00 seconds To change the date and time adjust the setting from the menu X Date time p 44 To check the date and time Press the g button while the camera is turned off The current time is displayed for approx 3 seconds Changing the display langu...

Page 14: ...14 EN 3 Use AB to select W and press the o button W FRANCAIS DEUTSCH ESPAÑOL ITALIANO ENGLISH ུࢊ OK SET BACK MENU 4 Use ABCD to select your language and press the o button 5 Press the m button ...

Page 15: ...flashes red Try focusing again 1 400 1 400 F3 5 F3 5 P AF target mark Press halfway Shutter speed Aperture value Focusing p 58 Shooting with optimum aperture value and shutter speed K mode In this mode automatic camera shooting can be used while also allowing changes to a wide range of other shooting menu functions such as exposure compensation white balance and so on when needed 1 Set the mode di...

Page 16: ...alfway down You can operate the camera by tapping the body when TAP CONTROL is ON TAP CONTROL p 46 To shoot movies Shooting movies A mode p 19 Viewing images 1 Set the mode dial to q 1 1 IN 10M 10M 2009 08 26 2009 08 26 12 30 12 30 100 0001 100 0001 NORM NORM Playback image Frame number 2 Use ABCD to select an image Displays 10 frames before the current image Displays next image Displays previous ...

Page 17: ...4 00 12 00 34 IN During playback Elapsed time Total recording time First last frame frame advance During pause press A to display the first frame and press B to display the last frame Playback is reversed while C is pressed playback occurs normally while D is pressed Press the o button to resume playback 2009 08 26 2009 08 26 12 30 12 30 100 0004 100 0004 00 14 00 34 00 14 00 34 IN During pause To...

Page 18: ...ls on the functions that can be adjusted see Menus for Shooting Functions on page 27 Using the best mode for the shooting scene s mode 1 Set the mode dial to s PORTRAIT SET OK MENU EXIT An explanation of the selected mode is displayed while the E button is pressed and held 2 Use AB to select the best shooting mode for the scene and press the o button 10M 10M 4 4 IN NORM NORM Icon indicating the sc...

Page 19: ... 10M 4 4 IN NORM NORM iAUTO The indicator changes to the icon for the scene mode selected by the camera Press the shutter button halfway down or press the g button to check which shooting mode the camera has automatically selected In some cases the camera may not select the desired shooting mode When the camera cannot identify which is the optimal mode P mode will be selected Shooting movies n mod...

Page 20: ...H AUTO AUTO In addition to the wide variety of shooting modes the camera has functions that broaden the expressive range and shooting options available to the photographer Using the optical zoom Pressing the zoom button adjusts the shooting range Pressing the wide W button Pressing the telephoto T button 10M 10M P 4 4 IN NORM NORM 10M 10M P 4 4 IN NORM NORM W W T T W W T T Zoom bar Optical zoom 3 ...

Page 21: ...ooting This function enables the camera to focus and shoot subjects at close distances 1 Press the button You can operate the camera by tapping the body when TAP CONTROL is ON TAP CONTROL p 46 P OK OK SET SET OFF OFF OFF OFF OFF 2 Use CD to select the setting option and press the o button to set Item Description OFF Macro mode is deactivated MACRO This enables shooting as close as 10 cm 3 9 in 1 3...

Page 22: ...imer after it starts Press the Y button again Using the LED illuminator In a dark location the LED illuminator can be used as an auxiliary light to see things or compose shots 1 Set LED ILLUMINATOR p 46 to ON 2 Press and hold the Y button down until the LED illuminator lights up If you perform an operation when the LED illuminator is on it will illuminate up to approx 90 seconds LED illuminator Th...

Page 23: ... 2 0 P 4 4 IN ISO 1600 ISO 1600 NORM NORM Normal No information Histogram Grid Reading a histogram If the peak fills too much of the frame the image will appear mostly white If the peak fills too much of the frame the image will appear mostly black The green section shows the luminance distribution in the center area of the monitor Using the FUNC menu The FUNC menu provides the following menu func...

Page 24: ...e o button to set To use the effects preview screen Multi window Selecting an option from ZOOM EXPOSURE COMP WB or ESP n shows 4 preview images that reflect the adjusted values of the selected shooting function Use ABCD to select the desired image and press the o button Brightening the monitor Backlight boost Pressing and holding the o D button brightens the monitor The monitor returns to the orig...

Page 25: ...SO 400 NORM NORM 10M 10M 2009 08 26 2009 08 26 12 30 12 30 2 0 2 0 F3 5 F3 5 4 4 IN NORM NORM 1 1000 1 1000 ISO 400 ISO 400 Normal Detailed Histogram No information Reading a histogram p 23 Index view calendar view and close up view Index view and calendar view enable quick selection of a target image Close up view up to 10x magnification allows checking of image details 1 Press the zoom button 20...

Page 26: ...a panorama image during playback Viewing images p 16 NORM NORM 2009 08 26 12 30 2009 08 26 12 30 2 2 100 0003 100 0003 2 Press the o button Current viewing area To control panorama image playback Zoom in Zoom out Press the zoom button Playback direction Press ABCD to scroll in the direction of the pressed button Pause Press the o button Restart scrolling Press the o button Stop playback Press the ...

Page 27: ...res at A4 8 5 11 in 3M 2048 1536 Suitable for printing pictures up to A4 8 5 11 in 2M 1600 1200 Suitable for printing pictures at A5 5 7 in 1M 1280 960 Suitable for printing pictures at postcard size VGA 640 480 Suitable for viewing pictures on a TV or using pictures on emails and web sites 16 9 1920 1080 Suitable for playing pictures on wide screen TV COMPRESSION FINE Shooting at high quality NOR...

Page 28: ...r speeds even under dimly lit conditions However high sensitivity introduces electrostatic noise into the resulting picture which may give it a grainy appearance Submenu 2 Application AUTO The camera automatically adjusts the sensitivity according to the shooting scene HIGH ISO AUTO The camera uses a higher sensitivity compared to AUTO to minimize blur caused by a moving subject or by camera shake...

Page 29: ... This function is not available when SUPER MACRO p 21 or O S MACRO LED p 21 is selected Selecting the range for measuring the brightness ESP n B CAMERA MENU X ESP n K s A Submenu 2 Application ESP Shoots to obtain a balanced brightness over the entire screen Meters the brightness at the center and surrounding areas of the screen separately n spot Shoots the subject at the center during backlightin...

Page 30: ...AGE STABILIZER still images is set to ON noises may occur from the inside of the camera if the shutter button is pressed Images may not be stabilized if camera shake is too severe When the shutter speed is extremely slow such as when taking still shots or taking pictures at night the stabilizer may not be as effective When shooting while the DIS MOVIE MODE movie is set to ON the image will be enla...

Page 31: ...lected mode Using the best mode for the shooting scene s mode p 18 Detecting a smiling face to release the shutter automatically lSMILE SHOT mode 1 Select lSMILE SHOT and then aim the camera towards the subject The self timer lamp turns on When a smiling face is detected the camera automatically takes 3 sequential shots Pictures can also be taken manually by pressing the shutter button The camera ...

Page 32: ... or O SCENE MODE settings except for some scene modes 1 Not available in s mode p 18 2 The A IMAGE QUALITY p 27 setting cannot be changed The focus exposure p 21 zoom position p 20 and WB p 28 are locked at the first frame The flash p 20 is fixed to FLASH OFF mode Panorama images can be edited using SHADOW ADJ p 30 COLOR EDIT p 36 only Playing back panorama images p 26 Taking pictures with COMBINE...

Page 33: ...ird frame 5 Take the third frame in the same way as Steps 3 to 4 After the third frame is taken the camera automatically processes the frames and the combined panorama image is displayed To cancel making panoramic picture during shooting press the m button Taking pictures with COMBINE IN PC 1 Use ABCD to select the direction that the frames are combined 2 Press the shutter button to take the first...

Page 34: ... RESET A K s b A Submenu 1 Application YES Restores the following menu functions to the default settings Flash p 20 Exposure compensation p 21 Macro p 21 Self timer p 22 A IMAGE QUALITY p 27 Menu functions in B CAMERA MENU p 28 to 30 NO The current settings are not changed ...

Page 35: ...ERFECT FIX Depending on the picture the editing may not be effective The retouching process may lower the image resolution Submenu 1 Application ALL SHADOW ADJ and REDEYE FIX are applied together SHADOW ADJ Only sections darkened by backlighting and dim lighting are brightened REDEYE FIX Eyes that are reddened by the flash are corrected 1 Use AB to select a correction method and press the o button...

Page 36: ... the o button 2 Use the zoom button to select the size of the cropping frame and use ABCD to move the frame T W SET OK Cropping frame 3 Press the o button The edited image is saved as a separate image Changing the color tone of image COLOR EDIT I EDIT X COLOR EDIT Submenu 2 Application Black white This changes the image to black and white Sepia This changes the image to a sepia tone Saturation har...

Page 37: ...n index of 9 frames from a movie INDEX I EDIT X INDEX 1 Use CD to select a movie and press the o button INDEX SET OK MENU BACK This function extracts 9 frames from a movie and saves them as a new picture INDEX containing thumbnails of each frame Protecting images 0 J PLAYBACK MENU X 0 Protected images cannot be erased by ERASE p 17 SEL IMAGE or ALL ERASE p 38 but all images are erased by MEMORY FO...

Page 38: ...rding starts Erasing images K ERASE K ERASE Check each picture before erasing to avoid erasing any important pictures you may want to keep Submenu 1 Application SEL IMAGE Images are individually selected and erased ALL ERASE All images in the internal memory or card are erased When erasing pictures in the internal memory do not insert the card into the camera When erasing pictures from the card in...

Page 39: ... the functions while referring to Using the Menu p 3 Saving print settings to the image data L PRINT ORDER L PRINT ORDER Print Reservations DPOF p 51 Print reservation can only be set for still images that are recorded to the card ...

Page 40: ...NO Cancels formatting 1 Be sure to remove the card before formatting the internal memory Copying images in the internal memory to the card BACKUP E SETUP X BACKUP Submenu 2 Application YES Backs up image data in the internal memory to the card NO Cancels the backup It takes some time to back up data Check that the battery has sufficient power before starting the backup or use an AC adapter Changin...

Page 41: ...en VOLUME 2 3 OFF No sound LOW HIGH The volume of the startup sound is selected 1 This image cannot be changed 2 When SCREEN is set to OFF this setting is not available 3 When F SILENT MODE p 47 is set to ON this setting is not available To register a startup image 1 Select 2 in Submenu 3 for SCREEN and press the o button 2 Use CD to select the image to be registered and press the o button Selecti...

Page 42: ...ting while the image is being displayed Selecting the camera sound and its volume SOUND SETTINGS E SETUP X SOUND SETTINGS Submenu 2 Submenu 3 Submenu 4 Application BEEP SOUND TYPE 1 2 Selects the operating sound and volume of the camera buttons except the shutter button VOLUME OFF No sound LOW HIGH SHUTTER SOUND SOUND TYPE 1 2 3 Selects the type and volume of the shutter sound VOLUME OFF No sound ...

Page 43: ... from the previous card This is useful for managing all image folder names and files names with sequential numbers 1 The number for the folder name is reset to 100 and the one for the file name is reset to 0001 Adjusting the CCD and the image processing function PIXEL MAPPING E SETUP X PIXEL MAPPING This function has already been adjusted at factory shipping and no adjustment is needed right after...

Page 44: ...M D TIME MENU CANCEL SET Y Y M M D D Date order Setting the date and time for another time zone DUALTIME E SETUP X DUALTIME By setting DUALTIME to ON and setting the date and time the set date and time is reflected in the image file names date prints and so on Submenu 2 Submenu 3 Application OFF Switches to the date and time set in X Date time ON Proceeds to the setting screen 1 Switches to the da...

Page 45: ...China and so on The factory default settings differ according to the region where the camera is sold To play back camera images on a TV 1 Connect the TV and camera Connect to the TV video input jack yellow and audio input jack white Multi connector AV cable supplied Connector cover 2 Use the camera to select the same video signal system as the one of connected TV NTSC PAL 3 Turn on the TV and chan...

Page 46: ...nables the LED illuminator Using the LED illuminator p 22 Operating the camera by tapping the body TAP CONTROL E SETUP X TAP CONTROL Submenu 2 Application OFF Cancels TAP CONTROL ON TAP CONTROL is activated CALIBRATE Adjusts the tap strength and intervals between multiple taps on each side of the camera body top left right back Functions available when TAP CONTROL is set to ON Camera s top TOP Tap...

Page 47: ... camera once Start slideshow Tap the top surface of the camera twice The slideshow will automatically start for all images stored in internal memory or on the card with BGM set to OFF Display next image during a slideshow Tilt the camera right or tap the right side of the camera once Display previous image during a slideshow Tap the left side of the camera once Stop slideshow Tap the top surface o...

Page 48: ...ctBridge refer to the printer s instruction manual 1 PictBridge is a standard for connecting digital cameras and printers of different makers and printing out pictures directly The printing modes paper sizes and other parameters that can be set with the camera vary depending on the printer that is used For details refer to the printer s instruction manual For details on the available paper types l...

Page 49: ...only when print reservations have been made Print Reservations DPOF p 51 4 Use AB to select SIZE Submenu 3 and press D If the PRINTPAPER screen is not displayed the SIZE BORDERLESS and PICS SHEET are set to the printer s standard STANDARD STANDARD PRINTPAPER SET OK MENU BACK SIZE BORDERLESS 5 Use AB to select the BORDERLESS or PICS SHEET settings and press the o button Submenu 4 Application OFF ON...

Page 50: ...he date Selecting WITHOUT prints the images without the date FILE NAME WITH WITHOUT Selecting WITH prints the file name on the image Selecting WITHOUT does not print any file name on the image P Proceeds to the setting screen This selects a portion of the image for printing To crop an image P 1 Use the zoom button to select the size of the cropping frame use ABCD to move the frame and then press t...

Page 51: ...on are saved in the image on the card This enables easy printing at a printer or print shop supporting DPOF by using only the print reservations on the card without a computer or a camera 1 DPOF is a standard for storing automatic printout information from digital cameras Print reservations can be set only for the images stored on the card Insert a card with recorded images before making print res...

Page 52: ...ting date TIME This prints the image with the shooting time OK SET BACK MENU PRINT ORDER SET CANCEL 1 1 1 1 6 Use AB to select SET and press the o button Reserving one print each of all images on the card U 1 Follow Steps 1 and 2 in p 51 2 Use AB to select U and press the o button 3 Follow Steps 5 to 6 in Resetting all print reservation data 1 Set the mode dial to q and then press the m button to ...

Page 53: ...press the o button 4 Use CD to select the image with the print reservation you want to cancel Use AB to set the print quantity to 0 5 If necessary repeat Step 4 and then press the o button when finished 6 Use AB to select the X date print screen option and press the o button The settings are applied to the remaining images with the print reservation data 7 Use AB to select SET and press the o butt...

Page 54: ...e desktop Macintosh appears in the OLYMPUS Master 2 folder Browse window appears after starting the software When you start OLYMPUS Master 2 for the first time after installation Default Settings and Registration screens appear Follow the instructions on the screen System requirements and installation of OLYMPUS Master 2 Install the OLYMPUS Master 2 software by referring to the included installati...

Page 55: ...sfer and save the image data on your computer while the camera and the computer are connected System requirements Windows Windows 2000 Professional XP Home Edition XP Professional Vista Macintosh Mac OS X v10 3 or later On a computer running Windows Vista if MTP is set for the submenu that appears by pressing D after selecting PC in Step 3 of Connecting the camera to a computer p 54 Windows Photo ...

Page 56: ...ally turns off Press the n button to turn on the camera Set the mode dial to a position other than q Wait until flash charge stops blinking before taking pictures Monitor Difficult to see Condensation 1 may have formed Turn off the power and wait for the camera body to become acclimated to the surrounding temperature and dry out before taking pictures 1 Dew drops can form in the camera when it is ...

Page 57: ...ware etc to view the image on a computer If the image still cannot be viewed the image file is corrupted Error message Corrective action r THE IMAGE CANNOT BE EDITED Problem with selected image Use photo retouch software etc to edit the image on a computer CARD COVER OPEN Operation problem Close the battery card compartment cover g BATTERY EMPTY Battery problem Charge the battery NO CONNECTION Con...

Page 58: ...of subjects where autofocus is difficult In the following cases after focusing on an object by pressing the shutter button halfway down with high contrast at the same distance as the subject compose the shot and take the picture Subjects with low contrast When extremely bright objects appear in the center of the screen Object with no vertical lines 1 1 It is also effective to compose the shot by h...

Page 59: ...ing pictures of a white beach or snow scene Set the mode to q BEACH SNOW a SNOW p 31 Taking pictures using exposure compensation p 21 Adjust the brightness while viewing the screen for taking the picture Normally taking pictures of white subjects such as snow results in images that are darker than the actual subject Use the F button to adjust in the positive direction to express whites as they app...

Page 60: ... POWER SAVE p 46 to ON Playback Editing tips Playback Viewing images in the internal memory and card Remove the card when viewing pictures in the internal memory Loading the battery and the xD Picture card sold separately into the camera p 11 Using the microSD card microSDHC card sold separately p 12 Editing Erasing the sound recorded to a still image Record over the sound with silence when playin...

Page 61: ...of battery with the supplied battery charger It might cause explosion leaking overheating or fire For plug in type battery charger This power unit is intended to be correctly orientated in a vertical or floor mount position Camera care Exterior Wipe gently with a soft cloth If the camera is very dirty soak the cloth in mild soapy water and wring well Wipe the camera with the damp cloth and then dr...

Page 62: ...so available with the use of a computer Cards can be removed from the camera and exchanged but this is not possible with the internal memory Use of larger capacity cards enables you to take more pictures Index area Notes can be filled in here Contact area Contact section of the card with the internal camera terminal Do not touch the contact area directly Cards compatible with this camera xD Pictur...

Page 63: ... With sound Without sound With sound Without sound F 3648 2736 L 8 8 204 205 M 16 16 399 404 H 2560 1920 L 16 17 404 410 M 34 35 820 841 I 2048 1536 L 25 26 615 627 M 52 54 1254 1305 J 1600 1200 L 43 44 1031 1066 M 81 86 1938 2063 K 1280 960 L 65 68 1560 1640 M 121 134 2907 3198 C 640 480 L 206 243 4920 5815 M 335 446 7996 10661 D 1920 1080 L 40 41 954 984 M 76 81 1827 1938 Movies IMAGE SIZE FRAME...

Page 64: ...r resistance The waterproof feature is warranted 1 to operate at depths up to 3 m 9 8 feet for up to one hour The waterproof feature may be compromised if the camera is subject to substantial or excessive impact Shock resistance The anti shock feature warrants 2 the operation of the camera against accidental impact incurred from everyday use of your digital compact camera The anti shock feature do...

Page 65: ... To avoid such damage wash the camera using the following method 1 Insert the battery and close the battery card compartment cover and connector cover firmly so that each lock makes the clicking sound 2 Fill a bucket with fresh water immerse the camera in the bucket with the lens surface downward and shake the camera thoroughly 3 Press the n button several times in the water and close open the len...

Page 66: ...VER DISASSEMBLE EXPOSE THIS PRODUCT TO WATER OR OPERATE IN A HIGH HUMIDITY ENVIRONMENT General Precautions Read All Instructions Before you use the product read all operating instructions Save all manuals and documentation for future reference Cleaning Always unplug this product from the wall outlet before cleaning Use only a damp cloth for cleaning Never use any type of liquid or aerosol cleaner ...

Page 67: ...insert a card by mistake such as a microSD card do not use force Contact authorized distributors service centers CAUTION Stop using the camera immediately if you notice any unusual odors noise or smoke around it Never remove the batteries with bare hands which may cause a fire or burn your hands Do not leave the camera in places where it may be subject to extremely high temperatures Doing so may c...

Page 68: ... the clothing and flush the affected area with clean running cold water immediately If the fluid burns your skin seek medical attention immediately Never subject batteries to strong shocks or continuous vibration CAUTION Before loading always inspect the battery carefully for leaks discoloration warping or any other abnormality The battery may become hot during prolonged use To avoid minor burns d...

Page 69: ...e failure or damage to the monitor A strip of light may appear on the top bottom of the monitor but this is not a malfunction When a subject is viewed diagonally in the camera the edges may appear zigzagged on the monitor This is not a malfunction it will be less noticeable in playback mode In places subject to low temperatures the LCD monitor may take a long time to turn on or its color may chang...

Page 70: ... for damages resulting from the use of the information contained therein Olympus reserves the right to alter the features and contents of this publication or software without obligation or advance notice FCC Notice Radio and Television Interference Changes or modifications not expressly approved by the manufacturer may void the user s authority to operate this equipment This equipment has been tes...

Page 71: ...Frequency Hz Plug type China 220 50 A Hong Kong 200 220 50 BF India 230 240 50 C Indonesia 127 230 50 C Japan 100 50 60 A Korea rep 220 60 C Malaysia 240 50 BF Philippines 220 230 60 A C Singapore 230 50 BF Taiwan 110 60 A Thailand 220 50 C BF Vietnam 220 50 A C Oceania Countries Regions Voltage Frequency Hz Plug type Australia 240 50 O New Zealand 230 240 50 O North America Countries Regions Volt...

Page 72: ...TED WARRANTY IMAGING PRODUCTS Olympus warrants that the enclosed Olympus imaging product s and related Olympus accessories individually a Product and collectively the Products will be free from defects in materials and workmanship under normal use and service for a period of one 1 year from the date of purchase If any Product proves to be defective within the one year warranty period the customer ...

Page 73: ... PRODUCTS OR ANY PART THEREOF OR THE MERCHANTABILITY OF THE PRODUCTS OR THEIR FITNESS FOR A PARTICULAR PURPOSE OR RELATING TO THE INFRINGEMENT OF ANY PATENT COPYRIGHT OR OTHER PROPRIETARY RIGHT USED OR INCLUDED THEREIN IF ANY IMPLIED WARRANTIES APPLY AS A MATTER OF LAW THEY ARE LIMITED IN DURATION TO THE LENGTH OF THIS LIMITED WARRANTY SOME STATES MAY NOT RECOGNIZE A DISCLAIMER OR LIMITATION OF WA...

Page 74: ...rvice your package should include the following 1 Sales receipt showing date and place of purchase 2 Copy of this limited warranty bearing the Product serial number corresponding to the serial number on the Product unless it is a model on which Olympus does not place and record serial numbers 3 A detailed description of the problem 4 Sample prints negatives digital prints or files on disk if avail...

Page 75: ...W 0 3 m 1 0 ft to T macro mode 0 02 m 0 8 in to 0 5 m 1 6 ft W only super macro mode 0 07 m 2 8 in to 0 2 m 0 7 ft W only S macro LED mode Monitor 2 7 TFT color LCD display 230 000 dots Flash charge time Approx 3 5 sec for full flash discharge at room temperature using a new fully charged battery Connector Multi connector DC IN jack USB connector A V OUT jack Automatic calendar system 2000 up to 2...

Page 76: ... V 50 60 Hz Output DC 4 2 V 700 mA Charging time Approx 2 hours Operating environment Temperature 0 C to 40 C 32 F to 104 F operation 20 C to 60 C 4 F to 140 F storage Dimensions 62 0 mm W 23 8 mm H 90 0 mm D 2 4 0 9 3 5 in Weight Approx 70 g 2 5 oz Using in low temperatures Low temperature operation of the optional Olympus xD Picture Card and lithium ion battery are guaranteed to 0 C 32 F However...

Page 77: ...rature 10 C to 40 C 14 to 104 F operation 20 C to 65 C 4 to 149 F storage Humidity 95 and below operation 85 and below storage Dimensions 25 0 mm W x 20 3 mm H x 1 7 mm D 1 0 0 8 0 07 in Handle 2 2 mm 0 09 in Weight Approx 0 9 g 0 03 oz Design and specifications subject to change without notice ...

Page 78: ...INT INFO 50 FILL IN 21 FINE 27 FINE ZOOM 29 FLASH AUTO 21 Flash charge 56 Flash mode 20 A AC adapter 62 AF lock 18 AF MODE 29 ALL PERFECT FIX 35 ALL SLIDESHOW 35 ALL INDEX 49 ALL PRINT 49 All image print reservation U 52 AUTO FILE NAME 43 AUTO ISO 28 AUTO WB 28 AV cable 2 45 B BACKUP 40 Battery 2 10 56 60 61 Battery charger 10 61 BEAUTY FIX M 35 b mode 18 BEEP 42 BGM 35 Black White 36 C CALENDAR 3...

Page 79: ...icroSD Attachment 2 12 64 microSD card 12 64 microSDHC card 12 64 Monitor brightness adjustment s 44 MOVIE SLIDESHOW 35 MULTI PRINT 49 MULTI WINDOW 24 N NO X 52 NORMAL 27 NORMAL MENU COLOR 41 NORMAL SLIDESHOW 35 NTSC 45 Number of prints x 50 O OLYMPUS Master 2 2 54 Optical zoom 20 P PAL 45 PANORAMA N 32 Panorama playback 26 PC 54 PERFECT FIX H 35 PictBridge 48 Picture rotation y 38 PIXEL MAPPING 4...

Page 80: ...e frame shooting o 28 SLIDE SLIDESHOW 35 SLIDESHOW G 35 S MACRO LED O 21 Sound recording Adding sound to still pictures R 38 Recording sound with still pictures R 30 SOUND SETTINGS 42 SPARKLE EYE 35 SPOT AF MODE 29 Spot metering n 29 STILL PICTURE SLIDESHOW 35 Strap 2 Sunny day 5 28 SUPER MACRO 21 T TAP CONTROL 46 TIME X 52 Top menu 5 Tungsten light 1 28 Turn the camera on 13 15 TYPE 35 U USB cabl...

Page 81: ...81 EN MEMO ...

Page 82: ...82 EN MEMO ...

Page 83: ...83 EN MEMO ...

Page 84: ...84 EN MEMO ...

Page 85: ...on to complete the setting Four Types of Setting Operations E button Using the Menu Using the Menu Various camera settings can be accessed through the menus including functions used during shooting and playback and the date time and screen display There may be unavailable menus depending on the other related settings or the selected mode p 31 1 2 ISO OFF ON CAMERA MENU AUTO o FINE ZOOM DIGITAL ZOO...

Page 86: ...w to Use the Camera Four Types of Setting Operations p 3 Printing Direct printing PictBridge p 48 Print Reservations DPOF p 51 Shooting and Playing Back Images Shooting Viewing and Erasing p 15 Preparing the Camera Preparing the Camera p 10 Names of Parts 6 Preparing the Camera 10 Shooting Viewing and Erasing 15 Using Shooting Modes 18 Using Shooting Functions 20 Using Playback Features 25 Menus f...

Reviews: