Page 3 from 4
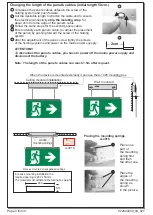
Changing the length of the panel’s cables (initial length 50cm.)
To release the panel’s cables unfasten the screw of the
holding system and push forward.
Cut the desirable length to shorten the cable and to ensure
the electrical connectivity
strip the isolating wrap
for
about 2cm from the edge of the panel’s cable.
Follow the same steps for the second panels cable.
Enter carefully each panel’s cable, (to adjust the placement
of the panel) by pushing forward the screw of the holding
system.
After the adjustment of the panel, screw tightly the screws
of the holding systems and power on the mains power suypply .
ATTENTION!!
To disconnect the panel’s cables, you have to power off the mains power supply and
disconnect the battery.
Note: The length of the panel’s cables can reach 1.5m after request.
1
2
3
4
5
Ceiling mounted installation
Wall mounted
When the device is mounted externally it can use the A-1028 mounting box.
Recess mounted on suspended ceilings
A-3018
A-3018
mounting springs
In recess mounting installation the
required opening is 280 x 50 mm.
The material must withstand the luminaires weight.
280
50
Placing the mounting springs
Α-3018
Place one
part of
the mounting
spring first
and then
the other one.
Place the
edges of
the mounting
spring as
shown
in the picture.
2
1
922044000_09_027
1
2
2cm


