Page 2 from 4
3
1
4
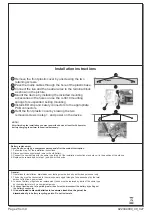
Installation instructions
Remove the front plastic cover by unscrewing the two
retaining screws.
Pass the mains cables through the hole of the plastic base.
Connect the live and the neutral wires to the terminal block
as shown in the picture.
Mount the device by installing the included mounting
accessories in the holes or use the Α-3018 mounting
springs for suspended seiling mounting.
Install LED strip and batery connectors to the appropriate
PCB connectors.
Refit the front plastic cover by srewing the two
removed screws in step 1, and power on the device.
1
2
3
4
5
6
5
2
L
N
NOTE!!
After finishing the installation you must power the device at least for 24 hours for
battery charging to perform the nominal autonomy.
Battery replacement
It can be done only by a competent person and after the mains interruption
1. Follow the step 1 of the installation instructions.
2. Disconnect the connector and remove the old battery.
3. Connect the new battery with the same type (step 5 of the installation instructions) and place it in the position of the old one.
4. Replace the removed parts (step 1) and power the device.
922044000_09_027
General
:
1. Operations for installation, maintainance or testing must be done by authorized personnel only.
2. The device must be connected to the mains power supply through a fuse dependent by the total
amount of the line’s power load.
In case of battery or light source replacement, these must be replaced by parts of the same type,
by the manufacturer or by a competent person.
t i
in battery recycling points. Do not incinerate.
3.
4. In case of inactive use for a period greater than 2 months, disconnect the battery by pulling out
the battery’s connector.
5.
I s not allowed to discard batteries in to common trash bins, they must be
discarded only


