


Page
4
from
5
923037016
_09_00
1
neutral
(
Fig. 2
).
and red cable to (+) pole
(
Fig. 2
)
.
4. Install the included cable gland or the rubber o-ring. Pass through the mains cable and stabilize it
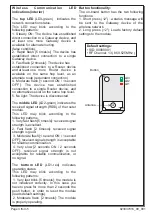
1. Install the included mounting accessories to hook the device from the mounting holes (Fig.1).
2. Unfasten the 4 mounting screws to remove the front plastic cover (Fig.1).
3. Make sure that the battery’s cables are connected to the respective poles. Black cable to (-) pole
by fastening the cable gland. Connect the wires to the terminal blocks
L
for live wire and
Ν
for
1N*m).
5
.
Refit with care the front plastic cover, by fastening the 4 mounting screws (tightening torque
After the installation has finished, charge the batteries for at least 24 hours so as to obtain the
rated autonomy duration
.
WARNING!!
INSTALLATION PROCEDURE (For wall mounting only)
INDICATION LED STATUS (with the mains power supply connected
)
Indicator ON
Indicator Blinking
Indicator OFF
POWER / CHARGE
LAMP FAULT / BATT. FAULT
Disconnected battery / not charging
Normal operation mode
Charged battery
Low emergency duration (replace battery)
Battery under charge
Lamp fault (Check lamps and replace if needed)
TEST
button
Fig
.
1
POWER
CHARGE
indicator
Mounting holes
LAMP FAULT
BATT. FAULT
indicator
Cover
retaining
screws
4
N
L
3
Fig.
2