


Page
5 from
6
92250300
1
_09_001
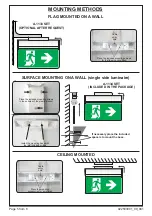
SURFACE MOUNTING ON A WALL
(
single side luminaire
)
FLAG MOUNTED ON A WALL
MOUNTING METHODS
CEILING MOUNTED
Cable
entry
hole
Place the mounting
accessories for installation
Cable
entry
hole
Place the included mounting screws
for the flag mounting base
Place the included mounting screws
in these holes of the plastic bracket
Install the mounting base with
the two included screws
A-1133 SET
(OPTIONAL AFTER REQUEST)
A-1134 SET
(INCLUDED IN THE PACKAGE)
If necessary place the included
spacers to mount the base.


