background image

EN 


9.07B – 12 Volt Function 


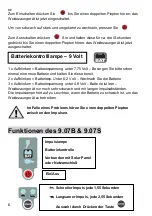
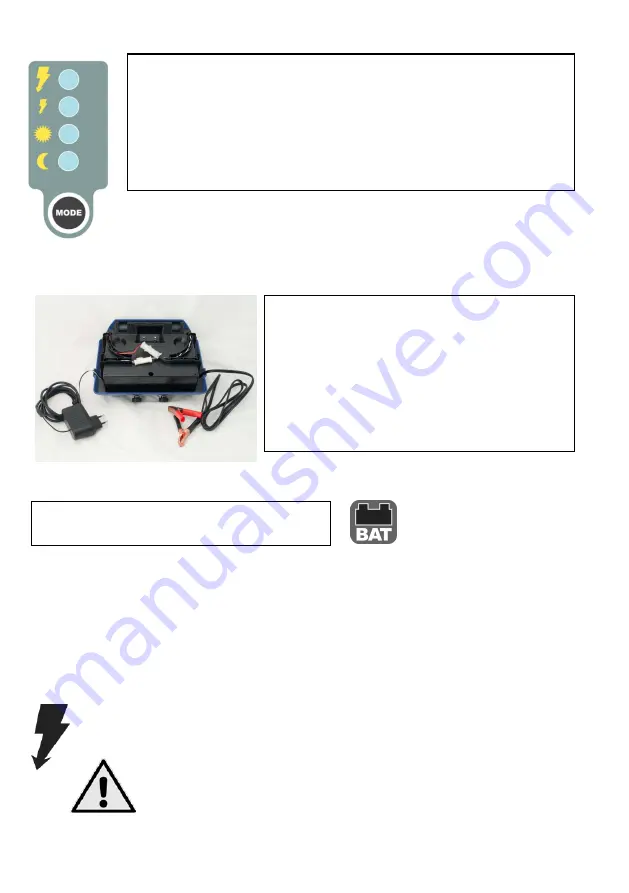
Flashing x 1 = under 12.15 Volts in the battery – remember it will need charging 
soon! 
Flashing x 2 = under 11.95 Volts in the battery – Charge the Battery 
Flashing x 3 = under 11.74 Volts in the battery – Empty – Now operating Slow pulse 
and Low power 


Pulse light stops flashing when battery level in energiser is not high enough 
to produce pulses. 
Pulse light flashes twice when the fence voltage is below 2000 Volts. 

 
Beeper will sound twice during the pulse if there is a problem. 


High Power   - 0.7 J 
LowPower    - 0.3 J 
Day Mode     - High During the day – Low at night 
Night Mode  - High at night – Low during the day 

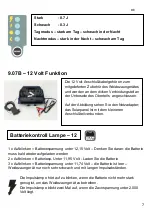
Battery Warning Light – 12 Volt


The 12 Volt Cable set comes with the 
energiser and needs to be fitted to the big 
connector on the underside of the top. 

In the picture you can see the mains 
adaptor/Solar Panel is connected to the 
smaller connector. 

20 

Summary of Contents for Lister 9.03B

Page 1: ...FICATEURS POUR CL TURES ELECTRIFICADOR DE CERCAS PARA PASTOS SCHRIKDRAADAPPARATEN GENERATORI DI CORRENTE PER RECINZIONI ELETTRICHE DE Gebrauchsanweisung EN Operating instructions FR Mode d emploi ES I...

Page 2: ...ngen finden Fassen Sie nicht an den Zaun oder die Anschl sse Ihres Weidezaunger tes solange es in Betrieb ist Der elektrische Schlag eines Weidezaunes kann gef hrlich f r kleine Kinder oder Personen m...

Page 3: ...er hrung verbindet das Tier den Stromflu und die Erde und erh lt einen Stromschlag Montage des Weidezaunger tes Als erstes montieren Sie die Halterung und den Erdpfahl wie in der nebenstehenden Abbild...

Page 4: ...hlu Kabels mit dem Erdpfahl Einbau der 9 Volt Batterie 1 ffnen des Weidezaunger tes durch Dr cken der Klipverschl sse des Griffes 2 Heben Sie das Oberteil ab und stellen Sie die Batterie in den Kasten...

Page 5: ...tecken Sie den Handgriff wieder auf das Weidezaunger t vergewissern Sie sich da dieser wieder richtig einrastet Verbinden Sie das mitgelieferte ROTE Zaunanschlu kabel mit dem Zau Funktionen des 9 03B...

Page 6: ...e diese bereit 2 x Aufblinken Batteriesp Unter 6 2 Volt Wechseln Sie die Batterie 3 x Aufblinken Batteriespannung unter 4 8 Volt Batterie ist leer Weidezaunger t nur noch sehr schwach und mit langen I...

Page 7: ...en wenn die Batterie nicht mehr stark genug ist um das Weidezaunger t zu betreiben Die Impulslampe blinkt zwei Mal auf wenn die Zaunspannung unter 2 000 Volt liegt Stark 0 7 J Schwach 0 3 J Tagmodus s...

Page 8: ...igt Stellen Sie sicher da sich die Unterlegscheibe innen befindet und der Bolzen von innen nach au en geht vom Hand griff zum Winkel Stellen Sie sicher da die Sicherungsscheibe richtig sitzt bevor Sie...

Page 9: ...kann das Weidezaunger t mit dem Netz Adapter betrieben werden Die Solar Adapter Kontrollampe leuchtet w hrend des Ladevorgangs Erdung Schlechte Erdung ist meistens das Problem wenn das Weidezaunger t...

Page 10: ...Volt an ist es nicht in Ordnung b Installieren Sie einen zus tzlichen Erdpfahl in mindestens 1 m Abstand c Verbinden Sie die Erdpf hle mit einem Untergrundkabel Wie wird die Erdung getestet Wartung T...

Page 11: ...drei 3 Jahren auf Material und fachm nnische Arbeit ab dem Tag an dem es an den Endkunden verkauft worden ist Zur Anmeldung von Garantieanspr chen m chte der Kunde das defekte Produkt an den Herstelle...

Page 12: ...mit schwarzer Schrift auf gelbem Hintergrund Vorsicht Elektrozaun stehen oder eine Hand mit einem symbolisierten Stromschlag abgebildet sein Mindesth he 25 mm Der Aufdruck auf dem Warnschild sollte w...

Page 13: ...der Zaun bzw jeder Teil des Zaunes darf nicht n her an der Freileitung verlaufen wie nachfolgend genannt Leistung des Stromkabels bis 1 000 Volt Zwischenraum 3m Leistung des Stromkabels 1 000 bis 33 0...

Page 14: ...ierten Standards EN 55014 1 2006 EN 55014 2 1997 A1 2001 sowie den elektrischen Sicherheitsstandards EN 60335 2 76 2005 A1 2006 Tuusula Finnland Januar 2014 Die unterschriebenen Erkl rungen zur Konfor...

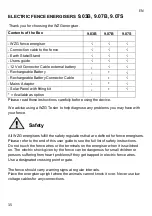
Page 15: ...ser when it is switched on The electric shock given by the fence can be dangerous for small children or persons suffering from heart problems if they get trapped in electric fence wires Use a designat...

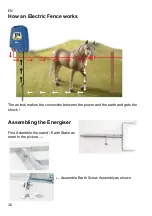
Page 16: ...ence works The animal makes the connection between the power and the earth and gets the shock Assembling the Energiser First Assemble the stand Earth Stake as seen in the picture Assemble Earth Screw...

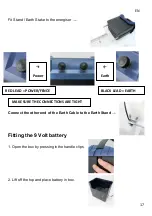
Page 17: ...other end of the Earth Cable to the Earth Stand Fitting the 9 Volt battery 1 Open the box by pressing in the handle clips 2 Lift off the top and place battery in box Earth RED LEAD POWER FENCE BLACK L...

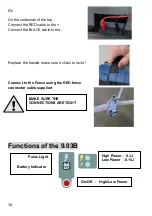
Page 18: ...CK cable to the Replace the handle make sure it clicks to lockt Connect to the Fence using the RED fence connector cable supplied Functions of the 9 03B MAKE SURE THE CONNECTIONS ARE TIGHT High Power...

Page 19: ...in the battery Change the Battery Flashing x 3 Under 4 80 Volts in the battery Empty Now operating Slow pulse and Low power Pulse light stops flashing when battery level in energiser is not high enou...

Page 20: ...t high enough to produce pulses Pulse light flashes twice when the fence voltage is below 2000 Volts Beeper will sound twice during the pulse if there is a problem High Power 0 7 J LowPower 0 3 J Day...

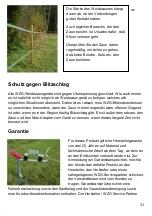
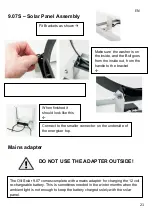
Page 21: ...s when the ambient light is not enough to keep the battery charged solely with the solar panel DO NOT USE THE ADAPTER OUTSIDE 9 07S Solar Panel Assembly Mains adapter Fit Brackets as shown Make sure t...

Page 22: ...ng Poor earthing is the most likely cause of poor performance of the energiser please follow these simple rules 1 Wet Clay ground makes good earthing Dry sandy soil is a poor earth 2 Use good quality...

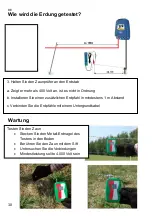
Page 23: ...nance Test the fence Put the testers earth in the ground Touch the fence with the testers pin Check connections Minimum Voltage should be 4 000 volts The Power in the electric fence is dependent on th...

Page 24: ...r s contact information The Manufacturer WZG Service Partner will repair or replace the defect product and return it as soon as possible The warranty does not cover any damages that are caused by inco...

Page 25: ...on system earth Connecting leads that are run inside buildings shall be effectively insulated from the earthed structural parts of the building This may be achieved by using insulated high voltage cab...

Page 26: ...a public pathway a non electrified gate shall be incorporated in the electric animal fence at that point or a crossing by means of stiles shall be provided At any such crossing the adjacent electrifi...

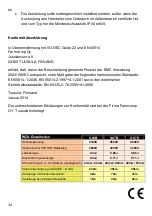
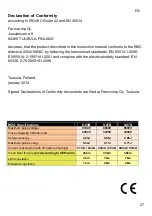
Page 27: ...ety standard EN 60335 2 76 2005 A1 2006 Tuusula Finland january 2014 Signed Declarations of Conformity documents are filed at Farmcomp Oy Tuusula WZG Specifications 9 03B 9 07B 9 07S Maximum pulse vol...

Page 28: ...es raccordements de votre lectrificateur lorsque ce dernier fonctionne Le choc lectrique provoqu par une cl ture peut constituer un danger pour les jeunes enfants et les personnes souffrant de trouble...

Page 29: ...qu il touche la cl ture l animal relie le flux de courant la terre et re oit un choc lectrique Montage de l lectrificateur Monter la fixation et le piquet de terre suivant l illustration ci contre Mon...

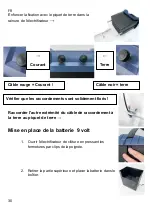
Page 30: ...ent la terre au piquet de terre Mise en place de la batterie 9 volt 1 Ouvrir l lectrificateur de cl ture en pressant les fermetures par clips de la poign e 2 Retirer la partie sup rieure et placer la...

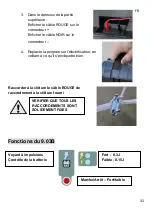
Page 31: ...ur 4 Replacer la poign e sur l lectrificateur en veillant ce qu il s encliquette bien Raccorder la cl ture le c ble ROUGE de raccordement la cl ture fourni Fonctions du 9 03B VERIFIER QUE TOUS LES RAC...

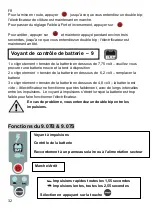
Page 32: ...batterie en dessous de 6 2 volt remplacer la batterie 3 x clignotement tension de la batterie en dessous de 4 8 volt la batterie est vide l lectrificateur ne fonctionne que tr s faiblement avec de lon...

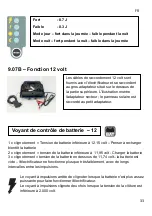
Page 33: ...r te de clignoter lorsque la batterie n est plus assez puissante pour faire fonctionner l lectrificateur Le voyant impulsions clignote deux fois lorsque la tension de la cl ture est inf rieure 2 000 v...

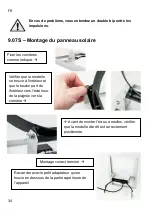
Page 34: ...er que la rondelle se trouve l int rieur et que le boulon part de l int rieur vers l ext rieur de la poign e vers la corni re Avant de monter l crou oreilles v rifier que la rondelle d arr t est corre...

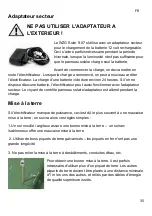
Page 35: ...onctionner avec l adaptateur secteur Le voyant de contr le panneau solaire adaptateur est allum pendant la charge Mise la terre Si l lectrificateur manque de puissance ceci est d le plus souvent une m...

Page 36: ...ue plus de 400 volt ceci n est pas normal b Installer un piquet de terre suppl mentaire une distance minimale d 1 m c Raccorder les piquets de terre un c ble enterr Comment tester la mise la terre Mai...

Page 37: ...reste inutilis pendant une dur e prolong e Garantie Ce produit est soumis une garantie du fabricant de trois 3 ans concernant le mat riau et la qualit de la fabrication qui prend effet la date laquel...

Page 38: ...tes les cl tures lectriques install es au bord des routes ou des voies publiques doivent tre quip es de panneaux d avertissement plac s intervalles r guliers Le panneau d avertissement doit pr senter...

Page 39: ...es donn es Les c bles de connexion et les fils des cl tures lectriques ne doivent pas croiser de c bles ou de lignes de communications a riens Si une cl ture lectrique doit tre install e sous une lign...

Page 40: ...nchir la cl ture sans danger cet endroit Les fils lectriques qui se trouvent proximit devront tre quip s de panneaux d avertissement cet endroit On devra v rifier que tous les lectrificateurs de cl tu...

Page 41: ...s d clarations de conformit sign es sont d pos es aupr s de la soci t Farmcomp OY Tuusula Caract ristiques d taill es WZG 9 03B 9 07B 9 07S Tension de pointe 9100V 9800V 9800V Tension pour une charge...

Page 42: ...de las normas de seguridad No toque el alambrado o los bornes del electrificador mientras ste se encuentre conectado Una descarga el ctrica podr ser peligrosa para ni os peque os o personas con afecci...

Page 43: ...una conexi n entre el flujo de corriente y la tierra y recibe una descarga el ctrica Instalaci n del electrificador de cercas En primer lugar coloque el soporte y la varilla de tierra como se muestra...

Page 44: ...illa de tierra Colocaci n de la bater a de 9 voltios 1 Abra el electrificador presionando los cierres de clip del asa 2 Levante la cubierta superior y coloque la bater a en el compartimento de bater a...

Page 45: ...a en el electrificador Preste atenci n a que sta encaje correctamente Acople a la cerca el cable de conexi n de la cerca ROJO que se incluye en el suministro Funciones del electrificador 9 03B CERCI R...

Page 46: ...ara usarla 2 x parpadeos La tensi n de la bater a es inferior a 6 2 voltios Sustituya la bater a 3 x parpadeos La tensi n de la bater a es inferior a 4 8 voltios La bater a est agotada El electrificad...

Page 47: ...sando la tecla Alta 0 7 julios Baja 0 3 julios Modo d a potencia alta durante el d a y baja por la noche Modo noche potencia alta por la noche y baja durante el d a L mpara de control de la bater a 12...

Page 48: ...La l mpara de impulso parpadea 2 veces cuando la tensi n de la cerca es inferior a 2 000 voltios En caso de que se produzca un problema escuchar un pitido doble entre los impulsos 9 07S Instalaci n de...

Page 49: ...iniciado el proceso de carga podr ser desconectarlo El proceso de carga para una bater a agotada es de 24 horas Es posible poner en marcha el electrificador con el adaptador de red incluso en caso de...

Page 50: ...loso permite una buena conexi n a tierra Por el contrario la conexi n a tierra en un suelo seco arenoso es deficiente 2 Emplee buenas varillas de puesta a tierra galvanizadas Las varillas de hierro no...

Page 51: ...ierra el clavo de tierra del dispositivo de comprobaci n Toque la cerca con el pasador Controle las conexiones La potencia m nima debe ser de 4 000 voltios El nivel de potencia de la cerca depende del...

Page 52: ...sible La garant a no cubre los da os causados por un uso incorrecto o negligente o por una instalaci n que no haya sido realizada conforme a las instrucciones as como otros da os provocados por causas...

Page 53: ...ancia m nima de 10 m entre los electrodos de tierra del electrificador y las partes conectadas a sistemas de conexi n a tierra tales como la tierra de protecci n del suministro p blico de electricidad...

Page 54: ...ue las aves se posen en edificios el alambrado de la cerca el ctrica jam s deber estar conectado al electrodo de tierra del electrificador Adem s ser necesario colocar se ales de advertencia en aquell...

Page 55: ...e 2014 Las declaraciones firmadas se encuentran depositidas en la empresa Farmcomp OY Tuusula WZG Informaci n detallada 9 03B 9 07B 9 07S Tensi n m xima 9 100 voltios 9 800 voltios 9 800 voltios Tensi...

Page 56: ...gheidsbepalingen aantreft Raak de omheining of de aansluitingen van uw schrikdraadapparaat niet aan zolang het apparaat in werking is De elektrische schok van een schrikdraadapparaat kan gevaarlijk zi...

Page 57: ...mheining aanraakt loopt er stroom tussen het dier en de aarde en krijgt het dier een schok Montage van het schrikdraadapparaat Eerst monteert u de houder en de aardpaal zoals is aangegeven op de afbee...

Page 58: ...uit kabel met de aardpaal Montage van de 9 volt accu 1 Openen van het schrikdraadapparaat door indrukken van de klemaansluitingen van de handgreep 2 Trek het bovenste gedeelte er af en zet de accu in...

Page 59: ...tekker 4 Steek de handgreep weer op het schrikdraadapparaat controleer f eze weer goed in elkaar past Verbind de erbij geleverde RODE omheiningsaansluitkabel met de omheining Functies van de 9 03B CON...

Page 60: ...en accuspanning onder 6 2 volt vervang de accu 3 x knipperen accuspanning onder 4 8 volt accu is leeg schrikdraadapparaat alleen nog zeer zwak en met lange impulsafstanden De impulslamp stopt met bran...

Page 61: ...wak is om het schrikdraadapparaat te laten functioneren De impulslamp knippert twee maal wanneer de omheiningsspanning onder de 2 000 volt gedaald is Sterk 0 7 J Zwak 0 3 J Dagmodus sterk overdag s na...

Page 62: ...angegeven Controleer of de beveiligingsplaat goed zit voor u de vleugelmoer monteert Na voltooiing moet het resultaat er zo uitzien Verbinden met het kleine verbindingsgedeelte aan de onderkant van he...

Page 63: ...is kan het schrikdraadapparaat met de netadapter worden gebruikt De zonne adapter controlelamp brandt gedurende het laden Aarding Slechte aarding is meestal het probleem wanneer het schrikdraadapparaa...

Page 64: ...an 400 volt aangeeft is er iets niet in orde b Installeer nog een aardpaal met een afstand van ten minste 1 meter c Verbind de aardpalen met een ondergrondse kabel Hoe wordt de aarding getest Onderhou...

Page 65: ...los te koppelen wanneer deze gedurende langere tijd niet wordt gebruikt Garantie Voor dit product geldt een fabrieksgarantie van 3 jaar op materiaal en het werk van de vakman vanaf de dag waarop het...

Page 66: ...schade gebruikt worden Elke elektrische omheining langs openbare straten of wegen moet op regelmatige afstanden van een waarschuwingsbord voorzien zijn Het waarschuwingsbord moet voldoen aan de minimu...

Page 67: ...n mogen bovengrondse leidingen en communicatieleidingen niet kruisen Als een elektrische omheining onder of in de buurt van een over land lopende bovengrondse leiding ge nstalleerd moet worden mag hij...

Page 68: ...dergelijke plaatsen moeten de in de buurt liggende elektrische draden van waarschuwingsborden worden voorzien Zorg ervoor dat alle op het net aangesloten schrikdraadapparaten die met de elektrische om...

Page 69: ...2005 A1 2006 Tuusula Finland januari 2014 De ondertekende verklaringen met betrekking tot conformiteit zijn bij de firma OY Tuusula gedeponeerd WZG details 9 03B 9 07B 9 07S Hoogste spanning 9100 V 9...

Page 70: ...posizioni relative alla sicurezza Non toccare la recinzione n gli attacchi del generatore di corrente durante il funzionamento Lo shock elettrico di una recinzione pu essere pericoloso per bambini in...

Page 71: ...un collegamento tra il flusso di corrente ed il terreno e riceve uno shock elettrico Montaggio del generatore di corrente per recinzioni elettriche Innanzitutto montare il supporto e la barra di terr...

Page 72: ...arra di terra Inserimento della batteria da 9 Volt 1 Aprire il generatore facendo pressione sulle chiusure a clip dell impugnatura 2 Rimuovere la parte superiore e collocare la batteria nell alloggiam...

Page 73: ...uindi riposizionare l impugnatura sul generatore di corrente assicurarsi che questa scatti correttamente in posizione Collegare il cavo di collegamento della recinzione ROSSO alla recinzione Funzioni...

Page 74: ...peggia 2 x tensione della batteria inferiore a 6 2 Volt sostituire la batteria Lampeggia 3 x tensione della batteria inferiore a 4 8 Volt la batteria scarica il generatore di corrente ancora molto deb...

Page 75: ...basso per azionare il generatore La luce a impulso lampeggia due volte se la tensione della recinzione inferiore a 2 000 Volt Forte 0 7 J Debole 0 3 J Modalit giorno forte durante il giorno debole dur...

Page 76: ...rondella si trovi all interno e che il bullone sia rivolto dall interno verso l esterno ossia dalla maniglia verso l angolo Assicurarsi che la rondella di sicurezza sia innestata correttamente prima...

Page 77: ...nnello fotovoltaico dell adattatore di rete resta illuminata durante il processo di carica Messa a terra Una messa a terra di cattiva qualit nella maggior parte dei casi il motivo per cui il generator...

Page 78: ...il valore visualizzato sia superiore a 400 Volt vi un problema b Installare una barra di terra supplementare ad almeno 1 m di distanza c Collegare le barre di terra con un cavo sotterraneo Come viene...

Page 79: ...comanda inoltre di scollegare sia la recinzione che il cavo di alimentazione dal generatore Garanzia Questo prodotto coperto da una garanzia di tre 3 anni per il materiale e la manodopera specializzat...

Page 80: ...essere soggette a danni meccanici La presenza di qualsiasi recinzione elettrica situata in prossimit di strade o di percorsi pubblici deve essere segnalata per mezzo di cartelli di pericolo i quali de...

Page 81: ...i I cavi per generatori di corrente di recinzioni elettriche non possono essere collocati all interno degli stessi condotti insieme ai cavi di alimentazione ai cavi telefonici e per la trasmissione de...

Page 82: ...lettrificato per consentire di oltrepassare la recinzione senza rischi Inoltre in queste zone devono essere apposti sui fili della recinzione adiacenti degli appositi cartelli di pericolo Assicurarsi...

Page 83: ...firmate delle dichiarazioni di conformit sono depositate presso l azienda Farmcomp OY Tuusula WZG Informazioni dettagliate 9 03B 9 07B 9 07S Tensione massima 9100V 9800V 9800V Tensione con livello di...

Page 84: ...IT Lister GmbH Tel 49 0 2351 10 60 0 Am M hlenberg 3 Fax 49 0 2351 10 60 0 DE 58509 L denscheid e mail info lister de GERMANY http www lister de 84...

Reviews: