Olive Olive OPUS N5 User Manual Download Page 3

3

1  QUICK-START GUIDE

Step 1: Unpacking your OPUS

Your package includes the following items: 

•  OPUS pure audio system
•  Remote control (w/ batteries) 
•  Cables: RCA, power
•  Software: Recovery DVD, Upgrade CD, user manual

Step 2: Setting up your OPUS 

•  Place your OPUS close to your stereo system, in a cool, well-ventilated place.
•  Attach the wireless antenna (7).
•  Connect it via its RCA or digital output to the input of your stereo system.
•  Plug the power cable into your OPUS and into the power outlet.
•  Turn on the OPUS and your stereo system.

Your OPUS takes about 40 seconds to boot up from a cold start. Please never unplug your 
device while it is turned on or in sleep mode, it might damage your device.

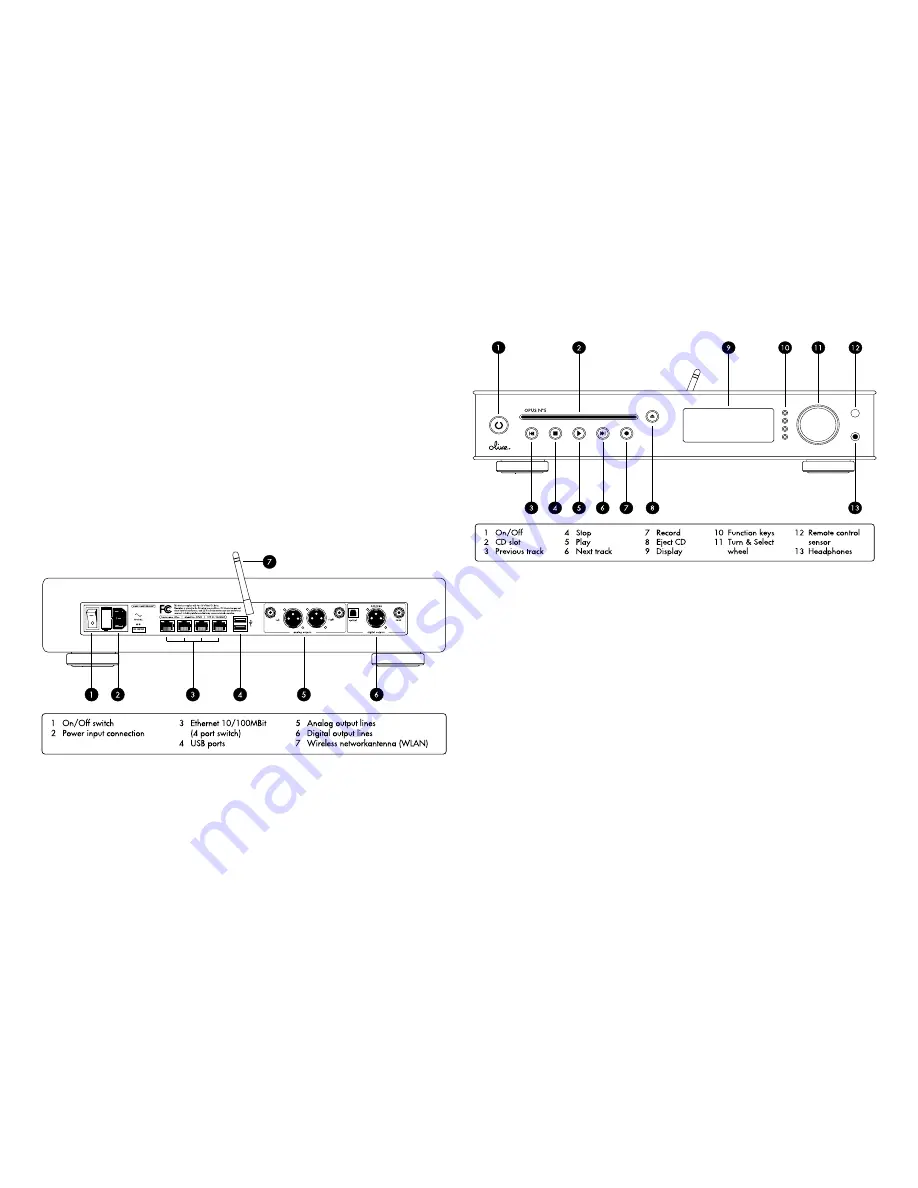
Step 3: Navigating your OPUS 

Your OPUS provides the following navigational controls, and in the following we’ll be refer-
ring to this picture:

•  Once the OPUS is on, you’ll mostly be using the jog-shuttle or wheel (11). Use the in-

ner-wheel to scroll up and down. Turn the outer-wheel to the right (clockwise) to select 
an item or to the left (counter-clockwise) to go back one level.  

•  The soft keys to the right of the display (10) allow to choose functions that are relevant 

for a particular context (“soft” because the functions they allow are soft-coded, with 
changing uses for different screens).

•  The other buttons (3-8) behave just like the buttons on a CD-Player. 
•  Use the remote just like the other buttons – while sitting down. Hit the MENU button 

on your remote twice anytime you want to see the display with large letters in “couch 
view”. It doesn’t get much easier than that. 

•  To put your OPUS to sleep, just press the ON/OFF button (1) shortly.  To turn it off 

completely, hold down the same button for a few seconds.

Note: Within this user manual we will refer to screen menu options in CAPITAL letters for 
easier readability, even though on the screen you will see them written starting with a capi-
tal and then small letters. Starting point will always be the main menu, the top most menu to 
which you can always return by continuing to turn the jog-shuttle to the left.

Step 4: Play a CD

Insert a CD into the slot, select the track you like, press play.

Summary of Contents for Olive OPUS N5

Page 1: ...Olive OPUS N 5 User Manual Edition 3 September 2007 Software Release 2 3 18...

Page 2: ...latory and Environmental Compliance 22 7 1 Legal Notices 22 7 2 Environmental Compliance 24 Welcome Congratulations and thank you for purchasing an Olive OPUS Your OPUS will provide you with a whole n...

Page 3: ...eel to the right clockwise to select an item or to the left counter clockwise to go back one level The soft keys to the right of the display 10 allow to choose functions that are relevant for a partic...

Page 4: ...sts Now that you have music on your OPUS you can easily create playlists for every mood or occasion There are two ways On the OPUS 1 Go to LIBRARY PLAYLISTS press NEW and enter the name of your playli...

Page 5: ...ee that here you can also in uence what happens anytime you press the play button RANDOM OPUS plays tracks from the selected album or playlist in random order REPEAT OPUS repeats the selected track s...

Page 6: ...er Choose the one you like or use your cursor to select the tracks to be played More on how to cre ate them is in a later section SEARCHLISTS Here are all the searchlists you ve de ned in alphabetical...

Page 7: ...nce this as part of the settings default is off Since the import time is much shorter than the playing time listening and importing is not in sync CDs which are not recognized by the internal or onlin...

Page 8: ...also sometimes referred to as metadata or liner notes is the information that goes along with the music le that describes a music piece or album which artist is playing when the recording was made etc...

Page 9: ...ake it play louder or less loud by increments of a decibel dB Default is no pre adjustment ENCODING Here you can see what audio le format the track is stored in which will depend on how it was importe...

Page 10: ...ame of your new searchlist 3 Press soft key OK and the new empty searchlist is created 4 Press the soft key CHANGE to de ne the search criteria Turning the inner wheel right you are presented with the...

Page 11: ...LIST to transfer the tracks to the external player Eject your portable device player Caution You need to press the soft key EJECT on the OPUS before unplugging the portable device to avoid data loss o...

Page 12: ...ackground lighting of the keys Shortcuts The bottom 8 buttons allow you to shortcut to the named menu section from wherever you are SOURCE is tempo rarily unused INFO will either show the music librar...

Page 13: ...takes place Here you can drill down further by clicking on the different items like LIBRARY ARTISTS etc or you can perform speci c functions e g such as starting play for the whole library or internet...

Page 14: ...your OPUS here This may be necessary to adjust to daylight saving time or if the OPUS has been unplugged for a longer period of time Use the inner wheel of the jog shuttle to set the digits a right t...

Page 15: ...in FLAC MP3 or WAV form For MP3 and Data CDs you can further determine that folders with artist and album titles are created during the burning process SPEED The Speed option lets you choose between...

Page 16: ...ation Before getting started please make sure that the network settings of all other devices such as Pcs Mac are set to Obtain an IP address automatically or DHCP This is especially important if you a...

Page 17: ...E 32 99 BD 39 To obtain valid WEP keys OPUS provides a special edit eld Only valid characters and digits are available Additionally a random key generator lets you create 64 and 128 bit keys automatic...

Page 18: ...starts using the operating system of the CD and the update procedure is launched automatically 7 On successful completion OPUS shows a message on the display and has to be restarted in its normal way...

Page 19: ...abetical list of songs 2 Starting with the rst song highlighted hit MARK and then scroll to the bottom of the list Sometimes it may be slow to highlight each song so be patient 3 Finally once you have...

Page 20: ...ease follow the instructions of the next section Recovery DVD The OPUS shipment contains a Recovery DVD which can be used to restore the operating system software to an OPUS Please note that in very f...

Page 21: ...il the moisture evaporates Caution This device is not equipped with a moisture sensor 5 Do not use force on switches controls or connection wires When moving the unit rst disconnect the power plug and...

Page 22: ...e rights to the titles being offered Please note that recording music cassettes vinyl records or CDs may injure copyright This equipment must not be used for unauthorized duplication of CD s or any ot...

Page 23: ...on of system and application software and user data are not covered under this Olive Limited Hardware Warranty This warranty does not apply a to damage caused by accident abuse misuse misapplication o...

Page 24: ...ermined by turning the equipment off and on the user is encouraged to try to correct the interference by one of more of the following measures Reorient or relocate the receiving antenna Increase the s...

Reviews: