background image

57

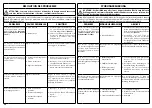
RISOLUZIONE DEI PROBLEMI

ATTENZIONE: fermare sempre l’unità e scollegare la candela prima di effettuare 

tutte le azioni correttive raccomandato nella tabella sottostante, tranne che 

venga richiesto il funzionamento dell’unità.

Quando si sono verificate tutte le possibili cause e il problema non è risolto, consultare un 

Centro Assistenza Autorizzato. Se si verifica un problema che non è elencato in questa tabella, 

consultare un Centro Assistenza Autorizzato.

PROBLEMA

POSSIBILI CAUSE

SOLUZIONE

Il motore non si avvia o si 

spegne solo dopo pochi 

secondi dall’avvio. (Assicurarsi 

che l’interruttore sia in 

posizione “I”)

1.  Non c’è scintilla. 


2.  Motore ingolfato.

1.  Controllare la scintilla della candela. 

Se non c’è la scintilla, ripetere il test 

con una candela nuova (RCJ-7Y).

2.  Seguire la procedura di pag.20. Se il 

motore non si avvia ancora, ripetere 

la procedura con una candela 

nuova.

Il motore parte, ma non 

accelera correttamente o non 

funziona correttamente ad 

alta velocità.

Il carburatore deve essere 

regolato.

Contattare un Centro Assistenza 

Autorizzato per regolare il carburatore.

Il motore non raggiunge la 

piena velocità e / o emette 

fumo eccessivo.

1.  Controllare la miscela 

olio / benzina.

2.  Filtro aria sporco. 

3.  Il carburatore deve essere 

regolato.

1.  Utilizzare benzina fresca e un olio 

adeguato per motore 2 tempi.

2.  Pulire: vedi le istruzioni nel capitolo 

Manutenzione filtro aria.

3.  Contattare un Centro Assistenza 

Au t o r i z z a t o   p e r   re g o l a re   i l 

carburatore.

Il motore si avvia, gira e 

accelera, ma non tiene il 

minimo.

Il carburatore deve essere 

regolato.

Regolare la vite del minimo “ T ” 

(Fig.66, pag.36) in senso orario per 

aumentare la velocità; vedere capitolo 

Manutenzione carburatore.

Il motore si avvia e funziona, 

ma il flusso d’aria è ridotto

1.  Griglia di protezione ostruita
2.  Girante danneggiata 

3.  Chiocciola e tubi ostruiti

1.  Pulire griglia di protezione
2.  Contattare un Centro Assistenza 

Autorizzato

3.  Pulire

TROUBLESHOOTING CHART

WARNING: Always stop unit and disconnect spark plug before performing all of 

the recommended remedies below except remedies that require operation of the 

unit.

When you have checked all the possible causes listed and you are still experiencing the 

problem, see your Servicing Dealer.  If you are experiencing a problem that is not listed in this 

chart, see your Servicing Dealer for service.

PROBLEM

POSSIBLE CAUSE

SOLUTION

Engine will not start or will 

run only a few seconds after 

starting.

(Make sure Ignition switch is 

in start position “I”)

1. No spark 


2. Flooded engine. 

1. Watch for spark at spark plug tip. If 

there is no spark, repeat test with a 

new spark plug (RCJ-7Y).

2. Follow procedure page 20 If engine 

still fails to start, repeat procedure 

with a new spark plug.

Engine starts but will not 

accelerate properly or will not 

run properly at high speed.

C a r b u r e t o r   r e q u i r e s 

adjustment.

Contact a Ser vicing Dealer for 

carburetor adjustment.

Engine does not reach full 

speed and / or emits excessive 

smoke

1.  Check oil fuel mixture. 

2.  Air filter dirty. 

3.  Carburetor requires 

adjustment.

1.  Use fresh fuel and the correct 

2-cycle oil mix.

2.  C l e a n   p e r   i n s t r u c t i o n   i n 

Maintenance-Air Filter Section.

3.  Contact a Servicing Dealer for 

carburetor adjustment.

Engine star ts, runs and 

accelerates but will not idle.

C a r b u r e t o r   r e q u i r e s 

adjustment.

Turn idle speed screw “T”  (Fig. 66, 

pag. 36) clockwise to increase idle 

speed.See Operation-Carburetor 

Adjustment.

The engine starts and runs, 

but the air flow is low

1.  Safety guard blocked
2.  Impeller damaged 

3.  Impeller housing and tubes 

blocked

1.  Clean safety guard
2.  Contact an Authorised Service 

Centre

3.  Clean

Summary of Contents for BV 300

Page 1: ...5 cm3 I D F GB E SK OWNER S MANUAL MANUALE USO E MANUTENZIONE BETRIEBS UND WARTUNGSANLEITUNG MANUEL D UTILISATION ET D ENTRETIEN MANUAL DE USO Y MANTENIMIENTO N VOD NA POU ITIE A DR BU Pubbl 56550197D...

Page 2: ...bindlich Der Hersteller beh lt sich das Recht vor eventuelle Ver nderungen vorzunehmen ohne jeweils vorher eine Anpassung der vorliegenden Bedienungsanleitung vorzunehmen E INTRODUCCION TRADUCCI N DE...

Page 3: ...__ 52 MAINTENANCE CHART_______________ 54 TROUBLE SHOOTING CHART__________ 57 WARRANTY CERTIFICATE_____________ 60 INTRODUCCION____________________ 2 EXPLICACION SIMBOLOS Y ADVERTENCI S DE SEGURIDAD__...

Page 4: ...tung vor der Inbetriebnahme lesen 2 Immer Helm Schutzbrille und Ger uschschutz tragen 3 Ger t BL SER 4 Garantierter akustischer Schalleistungspegel 5 Seriennummer 6 CE Zeichen 7 Baujahr 8 ACHTUNG Gefa...

Page 5: ...rme ANSI B175 2 1996 D 9 ACHTUNG Hei e Oberfl chen 10 ACHTUNG Die vom Blasger t mit hoher Geschwindigkeit abgesto enen Gegenst nde k nnen zur ckprallen und den Benutzer treffen Dies kann schwerwiegend...

Page 6: ...u r servoir de carburant 13 R servoir carburant 14 Poign e de d marrage 15 Pot d chappement 16 Vis de blocage tube 17 Poign e D BAUTEILE DES BLASER 1 D se 2 Blasrohr 3 Gashebel 4 Halbgasknopf 5 Schutz...

Page 7: ...7 NOTE...

Page 8: ...on montare la girante su altri motori o trasmissioni di potenza 20 In caso di necessit della messa fuori servizio del soffiatore non abbandonarlo nell ambiente ma consegnarlo al Rivenditore che provve...

Page 9: ...f its useful life think of the environment Take your old unit to your dealer who will be able to dispose of it in a proper manner 21 Only experienced persons who are familiar with the operation and sa...

Page 10: ...ht mit laufendem Motor liegen lassen 19 R sten Sie den Abtrieb des Blasger ts nur mit dem Originalgebl se des Herstellers aus Die Verbindung weiterer Baugruppen ist wegen der gr eren Unfallgefahr verb...

Page 11: ...le dar el destino correspondiente No montar el rotor en otros motores o transmisiones de potencia 21 Ceder o prestar el soplador exclusivamente a personas expertas y que conozcan el funcionamiento y...

Page 12: ...supplier to choose an adequate equipment The clothing must be proper and not an obstacle Wear adherent protective clothing OLEO MAC protective jackets Fig 1 and dungarees Fig 2 are ideal Do not wear...

Page 13: ...accidente Consultar con el vendedor de la m quina sobre los indumentos adecuados La ropa debe ser cumplir su funci n de protecci n y ser c moda Utilizar ropa adherente y protectora La chaqueta Fig 1 y...

Page 14: ...o that the two pins A on the spigot of the impeller housing engage the two slots C in the blower tube Rotate the blower tube in the direction of the arrow 2 When fitted tube should appear as shown in...

Page 15: ...rnos A Fig 1 2 son de distinta dimensi n tanto en el sinf n como en los tubos Esto obliga a montar los tubos en el sentido correcto 1 Conecte el tubo soplador B Fig 3 insertando los dos pernos A de la...

Page 16: ...and to keep fuel from escaping around the cap Tighten fuel cap securely after refueling Unit vibration can cause an improperly tightened fuel cap to loosen or come off and spill quantities of fuel Wip...

Page 17: ...parar el motor y dejar enfriar antes del llenado Aflojar el tap n del combustible lentamente para aliviar la presi n y evitar fugas de combustible Apretar firmemente el tap n de combustible despu s de...

Page 18: ...an equivalent high quality engine oil JASO specification FD or ISO specification L EGD CAUTION DO NOT USE AUTOMOTIVE OIL OR 2 CYCLE OUTBOARD OIL CAUTION Match your fuel purchases to your consumption...

Page 19: ...utiliza aceite para motores Oleo Mac PROSINT 2 y EUROSINT 2 Fig 16 o un aceite para motor de alta calidad equivalente especificaciones JASO FD o ISO L EGD PRECAUCI N NO UTILIZAR ACEITE PARA VEH CULOS...

Page 20: ...nspect the gasket 5 Immediately replace fuel cap and hand tighten Wipe up any fuel spillage WARNING Check for fuel leaks if any are found correct before use Contact a Servicing Dealer if necessary Eng...

Page 21: ...con cuidado en el dep sito Evitar que el combustible se derrame 4 Antes de volver a poner el tap n del combustible limpiar e inspeccionar la junta 5 Colocar inmediatamente el tap n y apretarlo a mano...

Page 22: ...hoke lever F Fig 28 back to the original position OPEN Repeat the procedure until the engine starts Once the engine is running press the throttle after 30 40 seconds B Fig 27 to release it from the ha...

Page 23: ...e el soplador tire lentamente la cuerda de arranque hasta que encuentre resistencia Fig 29 Tire en rgicamente algunas veces y a las primeras explosiones del motor ponga el cebador F Fig 28 en la posic...

Page 24: ...chine down Be particularly cautious and alert when wearing ear protectors as these can restrict your ability to hear sounds indicating danger shouts signals warnings etc Be extremely careful when work...

Page 25: ...e pueden limitar la capacidad de o r sonidos que indican riesgos avisos se ales advertencias etc Tener mucho cuidado al trabajar en pendiente o sobre terrenos irregulares Mantener siempre secas y limp...

Page 26: ...ther materials and rock including masonry and concrete products Repeated and or substantial inhalation of airborne crystalline silica can cause serious or fatal respiratory disease including silicosis...

Page 27: ...mento b sico presente en la arena el cuarzo los ladrillos la arcilla el granito la roca y muchos otros materiales como productos de hormig n y alba iler a La inhalaci n repetida y o intensa de s lice...

Page 28: ...slightly spray the work area with a hose or use a mister attachment when water is available Watch out for children pets open windows or cars and blow debris safely away Use the full nozzle extension s...

Page 29: ...con una manguera o un empalme para nebulizador cuando haya agua a disposici n Prestar atenci n a los ni os a los animales dom sticos a los autom viles y a las ventanas abiertas y soplar los desechos e...

Page 30: ...rom the corner and inward toward the centre of the work area The blower is designed to be used with one hand only Fig 45 and can be held in either the left or right hand On flat surfaces a more effici...

Page 31: ...aceras y reas exteriores Eliminar basura de esquinas cruces juntas entre piedras de pavimentaci n etc ATENCI N Al trabajar en los ngulos soplar desde el ngulo al interior hacia el centro del rea de tr...

Page 32: ...L FILTER Periodically check the condition of the fuel filter C If excessively dirty the filter should be renewed Fig 55 ENGINE Periodically clean the cylinder fins using compressed air If dirt is allo...

Page 33: ...sin el filtro de aire esto podr a causar graves da os Comprobar que el filtro de aire est correctamente colocado en la tapa antes de volver a montarlo FILTRO DE COMBUSTIBLE Controle peri dicamente la...

Page 34: ...ome very hot during operation and retain heat for a long time after the engine has been stopped This is the case even with the engine idling Contact can burn the skin Always remember the potential fir...

Page 35: ...n calientes durante mucho tiempo despu s de la parada del motor Esto ocurre incluso si el motor funciona al r gimen m nimo El contacto puede causar quemaduras de piel Recuerde el riesgo de incendio Si...

Page 36: ...The idle speed adjuster screw T Fig 66 is set to obtain an idle speed to 3000 rpm This engine is designed and manufactured in order to comply with the applicable 97 68 EC 2002 88 EC and 2004 26 EC Dir...

Page 37: ...ra obtener un r gimen de funcionamiento del motor 3000 rev min Este motor cumple las directivas 97 68 EC 2002 88 EC y 2004 26 EC ATENCI N No altere de ninguna manera la carburador TRANSPORTE No transp...

Page 38: ...se only ORIGINAL REPLACEMENT PARTS Any unauthorized changes and or use of non original replacement parts may result in serious injury or death to the operator or third parties DEMOLITION AND DISPOSAL...

Page 39: ...correcto y constante del soplador es preciso utilizar exclusivamente RECAMBIOS ORIGINALES Eventuales modificaciones no autorizadas y o el uso de accesorios no originales pueden causar lesiones graves...

Page 40: ...d damage the membranes Thoroughly clean the components inside the impeller housing H Fig 69 of all debris and dirt the shredder blade G Fig 70 the impeller blades F the slots in the safety guard Fig 7...

Page 41: ...pare Si queda mezcla en el carburador las membranas pueden da arse Limpie esmeradamente el interior del caracol H Fig 69 cuchilla trituradora G Fig 70 aletas del rotor F ranuras de la rejilla de prot...

Page 42: ...g 79 on the housing and on the tubes are two different sizes This means that the tubes cannot be assembled incorrectly Fit the intake tube C Fig 80 to the impeller housing so that the two pins F on th...

Page 43: ...a facilitar el montaje los dos pernos A Fig 79 son de distinta dimensi n tanto en el sinf n como en los tubos Esto obliga a montar los tubos en el sentido correcto Monte el colector C Fig 80 introduci...

Page 44: ...outlet of the muffler USE WARNING Always take hold of the machine firmly with both hands The vacuum is designed to be held in both hands Fig 86 with the right hand on the control grip and the left han...

Page 45: ...uos ATENCI N Evite cualquier contacto directo del cuerpo con la zona de salida del silenciador UTILIZACI N ATENCI N Aferre la m quina en rgicamente con ambas manos El aspirador se utiliza con ambas ma...

Page 46: ...e a blockage internally of the machine Switch off the engine immediately disconnect the vacuum tube and check whether or not the internal ducts are obstructed by debris Fig 94 Clean the impeller housi...

Page 47: ...i n PRECAUCI N Los ruidos anormales y las variaciones del n mero de revoluciones del motor podr an ser indicio de atascamientos internos de la m quina en fase de aspiraci n Apague inmediatamente el mo...

Page 48: ...giros min m nimo Po et ot ok na vo nobeh min 1 3000 Capacit serbatoio Fuel tank capacity Capacit du r servoir Kraftstofftank Inhalt Capacidad dep sito Objem palivovej n dr e cm3 600 0 6 Portata volume...

Page 49: ...mensions Abmessungen Dimensiones Rozmery mm 360 x 240 x 385 Capacit sacco aspiratore Vacuum collection bag capacity Capacit sac aspirateur Inhalt fangsack capacidad bolsa contenedora Objem vaku vys va...

Page 50: ...dB A 2 0 1 4 Livello potenza acustica garantita Guaranteed sound power level Niveau puissance acoustique assur Garantierter akustischer schalleistungspegel Nivel potencia ac stica garantizado Zaru en...

Page 51: ...51 NOTE...

Page 52: ...hradn zodpovednos e stroj 1 Genere soffiatore 1 Type blower 1 Cat gorie souffleur 1 Baurt bl ser 1 G nero soplador 1 Typ vyfukova 2 Marca Tipo 2 Trademark Type 2 Marque Type 2 Marke Typ 2 Marca Tipo...

Page 53: ...ivel de potencia ac stica medido Nameran rove zvukov ho v konu Livello di potenza acustica garantita Guaranteed sound power level Niveau de puissance acoustique garanti Garantierter akustischer Schall...

Page 54: ...are danni e usura X Sostituire X Carburatore Controllare il minimo X X Candela Controllare distanza elettrodi X Sostituire X Ogni 6 mesi Sistema antivibrante Ispezionare danni e usura X MAINTENANCE CH...

Page 55: ...ontr ler la distance des lectrodes X Remplacer X Tous les 6 mois Syst me anti vibrations V rifier dommages et niveau d usure X WARTUNGSTABELLE Die folgenden Wartungsintervalls gelten ausschlie lich be...

Page 56: ...Buj a Controlar la distancia de los electrodos X Sustituir X Cada 6 meses Sistema antivibraci n Inspeccionar da os y desgaste X TABU KA DR BY Pros m nezabudnite e nasleduj ce intervaly dr by sa vz ahu...

Page 57: ...il flusso d aria ridotto 1 Griglia di protezione ostruita 2 Girante danneggiata 3 Chiocciola e tubi ostruiti 1 Pulire griglia di protezione 2 Contattare un Centro Assistenza Autorizzato 3 Pulire TROU...

Page 58: ...r Motor startet und l uft f rdert jedoch einen geringen Luftstrom 1 Schutzgitter verstopft 2 Laufrad besch digt 3 Spirale und Rohre verstopft 1 Schutzgitter reinigen 2 Wenden Sie sich an eine autorisi...

Page 59: ...a pero el flujo de aire es reducido 1 Rejilla de protecci n obstruida 2 Rotor da ado 3 Espiral y tubos obstruidos 1 Limpiar la rejilla de protecci n 2 Llamar a un Centro de Asistencia Autorizado 3 Lim...

Page 60: ...unsuitable lubricants and fuels have been used non original spare parts and accessories have been fitted work has been done on the machine by unauthorised personnel 5 The warranty does not cover cons...

Page 61: ...sea v lido se han de completar todas sus partes y ha de estar debidamente timbrado por el vendedor 4 La garant a pierde su validez en los siguientes casos Falta evidente de mantenimiento Uso incorrec...

Page 62: ...62 NOTE...

Page 63: ...63 NOTE...

Page 64: ...gnare la macchina durante tutta la sua vita GB WARNING This owner s manual must stay with the machine for all its life F ATTENTION Ce manuel doit accompagner le moteur tout au long de sa vie D ACHTUNG...

Reviews: