

www.olarm.co/start
IDS X-Series Installation Guide
+27 21 009 0911 | [email protected] | www.olarm.co
E & OE. Terms & conditions may apply.
Page
1
2021-08-19
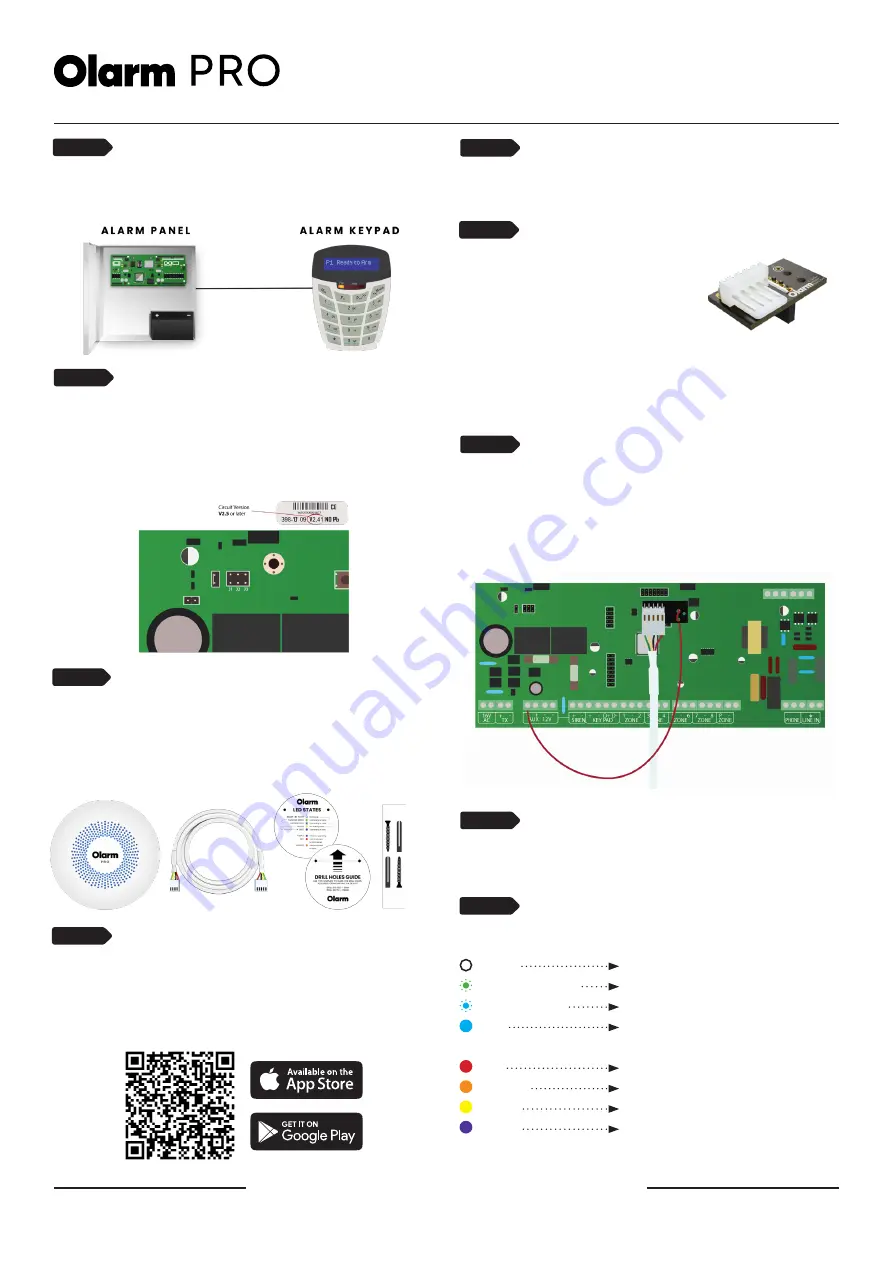
Locate your alarm panel
Note that the alarm panel is not the keypad. Alarm panels are
typically installed in a hidden location in the home such as a
cupboard or basement.
STEP 1
Verify the alarm panel’s firmware
version
Olarm PRO only supports IDS X-Series alarm panels with
firmware with version 2.5 and up. An alarm installer should be
able to upgrade the alarm panel firmware if required. Please
see the end of this manual for tips on how to view the alarm
panel firmware version via the keypad.
STEP 2
Unbox your Olarm PRO
The Olarm PRO box includes the following:
•
1x Olarm PRO device
• 1x Connector cable
• 1x Drill hole template and LED colour legend
•
2x Screws and wall plugs
STEP 3
Download the Olarm mobile app &
register your device
Scan QR code, or navigate to your app store on your device
and search for ‘Olarm’. This Olarm PRO will require an active
subscription to function. Please contact your installer or speak
to
for more information.
STEP 4
Power down the alarm panel
Turn the power to your IDS X-Series alarm panel off at the
mains and disconnect the battery.
STEP 5
Connect to the X-Series adaptor board to
the alarm panel
Connect the Olarm IDS X-Series adapter board to the IDS
X-Series alarm panel as indicated below. Wire the red 12V wire
from the Olarm IDS X-Series adapter board into one of the
AUX+ terminals on the alarm panel as illustrated below.
STEP 7
Colour
White
Flashing green
Flashing blue
Blue
Red
Orange
Yellow
Purple
Status
Booting up
Connecting to alarm panel
Connecting to cloud
Connected, all okay
Cannot connect to alarm panel
Cannot connect to cloud
WiFi pairing active
Firmware upgrading - do not
power the device off
Check your Olarm PRO’s status
STEP 9
Turn the alarm panel back on
Power your IDS X-Series alarm panel on again. The Olarm PRO
should light up as per the chart below.
STEP 8
Connect the serial cable
Connect the 4-pin side of the supplied
cable to the Universal port on the Olarm
PRO. Connect the 5-pin side of the
supplied cable to an Olarm PRO IDS
X-Series adapter board. These adapter
boards are sold separately to the Olarm
PRO and can be purchased directly from
Olarm.
Please contact
should you want to order.
STEP 6


