background image

HDRH-44-2U Quick Setup Guide 

                                                                                                               6                                                                                 R201304-V10 


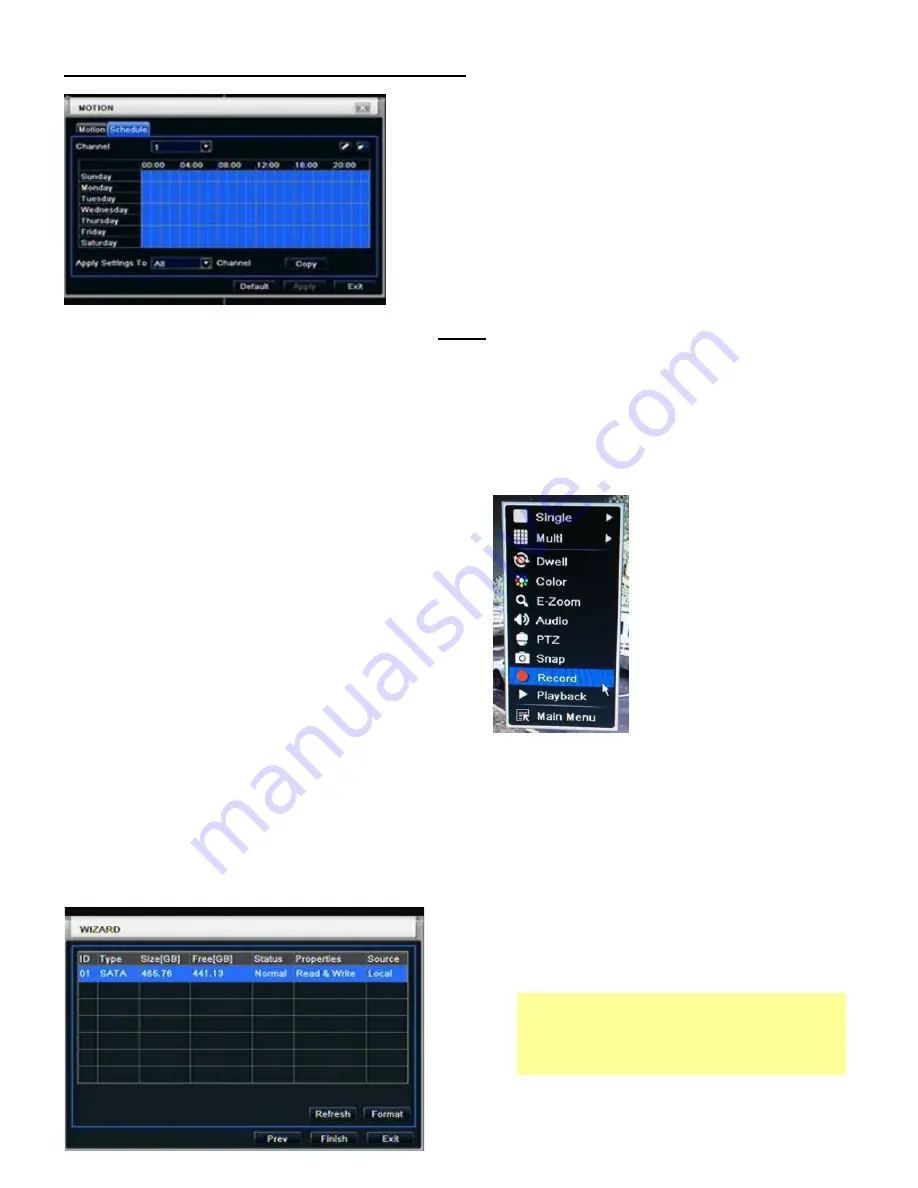
If Schedule Motion Recording needs to be changed

:  


   To modify motion recording schedule click on the 

pencil icon

 located on the upper right of the screen, then 

   click on desired days and times to schedule recording when motion trigger. 

If same schedule apply to all channels. After highlighting desired squares apply settings to “

All” Channel

, click 

Copy”and

 click Apply

 to save setting. To Enable full time motion Recording

,


highlight the entire 

Blue Grid


1.2 

Full Time Recording :


1.  Press “

Record” 

Button on the front panel of the DVR. Green box will appear on screen to confirm that manual 

recording is enabled. Press “

Record” 

Button again to stop recording.


OR

 Right click on main screen and select “

Record

”. 


Note:

 Definition of Holding Time (on motion detect setting) :  

After motion record is activated and there is 

NO 

activity within 10 seconds this will be handled as one event. 

Otherwise if there

 IS

 activity within that time frame it will continue recording. 


Note

: Change Daylight Savings on the first week of March and second week of November. 

3. Wizard for HDD setup


You can format HDD by using “Format” 
function. 
After HDD format completed, it will show 

Normal

 label on status. 

Please make sure to backup all HDD 

data before you format the HDD. 

All HDD data will be erased after HDD 
formatted. 
Please click “Finish” to get into login page.


Summary of Contents for OKINA

Page 1: ...annel K Two 2 eSATA Cable L Six 6 SATA Cable Inside DVR M One 1 Quick Set up Guide Book N One 1 User s Manual CMS Software CD A B C D E F G H I J k L Inside the DVR M N HDRH 44 2U Hybrid H 264 DVR 4 C...

Page 2: ...era 0 10 Input number0 10 and the above number together with other digital keys 6 Compound Button P T Z 1 Enter PTZ mode in live 2 Decrease the value in setup AUDIO 1 Control voice 2 Increase the valu...

Page 3: ...NC HD SDI video signal input 6 Audio in RCA 4 CH Audio input 7 HDMI port HDMI Connect to high definition display device 8 VGA port VGA output connect to monitor 9 USB port To connect external USB devi...

Page 4: ...er Then go to SYSTEM MENU DEVICE ID change the ID 1 2 3 Mouse Control REQUIRED Connection Recommend to connect the USB mouse to the back panel Mouse functions 1 Under LIVE mode On every channel you co...

Page 5: ...to set proper time zone GMT 8 Los Angeles Caution Please make sure to set time zone correctly To prevent getting different time stamps between local and remote site System Date to set current system...

Page 6: ...ill appear on screen to confirm that manual recording is enabled Press Record Button again to stop recording OR Right click on main screen and select Record Note Definition of Holding Time on motion d...

Page 7: ...ed in 5 After Apply the IP Address Netmask Gateway and DNS addresses should automatically be generated For STA TIP Write down HTTP Port Server Port and IP Address on a piece of paper for reference You...

Page 8: ...ecause they are free 3 Using your Internet Browser go to that website you selected and REGISTER to obtain User Name Password and Host Domain information to setup DDNS for your DVR TIP Write down Name...

Page 9: ...e and use the above values For router gateway devices provided by your ISP please contact your ISP technical support Note For further assistance regarding technical support and more details please vis...

Page 10: ...Full D1 Realtime H 264 DVR 4CH DDR 04 Full D1 Realtime H 264 DVR 8 16 CH DDR 08 DDR 16 Hybrid H 264 DVR 4CH HD 4 CH Analog HDRH 44 2U HD SDI H 264 DVR 4CH HDRS 04 1U HD SDI H 264 DVR 8 16 CH HDRS 08 2...

Reviews: