background image

English

30

5.

Enter the Location ID. This is a descriptive title up to 15 characters
long. Refer to the instructions below.

6.

Press the START key. The display shows NO=<OR LOCATION>.

7.

Enter the alternate fax number. Refer to the instructions following
Step 3. 

8.

The display shows G3 COMMUN. SPEED [33.6]. Press NO 

"

 key

to adjust the speed and 

!

 YES key to select it.

Note:

If you are experiencing problems communicating with a remote
location , try lowering the FAX SPEED or turning on ECHO
PROTECTION.

9.

The display shows G3 ECHO PROTECTION [OFF]. Press NO 

"

key to change the setting and 

!

 YES key to select it.

Note:

If the ISDN option is installed, the display will show ISDN DIAL
MODE (G4). Press 

!

 YES key to select G4 as the dial mode for

this One Touch key or press NO 

"

 key to change to G3 dial mode

and then press 

!

 YES key to select it.

10. After pressing the 

!

 YES key, the display automatically shows

LOCATION PROGRAMMING ENTER (SRCH, OT, A/D, #)

11. To continue programming One Touch keys, go back to Step 2. If

you are finished programming, press the Select Function key.

12. Lift off the plastic cover above the One Touch label. Using a pencil,

write in the name for your newly programmed One Touch key.
Replace the cover.

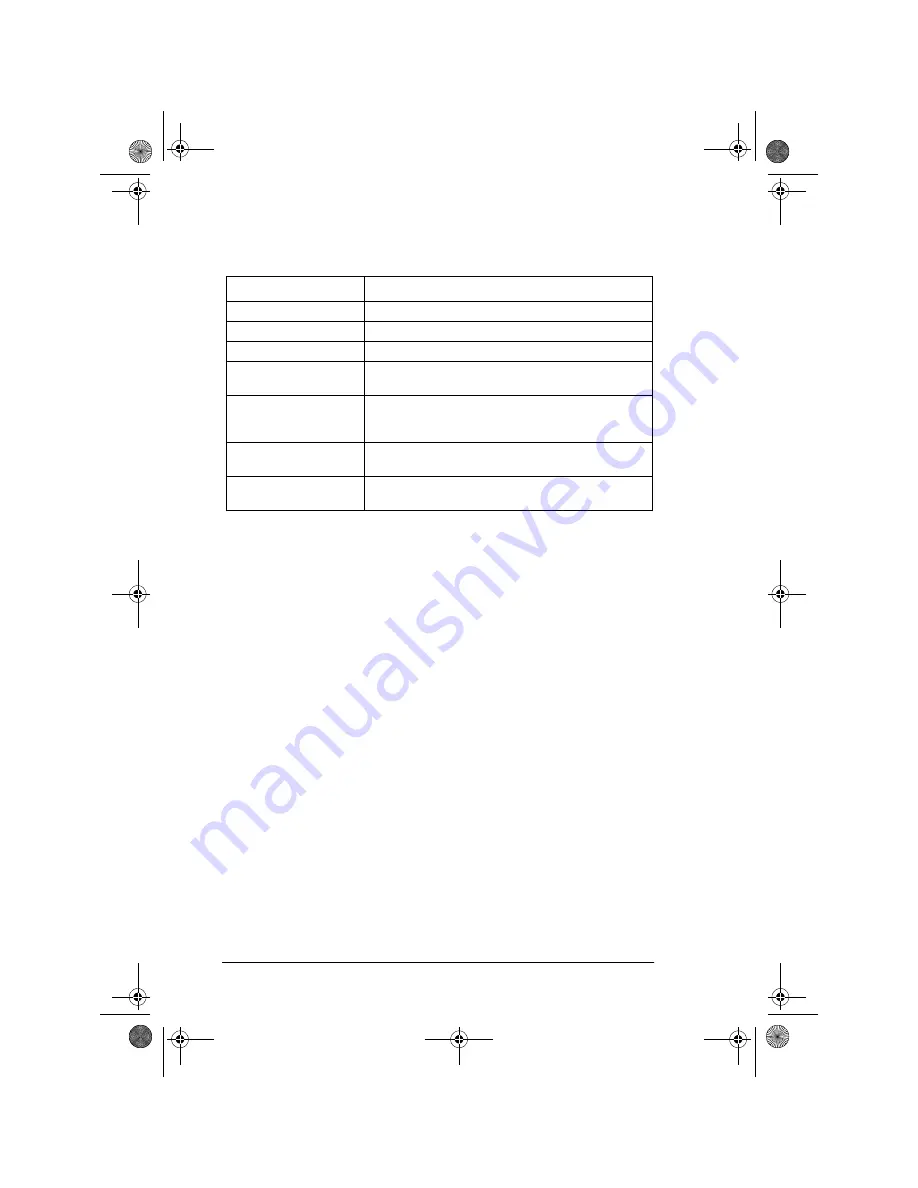
To do this

Use

Enter numbers

Numeric keypad (press once).

Enter spaces

Space One Touch key

Enter hyphens

Hyphen key

Enter alphabetic characters

Locate the character you want on the numeric keypad. Press 
that key repeatedly until the character appears.

Enter a unique character

Press the 0/Unique key repeatedly until the character you 
want appears. The following characters are available: ! # & ’ ( 
) * + , - . / : ; = ? · ä ß ñ ö ü Æ Å Ø æ å ø

Enter two characters using 
the same key

Press the NO 

"

 key to move to the next character.

Move the cursor to make 
corrections

Press 

!

 YES or 

"

 NO keys.

GB4550.book  Page 30  Wednesday, June 14, 2000  9:21 PM

Summary of Contents for OKIFAX 4550

Page 1: ...English User s Guide GB4550 book Page i Wednesday June 14 2000 9 21 PM...

Page 2: ...not necessarily constitute endorsement by the manufacturer Copyright 2000 All rights reserved Energy Star is a trademark of the United States Environmental Protection Agency This product complies wit...

Page 3: ...Signal tones 12 Chapter 2 Installation 13 Getting started 13 Where to install your fax machine 13 Unpacking 13 Setting up 14 Installing paper trays and stackers 14 Installing toner cartridge 15 Connec...

Page 4: ...axes in memory 40 Memory reception 40 No paper reception 40 No toner reception 41 Cancelling messages stored in memory 41 Rejecting unsolicited fax messages 42 Power failures and memory 42 Making copi...

Page 5: ...ing 64 ITU bulletin polling 64 Printing bulletin messages 64 Dual access 65 While sending faxes 65 While receiving faxes 65 While making copies 66 While printing reports 66 Chapter 6 Programming 67 Cu...

Page 6: ...mation report 85 Confidential reception report 86 Broadcast entry report 86 Power outage report 86 Protocol dump 87 Printing reports 87 Printing message confirmation report 87 Printing other reports 8...

Page 7: ...N programming flow 109 Term definitions 110 Other settings 110 ISDN dial mode user setting 30 110 ISDN dial mode communication parameter 111 Speech receive user setting 31 111 Other related functions...

Page 8: ...heat source such as a radiator or heat register Keep it out of direct sunlight Allow enough room around the machine for adequate ventilation and easy access Do not use the machine near water or spill...

Page 9: ...emoving covers may expose you to shocks or other hazards Do not make any adjustments other than those outlined in the manual as you may cause damage requiring extensive repair work If anything happens...

Page 10: ...r cartridges Exercise care when removing the toner cartridge Do not let it touch your clothing or porous materials The toner powder causes permanent stains Small amounts of toner spilled on skin or cl...

Page 11: ...understand the product CAUTION A caution appears in this manual like this A caution provides additional information which if ignored may result in equipment malfunction or damage WARNING A WARNING AP...

Page 12: ...English xii GB4550 book Page xii Wednesday June 14 2000 9 21 PM...

Page 13: ...ammed telephone numbers by name Halftone transmission in up to 64 shades of grey Fax communication at up to 33 600 bits per second Automatic redial and page re transmission when a telephone number is...

Page 14: ...al access feature allowing you to load and prepare documents for transmission while your fax machine is sending or receiving another message High speed scanning of original documents Restricted operat...

Page 15: ...option see Appendix A Component identification Your new fax machine package should contain the following items 1 Fax machine main unit 2 Document tray 3 Paper tray copy stacker 4 AC power cable 5 Tele...

Page 16: ...acked on top of this tray 2 Document tray Holds original documents that are to be faxed or copied 3 Document guides Adjust these guides to the page width of the documents that are to be faxed or copie...

Page 17: ...al telephone or answering machine Note Only one terminal is available and when the ISDN option is installed voice communication is not supported 11 Power switch 12 AC power inlet Connect the AC power...

Page 18: ...ed to install a new drum unit when the REPLACE DRUM CART message appears on the display Control panel keys and indicators 1 LCD panel Refer to this liquid crystal display LCD panel for instructions an...

Page 19: ...an also be used to enter a symbol 6 Search key The One Touch keys and Auto Dial numbers can be programmed to have a name or location ID associated with their telephone numbers Using this key by itself...

Page 20: ...he Select Function key a second time takes you directly back to the stand by mode of your fax machine 11 Copy key After loading a document press this key to make a copy When no documents are loaded pr...

Page 21: ...e numbers For example you may want to use this key to tell your fax machine to wait for an outside or international line to open Pauses in telephone numbers are marked by a P symbol 17 Space key One T...

Page 22: ...rogramming to create numbers with mixed pulse then tone operation Note This function is not available in some countries One touch keypad The One Touch keys are an important tool on your fax machine Yo...

Page 23: ...ntial document to a personal mailbox a memory storage area in the receiving fax machine 4 Relay Initiate TX key Using this key sets up a relayed fax transmission During a relayed fax transmission your...

Page 24: ...t three short beeps If your fax machine experiences a problem during communications it will emit three long beeps Press the Stop key to turn the error tone off then print a Message Confirmation Report...

Page 25: ...centimetres on each side of the fax machine to ensure adequate ventilation 3 Make sure that both power and telephone outlets are available nearby 4 Choose a location where the relative humidity is bet...

Page 26: ...chine CAUTION Do not ship the fax machine with the image drum unit and toner cartridge installed Refer to Shipping the Fax Machine later in this user s guide Setting up Installing paper trays and stac...

Page 27: ...rd and toward you until the control panel releases then swing it out of the way 3 Carefully remove the protective sheet from the document feeder CAUTION Never expose the image drum unit to light for m...

Page 28: ...t from the image drum unit 6 Place the image drum unit back into your fax machine Ensure that the tabs on both sides of the image drum are inserted correctly as shown Then press down firmly on both en...

Page 29: ...ibute the toner Then carefully peel the white plastic tape from the bottom of the toner cartridge CAUTION Be careful not to insert the toner cartridge backwards into the image drum unit 9 With the rid...

Page 30: ...line 1 Insert one end of the telephone cable into the LINE terminal at the back of the machine 2 Insert the other end of the telephone cable into your wall telephone socket Note Now you can connect ei...

Page 31: ...hone socket on your answering machine Note 2 You will need to have the TAD mode feature turned on for an answering machine to work with your fax machine See Setting the Answering Mode later in this us...

Page 32: ...the original length For example if a document created originally on legal size paper is received your fax machine reduces the received pages to fit on A4 or letter size paper Note Your fax machine is...

Page 33: ...s the YES key The display will show the currently set date and time 5 Using the numeric keypad enter the new date and time 6 Press the YES key to confirm your entry 7 Press the Select Function key to...

Page 34: ...to send you a fax message your machine will not accept it Note Some older types of fax machines do not send CNG calling tones and the line may be silent when you answer a call in TEL answering mode If...

Page 35: ...ode is normally turned off To have it turned on contact your supplier Memory Reception Mode MEM Use this answering mode if you want incoming faxes to be stored in the memory of your fax machine and no...

Page 36: ...n you will enter here includes TSI CSI This is the telephone number of your fax machine This number appears on displays and reports of other fax machines you are communicating with This number may als...

Page 37: ...ric keypad up to twenty characters Note Use the Hyphen or 8 One Touch key to enter a character before the number which is a generally recognised method of indicating the international access code befo...

Page 38: ...n key to finish Setting language Your fax machine comes with two languages installed which appear on the display and in reports Follow the instructions below to switch languages Note Your supplier may...

Page 39: ...X installations may require additional adjustments to your fax machine If you continue to have difficulty with fax communication after following these steps contact your supplier 1 Press the Select Fu...

Page 40: ...9 Space key four times then continue with Steps 9 10 MFP function To use your fax machine as a PC printer fax scanner you will need to install optional Multi Function Peripheral MFP software into your...

Page 41: ...automatically looks for the first unassigned Auto Dial number 1 Press the Select Function key then press the 8 Location Program One Touch key The display shows LOCATION PROGRAMMING ENTER SRCH OT A D 2...

Page 42: ...en press YES key to select it 10 After pressing the YES key the display automatically shows LOCATION PROGRAMMING ENTER SRCH OT A D 11 To continue programming One Touch keys go back to Step 2 If you ar...

Page 43: ...ne Touch key or Auto Dial number programmed with the first part of the chain dial number The display will show PRESS OT AD SRCH KEY Then select the One Touch key or Auto Dial number programmed with th...

Page 44: ...mbers Numeric keypad press once Enter spaces Space One Touch key Enter hyphens Hyphen key Enter pauses Pause key i e to wait for long distance or outside lines Switch from pulse to tone dialling for p...

Page 45: ...e you have programmed some One Touch keys or Auto Dial numbers you can then program these numbers into groups to allow you to send the same fax to multiple locations You can program up to 5 groups usi...

Page 46: ...locations programmed into the group by carrying out Steps 1 3 At Step 4 repeatedly press the Start key to view all the programmed locations To delete a location press the NO key Note The locations pro...

Page 47: ...ents are very creased torn or crinkled make a copy on a photocopier and send the copy instead You can also use a photocopier to enlarge or reduce documents before sending Document size All documents m...

Page 48: ...as the document feeder is clear To do this load the document select your location and press the Start key Your document will be scanned into memory and sent when the current communication ends 1 Adju...

Page 49: ...too light Light Contrast is too dark Dark To dial using Do this A One Touch key Press the One Touch key An Auto Dial number Press the Auto Dial key then enter the two digit Auto Dial number on the nu...

Page 50: ...ly to look through Location IDs beginning with that letter 3 Press the Start key as soon as the desired location appears on the display Real time dialling Normally your fax machine dials the entire nu...

Page 51: ...splay will show STOPPED 2 If documents are stuck part way through the document feeder you may see the following message on the display RELOAD DOCUMENT Press the Stop key again Your fax machine feeds t...

Page 52: ...you change the reception mode of your fax machine any non confidential fax messages stored in memory are automatically printed If you want to print any fax messages stored in memory without changing t...

Page 53: ...will show PRINT MEMORY MSG 3 Press the YES key and stored messages will begin printing Note 1 If a memory reception password has been set you will have to enter this password to print any messages st...

Page 54: ...nly RX limit both transmission and reception T R and no limitation on transmission or reception OFF To use the closed network function follow the instructions below 1 Press the Select Function key 2 P...

Page 55: ...YES key 1 Load your documents 2 Press the Copy key The display shows PRG NO OF COPIES 1SETS If you want to make just one copy you are finished Your fax machine waits a moment then begins copying 3 To...

Page 56: ...x you can answer a voice request only after all pages have been transmitted If you are receiving a fax you can answer a voice request after reception of each page You will know if the person on the ot...

Page 57: ...nds a call back message to the remote site giving a telephone number where you can be reached Note 2 A call back message is only sent if you have programmed a call back number into your fax machine Re...

Page 58: ...English 46 GB4550 book Page 46 Wednesday June 14 2000 9 21 PM...

Page 59: ...nished selecting groups and or individual locations quickly press the Start key and the display changes to ENTRY IS OK DIAL START CHECK If your entries are Select location using Do this A group Press...

Page 60: ...owing the locations you have selected After printing the report the display changes to CHECK LOCATION S If your entries are OK press the NO key and the display shows ENTRY IS OK DIAL START CHECK If yo...

Page 61: ...Delayed sending of faxes The delayed transmission feature allows you to send documents at a specified date and time and frees you from the need to manually start the transmission You can program a de...

Page 62: ...unction key 3 Press the 1 Delayed TX One Touch key The display shows DELAYED TX DATE and today s date 4 Press the YES key and go to Step 7 if transmission is to occur later today If the transmission i...

Page 63: ...dividual locations 1 Load your document 2 Press the Select Function key 3 Press the 1 Delayed TX One Touch key The display shows DELAYED TX DATE and today s date 4 Press the YES key and go to Step 7 i...

Page 64: ...ted first 9 When selecting another group do not press the Auto Dial key but immediately press the key and enter the code number for the next group you want to select 10 Repeat Steps 8 to 9 until you h...

Page 65: ...568 are the first four digits of a number entered using the numeric keypad 14 If you want to confirm your entries by printing a report press the NO key and the display shows PRINT ENTRY REPORT Press t...

Page 66: ...if the displayed location is OK and to move onto the next location you have entered into your fax machine 17 If you want to add another group or location after checking the groups and locations you h...

Page 67: ...en placed in public places where anyone can look through received faxes To overcome this use the confidential fax feature when sending and or receiving confidential faxes You can send and receive conf...

Page 68: ...sending the confidential fax your mailbox number When your fax machine receives a confidential fax it stores the fax in your personal mailbox Your fax machine will automatically print a Confidential...

Page 69: ...e select another personal box number to use 7 Press the YES key and the display shows PRG PASSWORD ENTER 4DIGITS 8 Using the numeric keypad enter a four digit password and press the YES key to confirm...

Page 70: ...Select Function key 2 Press the 9 User Program One Touch key The display shows 1 FUNC PROGRAMMING 3 Using the numeric keypad press number 5 The display shows 5 PERSONAL BOX PRG 4 Press the YES key and...

Page 71: ...sword then press the YES key The received confidential fax starts printing Note If you want to clear the personal mailbox without waiting for the message to be printed press the Stop key at this point...

Page 72: ...r of your fax machine must be programmed into the Auto Dial list of your fax machine with the Auto Dial code number 70 Initiating relay broadcast 1 Load your document 2 Press the Select Function key 3...

Page 73: ...ds for polling Standard polling is to an old standard that is used by many but not all manufacturers and ITU selective polling which is the latest standard Your fax machine supports both standards ITU...

Page 74: ...d and the document has been sent your document remains in mailbox 0 allowing the document to retrieved more than once 6 Using the numeric keypad enter 0 for the personal mailbox you want to use and pr...

Page 75: ...n 1 With no documents loaded press the Select Function key 2 Press the 5 Polling One Touch Key The display shows NO MAIL BOX NO 3 Press the Start key when the fax machine you are contacting supports s...

Page 76: ...rogram One Touch key The display shows 1 FUNC PROGRAMMING 3 Using the numeric keypad press number 5 The display shows 5 PERSONAL BOX PRG 4 Press the YES key and the display shows PERSONAL BOX NO ENTER...

Page 77: ...uces the time you must spend waiting for other operations to finish While sending faxes After your fax machine has finished scanning a document into memory and is transmitting from memory you can Load...

Page 78: ...achine is automatically printing reports you can Continue to receive faxes while reports are being automatically printed if your fax machine has enough memory available When the report has finished pr...

Page 79: ...isplay show 1 ACTIVITY REPORT 3 Using the numeric keypad press 5 The display shows 5 CONFIGURATION 4 Press the YES key and the report will begin printing 5 Press the Select Function key to finish User...

Page 80: ...ff your Sender ID date and time will not be printed However some fax machines will print your TSI CSI 06 MONITOR VOLUME This function sets the volume your fax machine uses for telephone line monitorin...

Page 81: ...t to auto receive or telephone fax auto switch answering modes The available settings are 1 ring 5 seconds 10 seconds 15 seconds or 20 seconds Note If your fax machine is set to telephone fax auto swi...

Page 82: ...machine Available settings are off 00 11 22 33 44 55 66 77 88 99 and This function only works if your telephone system is a tone dialling system 17 MEM FEEDER SW This function controls how your fax ma...

Page 83: ...PC FAX SWITCH When your fax machine is set to answer in PC Receive Mode and your optional MFP software is set to receive fax messages all incoming calls are transferred directly to your PC However if...

Page 84: ...off 24 CONTINUOUS TONE With this function on your fax machine will emit a continuous tone after receiving a message Pressing the Stop key turns off the tone Set this function to off and your fax machi...

Page 85: ...the display Note If you are changing your fax machine s TX MODE DEFAULT settings the new settings will appear on the LEDs above the Transmit Resolution YES and the Type of Original NO 6 To select ano...

Page 86: ...s the Select Function key to finish Note Occasionally your fax machine may not be able to detect the ring pattern on its first try If this happens the display changes to DISTINCTIVE RING SET RESULT NG...

Page 87: ...keypad press number 5 The display shows 5 PERSONAL BOX PRG 4 Press the YES key and the display shows PERSONAL BOX NO ENTER 1 8 5 Using the numeric keypad enter the number of the personal mailbox you...

Page 88: ...ng memory password 1 Press the Select Function key 2 Press the 9 User Program One Touch key The display shows 1 FUNC PROGRAMMING 3 Using the numeric keypad press number 7 The display shows 7 MEM PASSW...

Page 89: ...ch key The display shows 1 FUNC PROGRAMMING 3 Using the numeric keypad press number 7 The display shows 7 MEM PASSWORD PRG 4 Press the YES key and the display shows PRG PASSWORD XXXX ENTER 4DIGITS 5 T...

Page 90: ...elect Function key to finish or continue to create department ID numbers Changing restricted ID 1 Using the numeric keypad enter your four digit password 2 Press the Select Function key 3 Press the 9...

Page 91: ...of the department ID you want to close and the display changes to ENTER ID XXXX ENTER 4DIGITS 7 Using the numeric keypad enter the required four digit password and the display changes to ID CLOSE 8 P...

Page 92: ...TE If your fax machine is set to pulse dialling this function controls how quickly your fax machine sends out dialling pulses the dial pulse rate varies in different countries Available settings are 1...

Page 93: ...is connected to a PBX use this function to tell your fax machine what access number is used to obtain an outside line from your PBX You can enter up to 4 digits See Connecting to a PBX in Installation...

Page 94: ...English 82 GB4550 book Page 82 Wednesday June 14 2000 9 21 PM...

Page 95: ...DISTANT STATION ID If you were sending a fax the Personal ID or telephone number of the remote fax machine that received the document will be printed If the remote fax machine does not have a Personal...

Page 96: ...ber of received messages stored up in your facsimile unit s memory PAGES lists the total number of pages received PERSONAL BOX prints out set up status of your mailboxes Confidential Bulletin Polling...

Page 97: ...ax machine s user functions The Sender ID ID fax number TEL NO and call back number CALL BACK NO currently programmed into your fax machine The current dial parameter settings of your fax machine Mess...

Page 98: ...D is recorded The number of the mailbox into which the message was received The number of pages received The result of the communication Service codes Broadcast entry report Each time you program a mu...

Page 99: ...ress the 6 Report Print One Touch key The display shows 1 ACTIVITY REPORT 3 Press the NO key repeatedly until the report you want to print appears on the display 4 Press the YES key The report will be...

Page 100: ...jam occurred in the machine sending the fax STOP Stop key was pressed ending the session Code Explanation TX A communication initiated by your fax machine RX A communication initiated by a remote fax...

Page 101: ...ke it is positioned straight in your feeder press the Stop key to try to feed the document the rest of the way through the feeder If this fails follow the instructions below 1 Grasp the control panel...

Page 102: ...fan the paper before loading it into your paper tray WARNING IF YOU OPEN THE TOP COVER YOU WILL SEE A LABEL THAT READS CAUTION HOT THIS AREA IS EXTREMELY HOT AND MUST NOT BE TOUCHED UNDER ANY CIRCUMST...

Page 103: ...um 4 Carefully pull out any paper you see jammed inside the machine 5 Place the image drum unit back into your fax machine Ensure that the tabs on both sides of the image drum are inserted correctly a...

Page 104: ...oner cartridge varies depending on the type of documents you usually receive or copy The first toner cartridge installed in a new image drum has a slightly decreased yield because the image drum itsel...

Page 105: ...HEN HANDLING THE TONER CARTRIDGE DO NOT LET TONER SPILL ON YOUR CLOTHING OR OTHER POROUS MATERIALS SEE SAFETY AT THE BEGINNING OF THIS USER S GUIDE WARNING IF YOU OPEN THE TOP COVER YOU WILL SEE A LAB...

Page 106: ...er cartridge CAUTION Be careful not to insert the toner cartridge backwards into the image drum unit 5 With the ridged sides facing up and the coloured lever on your right insert the toner cartridge i...

Page 107: ...pe provided in the package with your new toner cartridge gently wipe back and forth across the full length of the LED array 8 Close the top cover 9 Close the control panel Press down until it snaps in...

Page 108: ...If the faxes you receive are light or have vertical streaks in them and you are not out of toner or if your fax machine displays a REPLACE DRUM CART message your fax machine needs a new image drum un...

Page 109: ...the packaging materials from your new image drum unit and throw it away 4 Carefully remove the protective sheet from your new image drum unit 5 Insert the new image drum unit into your fax machine en...

Page 110: ...r used image drum Reading print counters Your fax machine s print counters count the number of pages your fax machine has printed or scanned in its lifetime If you are experiencing a problem a service...

Page 111: ...m read through the list of problems and solutions before calling your supplier Your telephone does not ring if your fax machine is set tel fax answering mode and the incoming call is a voice call This...

Page 112: ...blems You may be trying to communicate with an incompatible fax machine the standard fax machine can only communicate with ITU T Group 3 fax machines the ISDN option allows the fax machine to communic...

Page 113: ...eck the fax number to make sure it was entered correctly see Dial Directories When you are dialling with an Auto Dial code be sure to press the Auto Dial key before you enter the code If your fax mach...

Page 114: ...mmed for PBX operation before it will work See Connecting to a PBX in Installation You want to answer an external telephone but your fax machine always answers first If you are using an external telep...

Page 115: ...n the cover to make sure it is closed and latched PAPER OUT JAM FAX CONFIRM AND STOP or PAPER OUT JAM FAX CHECK PAPER OR PATH No Paper The paper tray is out of paper Add more paper PAPER JAM FAX CONFI...

Page 116: ...he end of its projected life Make sure a new drum is available and replace the drum when print quality begins to deteriorate See Replacing Image Drum Unit PRINTER ALARM 2 FAX REFER TO USER GUIDE or PR...

Page 117: ...DE Memory Overflow The memory in your fax machine has become full with received faxes or delayed transmission faxes Either print received faxes or wait until delayed faxes have been sent before scanni...

Page 118: ...English 106 GB4550 book Page 106 Wednesday June 14 2000 9 21 PM...

Page 119: ...shades of gray Document size A4 A5 letter or legal size Recording paper Plain paper A4 letter or legal size Effective reading width ISO A4 208 6 mm for transmission 200 mm for copy 208 6 for copy wit...

Page 120: ...English 108 GB4550 book Page 108 Wednesday June 14 2000 9 21 PM...

Page 121: ...ess YES key and the display shows COUNTRY CODE 4 Enter the COUNTRY CODE and press the Start key 5 Enter the ISDN G4 NUMBER and press the Start key Category Specification Network compatibility ISDN Cir...

Page 122: ...B NUMBER This is the sub addressing number for directing communications Up to 19 numbers can be used ISDN CALLED NO This is the called number for the ISDN PBX Up to 20 numbers can be used This number...

Page 123: ...The following are a few related functions incorporated to enhance faxing operations Automatic Fallback If the G4 signal transmitted from the machine is rejected by the remote location the machine auto...

Page 124: ...Address Service Sub addresses are most commonly used when faxing point to multipoint P MP In addition to the telephone number of the remote location the user must also know and input the sub addresses...

Page 125: ...LED Array 95 Clock Setting 21 Closed Network 68 CNG Count 72 COMMUN ERROR 38 Communications Error 100 105 COMP 87 CONF 88 Confidential Faxes Conf TX key 11 Confidential Mailbox 56 Mailbox Password 56...

Page 126: ...n MCF 68 90 Incoming Ring 70 Instant Dialling 72 ISDN Dial Mode 110 ISDN G4 Option 109 ISDN Programming Flow 109 K Key Select Tone 12 L LCD Panel 6 103 Location Program key 11 M Manual Receive Mode 22...

Page 127: ...e Diagnosis 71 Remote Receive 70 Replace Toner Cart 104 Report Print key 11 Reports Active Memory Files 84 Activity 83 Broadcast Confirmation 84 Broadcast Entry 86 Confidential Reception 86 Configurat...

Page 128: ...nsolicited Fax Messages 42 User Functions Changing 73 Settings 67 Viewing 67 User Language 26 69 User Program key 12 V Voice Request 44 Voice Request Tone 12 W WAITING TO BE POLLED 62 Width Reduction...

Reviews: