Oki ML8810 Hardware Installation Instructions Download Page 2

2

6. Pull down the lever in the direction indicated by the 

arrow in the illustration.     

Note:

 If the interface cable interferes with the 

tractor, be sure it is secured in the channel (1).    

7. Turn on the printer.
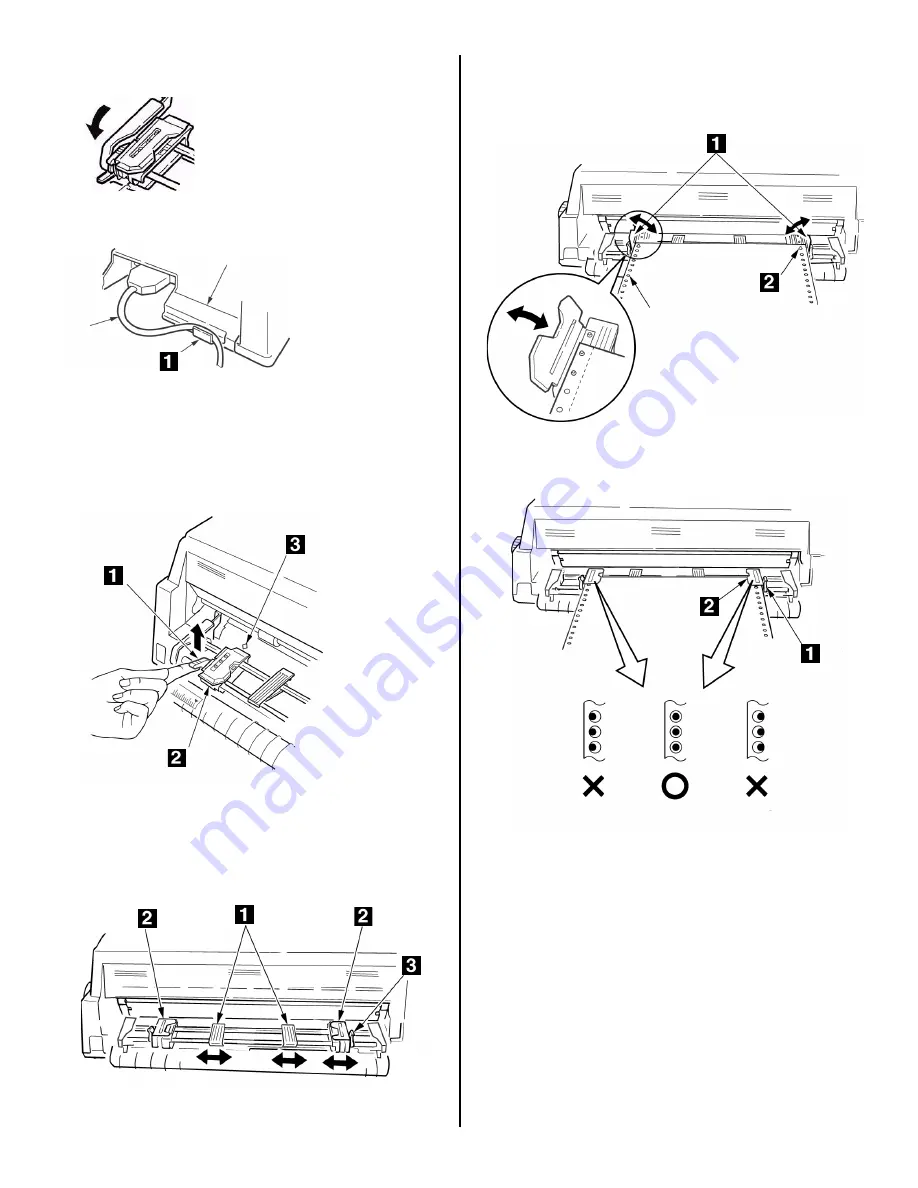
Load Paper

1. Lift the lock lever (1) on the left tractor and move it 

to match the width of the continuous forms you are 
using.      

Note:

 The center of the diamond mark (3) indicates 

the location where the center of the first character 

prints. 

2. Evenly space the paper guides (1) between the 

tractors (2), then lift the right tractor lock lever (3) 

to release it.    

F6_2_09.jpg


3. Open the tractor covers and (1) load the continuous 

forms paper on the pins (2), fine tuning the position 

of the right tractor so that the paper holes are 
centered on the pins. Be sure to keep the paper 
properly aligned by loading an equal number of holes 

on the pins on either side.         

4. Re-lock the right tractor (1), then close the tractor 

covers (2).     

5. Lower the stacker back into place. 

Set the Printer to Use the Rear 

Tractor Path 

1. Press SEL.  
1. Press MODE until you see REAR TRACTOR on the 

second line of the display.  

The printer changes paths, the rear continuous 
forms load to the print position, and the printer 

returns to the on line state.  

ML8810 RFT F03_c.JPG


F6_2_07.jpg


F6_2_08.jpg


F6_2_10.jpg


F6_2_11

.jpg


Summary of Contents for ML8810

Page 1: ...the printer It mounts on the posts inside the stacker While holding the lever 1 on each side of the Rear Push Tractor slip the U shaped brackets 2 at either end of the tractor under the posts 3 inside...

Page 2: ...3 to release it F6_2_09 jpg 3 Open the tractor covers and 1 load the continuous forms paper on the pins 2 fine tuning the position of the right tractor so that the paper holes are centered on the pins...

Page 3: ...eur traction arri re sur l imprimante Il se monte sur les goujons l int rieur de l empileur En tenant les leviers 1 de chaque c t du chargeur traction arri re glissez les supports en U 2 chaque extr m...

Page 4: ...ur le d gager F6_2_09 jpg 3 Ouvrez le couvercle des tracteurs et 1 chargez les formulaires en continu sur les ergots 2 en faisant un r glage fin du tracteur droit afin que les trous du papier soient c...

Page 5: ...la impresora El tractor se instala en los pivotes que se encuentran dentro del apilador Mientras sostiene la palanca 2 en ambos costados del Tractor de empuje trasero deslice los soportes en forma de...

Page 6: ...orugas y 1 coloque las formas continuas en las espigas 2 coloc ndolas de manera que los orificios del papel queden correctamente centrados sobre las espigas Aseg rese de que el papel est correctamente...

Page 7: ...r traseiro na impressora Ele se encaixa nos pinos dentro do empilhador Enquanto segura as alavancas 1 localizadas nas duas extremidades do tracionador de empurrar traseiro encaixe os suportes em forma...

Page 8: ...a as coberturas dos tracionadores 1 e coloque formul rios cont nuos sobre os pinos 2 ajustando a posi o do tracionador direito de modo que os orif cios do papel estejam centralizados sobre os pinos Ma...

Reviews: