background image

B2520 / B2540

- 62 -

Description of the tab F

AX

 P

ARAMETERS

Cover sheet

The cover sheet is part of a fax document automatically 
generated by your terminal, on which there is information 
concerning the sender, the recipient, the date, the time 
sent, comments, etc... 


This page may be sent alone or in front of a fax document, 
but always at the same time as the document. A 
document may be sent with a cover sheet from the 
multifunction terminal or from the central processing unit. 
In the latter case, some of the information in the cover 
sheet may be provided by yourself when making the send 

request. It is necessary to create model cover sheets 
before sending a document using them. On the other 
hand, once the cover sheet is created, a model cover 
sheet may be used for all documents sent.


Your terminal offers the possibility of creating and 
customizing some model cover sheets which you can 
choose when sending a fax.

Creating a cover sheet

1

From the tab C

OVER


PAGE

, click on the button 

N

EW

.

2

Select the model cover sheet you have 

created using the menu F

ILE

.


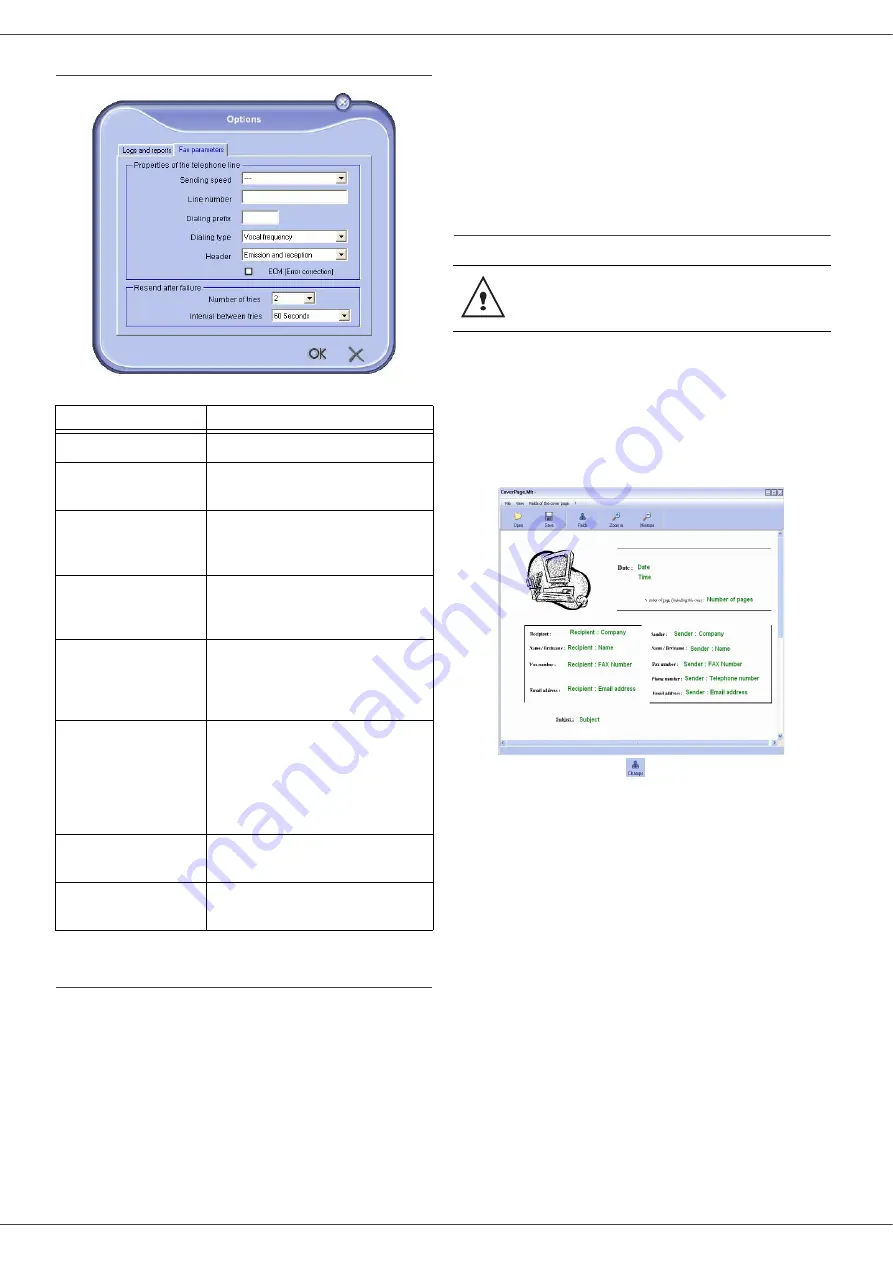
A window with the model cover sheet you 

have created is displayed:


3

Click on the icon 

 to display the available 

fields.


Field

Description

Sending speed

Fax default transmission speed.

Line number

Number of the line where your 
terminal is connected.

Dialing prefix

This dialing prefix shall be 
automatically inserted in front of the 
number before sending on this line.

Dialing type

Must be parametered according to 
the type of switchboard your 
terminal is connected to.

Header

Displays a Communication 
Identification Line (LIC) on the 
documents you send or on the 
documents you receive.

ECM

Corrects communication errors due 
to line disturbance. This option 
ensures that received documents 
are integral. On the other hand, 
communication times may be longer 
if the line is bad.

Number of tries

Number of attempts the Terminal 
must make if send fails.

Interval between tries

Duraton between two send 
attempts.

It is necessary to create a model cover 

sheet before sending a fax with it.

Summary of Contents for B2520

Page 1: ......

Page 2: ...eb site http www okiprintingsolutions com Trademark Information Oki and Microline are registered trademarks of Oki Electric Industry Company Ltd ENERGY STAR is a trademark of the United States Environ...

Page 3: ...cuments through your PC If you have a WLAN adaptor optional you can communicate with a personal computer wirelessly WLAN is an option working only with an original adaptor that you can obtain from you...

Page 4: ...Activating Deactivating the answering machine 23 Printing fax messages stored in the memory 23 Fax rerouting 23 Activating rerouting 23 Setting the re direction contact 23 Printing rerouted documents...

Page 5: ...your documents 46 Print the list of files located in the key 46 Print the files located in the key 46 Delete your files located in the key 47 Analyze the USB memory key content 48 Save a document on a...

Page 6: ...inter cleaning 67 Printer external cleaning 67 Printer issues 67 Error messages 67 Paper jam 68 Scanner issues 69 Miscellaneous issues 69 Communication errors 69 Transmission from the feeder 69 Transm...

Page 7: ...it is imperative to apply the following safety measures your device shall be connected to a power outlet located nearby The outlet shall be easily accessible Your device is delivered with a grounded...

Page 8: ...bels at the positions shown below For your safety you must never touch these surfaces when you remove a paper jam or when you replace the EP cartridge Symbols for the main power switch This machine us...

Page 9: ...of ambient humidity without condensation with a maximum fluctuation of 20 per hour Terminal The section below describes the precautions to be taken when using the machine Never turn the machine off or...

Page 10: ...g paper in the stack must be avoided because it may cause double feeding When withdrawing the cassette from the main unit always support it with both hands to avoid doing drop it If you use paper alre...

Page 11: ...setup guides 7 Manual input tray 8 Fold down stop for paper delivery 9 Smart card insertion point 10 Command panel 4 5 6 7 8 9 3 2 1 1 Paper jam cover 2 Power supply cord connection 3 On Off switch 4...

Page 12: ...eypad 4 Key deletes the character to the left of the cursor 5 Key input or line feed 6 Key access to special characters 7 Key Shift 8 Key SCAN document analysis to the PC 9 Key COPY local copy 10 Key...

Page 13: ...tated at the beginning of this booklet 3 Remove all stickers from the machine 4 Remove the plastic protection film from the screen Installing the document feeder 1 Secure the document feeder by fittin...

Page 14: ...ed cassette ex 250 sheets of 20 lb 80 g m paper 6 Put the feed cassette back in its location Cartridge installation Refer to the section Consumables on page 72 1 Stand in front of the machine 2 Push t...

Page 15: ...as provided by your network administrator into port of your fax machine and the other end into your local network port dedicated to your fax machine 3 Make sure that the On Off switch is on Off O posi...

Page 16: ...manual feed guides to the maximum 2 Insert a sheet or an envelope in the manual input tray 3 Adjust the paper guides against the right and left edges of the sheet or the envelope Before inserting pape...

Page 17: ...ications around the glass 2 Press the button 3 Press the button Advanced copying The sophisticated copy allows to do custom setups for the current copy 1 Place the document to be copied in the automat...

Page 18: ...ea of a document by choosing the origin and the zoom level to apply to the document from 25 to 400 842 ADVANCED FCT COPY ZOOMING 1 Enter the desired zoom level with the Alpanumerical keyboard or choos...

Page 19: ...ed on the paper trays The following table describes the different cases 852 ADVANCED FCT SCAN PRINT TRAY PAPER 1 Select the default paper tray to use AUTOMATIC or MANUAL with the buttons and 2 Confirm...

Page 20: ...top bottom margins offsets by 0 5 mm steps with the buttons and 2 Confirm by pressing the OK button 3 Quit this menu by pressing the button Format paper setup This menu allows you to define the defaul...

Page 21: ...nd confirm with OK 8 You may enter the number of pages before transmission and confirm with OK 9 Confirm postponed transmission by pressing key Your document is stored and will be sent at the new time...

Page 22: ...will be relayed either immediately or at a later time according to your choice to the remote fax which will relay the document Fax answering machine The Fax answering machine allows you to keep confi...

Page 23: ...sed to reroute faxes received to a directory contact To use this function you have to perform two operations 1 Activate rerouting 2 Set the rerouting address of the fax Activating rerouting 391 FAX RE...

Page 24: ...luding those in deposit or in delayed transmission etc It allows you to Consult or modify the waiting queue In this waiting queue the documents are coded the following way Order number in the queue do...

Page 25: ...use and access to MBX 01 31 are conditioned by the initialisation defined by a MBX code if needed and a mnenonic its S I D Later you may modify the features of an MBX print the contents of an MBX onl...

Page 26: ...riber s MBX number and confirm with OK 5 If you wish to delay transmission enter the new transmission time next to the current time and press OK 6 If you wish to modify the document feed type select o...

Page 27: ...ng OK Polling a deposited document 33 FAX POLLING RX 1 Enter the number of the party whose document you want to poll or choose your dialling mode You can poll several documents using the key 2 Dependi...

Page 28: ...such as private automatic branch exchange PABX You must select the network which is in use To select the type of network 251 SETUP TEL NETWORK NETWORK TYPE 1 Select option PABX or PSTN then confirm yo...

Page 29: ...l range between 1 and 30 2 Enter the outgoing local prefix of the company s telephone network maximum 5 characters and validate with OK 3 To exit this menu press Transmission report You may print a tr...

Page 30: ...al systematically FAX ANSWER the terminal handles reception of fax messages automatically the external device handles reception of telephone communications automatically To set the reception mode 241...

Page 31: ...cuments to be transmitted 2 TX header If this parameter is on your header will appear on all documents sent to your subscribers with your name number date and number of pages Note U S regulations requ...

Page 32: ...if you have PC equipment The memory capacity is limited you need to empty your MBX or else new messages may not be received Parameter Signification 75 Text Attchmt Editing YES NO and printing the rec...

Page 33: ...is deleted following a print error in PC print mode 92 Printer wait timeout Wait time out for data from PC before the task is deleted in PC print 93 Replace format Page format change This parameter a...

Page 34: ...ng of the list of setups starts Font printing You can print the list of fonts installed on your terminal at any time To print PCL fonts 57 PRINT PCL FONTS To print SG Script fonts 58 PRINT SGSCRIPT FO...

Page 35: ...22 with the keyboard 2 The number of received pages appears on the screen 3 Quit this menu by pressing the button Scanned pages counter To view the number of pages scanned on your machine 823 ADVANCED...

Page 36: ...when this field is not completed the files are stored directly under the root of the FTP server for example server name Durand Confirm with OK Define the attachment format Image or PDF then confirm wi...

Page 37: ...ith the keypad 2 With or browse the directory and select the record or list you want to delete by pressing OK 3 Press on OK to confirm the deletion 4 Repeat the operations for each record or list you...

Page 38: ...onfiguration To configure your terminal manually you should obtain the usual information used to set a peripheral device IP address sub network mask network and gateway address To configure the local...

Page 39: ...cross the whole radio network is as fast as the weakest connection in the network The speed of communication is also dependent on spatial distance between transmitter and receiver as well as the numbe...

Page 40: ...appear on the screen Select the option you want and confirm with OK If you choose WITH SECURITY the sub menu WEP KEY 1 appears enter the key number 1 to 4 maximum that you are using on your network 8...

Page 41: ...3 Select PARAMETERS using the keys or and confirm with OK 4 Select SSID using the keys or and confirm with OK 5 The name of your network will appear on the screen Enter the new name of your network a...

Page 42: ...rm with OK 6 SSID appears on the screen enter house using the numerical keypad and confirm with OK 7 Select the mode AD HOC MODE and confirm with OK 8 Enter 1 in the field CHANNEL and confirm with OK...

Page 43: ...AUTHENT SPEC carry out the two following operations 4 Enter the IDENTIFIER then validate with OK key 5 Enter the PASSWORD then validate with OK key Sending an E Mail 1 Place the document to be copied...

Page 44: ...t B W SCAN to send a document in black and white or color SCAN to send a document in color Validate with OK key this setting may be changed at any time during the send procedure with the color key 9 E...

Page 45: ...puter no E Mail poll Share PC lets you if your PC and fax have two different addresses transfer all mails or only those with attachments to a PC if your PC and fax share the same address use the fax a...

Page 46: ...specting the way of insertion MEDIA ANALYSIS appears on the screen 2 Select PRINT DOC with the or buttons and confirm with OK 3 Select FILE with the or buttons and confirm with OK 4 You have three pos...

Page 47: ...elete your files ALL to delete all the files located in the USB memory key Select ALL with the or buttons and confirm with OK You come back to the previous menu SERIE to delete a series of files locat...

Page 48: ...N TO with the or buttons then confirm with the OK button 4 Choose the COLOR between BLACK WHITE and COLOR with the or buttons and the button OK 5 With the alphanumeric keyboard give a name to the scan...

Page 49: ...sk space for the installation RAM memory 128 Mbytes minimum for Windows 98 Me and 2000 192 Mbytes minimum for Windows XP Home and Pro Installation Install the software on your PC Turn your PC on Open...

Page 50: ...your PC 14 Click on the CONTINUE button to copy the utilities and PaperPort SE software that comes along with the kit 15 At the end of the installation you need to restart your PC to update the system...

Page 51: ...FAXES 2 Right click OKI B2500 MFP 3 Click PROPERTIES 4 Click the PRINT TEST PAGE button Reinstall the drivers if the installation failed You can now use the multifunction machine to print or scan your...

Page 52: ...case click on the NOT IN THE LIST button The next window appears Type the IP address or the NetBIOS name of the hardware that you wish to add You can test the connection between the PC and the hardwa...

Page 53: ...that you have installed contains two multifunction machine management applications MF DIRECTOR and MF MONITOR which allow you to check whether the multifunction machine is connected to your PC monito...

Page 54: ...g utilities and software get HELP from the current documentation run the PaperPort software Doc Manager To run a software or utility contained in the COMPANION SUITE PRO kit place the cursor on it and...

Page 55: ...by clicking on the OK button Companion Suite Pro LL functions Document analysis The document analysis can be carried out in two ways either by the SCAN TO function application accessible from the MF...

Page 56: ...via the USB connection The printer driver allows you to print via the wireless connection This driver is installed when you add a network printer Printing with the multifunction machine To print a do...

Page 57: ...o the list Add a group to the terminal address book 1 Click the link ADDRESS BOOK of the window MF DIRECTOR 2 Select the terminal address book 3 Click NEW and select GROUP in the displayed menu 4 Ente...

Page 58: ...ctory makes it possible to exchange address book entries between two devices without having to enter contacts one by one manually Directories can be imported from files in EAB format EAB files are aut...

Page 59: ...ist of contacts 5 If necessary adjust the advanced options send later and resolution in the tab ADVANCED OPTIONS 6 To add a cover sheet select the tab COVER PAGE then click the box WITH THE COVER PAGE...

Page 60: ...ts in your list of contacts 7 Your send request can then be checked if necessary in the outbox Receive a fax The window MF Manager and MF Director show using different messages the reception of a fax...

Page 61: ...the date and reception of the fax the status Fax parameters Access to fax parameters 1 Click on the icon of the window MF DIRECTOR 2 Select TOOLS OPTION FAX 3 Make the adjustments require referring to...

Page 62: ...ing a cover sheet 1 From the tab COVER PAGE click on the button NEW 2 Select the model cover sheet you have created using the menu FILE A window with the model cover sheet you have created is displaye...

Page 63: ...u wish Second step Add the fields that you want to be displayed in the cover page fax number comment subject and so on As mentioned before these fields will be filled by Fax application at emission ti...

Page 64: ...anner source as shown below Add any recipient to the recipient list click on the tab ADVANCED OPTIONS select resolution FINE as shown below Finally click on the button SAVE AS DRAFT in the lower right...

Page 65: ...tton FIELDS in the toolbar a window pops up allowing you to add the fields on top of the background image e Click on the button SAVE to save the Cover Page template and exit this window f The window N...

Page 66: ...ge is displayed on the screen 1 Press OK 2 Stand in front of the device 3 Push on the left and right sides of the cover and pull it towards you 4 Raise and remove the toner cartridge from the machine...

Page 67: ...Error messages When the printer encounters any of the problems described below the corresponding message is shown on the machine display PLEASE WAIT UNKNOWN CARD REMOVE CARD ACTION CANCELLED REMOVE C...

Page 68: ...cally If a paper jam occurs in the machine and the following message appears 1 Remove the toner cartridge and check if a sheet is jammed 2 Remove the sheet of paper which causes the paper jam 3 Put th...

Page 69: ...t inserted backwards You cannot send a fax 1 Check that the telephone line cable is correctly plugged in 2 Check the tone by pressing the key 3 Check the prefix is correctly programmed and used Commun...

Page 70: ...ber of pages in the document Code 0C Received document error Ask the subscriber who called you to check the length of his document it may be too long to be completely received Code 0D Transmission fai...

Page 71: ...computer specifications software applications connection modes LAN USB or WLAN paper formats as well as file types and sizes Preheating time 21 sec First page out time 13 sec Type Autonomous Black an...

Page 72: ...o 4 000 pages when printing on Letter paper with a 5 max black and white ratio The service life of the toner cartridge mainly depends on the type of printed document and the average number of pages pe...

Page 73: ...Available 24 hours a day 7 days a week Visit our multilingual web site www OKIPRINTINGSOLUTIONS COM Visit MY OKIDATA COM Call 1 800 654 3282 Oki Data Americas Inc 2000 Bishops Gate Blvd Mt Laurel NJ...

Reviews: