background image


        SD SERIES BENCH SCALE  EN-1

Ohaus SD Series Bench Scale

INSTRUCTION MANUAL


•  The contents of this manual applies to all models of the SD Series Bench    

  Scale.


•  Calibration weights are not provided with this product.


•  For best results, use the product within the specified operating temperature   


 range.


•  For best accuracy, perform your measurements in a clean environment, free  


of electrostatic and magnetic fields, dust and dirt, moisture, vibration and air  


 currents.


•  Use your SD Series Bench Scale with care, gently loading items to be weighed  


on the center of the platform.  Avoiding rough treatment will aid in extending  


the life of your Scale.

SD-Manual original.indb   1

9/8/2006   3:09:49 PM

Summary of Contents for SD Series

Page 1: ...i SD Series Bench Scale Báscula de mesa de la serie SD Balance de table Série SD Tischwaage der SD Serie Bilancia da banco serie SD SD Manual original indb 1 9 8 2006 3 09 48 PM ...

Page 2: ...ii SD Manual original indb 2 9 8 2006 3 09 48 PM ...

Page 3: ... conformidad con la Directriz EMC 89 336 EEC y con la Directriz para Bajo Voltaje 73 23 EEC La Declaración de Conformidad completa está disponible a través de Ohaus Corporation Ce produit est conforme à la directive EMC 89 336 EEC et à la directive de basse tension 73 23 EEC Vous pouvez obtenir une déclaration complète de la conformité auprès de Ohaus Corporation Dieses Produkt entspricht der EMC ...

Page 4: ...s locales mediante el sistema de recogida selectiva de aparatos eléctricos y electrónicos Si tiene alguna pregunta al respecto diríjase a las autoridades responsables o al distri buidor que le proporcionó el equipo Si transfiere este equipo por ejemplo para la continuación de su uso con fines privados comerciales o industriales deberá transferir con él esta disposición Muchas gracias por su contri...

Page 5: ...Vielen Dank für Ihren Beitrag zum Schutz der Umwelt Smaltimento In conformità a quanto stabilito dalla Direttiva Europea 2002 96 CE in materia di ap parecchi elettrici ed elettronici RAEE questo strumento non può essere smaltito come i normali rifiuti Tale presupposto resta valido anche per i Paesi al di fuori dei confini della UE conformemente alle norme nazionali in vigore Si prega quindi di sma...

Page 6: ...nt system is compliant with the ISO 9001 standard s requirements On May 15 2003 Ohaus Corporation USA was re registered to the ISO 9001 2000 standard Registro ISO 9001 En 1994 Bureau Veritus Quality International BVQI le otorgó a Ohaus Corporation EE UU un certificado de registro ISO 9001 el cual confirma que el sistema administrativo de calidad de Ohaus cumple con los requerimientos del estándar ...

Page 7: ...roduct within the specified operating temperature range For best accuracy perform your measurements in a clean environment free of electrostatic and magnetic fields dust and dirt moisture vibration and air currents Use your SD Series Bench Scale with care gently loading items to be weighed on the center of the platform Avoiding rough treatment will aid in extending the life of your Scale SD Manual...

Page 8: ...L and SD200L are equipped with adjustable leveling feet Adjust the four leveling feet under the platform to level it Power Options AC Adapter Operation The AC Adapter included may be used to power the system when battery power is not available Check that the AC input power as marked on the Adapter matches the available power source Connect the round plug of the AC Adapter to the power input jack a...

Page 9: ...r recycling requirements in accordance with local laws and regulations Indicator Mounting and Placement Options Table Top Placement The Indicator may be placed on a flat table surface without additional hardware Four rubber feet provide reduced slippage on most surfaces Direct Wall Mounting The Indicator may be mounted directly to a wall using two screws not included Select appropriate size screws...

Page 10: ...ut solid backing use appropriate anchoring hardware MOUNTING NOTES 1 When attaching brackets Insert round pins into holes at bottom of Indicator slide each bracket back to lock in place 2 Mounting brackets may be attached in two different orientations to provide optimum viewing angle 3 Some mounting positions may require that the brackets be attached to the work surface before being attached to th...

Page 11: ...initiates the calibration process Display Window Large 7 Segment Numeric Characters Weight mass values are shown using 4 digits including negative sign and decimal places Prompts for calibration and possible error conditions are also shown using these digits Stable Reading Indication A will appear in the lower left corner of the display to indicate when the reading is stable Weighing Unit Indicati...

Page 12: ...s reached When a container is used the ON ZERO Off button may be used to simulate a Tare function Additional mass may then be added as a NET weight When removing both the sample and container from the scale a negative value may be displayed Zero the scale again before subsequent usage NOTE The ON ZERO Off button will perform a true zero setting function when displayed values are within 2 of full c...

Page 13: ...ED TO EQUAL THE REQUIRED CALIBRATION WEIGHT 1 Allow the scale to warm up and stabilize for a least two minutes before commencing the calibration procedure 2 To select the weighing unit to be used for calibration press the UNITS Cal button until the correct unit is displayed NOTE The calibration process can be stopped at any time by pressing the UNITS Cal button or by turning the scale off The corr...

Page 14: ...h the calibration function may be locked disabled and unauthorized recalibration prevented 1 With the scale powered off remove the back housing section of the indicator by unscrewing the four screws at the bottom 2 Slide the switch on the PCB marked SW3 to the position marked CAL LOCK 3 Reassemble the housing 4 If required place tamper evident sealing labels over the screw holes or over the housin...

Page 15: ... Underload Indication Negative value Auto Shut Off 4 minutes no activity battery operation only Battery Operating Time 360 hours Operating Temperature Range 41 to 104 F 5 to 40 C at 10 to 80 relative humidity non condensing Cable Length 1 8m 72 uncoiled Display 4 Digit LCD 0 8 20mm high Scale Base Size 316mm L x 280mm W x 45mm H 12 4 x L x 11 W x 1 77 H Indicator Size 210mm L x 91mm W x 39mm H 8 2...

Page 16: ...Underload Indication Negative value Auto Shut Off 4 minutes no activity battery operation only Battery Operating Time 360 hours Operating Temperature Range 41 to 104 F 5 to 40 C at 10 to 80 relative humidity non condensing Cable Length 1 8m 72 uncoiled Display 4 Digit LCD 0 8 20mm high Scale Base Size 520mm L x 400 mm W x 75 mm H 20 5 L x 15 7 W x 3 H Indicator Size 210mm L x 91mm W x 39mm H 8 27 ...

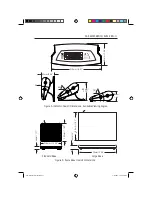
Page 17: ...ons 53mm 2 09 69mm 2 72 39mm 1 54 210mm 8 27 91mm 3 58 280mm 11 02 45mm 1 77 Figure 5 Indicator Overall Dimensions Available Viewing Angles 0º 50º 70º Standard Base Large Base 316mm 12 44 400 mm 15 7 520mm 20 5 75mm 3 SD Manual original indb 11 9 8 2006 3 09 54 PM ...

Page 18: ...misuse exposed to radioactive or corrosive materials has foreign material penetrating to the inside of the product or as a result of service or modification by other than Ohaus In lieu of product registration the warranty period shall begin on the date of shipment to the authorized dealer No other express or implied warranty is given by Ohaus Corporation Ohaus Corporation shall not be liable for a...

Reviews: