OHAUS Scout SPX Quick Start Manual Download Page 4

Scout

 SPX Balances                                  Quick Start Guide


Scout


SPX Balances


iv

          Ohaus Corporation  www

.

ohaus.com


Weighing 

1.  Press the 

Zero/On

 button to turn the balance on. 

2.  Select Weighing (this application is the default) by pressing & holding 

Mode


key. 

3.  Press 

Tare

 or 

Zero

 if necessary to begin. 

4.  Place objects on the pan to display the weight. When stable, the 

*


appears. 

The display shows the resulting value of the sample

.  


MENU STRUCTURE


Sub-Menus 

C.a.l 

S.e.t.u.p


M.o.d.e 

U.n.i.t


E.n.d


User Menu 

Items: 


Span 
Lin 


Reset 

Yes/

No


Filter  

Low/

Med

/High 

AZT 

0.5

/1/3/Off 

StableRange 

0.5/

1

/2//5 

Backlight 

Off/On/

Auto


Auto Tare 

Off

/On/On-acc 

Auto Off 

Off

/1/5/10 


Reset 

Yes/

No


Weighing 

On

/Off 

Counting 

On

/Off 

Percent 

On

/Off 

Check 

On

/Off 

Totalize 

On

/Off 

Hold 

Disp

/Peak/Off 


Reset 


kg 
ct 

oz 
ozt 
dwt 
lb 
lb:oz 
grn 
hkt* 
sgt* 
twt* 
t*     
tola/tical 


End 

End 

End 

End 


Note: Bold fonts are default settings in the menus.     * Only available in certain regions. 

ADDITIONAL FEATURES


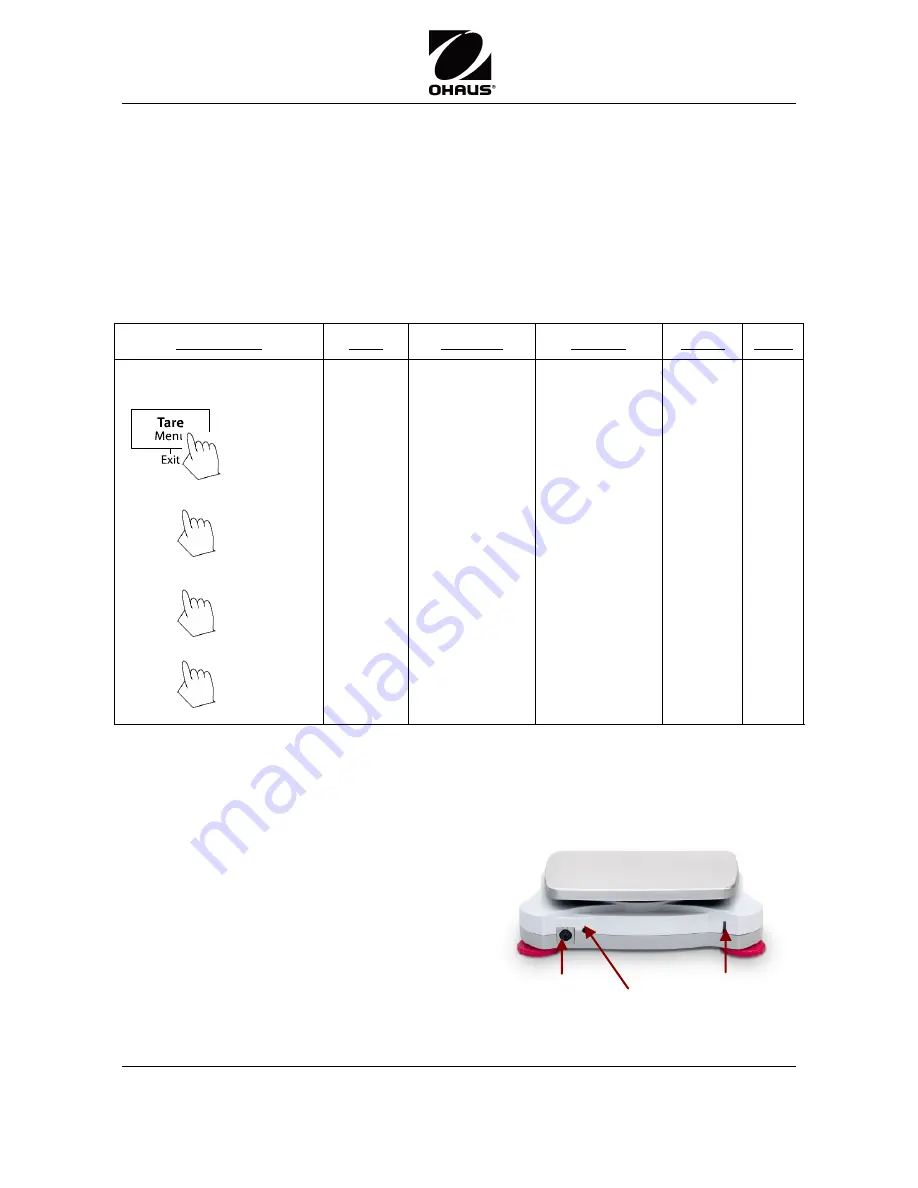
Connecting the Interface


Use an optional interface connectivity kit to 
connect the balance either to a computer, 
printer or OHAUS auxiliary display. 
 
Below Interface kit accessories are available: 
RS232, USB Host, USB Device, Ethernet, 
Bluetooth

*

Interface connection on the rear of 
the balance: 


* Interface kits may vary according to local regulations 


No/Back 

Long press -

Enter menu


Short press -

Accept


Short press – 
Go to 

Next/Prev.


menu


Yes 

Exit 

Short press – 

Exit

 menu


Interface connection 

AC Adapter jack 

Security slot 

Summary of Contents for Scout SPX

Page 1: ...pid temperature changes PREPARATION FOR USE Step 1 Release the red Transportation Lock on subplatform of the balance Turn the pointer 90 counter clockwise Step 2 Install the Pan Rectangular pan Place...

Page 2: ...voltage range printed on the AC adapter s ratings label Only connect the AC adapter to a compatible grounded socket Position the instrument such that the AC adapter can be easily disconnected from the...

Page 3: ...ce turned on Step 1 Press and hold Menu until mMeNU Menu is displayed Step 2 Release the button the display will show C A L Step 3 Press Yes to accept SpaN will then be shown Step 4 Press Yes to begin...

Page 4: ...Off 1 5 10 Reset Yes No Weighing On Off Counting On Off Percent On Off Check On Off Totalize On Off Hold Disp Peak Off Reset g kg ct N oz ozt dwt lb lb oz grn hkt sgt twt t tola tical C End End End En...

Page 5: ...t www ohaus com ce This product complies with the EU Directive 2002 96 EC WEEE Please dispose of this product in accordance with local regulations at the collecting point specified for electrical and...

Page 6: ...EL USO Paso 1 Libere el bloqueo de transporte de color rojo ubicado en la sub plataforma de la balanza Gire el puntero 90 en sentido antihorario Puntero de bloqueo de transporte Paso 2 Instale el pla...

Page 7: ...ecificaciones del adaptador de CA Solo conecte el adaptador de CA a una toma compatible con conexi n de tierra Posicione el instrumento de tal forma que el adaptador de CA se pueda desconectar f cilme...

Page 8: ...esionado Menu hasta que aparezca mMeNU Menu Paso 2 Suelte el bot n la pantalla mostrar C A L Paso 3 Pulse Yes para aceptar SpaN se mostrar a continuaci n Paso 4 Pulse Yes para comenzar la calibraci n...

Page 9: ...s No Weighing On Off Counting On Off Percent On Off Check On Off Totalize On Off Hold Disp Peak Off Reset g kg ct N oz ozt dwt lb lb oz grn hkt sgt twt t tola tical C End End End End Nota Las letras e...

Page 10: ...n l nea en www ohaus com ce Este producto cumple la directiva de la UE 2002 96 EC WEEE Deseche este producto de acuerdo con las normativas locales en el punto de recogida indicado para los equipos el...

Page 11: ...l UTILISATION tape 1 D verrouiller le verrou de transport rouge sur le socle de la balance Tourner l indicateur de 90 dans le sens antihoraire Etape 2 Installer le plateau Plateau rectangulaire Placer...

Page 12: ...ette de l adaptateur CA Uniquement raccorder l adaptateur CA une prise avec mise la terre Positionner l quipement de fa on ce que l adaptateur CA puisse facilement tre d branch de la prise Positionner...

Page 13: ...er et maintenir Menu jusqu ce mMeNU Menu soit affich Etape 2 Rel cher le bouton l affichage indique C A L Etape 3 Appuyer Oui pour accepter SpaN est alors affich Etape 4 Appuyer Oui pour commencer l t...

Page 14: ...ff 1 5 10 Reset Yes No Weighing On Off Counting On Off Percent On Off Check On Off Totalize On Off Hold Disp Peak Off Reset g kg ct N oz ozt dwt lb lb oz grn hkt sgt twt t tola tical C End End End End...

Page 15: ...e Le pr sent produit est conforme aux Directives 2014 30 UE EMC 2014 35 UE LVD et 2014 31 UE NAWI La d claration de conformit UE est disponible en ligne sur le site www ohaus com ce Le pr sent produit...

Page 16: ...informations sur la balance se reporter au manuel d instructions On peut obtenir le manuel d instructions soit par balayage du code QR code ou en se rendant sur la page produit Scout SPX pour le t l...

Reviews: