background image

ES-10  

Agitadoras con parilla de calentamiento Guardian

TM 


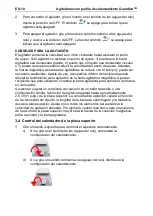
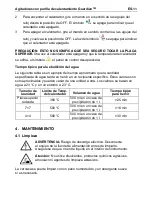
Para encender el agitador, gire el mando en el sentido de las agujas del reloj 

desde la posición de OFF. El sí

mbolo  

 se apaga para indicar que el 

agitador está apagado. 


Para apagar el agitador, gire el mando en sentido contrario a las agujas del 

reloj y


vuelva a la posición de OFF. La luz del sí

mbolo  

 se apaga para 

indicar que el agitador está apagado. 


CONSEJOS PARA LA AGITACIÓN 

El agitador aumenta la velocidad a un ritmo constante hasta alcanzar el punto 
de ajuste. Si el agitador no alcanza su punto de ajuste: 1) puede que la barra 
agitadora sea demasiado grande, 2) puede que el lí

quido sea demasiado viscoso 

o 3) puede que sea necesario reducir la velocidad del punto de ajuste. Además, 
la fuerza magnética de las barras agitadoras se reduce con el tiempo y puede ser 
necesario sustituirlas. Aparte de eso, la superficie inferior del recipiente puede 
afectar al rendimiento de la agitación de la barra agitadora magnética. Ajuste el 
recipiente que está utilizando o cambie la barra agitadora para optimizar la mezcla 
en la muestra. 
Al calentar y agitar un recipiente de reacción en un baño de aceite o una 
configuración similar, la función de agitación agitará hasta aproximadamente 
2,5 cm (1 pulg.) de la placa superior. La velocidad de agitación variará en función 
de la viscosidad del lí

quido, la longitud de la barra de centrifugado y la distancia 

desde la placa superior. Ajuste uno o todos los elementos para alcanzar la 
velocidad de agitación deseada. Por ejemplo, cuanto más cerca esté el recipiente 
de reacción de la placa superior, mayor será la fuerza de la conexión magnética 
entre la unidad y la barra agitadora. 

3.4  Control del calentador de la placa superior 

Gire el mando izquierdo para controlar el ajuste de calentamiento. 
c) 

Si se gira en el sentido de las agujas del reloj, aumentará la 
configuración del calentamiento. 


d) 

Si se gira en sentido contrario a las agujas del reloj, disminuirá la 
configuración del calentamiento. 


Summary of Contents for Guardian 2000

Page 1: ...GuardianTM 2000 Hotplate Stirrer e G21 Instruction Manual...

Page 2: ......

Page 3: ...4 Installation 4 2 OVERVIEW 5 2 1 Dimensions 5 2 2 Control Panel 8 3 OPERATION 9 3 1 Getting Ready 9 3 2 Standby Mode 9 3 3 Controlling the Stirrer 9 3 4 Controlling the Top Plate Heater 10 4 MAINTEN...

Page 4: ...osion hazard Caution hot surface Protective conductor terminal Alternating current Electrical shock hazard Safety Precautions WARNING The protection provided by the unit may be impaired if used with a...

Page 5: ...e substances Glass breakage as a result of mechanical shaking power Incorrect container size Too much medium Unsafe condition of container Earth Ground Protective Conductor Terminal Alternating Curren...

Page 6: ...produced by the unit and place the unit a minimum of six 6 inches from vertical surfaces Do not position the equipment such that it is difficult to disconnect the power cord during use Always place t...

Page 7: ...2 A 220 240 V 1 A Fuses Hotplate Stirrer Hotplate 10 A 5 x 20 mm 250 VAC 6 3 A 5 x 20 mm 250 VAC Fuses Stirrer 6 3 A 5x20 mm 250 VAC Temperature Range 50 to 380 C Temperature Stability of Top Plate 3...

Page 8: ...120 V 2 A 220 240 V 1 A Fuses Hotplate Stirrer Hotplate 10 A 5 x 20 mm 250 VAC 6 3 A 5 x 20 mm 250 VAC Fuses Stirrer 6 3 A 5x20 mm 250 VAC Temperature Range 70 to 500 C Temperature Stability of Top Pl...

Page 9: ...120 V 2 A 220 240 V 1 A Fuses Hotplate Stirrer Hotplate 15 A 5 x 20 mm 250 VAC 10 A 5 x 20 mm 250 VAC Fuses Stirrer 6 3 A 5x20 mm 250 VAC Temperature Range 70 to 500 C Temperature Stability of Top Pl...

Page 10: ...Hot Top Caution Indicator Illuminates when the top plate surface is hot Do not touch 5 Speed Indicator Illuminates when stirrer is running 6 Right Knob Controls speed 7 Power Entry Module PEM 8 Fuse...

Page 11: ...off a All heating and stirring function will turn off b If the top plate is hot the on the control panel will remain illuminated 2 When the unit is switched on a The unit is ready for normal use b If...

Page 12: ...change the stir bar to optimize mixing in the sample When heating and stirring a reaction vessel within an oil bath or similar set up the stirring function will stir up to approximately one inch 2 5 c...

Page 13: ...mL in 1L beaker 25 min 7 7 500 C 500mL in 1L beaker 18 min 4 4 500 C 500mL in 1L beaker 30 min 4 MAINTENANCE 4 1 Cleaning WARNING Electric Shock Hazard Disconnect the equipment from the power supply b...

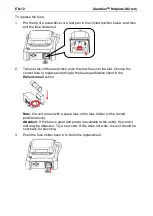
Page 14: ...Choose the correct fuse to replace according to the fuse specification listed in the Dimensions Section Note the unit comes with a spare fuse in the fuse holder in the circled position above Attention...

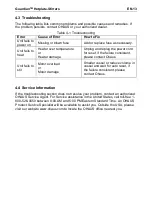
Page 15: ...eset if the failure consistent please contact Ohaus Unit fails to stir Motor overload or Motor damage Smaller vessel or reduce volume in vessel and wait for auto reset if the failure consistent please...

Page 16: ...www ohaus com ce This product complies with the applicable statutory standards of the Restriction of the Use of Certain Hazardous Substances in Electrical and Electronic Equipment Regulations 2012 UK...

Page 17: ...been tested and found to comply with the limits for a Class A digital device pursuant to part 15 of the FCC Rules These limits are designed to provide reasonable protection against harmful interferenc...

Page 18: ...t has been damaged by accident or misuse exposed to radioactive or corrosive materials has foreign material penetrating to the inside of the product or as a result of service or modification by other...

Page 19: ...GENERAL 5 2 1 Dimensiones 5 2 2 Panel de control 8 3 FUNCIONAMIENTO 9 3 1 Prepar ndose 9 3 2 Modo de reposo 9 3 3 Control de la agitadora 9 3 4 Control del calentador de la placa superior 10 4 MANTENI...

Page 20: ...quipo si no se evita NOTA Corresponde a informaci n til sobre el producto S mbolos de advertencia Riesgo general Riesgo de explosi n Precauci n superficie caliente Terminal conductor de protecci n Cor...

Page 21: ...N Tenga en cuenta los siguientes riesgos cuando la unidad se caliente Materiales inflamables Sustancias combustibles con un punto de ebullici n bajo Rotura del cristal como resultado de la fuerza de...

Page 22: ...or esta y coloque la unidad a una distancia m nima de seis 6 pulgadas de superficies verticales No coloque el equipo de forma que sea dif cil desconectar el cable de alimentaci n durante el uso Coloqu...

Page 23: ...240 V 1 A Fusibles Agitador magn tico Magn tico 10 A 5 20 mm 250 V CA 6 3A 5 20 mm 250 V CA Fusibles Agitador 6 3 A 5x20 mm 250 VAC Rango de temperatura 50 C a 380 C Estabilidad de temperatura de la p...

Page 24: ...120 V 2 A 220 240 V 1 A Fusibles Agitador magn tico Magn tico 10 A 5 20 mm 250 V CA 6 3A 5 20 mm 250 V CA Fusibles Agitador 6 3 A 5x20 mm 250 VAC Rango de temperatura 70 a 500 C Estabilidad de tempera...

Page 25: ...0 120 V 2 A 220 240 V 1 A Fusibles Agitador magn tico Magn tico 15 A 5 20 mm 250 V CA 10 A 5 20 mm 250 V CA Fusibles Agitador 6 3 A 5x20 mm 250 VAC Rango de temperatura 70 a 500 C Estabilidad de tempe...

Page 26: ...de temperatura excesiva se ilumina cuando la superficie de la bandeja superior est caliente No la toque 5 Indicador de velocidad se ilumina cuando el agitador est funcionando 6 Control derecho contro...

Page 27: ...a unidad est apagada a Todas las funciones de calentamiento y de agitado se apagar n b Si la placa superior est caliente el s mbolo en el panel de control permanecer encendido 2 Cuando la unidad est e...

Page 28: ...ecipiente puede afectar al rendimiento de la agitaci n de la barra agitadora magn tica Ajuste el recipiente que est utilizando o cambie la barra agitadora para optimizar la mezcla en la muestra Al cal...

Page 29: ...do que la cantidad especificada de agua tarda en hervir en un recipiente espec fico Estos valores son solo aproximados y pueden variar de una unidad a otra Los valores se basan en agua a 23 C y en un...

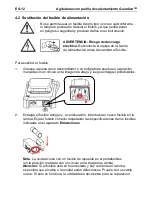
Page 30: ...llador o un bol grafo de prueba en la posici n marcada con un c rculo en la imagen de abajo y luego extraiga el portafusibles 2 Extraiga el fusible antiguo y a continuaci n introduzca el nuevo fusible...

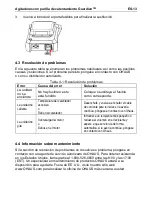
Page 31: ...lva a enchufar el cable de corriente para reiniciar si la aver a contin a p ngase en contacto con Ohaus La unidad no gita Sobrecarga del motor o Da os en el motor Introduzca un recipiente m s peque o...

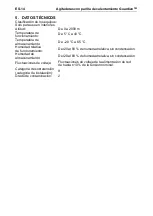
Page 32: ...Temperatura de almacenamiento De 20 C a 65 C Humedad relativa de funcionamiento Del 20 al 80 de humedad relativa sin condensaci n Humedad de almacenamiento Del 20 al 80 de humedad relativa sin conden...

Page 33: ...tica del Reino Unido de 2016 y las normativas sobre seguridad de los equipos el ctricos de 2016 En www ohaus com uk declarations encontrar la declaraci n de conformidad del Reino Unido completa Este p...

Page 34: ...da os por un accidente o un mal uso o se ha expuesto a materiales radiactivos o corrosivos si ha penetrado material extra o en el interior del producto o como resultado de un mantenimiento o una modif...

Page 35: ...R U 5 2 1 Dimensions 5 2 2 Panneau de commande 8 3 FONCTIONNEMENT 9 3 1 Pr paration 9 3 2 Mode veille 9 3 3 Contr le de l agitateur 9 3 4 Contr le du bloc chauffant de la plaque sup rieure 10 4 MAINTE...

Page 36: ...e ATTENTION Fournit des informations importantes sur le produit Peut entra ner des dommages l quipement si la situation n est pas vit e REMARQUE Fournit des informations utiles sur le produit Symboles...

Page 37: ...rideaux et autres mat riaux inflammables Maintenez le cordon d alimentation l cart de la plaque chauffante MISE EN GARDE Tenez compte des risques suivants lors du chauffage Mati res inflammables Subs...

Page 38: ...ite par l unit et placez l unit au moins six pouces 15 cm des surfaces verticales Positionnez l quipement de mani re ce que le cordon d alimentation ne soit pas difficile d brancher pendant utilisatio...

Page 39: ...gitateur 100 120 V 2 A 220 240 V 1 A Fusibles Agitateur chauffant Plaque chauffante 10 A 5 x 20 mm 250 V CA 6 3 A 5 x 20 mm 250 V CA Fusibles Agitateur 6 3 A 5x20 mm 250 VAC Gamme de temp rature 50 C...

Page 40: ...e 50 60 Hz Agitateur 100 120 V 2 A 220 240 V 1 A Fusibles Agitateur chauffant Plaque chauffante 10 A 5 x 20 mm 250 V CA 6 3 A 5 x 20 mm 250 V CA Fusibles Agitateur 6 3 A 5x20 mm 250 VAC Gamme de temp...

Page 41: ...ue 50 60 Hz Agitateur 100 120 V 2 A 220 240 V 1 A Fusibles Agitateur chauffant Plaque chauffante 15 A 5 x 20 mm 250 V CA 10 A 5 x 20 mm 250 V CA Fusibles Agitateur 6 3 A 5x20 mm 250 VAC Gamme de temp...

Page 42: ...rieure chaude S allume lorsque la surface de la plaque sup rieure est chaude Ne pas toucher 5 Indicateur de vitesse S allume lorsque l agitateur est en marche 6 Bouton droit Contr le la vitesse 7 Mod...

Page 43: ...st teinte a Toutes les fonctions de chauffage et d agitation s teignent b Si la plaque sup rieure est chaude le du panneau de commande reste allum 2 Lorsque l unit est allum e a L unit est pr te pour...

Page 44: ...rre d agitation magn tique Adaptez le r cipient utilis ou changez la barre d agitation pour optimiser le m lange de l chantillon Lors du chauffage et de l agitation d un r cipient de r action dans un...

Page 45: ...p du bloc chauffant Volume d eau Temps d bullition moyen Plaque ronde 380 C 500 ml dans un b cher de 1 l 25 min 7 7 500 C 500 ml dans un b cher de 1 l 18 min 4 4 500 C 500 ml dans un b cher de 1 l 30...

Page 46: ...sible ad quat en vous r f rant aux caract ristiques du fusible indiqu es la section Dimensions Remarque l unit est livr e avec un fusible de rechange dans le porte fusible dans la position indiqu e ci...

Page 47: ...r initialiser la machine Si l erreur persiste veuillez contacter OHAUS L unit n agite pas Surcharge du moteur ou Dommages au moteur R duisez le volume du r cipient et attendez la r initialisation auto...

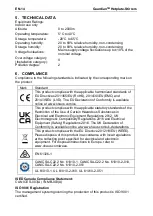
Page 48: ...ture de fonctionnement de 5 C 40 C Temp rature de stockage de 20 C 65 C Humidit de fonctionnement de 20 80 d humidit relative sans condensation Humidit de stockage de 20 80 d humidit relative sans con...

Page 49: ...la compatibilit lectromagn tique de 2016 et aux r glementations sur les quipements lectriques s curit de 2016 La d claration de conformit pour le Royaume Uni compl te est disponible en ligne sur le si...

Page 50: ...raison d une utilisation non conforme a t expos des substances radioactives ou corrosives si des corps trangers p n trent l int rieur du produit ou la suite d un entretien ou d une modification effec...

Page 51: ...4 Aufstellung 4 2 BERSICHT 5 2 1 Technische Daten 5 2 2 Bedienfeld 8 3 BETRIEB 9 3 1 Erste Schritte 9 3 2 Standby Modus 9 3 3 Bedienung des R hrers 9 3 4 Einstellung der Deckplattenheizung 10 4 PFLEG...

Page 52: ...tesch den f hren HINWEIS F r n tzliche Informationen ber das Produkt Warnsymbole Allgemeine Gefahr Explosionsgefahr Vorsicht hei e Oberfl che Schutzleiteranschluss Wechselstrom Stromschlaggefahr Sich...

Page 53: ...sowie von Papier T chern und anderen brennbaren Materialien fern Halten Sie das Netzkabel von der Heizplatte fern VORSICHT Seien Sie sich beim Aufheizen folgender Risiken bewusst Brennbare Stoffe Bren...

Page 54: ...und platzieren Sie das Ger t in mindestens 15 cm Entfernung zu vertikalen Fl chen Platzieren Sie das Ger t immer so dass das Netzkabel im Betrieb leicht vom Netzanschluss getrennt werden kann Das Ger...

Page 55: ...herungen Heizplattenr hrer Heizplatte 10 A 5 x 20 mm 250 V AC 6 3 A 5 x 20 mm 250 V AC Sicherungen R hrer 6 3 A 5x20 mm 250 VAC Temperaturbereich 50 C bis 380 C Temperaturstabilit t der Deckplatte 3 1...

Page 56: ...0 240 V 1 A Sicherungen Heizplattenr hrer Heizplatte 10 A 5 x 20 mm 250 V AC 6 3 A 5 x 20 mm 250 V AC Sicherungen R hrer 6 3 A 5x20 mm 250 VAC Temperaturbereich 70 C bis 500 C Temperaturstabilit t der...

Page 57: ...20 240 V 1 A Sicherungen Heizplattenr hrer Heizplatte 15 A 5 x 20 mm 250 V AC 10 A 5 x 20 mm 250 V AC Sicherungen R hrer 6 3 A 5x20 mm 250 VAC Temperaturbereich 70 C bis 500 C Temperaturstabilit t der...

Page 58: ...kplatte hei ist Bitte nicht anfassen 5 Drehzahlanzeige Leuchtet wenn der R hrer in Betrieb ist 6 Rechter Knopf Drehzahlregelung 7 Netzeingangsmodul Power Entry Module PEM 8 Sicherung 9 Montagebohrung...

Page 59: ...d R hrfunktionen werden ausgeschaltet b Wenn die obere Platte hei ist leuchtet die Anzeige auf dem Display weiter 2 Bei Einschalten des Ger ts a Das Ger t ist f r den blichen Betrieb bereit b Wenn die...

Page 60: ...n auf die R hrleistung des Magnetr hrstabs haben Verwenden Sie ein anderes Gef oder wechseln Sie den R hrstab um das Mischen in der Probe zu optimieren Beim Erhitzen und R hren eines Reaktionsgef es i...

Page 61: ...on 23 C in einer Umgebungstemperatur von 23 C Ger teformat Grenzwert Heiz temp Wasservolumen Typische Siedezeit Runde Deckplatte 380 C 500 ml in 1 l Becher ca 25 min 7 7 Zoll 500 C 500 ml in 1 l Beche...

Page 62: ...e Sicherung gem der Sicherungsspezifikation aus die im Abschnitt Technische Daten angegeben ist Hinweis Das Ger t wird mit einer Ersatzsicherung im Sicherungshalter an der oben eingekreisten Stelle ge...

Page 63: ...es wieder ein um das Ger t zu resetten sollte der Fehler weiterhin bestehen wenden Sie sich bitte an OHAUS Das Ger t r hrt nicht berlastung des Motors oder Motorschaden Verkleinern Sie das Gef oder r...

Page 64: ...riebstemperatur 5 C bis 40 C Lagertemperatur 20 C bis 65 C Betriebsfeuchtigkeit 20 bis 80 relative Feuchte nicht kondensierend Lagerfeuchtigkeit 20 bis 80 relative Feuchte nicht kondensierend Spannung...

Page 65: ...hen Vertr glichkeit von 2016 und den Bestimmungen zu Elektroger ten Sicherheit von 2016 Die Konformit tserkl rung des Vereinigten K nigreichs ist online unter www ohaus com uk declarations verf gbar D...

Page 66: ...de wenn es radioaktiven oder korrosiven Materialien ausgesetzt war wenn Fremdk rper in das Innere des Produkts eingedrungen sind oder wenn das Produkt durch andere Unternehmen als OHAUS gewartet oder...

Page 67: ...NORAMICA 5 2 1 Dimensioni 5 2 2 Pannello di controllo 8 3 FUNZIONAMENTO 9 3 1 Preparativi 9 3 2 Modalit standby 9 3 3 Controllo dell agitatore 9 3 4 Controllo del riscaldatore della piastra 10 4 MANUT...

Page 68: ...NOTA Indica informazioni utili sul prodotto Simboli di avvertenza Rischio generico Rischio di esplosione Attenzione superficie calda Terminale conduttore di protezione Corrente alternata Rischio di s...

Page 69: ...attenzione ai seguenti rischi durante il riscaldamento Materiali infiammabili Sostanze combustibili con basso punto di ebollizione Rottura del vetro a causa della forza meccanica di agitazione Dimensi...

Page 70: ...pico prodotto dalla stessa e posizionarla ad almeno 15 cm di distanza dalle superfici verticali Non posizionare l apparecchiatura in modo che sia difficile scollegare l alimentazione elettrica durante...

Page 71: ...20 240 V 1 A Fusibili Agitatore piastra riscaldante Piastra riscaldante 10 A 5 x 20 mm 250 VCA 6 3 A 5 x 20 mm 250 VCA Fusibili Agitatore 6 3 A 5x20 mm 250 VAC Gamma di temperatura Da 50 C a 380 C Sta...

Page 72: ...V 2 A 220 240 V 1 A Fusibili Agitatore piastra riscaldante Piastra riscaldante 10 A 5 x 20 mm 250 VCA 6 3 A 5 x 20 mm 250 VCA Fusibili Agitatore 6 3 A 5x20 mm 250 VAC Gamma di temperatura Da 70 C a 5...

Page 73: ...0 V 2 A 220 240 V 1 A Fusibili Agitatore piastra riscaldante Piastra riscaldante 15 A 5 x 20 mm 250 VCA 10 A 5 x 20 mm 250 VCA Fusibili Agitatore 6 3 A 5x20 mm 250 VAC Gamma di temperatura Da 70 C a 5...

Page 74: ...e di pericolo temperatura eccessiva del piano Si illumina quando la temperatura del riscaldatore calda Non toccare 5 Indicatore di velocit Si illumina quando l agitatore in funzione 6 Manopola destra...

Page 75: ...oni di riscaldamento e agitazione si spengono b Se la piastra superiore calda il sul pannello di controllo rimane illuminato 2 All accensione dell unit a L unit pronta per il normale utilizzo b Se le...

Page 76: ...timizzare la miscelazione nel campione Durante il riscaldamento e l agitazione di un contenitore di reazione all interno di un bagno d olio o in una configurazione simile la funzione di agitazione agi...

Page 77: ...500 C 500 ml in un becher da 1 l 18 min 4 4 500 C 500 ml in un becher da 1 l 30 min 4 MANUTENZIONE 4 1 Pulizia AVVERTENZA Rischio di scossa elettrica Scollegare l apparecchiatura dall alimentazione el...

Page 78: ...fusibile corretto da sostituire in base alle specifiche del fusibile indicate nella sezione Dimensioni Nota l unit viene fornita con un fusibile di ricambio nel portafusibili nella posizione cerchiat...

Page 79: ...di alimentazione per il reset se il guasto costante contattare OHAUS L unit non agita Sovraccarico motorino oppure Danni al motore Serbatoio pi piccolo o ridurre il volume nel serbatoio e attendere i...

Page 80: ...to da 5 C a 40 C Temperatura di stoccaggio da 20 C a 65 C Umidit di funzionamento umidit relativa dal 20 all 80 senza condensa Umidit di stoccaggio umidit relativa dal 20 all 80 senza condensa Fluttua...

Page 81: ...he sulla compatibilit elettromagnetica del 2016 alle normative relative alle apparecchiature elettriche sicurezza del 2016 La Dichiarazione di conformit completa disponibile online su www ohaus com uk...

Page 82: ...oprio esposto a materiali radioattivi o corrosivi ha materiale estraneo che penetrato all interno del prodotto o come risultato di servizio o modifica da personale non autorizzato da OHAUS In alternat...

Page 83: ......

Page 84: ...ices worldwide Con oficinas en todo el mundo Avec des bureaux partout dans le monde Mit B ros weltweit Con uffici in tutto il mondo www ohaus com 30692776 P N 30692776 A 2022 Ohaus Corporation all rig...

Reviews: