background image

EXPLORER BALANCES 


EN-35 


4.4.3 Application 

Setup 


The Application can be customized for various user preferences. 
 

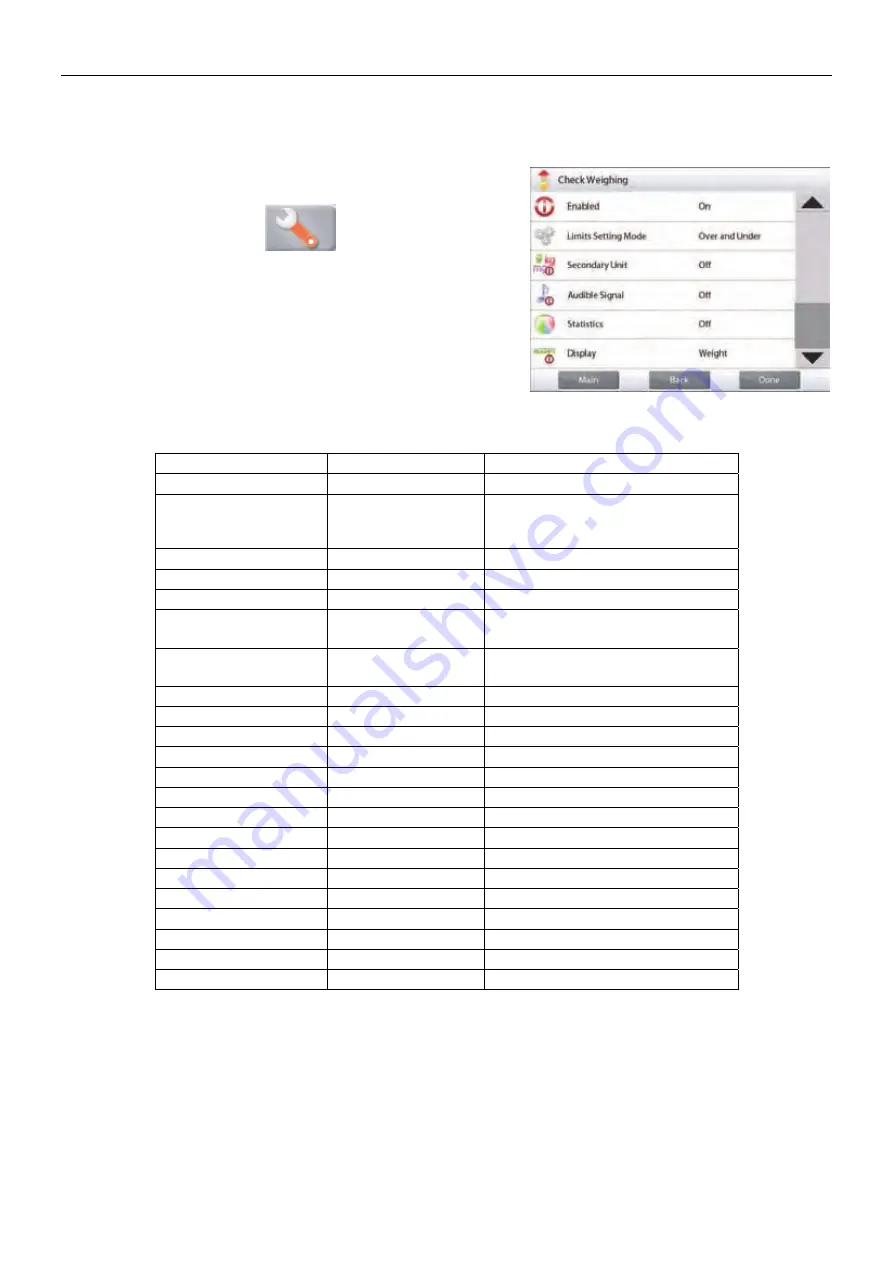
Touch the Setup Icon (wrench) to enter the Application Setup 
from the home screen: 


The 

Setup

 Menu is now displayed. 

Select the list item to view or change the setting as 
desired. 
To return to the Application home screen, touch 

Done

.


Check Weighing Application Setups

 (defaults in 

Bold


Item Available 

Settings 

Comments 

Enabled 

On

, Off 

Turns Application on/off 

Limits Setting Mode 

Over and Under

Nominal/Weight Tol, 
Nominal/Percent Tol.

To select the Mode 

Secondary Unit 

On, 

Off


To show the Second Display line 

Audible Signal 

On

, Off 

Beeps if reading is 

under 

or 

over. 

Statistics 

Off

, Manual, Auto 


Display Setting 

Weight

,  

Check Status 

To show Weight or Check Status 
on Main Display Line  

Lock Settings 

On, 

Off 


Press to lock the current setting(s) 
so they cannot be changed. 

Reference fields 


Over Limit 

On

, Off 

Over weight limit 

Under Limit 

On

, Off 

Over weight limit 

Gross On, 

Off


Gross weight is displayed 

Net On, 

Off


Net weight is displayed 

Tare On, 

Off


Tare weight is displayed 

Target 

On

, Off 

Used for Nominal Checkweigh 

Positive Tolerance 

On

, Off 

Used for Nominal Checkweigh 

Negative Tolerance 

On

, Off


Used for Nominal Checkweigh 

Print Options 

 See 

Printing 

Section. 

Over Limit 

On

, Off 


Under Limit 

On

, Off 


Target 

On

, Off 

Used for Nominal Checkweigh 

Positive Tolerance 

On

, Off 

Used for Nominal Checkweigh 

Negative Tolerance 

On

, Off


Used for Nominal Checkweigh 


Summary of Contents for EX10201

Page 1: ...Explorer Balances Instruction Manual ...

Page 2: ......

Page 3: ... Screen 12 3 2 Principal Functions and Main Menu 12 3 3 Overview of Parts and Features Draft Shield Models 13 3 4 Overview of Parts and Features Non Draft Shield Models 14 3 5 Overview of Parts and Features Terminal 15 3 6 Functions and Their Icons 16 3 6 1 Standby 16 3 6 2 Printing Data 16 3 6 3 Applications 16 3 6 4 TouchLess Sensor Status 16 3 6 5 AutoCal 16 3 6 6 Menu 16 3 6 7 More 16 3 6 8 Le...

Page 4: ... 61 4 10 1 Measuring the Density of a Solid Using Water default 61 4 10 2 Application Setup 63 4 10 3 Measuring the Density of a Buoyant Material Using Water 64 4 10 4 Measuring the Density of a Solid Using an Auxiliary Liquid 64 4 10 5 Measuring the Density of a liquid using a Calibrated Sinker not supplied 65 4 10 6 Measuring the Density of Porous Material Using Oil 67 4 11 Peak Hold 69 4 11 1 P...

Page 5: ...s 96 5 6 1 Turning an Application ON OFF 96 5 7 Weighing Units 96 5 7 1 Units Sub menu 96 5 7 2 Turning a Unit ON OFF 97 5 7 3 Custom Units 97 5 8 GLP and GMP Data 98 5 8 1 GLP Data Sub menu 98 5 8 2 Header 98 5 8 3 Balance Name 98 5 8 4 User Name 98 5 8 5 Project Name 98 5 9 Communication 99 5 9 1 Communication Sub menu 99 5 9 2 Baud Rate 99 5 9 3 Transmission 99 5 9 4 Handshake 100 5 9 5 Alterna...

Page 6: ...k I O Settings 108 5 14 11 Factory Reset 108 5 15 Securing the Menu and Key Lock menu settings 108 5 16 Information 109 5 16 1 Using Information 109 6 LEGAL FOR TRADE 110 6 1 Settings 110 6 2 Verification 110 6 3 Sealing 110 7 PRINTING 111 7 1 Connecting Configuring and Testing the Printer Computer Interface 111 7 2 Printout Examples 112 7 3 Output Format 120 8 MAINTENANCE 121 8 1 Calibration 121 ...

Page 7: ... Weighing Check Weighing Dynamic Weighing Filling Density Determination Pipette Adjustment and Statistical Quality Control applications 1 3 Safety Precautions Caution Read all safety warnings before installing making connections or servicing this equipment Failure to comply with these warnings could result in personal injury and or property damage Retain all instructions for future reference Verif...

Page 8: ...nent Photo EX124 EX224 EX324 EX223 EX423 EX623 EX1103 EX2202 EX4202 EX6201 EX6202 EX10201 EX10202 Terminal X X X Weighing Base X X X Weighing Platform 90 mm Diameter X 130 mm Diameter X 180 x 210 mm X Sub Platform 130mm Diameter X Support Caps 4 Pcs X Wind Ring X Wind Shield X Draft Shield Assembly X X Power Adapter X X X Power Cord Country specific X X X Use Cover Terminal X X X Compact Disk USB ...

Page 9: ...r to assemble parts of the Draft Shield Refer to the illustrations and instructions below to identify and assemble your Explorer Balance Note The Terminal is identical for all Explorer Balance models 2 2 2 Installing the Wind Ring Weighing Platform on Models EX124 EX224 and EX324 Note Assembly instructions also apply to models with the suffix M or N 1 Place the Wind Ring in position 2 Insert the P...

Page 10: ...top doors of the Draft Shield Side Door Installation 1 Unlock 2 Align 3 Clear 4 Lock Position glass door to slide Open lock tab top insert in top groove and slide inside bottom groove Close lock tab Front Panel Installation 1 Release terminal 2 Align 3 Push to rear 4 Reconnect terminal Press button to separate Terminal from Base Seat panel s hooked ends in base Swing panel to vertical position Top...

Page 11: ...erminal The terminal can be detached and mounted on a wall or positioned on a table separate from the balance 2 4 Leveling the Equipment The Explorer has an illuminated level indicator as a reminder that the balance should be leveled for accurate weighing There is a level bubble in a small round window on the front of the Base To level the balance adjust the Leveling Thumbwheels at each corner unt...

Page 12: ...necting the Interface Use the built in RS 232 10101 Port to connect either to a computer or a printer with a standard straight through serial cable Or connect using the scale s USB port Note For configuration and interface commands see the Communication Menu Settings section For Connecting Configuring and Testing the Printer Computer Interface and for sample Print Output Formats see the Printing s...

Page 13: ...to hold the Terminal in place Release Button Base and Terminal Terminal Cable Note If a longer operation distance is required a Terminal Extension cable is available as an accessory 2 8 2 Terminal Mounting If desired the Terminal may be mounted to a wall or table using fasteners not supplied that are appropriate for the type of mounting surface The Terminal bracket will accommodate 4mm 8 screws Lo...

Page 14: ...weight Taring With no load on the pan press Tare to set the display to zero Place an empty container on the pan and press Tare Add material to the container and its net weight is displayed Remove container and container s weight appears as a negative number Press Tare to clear MENU SCREEN NAVIGATION Touch Menu to open the menu list Touch and drag the Scroll bar to view additional items Calibration...

Page 15: ...xplorer Balance models EX124 EX224 EX324 EX223 EX423 EX623 EX1103 Leveling Thumbwheels Data label Terminal cable storage clips Lock switch Weigh Below Access Foot Non Adjustable Type label M N models only Touchless Sensors Power Connection Draft Shield Light Illuminated Level Indicator hidden Touchless Sensors with Indicator Lights ...

Page 16: ...iew Figure 3 2 Explorer Base models EX2202 EX4202 EX6202 EX10202 EX6201 EX10201 Illuminated Level Indicator Touchless Sensors Touchless Sensors with Indicator Lights Type label M N models only Data label Terminal cable storage clips Lock switch Weigh Below Access Foot Non Adjustable Leveling Thumbwheels Power Connection ...

Page 17: ... Figure 3 3 Explorer Terminal Hooks to attach to base Capacity sticker Approved models only Touchless Sensors with Indicator Lights Terminal Bracket Terminal Release Buttons Angular Adjust Buttons Foot USB Device Connection Terminal Cable from Base Terminal Cable Clamp RS232 Connection Option Port ...

Page 18: ...when activated If the sensor cannot be activated sensor is disabled during certain instances like when the Menu is displayed the sensor shows a red light 3 6 5 AutoCal When AutoCal is ON the balance performs a self calibration AutoCal will automatically calibrate the Balance using the internal mass each time a change in temperature significant enough to affect accuracy or after every 11 hours Touc...

Page 19: ...eight against the last stored span calibration data 3 6 14 Calculator To use the built in calculator application touch Calculator A four function calculator with addition subtraction multiplication and division mathematical operations is available Perform a numeric operation using the keypad Press to view the result To Clear the display Press CE to clear the entry C to clear all Touch x to close a...

Page 20: ...st of modes appears Touch the one you want to enable Then touch Enabled in the setup menu for that application mode Percent Weighing in the example below Each enabled mode appears in the Applications menu The Explorer Balance incorporates the following Applications Weighing Parts Counting Percent Weighing Check Weighing Dynamic Animal Weighing Filling Totalization Formulation Differential Weighing...

Page 21: ...ING Home screen Main Display Line Second Display Line not shown Reference Fields Application Buttons Functions Application Icon 4 1 1 Edit Settings To view or adjust the current settings Touch the Edit Settings button The Settings screen appears Minimum Weight establish a minimum weight value to be used to verify a reading If an actual weight is below the established Minimum Weight value it is fla...

Page 22: ...cation Setups are below defaults in Bold Item Available Settings Comments Enabled On Off Turns Application on off Secondary Unit On Off To show the Second Display line Minimum Weight On Off To enable Min Weight Statistics Off Manual Auto Lock Settings On Off Press to lock the current setting s so they cannot be changed Reference fields Min Weight On Off Min Weight is displayed Gross On Off Gross w...

Page 23: ...to Press Close to return to the Setup menu To return to the Application home screen press Done Accumulating displayed values viewing data Manual Once Statistics Manual is enabled two buttons appear on the Application screen Statistics and Accumulate Application Auto Statistics Auto mode is similar to Manual mode except the first stable weight is automatically captured so the Accumulate button is n...

Page 24: ...lished APW Optimization occurs when the number of pieces added to the pan is between one and three times the number already on the pan The screen momentarily indicates Auto Optimization in the information line 4 2 1 1 Edit Settings To view or adjust the current settings touch the Edit Settings button The Settings screen is now displayed Settings available APW Sample Size Functions available Recalc...

Page 25: ...ece Weight APW Derived To establish a new APW touch the Recalculate APW button The APW Screen is displayed NOTE The sample size that is displayed will be used To use a different sample size change that first See below Follow the screen instructions to establish a new APW Actions available Tare Cancel or Accept Press Accept to capture the value and return to the Settings screen The Settings screen ...

Page 26: ...st the sample size touch the Samples button A numeric input window appears Key in the desired Sample Size then press 9 The next screen appears with the message to place the number of pieces entered in the numeric input window Place the indicated number of pieces on the platform Then touch either Tare Cancel or Accept Press Accept to capture the value and return to the Settings screen The Settings ...

Page 27: ...ode Secondary Unit On Off To show the Second Display line Statistics Off Manual Auto Lock Settings On Off Press to lock the current setting s so they cannot be changed Reference fields APW On Off The APW is displayed Gross On Off Gross weight is displayed Net On Off Net weight is displayed Tare On Off Tare weight is displayed Target On Off Used for Check Fill only Difference On Off Used for Check ...

Page 28: ... 2 1 Edit Settings To use the Parts Counting Check mode the Over Limit and Under Limit values must be set The Average Piece Weight and standard sample size can also be set Follow these steps Touch the Edit Settings button The Settings screen appears The buttons for APW Samples Over Limit and Under Limit show default or previously set values To change any value touch the button A keyboard screen ap...

Page 29: ...pplication Modes menu Press the Setup wrench button to enter the Counting Setup menu Change Counting Mode to Fill Counting The PARTS COUNTING Fill Home screen Main Display Line Second Display Line Reference Fields Application Buttons Functions The default or last Average Piece Weight APW is displayed Place objects on the pan to display the Fill Status 4 2 3 1 Edit Settings To use the Parts Countin...

Page 30: ...e the Statistics function to compare a number of samples and examine the relative deviation of the samples along with other statistical data A minimum of three samples is required Statistics can be determined manually Manual mode with key press after each step or automatically Auto Mode weights are automatically recorded when stable To use the statistics function enable it first in the Application...

Page 31: ...crements by one Continue to add items and press Accumulate to build the statistical data set At any time press the Statistics button to view the results The Statistics Results screen Press Print to send to the enabled COM port Press Close to return to the Application home screen with the current statistics set or Press Clear Data to clear the results and return to the Application home screen Stati...

Page 32: ...Press the upper left portion of the home screen so the available Application Modes are visible Select Percent Weighing The Percent Weighing Home Screen appears The PERCENT WEIGHING Home screen Main Display Line Second Display Line Reference Fields Application Buttons Functions Application Icon 4 3 1 Edit Settings To view or adjust the current settings To adjust the Application settings touch the E...

Page 33: ...ference Weight then press 9 The display returns to the previous screen with the new value highlighted To return to the Percent Weighing home screen touch Return to Application Using a Sample to Establish a Derived Reference Weight To establish a new Reference weight value touch the Recalculate Reference button The New Reference screen appears Follow the screen instructions to establish a new Refer...

Page 34: ...he sample is displayed as compared to 400 of the Reference Weight The Edit Settings screen shows current Reference Adjust value To change it touch Reference Adjust button A numeric input window appears Key in the desired Reference Weight Adjustment then press Done The display returns to the previous screen with the new value highlighted momentarily To return to the Percent weighing home screen tou...

Page 35: ...nit On Off To show the Second Display line Lock Settings On Off Press to lock the current setting s so they cannot be changed Reference fields Reference Weight On Off The Reference is displayed Difference weight On Off Displays the Difference to the reference weight Difference percent On Off Displays the Difference to the reference weight as percentage Gross On Off Gross weight is displayed Net On...

Page 36: ...HING Home screen Main Display Line Second Display Line Reference Fields Application Buttons Application Icon Functions 4 4 2 Edit Settings To view or adjust the current settings Touch the Edit Settings button The Settings screen appears The Application Settings Screen Settings available Over Limit Under Limit Functions Available Return to Application The check limit values are displayed in the set...

Page 37: ...Signal On Off Beeps if reading is under or over Statistics Off Manual Auto Display Setting Weight Check Status To show Weight or Check Status on Main Display Line Lock Settings On Off Press to lock the current setting s so they cannot be changed Reference fields Over Limit On Off Over weight limit Under Limit On Off Over weight limit Gross On Off Gross weight is displayed Net On Off Net weight is ...

Page 38: ...minal Wt Tolerance The Check Weighing options screen returns Press Done to begin Check Weighing CHECK WEIGHING Nominal Wt Tolerance home screen Main Display Line Second Display Line not shown Reference Fields Application Buttons Functions Application Icon To use this mode touch Edit Settings to set the Nominal and Upper and Lower Tolerance values in weight See keyboards below Press Return to Appli...

Page 39: ...inal Tolerance The Check Weighing options screen returns Press Done to begin Check Weighing The CHECK WEIGHING Nominal Percent Tolerance home screen Main Display Line Second Display Line not shown Reference Fields Application Buttons Application Icon Functions To use this mode touch Edit Settings to set the Target Weight and Upper and Lower Tolerance values in percent See keyboards below Press Ret...

Page 40: ...e results in the main Weighing Line set the Display Setting to Check Status using the Application Setup screen The default value is Weight The CHECK WEIGHING home screen with Display set to Check Status Main Display Line Second Display Line Reference Fields Application Buttons Application Icon Functions To enable audible signals for Under Accept and Over Touch Audible Signal On in the Application ...

Page 41: ...Statistics is enabled two buttons appear on the Application screen Statistics and Accumulate To add the sample to the data set place the item on the pan and press Accumulate When stable the Statistics button momentarily lights to show the item is added to the set and the data set quantity increments by one Continue adding items and pressing Accumulate to build the statistical data set At any time ...

Page 42: ...hing home screen the default or last Averaging Time is displayed Follow the screen instructions The DYNAMIC WEIGHING Home screen Main Display Line Second Display Line Reference Fields Application Buttons Functions Application Icon Place objects on the pan Press the Begin Dynamic button The balance begins a countdown averaging process During the countdown the information line displays the time rema...

Page 43: ...change it press the button A numeric input window is displayed Key in the desired Averaging Time then press Done The display returns to the previous screen with the new value highlighted To return to the Dynamic Weighing home screen touch Return to Application 4 5 2 Application Setup The Application can be customized for various user preferences Touch the Setup wrench to enter the Application Setu...

Page 44: ...yed Tare On Off Tare weight is displayed Print Options See Printing Section Averaging Time On Off 4 5 3 Dynamic Weighing Semi Auto The cycle begins when an object animal is placed on the pan but the held value must be reset manually To enable this feature touch the Setup Icon wrench in the top center of the main screen to enter the Dynamic Weighing Setup menu Change the mode to Semi Automatic The ...

Page 45: ...10 second delay To enable this feature enter the Dynamic Weighing Setup menu Press Auto Sample and change the mode to Automatic The Dynamic Automatic screen appears with the default or last Averaging Time displayed Place objects on the pan to begin The cycle starts automatically After the cycle ends remove the specimen and the balance returns to the Home screen automatically after a 10 second dela...

Page 46: ...ing Data Manual Once Statistics is enabled two buttons appear on the Application screen Statistics and Accumulate To add the sample to the data set place the item on the pan and press Accumulate When stable the Statistics button momentarily lights to show the item is added to the set and the data set quantity increments by one Continue adding items and pressing Accumulate to build the statistical ...

Page 47: ...1 Edit Settings To view or adjust the current settings Touch the Edit Settings button The Settings screen appears Settings available Target Weight Functions Available Recalculate Target Weight Return to Application Establish a Target Weight Each time a new item is used for filling the Target Weight fill to weight must be established There are two 2 methods to establish the Target Weight 1 The actu...

Page 48: ...Press Accept to return to the Settings screen The display returns to the Settings screen with the new Target Weight value highlighted momentarily To return to the Filling home screen touch Return to Application 4 6 2 Application Setup The Application can be customized for various user preferences Touch the Setup Icon wrench to enter the Application Setup menu from the home screen The Setup Menu ap...

Page 49: ...ht is displayed Tare On Off Tare weight is displayed Print Options See Printing Section Target Weight On Off Difference Weight On Off Difference Percent On Off 4 6 3 Statistics for Filling Use the Statistics function to compare a number of samples and examine the relative deviation of the samples along with other statistical data A minimum of three samples is required Statistics can be determined ...

Page 50: ...increments by one Continue adding items and pressing Accumulate to build the statistical data set At any time press the Statistics button to view the results The Statistics Results screen Press Print to send to the enabled COM port Press Close to return to the Application home screen with the current statistics set Press Clear Data to clear the results and return to the Application home screen Sta...

Page 51: ...corner then choose Application Modes scroll down to find Totalization press it then press Enabled to turn it On It will now appear in the Application Modes menu on the home screen Place objects on the pan to begin The TOTALIZATION Home screen Main Display Line Second Display Line Reference Fields Application Buttons Functions Application Icon The sample weight is shown on the Main Display Line Pre...

Page 52: ...ns Application on off Auto Sample Mode On Off To select the mode Reference fields Samples On Off To display the number of samples weighed Average weight On Off Displays the Average Standard deviation On Off Displays the standard deviation Minimum weight On Off Displays the Minimum value Maximum weight On Off Displays the Maximum value Range On Off Displays the Range Gross On Off Gross weight is di...

Page 53: ...rn this feature On Clear the pan if necessary Add a new sample The item weight is shown on the Main Display Line The weight of the item is automatically added when stable to the total The new total is shown on the Second Display Line Remove the item from the weighing pan then add the next item and continue the same as in manual mode When finished press the Clear Total button to reset the Second Di...

Page 54: ...in display Line Place the first ingredient on the pan or in a tared container Press Accept to store the first component A prompt says Place item 2 Press Accept Continue adding components and pressing Accept to store the weight of the individual components until the formula is complete The Total line shows the total weight of all the components Press Print at any time in the process to print the re...

Page 55: ...ication on off Mode Free Formulate Recipe Based To select the mode Filler On Off To prompt for a filler material Secondary Unit On Off To show the Second Display line Reference fields Total On Off Total is displayed Gross On Off Gross weight is displayed Net On Off Net weight is displayed Tare On Off Tare weight is displayed Target On Off For Recipe Based mode Difference weight On Off For Recipe B...

Page 56: ...options screen The RECIPE FORMULATION Home screen Main Display Line Second Display Line Reference Fields Application Buttons Functions Application Icon Press Begin Formulation If no items have been previously set up the Settings screen appears If items already exist in memory Formulation begins Press the Add New button A new default component is added to the end of the Formula default Name Weight ...

Page 57: ...t weight is shown on the Main Display Line The progress bar displays the fill status Within 10 percent of the target value the progress bar converts to fine resolution display Press Accept to add the weight of the component to the total The new total appears on the Second Display Line The Difference to the target is displayed for each component in weight and percent Follow the screen instructions ...

Page 58: ...EN 56 EXPLORER BALANCES Formulation Results Press Print to send the results to the enabled COM port To close the Results window and return to the Application home screen press Close ...

Page 59: ...ts are sequentially gathered for a one item and Auto Process Off where initial weights are gathered for a set of items then all the final weights for each item are gathered afterwards Touch the Setup icon wrench to enter Application Setup from the home screen The DIFFERENTIAL WEIGHING Home screen Main Display Line Second Display Line Reference Fields Application Buttons Functions Application Icon ...

Page 60: ...is feature is disabled if no initial weight is stored To Clear the item s final weight press Clear Final Weight This feature is disabled if no final weight is stored To clear all items press Clear All then confirm When finished press Return to Application On the main Application screen follow the screen instructions Add the first item then press Accept to store the value The initial weights of the...

Page 61: ...Settings Comments Enabled On Off Turns Application on off Auto Process Mode On Off To select the mode Reference fields Initial Weight On Off The initial weight is displayed Final Weight On Off The final weight is displayed Difference Weight On Off Displays the Difference to initial in weight Difference Percent On Off Displays the Difference to initial in percent Gross On Off Gross weight is displa...

Page 62: ...G Auto Home screen Main Display Line Second Display Line not shown Reference Fields Application Buttons Functions Application Icon Follow the screen instructions Press Item Settings to set up items in memory if necessary Use the buttons as necessary Follow the same steps as shown on page 57 Press Return to Application when ready A message prompts for Item 1 to be placed on the pan again then to pr...

Page 63: ... precision balance Density can be determined manually with a key press after each step or automatically weights are automatically recorded Before making density measurements establish the Application Settings The DENSITY DETERMINATION Home screen Main Display Line Second Display Line not shown Reference Fields Application Buttons Functions Application Icon 4 10 1 Measuring the Density of a Solid U...

Page 64: ...p 1 of 2 Weigh the Sample in Air Press Begin Density Calculation Follow screen instructions then press Accept to store the dry sample weight in air Step 2 of 2 Weigh the Sample Submerged in the Liquid Follow the screen instructions then press Accept to store the sample weight submerged in liquid Once the necessary weights have been determined the density of the sample is displayed in g cc along wi...

Page 65: ...id used during measurements Porous Material On Off To select Porous material Auto Print Result On Off To automatically print results Auto Sample Mode On Off To select the mode Reference fields Liquid Density On Off Test liquid s density is displayed Water Temperature On Off The water temp is displayed Oil density On Off The test oil s density is displayed Weight in Air On Off The sample weight is ...

Page 66: ...tup menu and select the following Density Type Solid Liquid Type Other Porous Material Off See Application Setup The DENSITY DETERMINATION SOLID Home screen Main Display Line Second Display Line Reference Fields Application Buttons Functions Application Icon Confirm the default values displayed Liquid Density etc are correct To edit the default values touch Edit Settings and the application Settin...

Page 67: ...etup Note when the Density Type is set to Liquid the Liquid type and Porous material selections are disabled The DENSITY DETERMINATION LIQUID Home screen Main Display Line Second Display Line Reference Fields Application Buttons Functions Application Icon Confirm that the default value displayed sinker volume is correct To edit the default values touch Edit Settings and the Settings screen is now ...

Page 68: ...eigh the Sinker in Air Follow the screen instructions then press Accept to store the sinker weight in air Step 2 of 2 Weigh the Sinker Submerged in the Test Liquid Follow the screen instructions then press Accept to store the sinker weight submerged in liquid Once the necessary weights have been determined the density of the Liquid sample is displayed in g cc along with the weight in air weight in...

Page 69: ... To edit the default values touch Edit settings The Settings screen appears Settings available Water Temp Oil Density Functions Available Return to Application The balance calculates water density based on the water temperature value entered look up table Measure the actual water temperature using a precision thermometer To adjust the Water Temperature or Oil Density values touch the Water Temp or...

Page 70: ...d Step 3 of 3 Weigh the Oiled Sample Submerged in Liquid Follow the screen instructions then press Accept to store the oiled sample weight submerged in liquid Once the necessary weights have been determined the density of the sample is displayed in g cc along with the weight in air un oiled and oiled and weight in water on the Application screen The value stays on the display until Begin Density D...

Page 71: ...cation allows both stable and unstable weights to be captured 4 11 1 Peak Hold Semi Automatic default In the upper left portion of the home screen select Peak Hold Follow the screen instructions to begin The PEAK HOLD Home screen Main Display Line Second Display Line Reference Fields Application Buttons Functions Application Icon Place item on the pan The capture process starts automatically The h...

Page 72: ... touch Done The Peak Hold Application Setups defaults in Bold Item Available Settings Comments Enabled On Off Turns Application on off Auto Sample Mode Manual Semi Automatic Automatic To select the mode of operation Stable Weight Only On Off To capture Stable values only Secondary Unit On Off To show the Second Display line Reference fields Gross On Off Gross weight is displayed Net On Off Net wei...

Page 73: ...nual Home screen Main Display Line Second Display Line Reference Fields Application Buttons Functions Application Icon Follow the screen instructions Place item on the pan Press Begin Peak Hold to begin the capture process The following screen appears The highest stable weight reading is held indefinitely Press End Peak Hold then clear the pan to reset the display and re start the process ...

Page 74: ...e to Automatic The HIGH POINT Auto Home screen Main Display Line Second Display Line Reference Fields Application Buttons Functions Application Icon Place item on the pan The capture process starts automatically The highest stable weight reading is held until the weight is removed The process starts automatically once the weight is removed from the pan after 10 sec delay ...

Page 75: ...he screen instructions to begin The INGREDIENT COSTING Home screen Main Display Line Second Display Line Reference Fields Application Buttons Functions Application Icon 4 12 1 Item Settings Press Item Settings to set up items in memory The Edit Settings Screen Settings available Add New Edit name Edit Cost Edit Unit Delete Item Clear All Functions Available Return to Application To set up the item...

Page 76: ...the previous screen with the new value highlighted momentarily To change the default component cost per unit Press Edit Cost The numeric entry screen appears Enter the new weight then press Done The display returns to the previous screen with the new value highlighted momentarily To change the default component Unit press Edit Unit The Weighing Units screen appears ...

Page 77: ... weight of the item is recorded then the screen prompts for the next component Unit Cost Total Weight and Total Cost are also displayed Continue follow the screen instructions to add the items to the pan and touch the Accept button until each item has been weighed Press the View Data button at any time to show the current results Item Item Cost and Item Weight After the last item has been weighed ...

Page 78: ... Done The Ingredient Costing Application Setups defaults in Bold Item Available Settings Comments Enabled On Off Turns Application on off Currency label None various To select the Currency label Reference fields Unit Cost On Off To display the Item cost Total Weight On Off To display the Total weight Total Cost On Off To display the Total cost Gross On Off Gross weight is displayed Net On Off Net ...

Page 79: ...Up to 30 samples can be used The PIPETTE ADJUSTMENT Home screen Main Display Line Second Display Line Reference Fields Application Buttons Functions Application Icon 4 13 1 Pipette Adjustment Manual default Confirm the default values displayed are correct Nominal Inaccuracy Imprecision Density Atmospheric Pressure Water Temperature etc To edit the default values touch the Edit Settings button The ...

Page 80: ... Done The display returns to the previous screen with the new value highlighted Continue to enter the required information following the above procedure Pipette Inaccuracy via the Inaccuracy button Barometric Pressure via the Barometric Pressure button Pipette Imprecision via the Imprecision button Pipette Name via the Pipette Name button Pipette Number via the Pipette number button When finished ...

Page 81: ...mples and pressing Accept to store each sample weight liquid The default number of samples is 10 It can be changed in Setup from 2 to 30 samples Once all the sample weights have been dispensed the Results screen is automatically displayed Press Graph to see results plotted Press Result to return to the result screen Press Close to return to the Pipette Adjustment home screen Note To view either th...

Page 82: ...ther Liquid used during measurements Unit of Pressure ATM inHg KPa mbar mmHg PSIA To select Atmospheric Pressure unit Volume Unit Pipette capacity unit mL uL Nominal capacity unit Secondary Unit On Off To show the Second Display line Lock Settings On Off Press to lock the current setting s so they cannot be changed Reference fields Nominal Volume On Off Nominal capacity displayed Inaccuracy On Off...

Page 83: ...e View Trace screen SQC collection can be done manually Manual mode requires key press after each step or automatically Auto Mode the weights are automatically recorded when stable In the upper left portion of the home screen select SQC The SQC Home screen Main Display Line Second Display Line Reference Fields Application Buttons Functions Application Icon 4 14 1 Edit Settings Confirm the default ...

Page 84: ... The Process screen is then displayed Follow the screen instructions then press Accept to store the sample weight The current number of Samples along with the Average Sum Minimum value Maximum value and Range are displayed Continue to follow the screen instructions by weighing samples and pressing Accept to store each sample s weight The sample size is 10 default It can be changed in Setup from 2 ...

Page 85: ... Standard Deviation for all currently saved batches Press Select to see and print the Batch Information screen for any saved batch Press Clear Batches to reset SQC results and return to the SQC home screen Press Close to return to the SQC home screen to begin another batch or to view process results To view the Process results graphically batch comparison press the View Trace button Press Print or...

Page 86: ...es in a Batch Tolerance Mode Weight Percent Tolerance used during measurements Auto Sample Mode Manual Semi Automatic Automatic To select the mode of operation Lock Settings On Off Press to lock the current setting s so they cannot be changed Reference fields Number of Batches On Off The total batches Number of Samples On Off The total samples Average On Off The Average value is displayed Total On...

Page 87: ...rs and setups Name Preset Tare APW Ref Wt or Target Sample size Under Limit Over Limit Level Mode Weighing x x x Counting x x x x x x x x Percent Weighing x x x x Check Weighing x x x x x x Dynamic Weighing x x x x Filling x x x x Totalization N A N A N A N A N A N A N A N A N A N A Formulation N A N A N A N A N A N A N A N A N A N A Differential Weighing N A N A N A N A N A N A N A N A N A N A De...

Page 88: ...e upper right area of the screen It shows the name of the most recently used library file The Library manager popup is now displayed Touch the Library Record to highlight it then touch Recall to load the record s settings into the Application Then press Close to return to the home screen with the Library name displayed and the stored parameters active 4 16 3 Deleting a Stored Library Record To del...

Page 89: ...f present to prevent damage CAUTION Do not place the balance on the pan support cone or Load cell Pins To use this feature remove power from the balance then remove the protective cover for the weigh below opening 2 screws The protective cover is reversible for easy storage The balance can be supported using lab jacks or any other convenient method Ensure the balance is level and secure Power on t...

Page 90: ... From any Application screen Touch Menu The Main Menu List appears on the display Select the Sub Menu Scroll down to the selected item of the Main Menu List and touch it The Sub Menu appears Select the Menu Item Continue until the desired setting is chosen in the Menu list Touch the setting to change it The changed setting will be displayed as highlighted for 2 seconds to confirm the changed value...

Page 91: ...al Calibration AutoCal Calibration is accomplished with the internal calibration mass Internal calibration can be performed at any time provided the balance has warmed up to operating temperature and is level With the Balance turned ON and no load on the pan touch AutoCal Internal Calibration The Balance begins to calibrate Alternately touch the shortcut Calibration Icon from any Application home ...

Page 92: ... mass Once completed the balance stores the Adjustment value and the display returns to the current application 5 3 5 Span Calibration Span calibration uses two calibration points one at zero load and the other at specified full load span Refer to Table 5 1 for Span values Note Factory default settings are shown in bold TABLE 5 1 Calibration Masses Model Span Calibration Points Weight Class EX124 ...

Page 93: ... for the User defined weight Place the specified calibration weight on the balance and the calibration process completes The display shows status then returns to the current application 5 3 7 Calibration Test Use Calibration Test to compare a known calibration weight against the stored span calibration data With no load on the scale press Cal Test to begin the process The balance captures the zero...

Page 94: ... Spanish Italian 5 4 3 Volume Controls the built in Speaker loudness Default value 5 mid level 0 disabled Off Range is 0 to 10 5 4 4 Display Settings Use this sub menu to change the setting for Screen Brightness Default value 50 mid level Range is 20 to 100 Touch Calibrate Touch the screen at the center of the ring O Press here First top left then bottom right Auto Dim Dims the display if no Scree...

Page 95: ...ilable to Selected and press to move them back To move all functions to the right Press and press to move them back 5 4 7 TouchLess Sensor Setup If desired assign Print Zero Tare or Calibrate to the Touchless Sensors Terminal Right Terminal Left Base Right and Base Left 5 4 8 Draft Shield light Set the status of the lighted Draft Shield feature OFF disabled ON enabled ...

Page 96: ...tting is locked when the Security Switch is set to the ON position 5 5 3 Filter level Set the amount of signal filtering LOW faster stabilization time with less stability MEDIUM normal stabilization time with normal stability HIGH slower stabilization time with more stability 5 5 4 Auto Zero Tracking Set the automatic zero tracking functionality OFF disabled 0 5 D display maintains zero up to a dr...

Page 97: ... Tare and Gross Indicator are locked at their current setting Graduations is forced to 1 Division and the menu item is hidden Weighing Units menu all units are locked at their current settings Communication Menu Stable Weight Only is locked ON Numeric Value Only is locked OFF Auto print mode selections are limited to OFF On Stability and Interval Continuous is not available Note The security switc...

Page 98: ...s enabled turned on it may be chosen from the Applications shortcut top left of all home screens The current menu item status is shown OFF disabled ON enabled 5 7 Weighing Units Enter this sub menu to activate the desired units of measure Note Due to national laws the indicator may not include some of the units of measure listed 5 7 1 Units Sub menu milligram gram kilogram carat ounce ounce troy p...

Page 99: ...led When Custom Unit is set to ON the Factor Exponent and Least Significant Digit must be set Factor Set the conversion factor using the numeric keypad Settings of 0 00001 to 1 9999999 are available The default setting is 1 000000 Exponent Set the factor multiplier 0 multiply the Factor by 1 1x10 0 1 multiply the Factor by 10 1x101 2 multiply the Factor by 100 1x10² 3 multiply the Factor by 1000 1...

Page 100: ...rs are available for each Header setting 5 8 3 Balance Name Set the balance identification Alphanumeric settings up to 25 characters are available The default setting is blank 5 8 4 User Name Set the user identification Alphanumeric settings up to 25 characters are available The default setting is blank 5 8 5 Project Name Enter this menu to set the Project identification Alphanumeric settings up t...

Page 101: ...232 shown Device Settings Print Settings Choosing a Settings item brings up yet another menu level the device settings are dependent on the COM chosen RS232 shown Device Settings Menu RS232 shown 5 9 2 Baud Rate Set the baud rate bits per second 2400 2400 bps 4800 4800 bps 9600 9600 bps 19200 19200 bps 38400 38400 bps 5 9 3 Transmission Set the data bits stop bit and parity 7 EVEN 1 7 data bits ev...

Page 102: ...is P Alternate Tare Command Set the alternate command character for Tare Settings of A to Z are available The default setting is T Alternate Zero Command Set the alternate command character for Zero Settings of A to Z are available The default setting is Z Print Settings Menu Note If LEGAL FOR TRADE is set to ON the print Output Stable setting is not reset 5 9 6 Print Output Print Stable Weight On...

Page 103: ...lected set the conditions for printing LOAD Prints when the displayed load is stable LOAD ZERO Prints when the displayed load or zero reading is stable When INTERVAL is selected set the time interval using the numeric keypad Settings of 1 to 3600 seconds are available 5 9 8 Print Calibration Data Set the automatic Calibration Data printing functionality OFF disabled ON enabled 5 9 9 Print Content ...

Page 104: ...XXXXXXX Project Name Set the status OFF the Project Name is not printed ON the Project Name is printed Project Name XXXXXXXXXXXX Application Name Set the status OFF the Application Name is not printed ON the Application Name is printed Result Set the status OFF the displayed reading is not printed ON the displayed reading is printed NUMERIC ONLY only the numeric portion of the displayed reading is...

Page 105: ...10 Total 10 000 kg Avg 1 000 kg Std 0 001 kg Min 0 999 kg Max 1 001 kg Diff 0 002 kg 5 9 10 Print Layout This sub menu is used to define the format of the data output to a printer or computer Format Set the printing format MULTI a multiple line printout is generated A CRLF is added after each data output SINGLE a single line printout is generated A TAB delimiter is added between each data output F...

Page 106: ...nd set the Baud rate to 9600 After selecting click OK to close setting for serial keys Close the Control Panel Run Excel to open one blank sheet Focus the cursor on one item At this time if scale sends data to the PC through the RS232 port the data will be put into the cell and the cursor will automatically move to the next vertical cell Note If the weighing value is a negative number set the targ...

Page 107: ...RE equivalent to pressing the TARE button PRINT equivalent to pressing the PRINT button 5 12 Diagnostics Use this menu to enable the Diagnostics troubleshooting functions and to enter the Service menu 5 12 1 Level Bubble Light To verify proper operation of the illuminated Level Bubble When selected this light should blink 5 12 2 Draft Shield Light Analytical models To verify proper operation of th...

Page 108: ...13 4 Reset Balance Setup Select YES to return all Balance Setup menu items to their factory settings 5 13 5 Reset Application Modes Select YES to return all Application Modes menu items to their factory settings 5 13 6 Reset Weighing Units Select YES to return all Weighing Units menu items to their factory settings 5 13 7 Reset GLP and GMP Data Select YES to return all GLP and GMP Data menu items ...

Page 109: ...5 14 2 Lock Calibration Set the status OFF the Calibration menu is not locked ON the Calibration menu is locked 5 14 3 Lock User Settings Set the status OFF the User Settings menu is not locked ON the User Settings menu is locked 5 14 4 Lock Balance Setup Set the status OFF the Balance Setup menu is not locked ON the Balance Setup menu is locked 5 14 5 Lock Application Modes Set the status OFF the...

Page 110: ...Menu and Key Lock menu settings A slide switch is used to secure the Lock menu settings When the switch is set to the ON position the Lock menu settings may be viewed but not changed This switch is located under the Base Set the position of the switch to ON by sliding the external Lock Switch to LOCKED as shown in Section 6 When the switch is in the ON position the start up display includes the LO...

Page 111: ... Main Menu A brief descrtiption of the item selected is displayed This feature is menu based 5 16 1 Using Information Touch the Info Icon to bring up the menu UPPER RIGHT Information topics beginning with Level Assist Touch the word or the in front of it to open a topic Touch x to close the Information topic ...

Page 112: ...xplained in Section 5 3 Set the position of the Security Switch to the locked position 4 Set Legal for Trade to ON in the Balance Setup menu 6 2 Verification A weights and measures official or authorized service agent must perform the verification procedure 6 3 Sealing After the Balance has been verified it must be sealed to prevent undetected access to the legally controlled settings Before seali...

Page 113: ...ud 9600 Parity 8 None Stop 1 Handshaking None Click OK Choose Properties Settings then ASCII Setup Check boxes as illustrated Send line ends Echo typed characters Wrap lines Use RS232 Interface Commands Section 9 6 1 to control the balance from a PC Note When the HyperTerminal configuration is complete it will automatically print the results of a Cal Test operation and echo print commands sent to ...

Page 114: ...ct Name Statistics Number of Samples 3 Total 2 737 g Average 0 912 g Standard Deviation 0 372 g Minimum 0 457 g Maximum 1 369 g Difference 0 912 g Signature ____________ Parts Counting Standard Company Name Address 1 Address 2 Address 3 Address 4 12 7 2010 3 20 PM Balance ID Balance Name EXPLORER User Name Project Name Application Parts Counting Quantity 3 PCS Net Gross 2 325 g Net 1 379 g Net Tar...

Page 115: ...ss 1 Address 2 Address 3 Address 4 12 7 2010 3 11 PM Balance ID Balance Name EXPLORER User Name Project Name Statistics Number of Samples 3 Total 6 PCS Average 2 PCS Standard Deviation 1 PCS Minimum 1 PCS Maximum 3 PCS Difference 2 PCS Signature ____________ Percent Weighing Company Name Address 1 Address 2 Address 3 Address 4 12 7 2010 3 27 PM Balance ID Balance Name EXPLORER User Name Project Na...

Page 116: ...t 0 455 g Net Tare 0 946 g T Target 310 000 g Tolerance wt 155 000 g Tolerance wt 155 000 g Signature ____________ Check Weigh Nom Tol Company Name Address 1 Address 2 Address 3 Address 4 12 7 2010 3 35 PM Balance ID Balance Name EXPLORER User Name Project Name Application Check Weighing Result Under Gross 1 399 g Net 0 453 g Net Tare 0 946 g T Target 310 000 g Tolerance 50 00 Tolerance 50 00 Sign...

Page 117: ...364 g Standard Deviation 40 027 g Minimum 31 404 g Maximum 116 966 g Difference 85 563 g Signature ____________ Filling Company Name Address 1 Address 2 Address 3 Address 4 12 7 2010 3 42 PM Balance ID Balance Name EXPLORER User Name Project Name Application Filling Result 1 825 g Net Gross 2 771 g Net 1 825 g Net Tare 0 946 g T Target 10 000 g Diff Weight g 8 175 g Diff Percent 81 8 Signature ___...

Page 118: ...10 3 54 PM Balance ID Balance Name EXPLORER User Name Project Name AURORA Application Formulation Total Target 3 000 g Total Actual 5 401 g Total Diff 80 0 Item 3 Target 1 000 g Actual 1 345 g Diff 34 5 Item 2 Target 1 000 g Actual 1 800 g Diff 80 0 Item 1 Target 1 000 g Actual 2 256 g Diff 125 6 Signature ____________ Formulation Free Formulat Company Name Address 1 Address 2 Address 3 Address 4 ...

Page 119: ...ss 2 Address 3 Address 4 12 7 2010 4 00 PM Balance ID Balance Name EXPLORER User Name Project Name Application Peak Hold Peak weight 115 722 g Gross 0 921 g Net 0 025 g Net Tare 0 946 g T On Stability No Signature ____________ Density Determination Company Name Address 1 Address 2 Address 3 Address 4 12 7 2010 4 01 PM Balance ID Balance Name EXPLORER User Name Project Name Application Density Soli...

Page 120: ...pette Name Pipette Number Number of Samples 4 2S 0 00 0 1S 25 00 1 1S Mean 1S 75 0 3 1S 0 00 0 2S 0 00 0 Signature ____________ Ingredient Costing Company Name Address 1 Address 2 Address 3 Address 4 12 7 2010 4 09 PM Balance ID Balance Name EXPLORER User Name Project Name Application Ingredient Cost Total Items 4 Total Weight 4 570 g Total Cost 13 73 Item 1 Item Weight 0 454 g Unit Cost 1 00 g It...

Page 121: ... Balance Name EXPLORER User Name Project Name Application SQC Batch Name x Samples 4 Unit g Nominal Weight 310 000 g Average 1 141 g Maximum 1 834 g Minimum 0 454 g Standard Deviation 0 514 g Relative Deviation 0 451 g Range 1 380 g T2 0 00 0 T1 0 00 0 T1 N T1 0 00 0 T1 0 00 0 T2 100 00 4 Signature ____________ ...

Page 122: ...33 AM Calibration test New Calibration 3999 97 g Old Calibration 4000 00 g Difference 0 03 g Weight ID__________ End 7 3 Output Format The Result Data and G N T data is output in the following format Field Label 1 Space 2 Weight 3 Space2 Unit 4 Space Stability 5 Space G N 6 Space Term Characters 7 Length 1 11 1 1 1 1 3 0 8 1 In certain cases a Label field of up to 11 characters is included 2 Each ...

Page 123: ...e balance to suitable location Cannot calibrate Calibration Menu locked LFT set to on Unstable environment Incorrect calibration masses Turn Calibration menu lock off Turn LFT off Move balance to suitable location Use correct calibration masses Cannot change menu settings Sub menu locked LFT set to on Unlock sub menu Turn LFT off Low Reference weight Reference weight too small The weight on the pa...

Page 124: ...C decreasing linearly to 50 relative humidity at 40 C Mains supply voltage fluctuations up to 10 of the nominal voltage Installation category II Pollution degree 2 Operability is assured at ambient temperatures between 5 C and 40 C Materials Base Housing die cast Aluminum Painted Top Housing Base Terminal plastic ABS Weighing Platforms 18 10 stainless steel In use Cover Terminal plastic PET Draft ...

Page 125: ...ion Pipette Adjustment Ingredient Costing Statistical Quality Control Stabilization time typical Within 2 seconds Within 3 seconds Display Full Color VGA Graphic LCD Display size 5 7 in 14 5 cm diagonal Backlight White LED Controls 4 wire resistive touch screen Communication RS 232 USB Balance power input 12 VDC 0 5A Power supply AC Adapter Input 100 240 VAC 0 6A 50 60 Hz AC Adapter Output 12 VDC ...

Page 126: ... Determination Pipette Adjustment Ingredient Costing Statistical Quality Control Stabilization time typical Within 1 5 seconds Display Full Color VGA Graphic LCD Display size 5 7 in 14 5 cm diagonal Backlight White LED Controls 4 wire resistive touch screen Communication RS 232 USB Balance power input 12 VDC 0 5A Power supply AC Adapter Input 100 240 VAC 0 6A 50 60 Hz AC Adapter Output 12 VDC 1 5A...

Page 127: ...ak Hold Density Determination Pipette Adjustment Ingredient Costing Statistical Quality Control Stabilization time typical Within 1 second Display Full Color VGA Graphic LCD Display size 5 7 in 14 5 cm diagonal Backlight White LED Controls 4 wire resistive touch screen Communication RS 232 USB Balance power input 12 VDC 0 5A Power supply AC Adapter Input 100 240 VAC 0 6A 50 60 Hz AC Adapter Output...

Page 128: ...Determination Pipette Adjustment Ingredient Costing Statistical Quality Control Stabilization time typical Within 1 second Display Full Color VGA Graphic LCD Display size 5 7 in 14 5 cm diagonal Backlight White LED Controls 4 wire resistive touch screen Communication RS 232 USB Balance power input 12 VDC 0 5A Power supply AC Adapter Input 100 240 VAC 0 6A 50 60 Hz AC Adapter Output 12 VDC 1 5A Pla...

Page 129: ...me typical Within 2 seconds Within 3 seconds Within 1 5 seconds Display Full Color VGA Graphic LCD Display size 5 7 in 14 5 cm diagonal Backlight White LED Controls 4 wire resistive touch screen Communication RS 232 USB Balance power input 12 VDC 0 5A Power supply AC Adapter Input 100 240 VAC 0 6A 50 60 Hz AC Adapter Output 12 VDC 1 5A Platform size 90 mm 3 5 in 130 mm 5 1 in Terminal Housing dime...

Page 130: ...n time typical Within 1 second Display Full Color VGA Graphic LCD Display size 5 7 in 14 5 cm diagonal Backlight White LED Controls 4 wire resistive touch screen Communication RS 232 USB Balance power input 12 VDC 0 5A Power supply AC Adapter Input 100 240 VAC 0 6A 50 60 Hz AC Adapter Output 12 VDC 1 5A Platform size 190 x 200 mm 7 5 x 8 0 in Terminal Housing dimensions W x D x H 195 x 155 x 68 mm...

Page 131: ...ES EN 129 9 2 Drawings and Dimensions Fully assembled dimensions Figure 9 1 Draft Shield models Figure 9 2 Non Draft Shield models 15 5 in 393 mm 3 9 in 98 mm 9 1 in 230 mm 9 1 in 230 mm 13 8 in 350 mm 15 5 in 393 mm ...

Page 132: ... kit 83033677 Left Glass Door kit 83033678 Right Glass Door kit 83033679 Top Glass Door kit 83033680 TABLE 9 8 ACCESSORIES DESCRIPTION PART NUMBER Foot Switch kit 83021086 Terminal Extension Cable kit 83021083 Density Determination kit 80253384 Tower Mount for Terminal 83021102 Draft Shield kit 83021084 Security Device 80850043 Printer Contact Ohaus Interface Cable Printer Contact Ohaus Interface ...

Page 133: ... Settings Menu Applications Balance Setup Menu Sensors Application Modes Menu AutoCal Weighing Units Menu Main Menu GLP and GMP Data Menu More Functions Communication Menu Level Assist Library Zero I O Settings menu Tare Diagnostics Menu Units Factory Reset Menu Pre Tare lockout Menu Cal Test Information Menu Calculator Stopwatch Logout ...

Page 134: ...ation Stability Indicator Range Automatic Calibration Filter Level AutoCal Adjustment Auto Zero Tracking Span Calibration Auto Tare User Calibration Gross Indicator Calibration Test Legal For Trade Language Graduations Volume Date and Time Display Settings User Manager Functions Configuration Sensors Draft Shield Light ...

Page 135: ...NS Continued ICON FUNCTION ICON FUNCTION Weighing Differential Parts Counting Density Determination Percent Weighing Peak Hold Check Weighing Ingredient Costing Dynamic Weighing Pipette Adjustment Filling Statistical Quality Control Totalization Formulation ...

Page 136: ...UNCTION Milligram unit Momme unit Gram unit Mesghal unit Kilogram unit Hong Kong Tael unit Carat unit Singapore Tael unit Ounce unit Taiwan Tael unit Ounce Troy unit Tical unit Pound unit Tola unit Pennyweight unit Baht unit Grain unit Custom unit 1 Newton unit Custom unit 2 Custom unit 3 ...

Page 137: ...User Settings Reset User Name Balance Setup Reset Project Name Application Modes Reset RS 232 Standard Weighing Units Reset USB Standard GLP and GMP Data Reset External Input 1 Communication Reset External Input 2 I O Settings Reset External Input 3 Reset All External Input 4 Level Bubble Light Draft Shield Light Sensors Service Menu ...

Page 138: ...S Continued ICON FUNCTION ICON FUNCTION Calibration Lockout User Settings Lockout Balance Setup Lockout Application Modes Lockout Weighing Units Lockout GLP and GMP Data Lockout Communication Lockout Library Lockout I O Settings Lockout Factory Reset Lockout ...

Page 139: ...ve H Enter or get Print Header Lines Attention header text length is up to 25 characters the setting format is H x header line text and H x could get the corresponding header line in the balance Z Same as pressing Zero Key T Same as pressing Tare Key xT Establish a preset Tare value in displayed unit X preset tare value Sending 0T clears tare if allowed PT Prints Tare weight stored in memory PM Pr...

Page 140: ...arget for weight tolerance mode xC Set Checkweighing tolerance x Attention when x is a positive value it is used to set the tolerance value vice versa PC Print Checkweighing tolerance xCW Set Checkweighing weight tolerance x Attention when x is a positive value it is used to set the tolerance value vice versa PCW Print Checkweighing weight tolerance xDH Set Display Hold mode Peak Hold x A Automati...

Page 141: ...e will respond ES Note 2 Application list Index Application Index Application 0 Weighing 11 Pipette Adjustment 1 Parts Counting 12 Ingredient Adjustment 2 Percent Weighing 13 SQC 3 Check Weighing 4 Dynamic Weighing 5 Filling 6 Totalization 7 Formulation 8 Differential 9 Peak Hold 10 Density Determination Note 3 Unit list Index Unit Index Unit 0 Milligram 11 Mesghal 1 Gram 12 Hong Kong Tael 2 Kilog...

Page 142: ...indows 2000 Windows XP or Windows 7 Available USB port Type A 4 pin female USB Connection The balance s USB port terminates with a 4 pin female USB Type B connector A USB Cable type B male to type A male is required not supplied 1 Ensure that the balance is powered on and working properly 2 Power on the computer and verify that its USB port is enabled and working properly 3 Plug the cable s USB co...

Page 143: ...mits stable data only PRINT Auto Print Continuous Balance repeatedly sends data as fast as possible PRINT Auto Print On Stable Balance automatically outputs data upon stability PRINT Auto Print xx sec Balance sends data every xx seconds PRINT Auto Print Off Only sends data when PRINT is pressed USB USB Off Turns Interface off saving battery power USB Baud Parity Handshake Set parameters to match p...

Page 144: ...aracter stability indicator 1 character when unstable blank when stable space 1 character legend 10 character TOTAL hh mm ss time interval etc CR 1 character LF 1 character Output examples Note and _ indicate spaces 192 21_g Manual Continuous or On Stable printing 0 01_g_ unstable reading 0 01_g___ 00 00 00 Interval Printing example 15sec interval 176 30_g_ _00 00 15 unstable reading 192 08_g___00...

Page 145: ...ast error code i e Err 0 0S print unstable data 1S print stable data only P same as pressing Print SP print stable weight only IP immediate print of displayed weight stable or unstable CP Continuous print of weights SLP Auto print stable non zero weight only SLZP Auto print stable non zero weight and zero reading xP Auto print on 1 to 3600 second intervals x 1 to 3600 0P turns auto print off PM pr...

Page 146: ...EN 144 EXPLORER BALANCES 10 SOFTWARE UPDATES Ohaus is continuously improving its balance software To obtain the latest release please contact your Authorized Ohaus Dealer or Ohaus Corporation ...

Page 147: ...epresentative within the EC or by the national weights and measures W M authorities The first stage of the initial verification has been carried out at the manufacturer s work It comprises all tests according to the adopted European standard EN45501 1992 paragraph 8 2 2 If national regulations limit the validity period of the verification the user of the weighing instrument must strictly observe t...

Page 148: ...ch you purchased this device Should this device be passed on to other parties for private or professional use the content of this regulation must also be related For disposal instructions in Europe refer to www ohaus com choose your country then search for WEEE Thank you for your contribution to environmental protection LIMITED WARRANTY Ohaus products are warranted against defects in materials and...

Page 149: ......

Page 150: ...Ohaus Corporation 7 Campus Drive Suite 310 Parsippany NJ 07054 USA Tel 973 377 9000 Fax 973 944 7177 With offices worldwide www ohaus com 83021171 P N 83021171 2011 Ohaus Corporation all rights reserved ...

Reviews: