background image

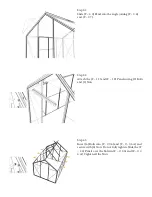
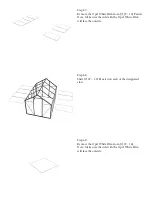
Step 65:

Slide (1) Bolt into each (F - 2 4) Beams and insert the 

Bolts into the holes of (F – C 0 7) and (F – C 0 7 A). 

Tighten (1) Nut to each Bolt.

Step 64:

Slide (1) Bolt into (2) (F - 2 4) Beams. These Bolts will 

be used in a later step.

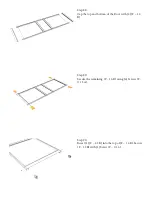
Step 66:

Slide (1) Bolt into each (F - 2 4) Beams and insert the 

Bolts into the holes of (F – C 0 7) and (F – C 0 7 A). 

Tighten (1) Nut to each Bolt.

Summary of Contents for OGAL-866

Page 1: ......

Page 2: ...plete this procedure you will need a Phillips Screwdriver Needle Nose Pliers and Gloves Option ally you may need a Step Ladder a Caulking Gun and Silicone Glass Glue Note Make sure the Greenhouse is l...

Page 3: ...into F C 0 2 A and F C 0 2 Attach 1 Nut F C 1 4 to each Bolt Do not fully tighten Step 5 Slide F 0 5 into position and make sure the Bolts slide into the grooves Fully tighten the Nuts Step 6 Lay ass...

Page 4: ...into F C 0 2 A and F C 0 2 Attach 1 Nut F C 1 4 to each Bolt Do not fully tighten Step 8 Slide F 0 5 into position and make sure the Bolts slide into the grooves Fully tighten the Nuts Step 9 Lay ass...

Page 5: ...peat for the other 3 corners Make sure beams are oriented to be able to rotate Note Do not fully tighten the Nuts until later Step 11 Connect F 2 9 and F C 0 2 F C 0 2 A with 1 Bolt and 1 Nut Do not f...

Page 6: ...rom the edge of F 1 7 to the top of F 2 3 Tighten Nuts at the indicated areas The lower Bolt will be used in a later step Step 14 Position F 0 3 B F 0 4 and the assembled parts to a right angle Make s...

Page 7: ...e structure is able to support itself Step 17 Attach the other section of the assembly to F 0 3 B and F 0 4 Tighten all Nuts of the assembly Note Make sure to always support the assembly until the str...

Page 8: ...Bolt Do not fully tighten the Nut Step 20 Insert 2 Bolts into F 0 5 Attach F 1 9 B to the Bolts Attach F 1 8 to the top Bolt and secure with 1 Nut Tighten all Nuts attached to F 1 8 Step 21 Attach F 3...

Page 9: ...ons Note Structure should be self supporting at this step if not tighten all loose Nuts Step 24 Insert 2 Bolts into F 0 5 Attach F 3 0 and F 0 5 to the lower notch of F 1 9 B using the lower Bolt Secu...

Page 10: ...other side Step 26 Connect F 1 7 to F 1 9 B using 1 Nut Repeat on the other side Do not fully tighten the Nuts Step 27 Attach 1 Bolt into 1 F 3 0 and F 0 3 B using 1 Nut Do not fully tighten the Nut...

Page 11: ...y installed 2 Bolts Make sure the shelf part is facing upward Repeat on the other side Step 29 Insert F 0 8 F 0 9 F 1 0 and F 1 1 into the Bolts at each location Tighten the Nuts at each point Step 30...

Page 12: ...p 31 Insert 1 Bolt into F 0 9 Connect F 1 8 and F 0 9 using 1 Nut Step 32 Insert 1 Bolt into F 1 0 Connect F 1 7 and F 1 0 using 1 Nut Step 33 Insert 1 Bolt into F 1 1 Connect F 1 7 and F 1 1 using 1...

Page 13: ...d locations Step 35 Insert 2 Bolts and 2 Nuts into F C 0 2 A in the indicated areas Do not fully tighten the Nuts Step 36 Insert F 2 3 into the Bolt on the base Slide 1 Bolt into F 2 3 Attach F 2 3 to...

Page 14: ...st face towards the sun when attached to the Greenhouse Step 39 Remove the Opal White Film from 8 F 3 4 Panels Note Make sure the side with the Opal White Film will face the outside Step 37 Insert F 2...

Page 15: ...eams at each of the designated areas Step 41 Remove the Opal White Film from 2 F 3 2 Panels Note Make sure the side with the Opal White Film will face the outside Step 42 Slide 2 F 3 2 Panels into the...

Page 16: ...he side with the Opal White Film will face the outside Step 44 Slide 2 F 3 3 Panels into the grooves of the beams at each of the designated areas Step 45 Remove the Opal White Film from 1 F 3 1 Panel...

Page 17: ...o each hole of F C 0 6 and F C 0 6 A Do not fully tighten the Nuts Step 46 Slide 1 F 3 1 Panel into the grooves of the beams at the designated area Step 48 Slide the Bolts on F C 0 6 A into the groove...

Page 18: ...ole in F C 0 6 and F C 0 6 A Do not fully tighten the Nuts Step 49 Slide the Bolts on F C 0 6 into the grooves of F 2 3 and F 0 5 Tighten the Nuts Step 51 Slide 2 Bolts into F 0 8 F 0 9 F 1 0 and F 1...

Page 19: ...he 2 F 1 9 B and F C 0 6 A F C 0 6 Tighten the Nuts Step 52 Insert 2 Bolts and 2 Nuts into the holes on the top edge of F 1 9 B as shown Do not fully tighten the Nuts Step 54 Slide 2 Bolts into the gr...

Page 20: ...F 0 6 and F 0 7 through the Bolts in F 1 9 B and F C 0 6 A F C 0 6 on the other side Tighten the Nuts Step 57 Attach 4 F 1 9 Brackets to the Bolts and tighten with 4 Nuts Repeat with the 3 other F 1 9...

Page 21: ...on each side to secure F C 0 7 and F C 0 7 A Step 58 Attach F C 0 7 and F C 0 7 A with F 4 3 using 6 Bolts and 6 Nuts Step 60 Remove the Opal White Film from 1 F 4 0 Panel Note Make sure the side with...

Page 22: ...and 2 Nuts Step 61 Slide F 4 0 Panel into the angle joining F 0 6 and F 0 7 Step 63 Insert 6 Bolts into F C 0 6 and F C 0 6 A and secure with 6 Nuts Do not fully tighten Slide the F 2 4 Panels over t...

Page 23: ...e holes of F C 0 7 and F C 0 7 A Tighten 1 Nut to each Bolt Step 64 Slide 1 Bolt into 2 F 2 4 Beams These Bolts will be used in a later step Step 66 Slide 1 Bolt into each F 2 4 Beams and insert the B...

Page 24: ...ed slots Step 67 Remove the Opal White Film from 7 F 3 5 Panels Note Make sure the side with the Opal White Film will face the outside Step 69 Remove the Opal White Film from 1 F 3 6 Note Make sure th...

Page 25: ...d F C 0 5 A to F C 0 6 and F C 0 6 A with the 6 Bolts and 6 Nuts Re peat for the other side Step 72 Insert the notch in F 2 8 through the Bolts in F 2 4 Attach using 2 Nuts Step 70 Slide 1 F 3 6 Panel...

Page 26: ...4 Remove the Opal White Film from 1 F 3 7 Panel Note Make sure the side with the Opal White Film will face the outside Step 75 Slide 1 F 3 7 Panel into the Window Assembly Step 73 Attach 2 F 2 6 to 1...

Page 27: ...Step 77 Secure the 4 corners with 4 Bolts and 4 Nuts Step 78 Attach F 2 0 to F 2 7 using 2 Screws F C 1 6 Step 76 Slide 1 F 2 5 over the top edge of F 3 7...

Page 28: ...of F 1 3 Step 81 Attach F 1 3 to F 1 2 and insert the Bolts through the holes of F 1 2 Tighten 2 Nuts on the Bolts Step 79 Using a Step Ladder slide the Window into the groove on F C 0 7 Make sure th...

Page 29: ...F 3 9 Panels Note Make sure the side with the Opal White Film will face the outside Step 84 Attach 2 F 1 5 Frames to 1 F 1 6 B Secure with 4 Screws F C 1 5 A Step 82 Attach F 2 1 to F 1 3 and F 0 7 u...

Page 30: ...Step 86 Attach 1 F 1 6 B to the other side of the F 1 5 Beams Secure with 4 Screws F C 1 5 A Step 87 Slide 2 F 3 8 Panels into the top and bottom slots Step 85 Slide 1 F 3 9 Panel into the middle slot...

Page 31: ...ep 89 Secure the remaining F 1 6 B using 4 Screws F C 1 5 A Step 90 Insert 1 F 2 2 B into the top of F 1 6 B Secure F 2 2 B with 1 Screw F C 1 6 Step 88 Cap the top and bottom of the Door with 2 F 1 4...

Page 32: ...n top and F 0 3 B on the bottom Note Ensure that the Door is placed with the raised sides of the frame on the outside Step 93 Secure Door with 2 Bolts and 2 Nuts at the indicat ed corners Step 91 Inse...

Page 33: ...A F 0 7 and F 0 6 join Step 96 Slide 1 G P 2 connector into where F C 0 7 F 0 7 and F 0 6 join Step 94 Insert 4 G P 1 units into the top corners of the front and back walls of the Greenhouse sliding t...

Page 34: ...right and fixed in place Step 99 Make sure all Nuts and Bolts are tight and secure Note Pay special attention to the Nuts and Bolts at the base of your Greenhouse Step 97 Cap F 1 3 with G P 3 L at th...

Page 35: ...y Aluminum Frame Step 100 It isn t necessary but it is advised to use Silicone Glass Glue or Tape between the Polycarbonate Panel and the Aluminum Frame to enhance the stability Note Silicone Glass Gl...

Reviews: