background image

3-5  Configure User Menu (SEL)

3 - 6  Ramp

The ramping function is performed during power up as well as any time the set point is changed.  Choose MINR (units
per minute) or HRR (units per hour) for RAMP, the unit will perform the ramping function. The ramp rate is
programmed by adjusting RR. The ramping function is disabled as soon as failure mode,  manual control mode, the
auto-tuning mode or the calibration mode is entered.

Example without Dwell Timer

Select MINR for RAMP, select °C for UNIT, select 1-DP for DP, Set RR= 10.0. SV is set to 200°C initially, and changed
to 100°C 30 minutes after power up. The starting temperature is 30°C. After power up, the process runs like the
curve shown below:

23

200

C

200

C

100

C

100

C

30

C

30

C

17

30

40

Time
(minutes)

Time
(minutes)

PV

0

Note:

When the ramp function is used, the display will show the current ramping value. However it will revert to the

set point value as soon as the up or down key is touched for adjustment. The ramping value is initiated to process
value either as power up or RR and /or set point are changed. Setting RR to zero disables the ramp function.

Figure 3.5 RAMP Function

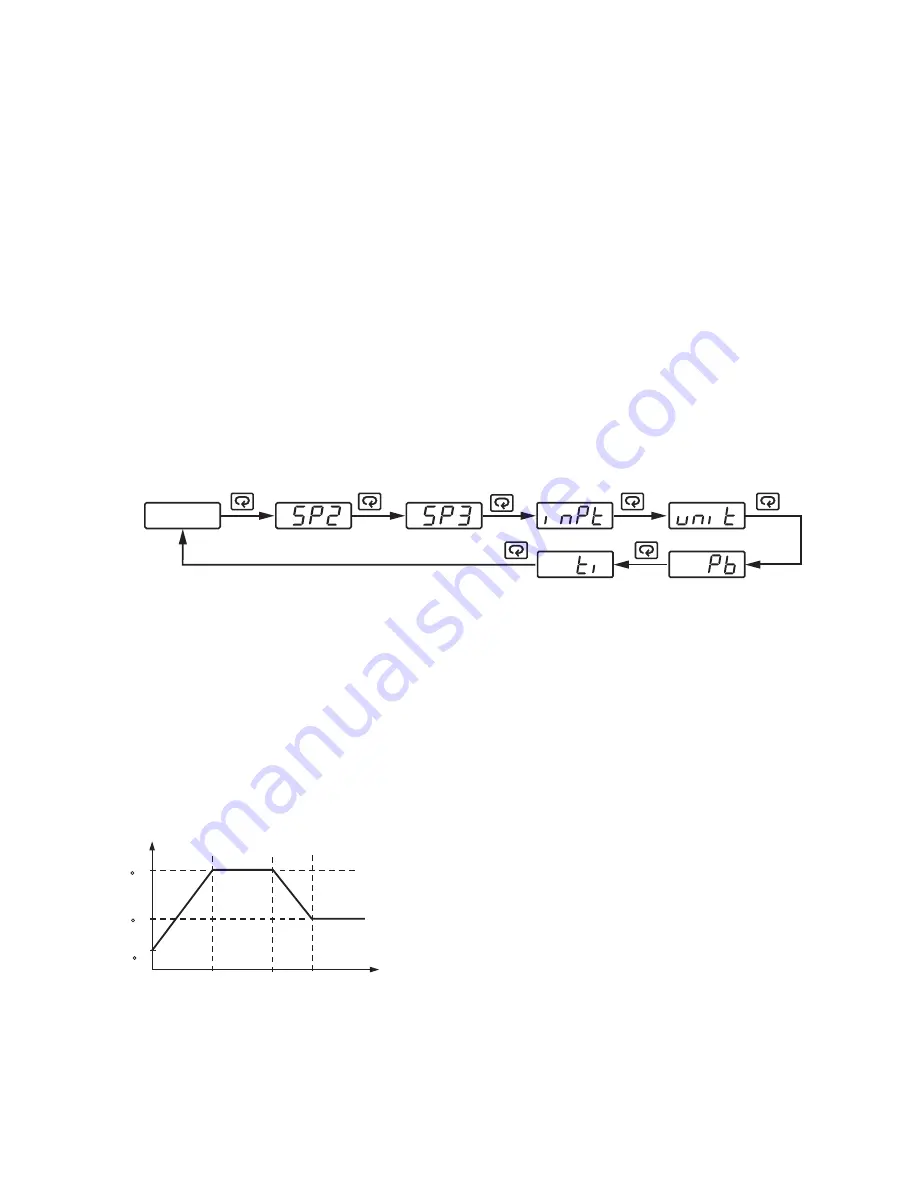
The units give you the flexibility to select those parameters which are most significant  and move these
parameters to the front of the display sequence.

OUT2 selects DE.LO    PB= 100.0                 SEL1 selects INPT
SEL2 selects UNIT       SEL3 selects PB        SEL4 selects TI
SEL5~SEL8 selects     NONE   Now, the upper display scrolling becomes:

PV

Example :

Alarm Failure Transfer

failure mode

ON

ALFT

OFF

ALFT

is activated as the unit enters

. Alarm will go on if

is set for

and go

off if

is set for

. The unit will enter failure mode when sensor break occurs or if the A-D converter of

the unit fails.

SEL1~SEL8 : Selects the parameter for view and change in the user menu.

Range : LOCK, INPT, UNIT, DP, SHIF, PB, TI, TD, O1HY, CYC1, OFST,

RR, O2HY, CYC2, CPB, DB, ADDR, ALHY

When using the up-down key to select the parameters, you may not obtain all of the above parameters.
The number of visible parameters is dependent on the setup condition. The hidden parameters for the specific
application are also deleted from the SEL selection.

Alarm Failure Transfer

failure mode

ON

ALFT

OFF

ALFT

Summary of Contents for SMARTER LOGIC ETR-9100

Page 1: ...Models ETR 9100 8100 4100 Microprocessor Based SMARTER LOGIC Temperature Control INSTRUCTION MANUAL SMARTER SMARTER LOGIC LOGIC LOGIC PK494 1 OMC October 2006...

Page 2: ...It is strongly recommended that a process incorporates an FM approved LIMIT CONTROL like the ETR 9040 or ETR 3 which will shut down the equipment at a preset process condition in order to preclude any...

Page 3: ...gnal Input 19 3 3 Control Outputs 20 3 4 Alarm 22 3 5 Display Configuration 23 3 6 Ramp 23 3 7 Dwell Timer 24 3 8 PV Shift 24 3 9 Digital Filter 25 3 10 Failure Transfer 25 3 11 Auto tuning 26 3 12 Ma...

Page 4: ...2 are available as an additional option This option allows the units to be integrated with a supervisory control system and or software A programming port is available for automatic configuration cali...

Page 5: ...ied either as the process is warming up cold start or as the process is in a steady state warm start Lockout Protection In order to meet various security requirements one of four lockout levels can be...

Page 6: ...3 0 1 V 4 0 5 V 5 1 5 V 6 4 20 mA 7 0 20 mA 8 0 10 V 9 Special Order Signal Input 0 None 1 Relay rated 2A 240VAC 2 Pulsed voltage to drive SSR 5V 30mA 3 Isolated 4 20mA 0 20mA 4 Isolated 1 5V 0 5V 5...

Page 7: ...ed parameter This key is used to 1 Revert the controllers display back to the process value or set point value if DISP is set to SP1 2 Reset the latching alarm once the alarm condition is removed 3 St...

Page 8: ...n 6 24 for an ETR 9100 Displays the program code of the product for 2 5 seconds Figure 1 4 Display at Power up 8 Upper Display to display process value menu symbol and error code etc Lower Display to...

Page 9: ...ication the number of available parameters depends on setup conditions and should be less than that shown in the flow chart You can select at most 8 parameters put in the user menu by using SEL1 SEL8...

Page 10: ...C Range UNIT Input unit selection 0 Degree C unit 1 Degree F unit 2 Process unit 0 1 DP Decimal point selection 1 0 No decimal point 1 1 decimal digit 2 2 decimal digits 3 3 decimal digits INLO INHI I...

Page 11: ...2 No Function 2 Deviation High Alarm 3 Deviation Low Alarm 6 Process High Alarm 7 Process Low Alarm 8 Cooling PID Function 2 RAMP Ramp function selection 0 No Function 1 Use unit minute 2 Use unit ho...

Page 12: ...nication function 0 No communication 1 Modbus RTU mode protocol 1 2 4 20mA retransmission output 3 0 20mA retransmission output 0 5V retransmission output 4 1 5V retransmission output 5 0 10V retransm...

Page 13: ...SEL7 Select 7 th parameter for user menu 10 Same as SEL1 SEL8 Select 8 th parameter for user menu 17 Same as SEL1 12 SEL1 Select 1 st parameter for user menu 2 0 No parameter selected 1 LOCK is put a...

Page 14: ...e model number serial number and date code for future reference when corresponding with our service center The serial number S N and date code D C are labeled on the box and the housing of control Mak...

Page 15: ...he ratings of the output devices and the inputs as specified in Chapter 6 are not exceeded Except the thermocouple wiring all wiring should use stranded copper conductor with a maximum gauge of 18 AWG...

Page 16: ...n required to find this optimum position In a liquid process addition of a stirrer will help to eliminate thermal lag Since the thermocouple is basically a point measuring device placing more than one...

Page 17: ...A 5Vdc Pulsed Voltage Internal Circuit 5V 0V 33 33 _ _ Figure 2 11 Output 1 Linear Current Figure 2 11 Output 1 Linear Current Figure 2 12 Output 1 Linear Voltage Figure 2 12 Output 1 Linear Voltage F...

Page 18: ...mA 0 20mA 4 20mA _ Load Figure 2 17 Output 2 Linear Voltage Figure 2 17 Output 2 Linear Voltage 2 8 Alarm Wiring Figure 2 18 Alarm Output to Drive Load Figure 2 18 Alarm Output to Drive Load Figure 2...

Page 19: ...ial cable as in fig 2 23 Using RS 232 communications as shown in fig 2 2 a special cable CC 94 1 should be used The other option is to configure a 9 pin serial cable as in fig 2 23 18 TX1 TX1 TX1 TX2...

Page 20: ...pecifies the current input signal value the conversion curve of the process value is shown as follows INHI process value PV INLO SL SH S input signal Figure 3 1 Conversion Curve for Linear Type Proces...

Page 21: ...T is measured by with range 0 100 0 In the steady state ie process has been stabilized if the process value is lower than the set point by a definite value for example 5 C while 20 C is used for PB th...

Page 22: ...measured by of PB with range 50 300 Initially set 100 for CPB and examine the cooling effect If cooling action should be enhanced then decrease CPB if cooling action is too strong then increase CPB Th...

Page 23: ...non alarm condition and energized in an alarm condition Note In the above descriptions SV denotes the current set point value for control which is different from SP1 as the ramp function is performed...

Page 24: ...d to process value either as power up or RR and or set point are changed Setting RR to zero disables the ramp function Figure 3 5 RAMP Function The units give you the flexibility to select those param...

Page 25: ...accomplished by using the PV shift function The SHIF function will alter PV only 165 C C Heat Transfer 200 C Sensor Subject Heater 35 C temperature difference is observed SHIF 0 165 C C Heat Transfer...

Page 26: ...ilure mode Output 2 Failure Transfer if activated will perform 1 If OUT2 is configured as COOL and BPLS is selected for O2FT then output 2 will perform bumpless transfer Thereafter the previous averag...

Page 27: ...ng beyond the normal process value is likely to cause damage NOTE The ramping function if used will be disabled once auto tuning is initiated The auto tuning mode is disabled as soon as either failure...

Page 28: ...ID Adjustment Guide Figure 3 9 shows the effects of PID adjustment on process response 27 PV Time Perfect PB too high PB too low Set point P action I action PV Time Perfect TI too low TI too high Set...

Page 29: ...torical trending through endless zones ETR communications provide for a very powerful and economic solution Setup Enter the setup menu Select RTU for COMM Set individual addresses for each unit which...

Page 30: ...mple Main Supply Main Supply ON OFF Timer ALM Heater T C Oven OUT1 Set SP1 150 0 SP2 30 0 SP1 150 0 SP2 30 0 4 1 Heat Only Control with Dwell Timer An oven is designed to dry products at 150 degrees C...

Page 31: ...1TY should be set to RELY A small temperature oscillation is tolerable hence use ON OFF control to reduce wear and tear on the mechanical parts and resulting over all cost To achieve ON OFF control th...

Page 32: ...Menu Adjustment of CPB is related to the cooling media used If water is used as cooling media instead of oil the CPB is set at 250 If air is used as cooling media instead of oil the CPB is set at 100...

Page 33: ...0 005 accuracy 0 20 mA current source with 0 005 accuracy 0 300 ohm resistant source with 0 005 accuracy 2 A test chamber providing 25 C 50 C temperature range 3 A switching network SWU16K optional f...

Page 34: ...at least 20 minutes in still air room room temperature 25 3 C Figure 5 2 Cold Junction Calibration Setup Figure 5 2 Cold Junction Calibration Setup 19 20 K K 5520A Calibrator 5520A Calibrator K TC The...

Page 35: ...and recalibration procedures for a linear voltage or a linear current input 1 Remove R60 3 3K and install two 1 4 W resistors RA and RB on the control board with the recommended values specified in t...

Page 36: ...conds for TC RTD and mV inputs 0 1 second for 4 20 mA and 1 5 V inputs Resolution 18 bits Sampling Rate 5 times second Maximum Rating 2 VDC minimum 12 VDC maximum 1 minute for mA input Temperature Eff...

Page 37: ...F 1292 F 8mV 70mV 3mA 27mA 1 3V 11 5V 0 05 0 05 70 5 1 3 K 1 3 K 1 3 K 650 K 2 2 M 2 2 M 2 2 M 2 2 M 2 2 M 2 2 M 2 2 M 2 2 M Output 1 Output 2 Relay Rating 2A 240 VAC life cycles 200 000 for resistive...

Page 38: ...w Alarm Deviation Band High Low Alarm PV High Low Alarm PID cooling control Alarm Mode Normal Latching Hold Latching Hold Dwell Timer 0 1 4553 6 minutes Data Communication Interface RS 232 1 unit RS 4...

Page 39: ...gital Filter Function First order Time Constant 0 0 2 0 5 1 2 5 10 20 30 60 seconds programmable Approval Standards Safety UL61010C 1 EN61010 1 IEC1010 1 Environmental Physical Operating Temperature 1...

Page 40: ...Hi Data 1 Lo Data 2 Hi Data 2 Lo CRC16 Hi CRC16 Lo Function 03 Read Holding Registers Function 06 Preset single Register Query from master Response from slave Slave address 0 255 Function code 6 Regis...

Page 41: ...character parity check error framing error etc or if the CRC16 check fails the controller ignores the message However if the controller receives a syntactically correct message which contains an ille...

Page 42: ...tegral time Derivative time Output 1 function Output 1 signal type Output 1 failure transfer Output 1 ON OFF hysteresis Output 1 cycle time Offset value for P control Ramp function Ramp rate 4 7 6 0 0...

Page 43: ...ode Serial Number Working hours of the controller mV calibration low coefficient mV calibration high coefficient RTD calibration low coefficient RTD calibration high coefficient Cold junction calibrat...

Page 44: ...ue OP2 control output value 0 00 0 00 0 000 4 4 1999 9 0 0 0 00 0 0 0 0 199 99 0 0 0 0 00 0 00 655 35 655 35 65 535 4 4 4553 6 65535 65535 655 35 65535 65535 65535 65535 455 36 65535 65535 65535 655 3...

Page 45: ...he following table for PB O1HY RR O2HY and ALHY Conditions Non linear input Linear input DP 0 Linear input DP 1 Linear input DP 2 Linear input DP 3 Scale low 0 0 0 0 0 0 00 0 000 Scale high 6553 5 655...

Page 46: ...such conversion Let M Value of Modbus message A Actual value of the parameter SL Scale low value of the parameter SH Scale high value of the parameter The conversion formulas are as follows M 65535 SH...

Page 47: ...00 00 4E 1F 00 01 TI 100 TD 25 0 OUT1 0 O1TY 0 O1FT 0 O1HY 0 1 00 B4 00 FA 00 00 00 00 00 02 4E 1F CYC1 18 0 OFST 25 0 RAMP 0 RR 0 0 OUT2 2 00 00 4E 1F 00 01 00 B4 00 64 4E 1F O2TY 0 O2FT 0 O2HY 0 1...

Page 48: ...0 H 48 H 68 H 28 Hi Lo Addr Func Register Addr Data Hi Lo CRC16 Query Example 5 Enter Manual Control Mode 06 00 H 48 H 68 H 27 Hi Lo Addr Func Register Addr Data Hi Lo CRC16 Query Example 6 Read All P...

Page 49: ...work under this warranty must be made in writing immediately upon discovery and in any event within one 1 year from delivery provided however all claims for defective Products and parts must be made i...

Page 50: ...967 3906 Fax 412 967 3930 www ogdenmfg com Chromalox Inc 2006 OGDEN SMARTER LOGIC ETR and ETR 9000 are Registered Trademarks of Ogden Manufacturing Co MARCA REGISTRADA Specifications subject to change...

Reviews: