background image

MILLENNIUM MM/MB

Functioning

GB - 17

Capitolo 5

2

3

1

6

4

7

5

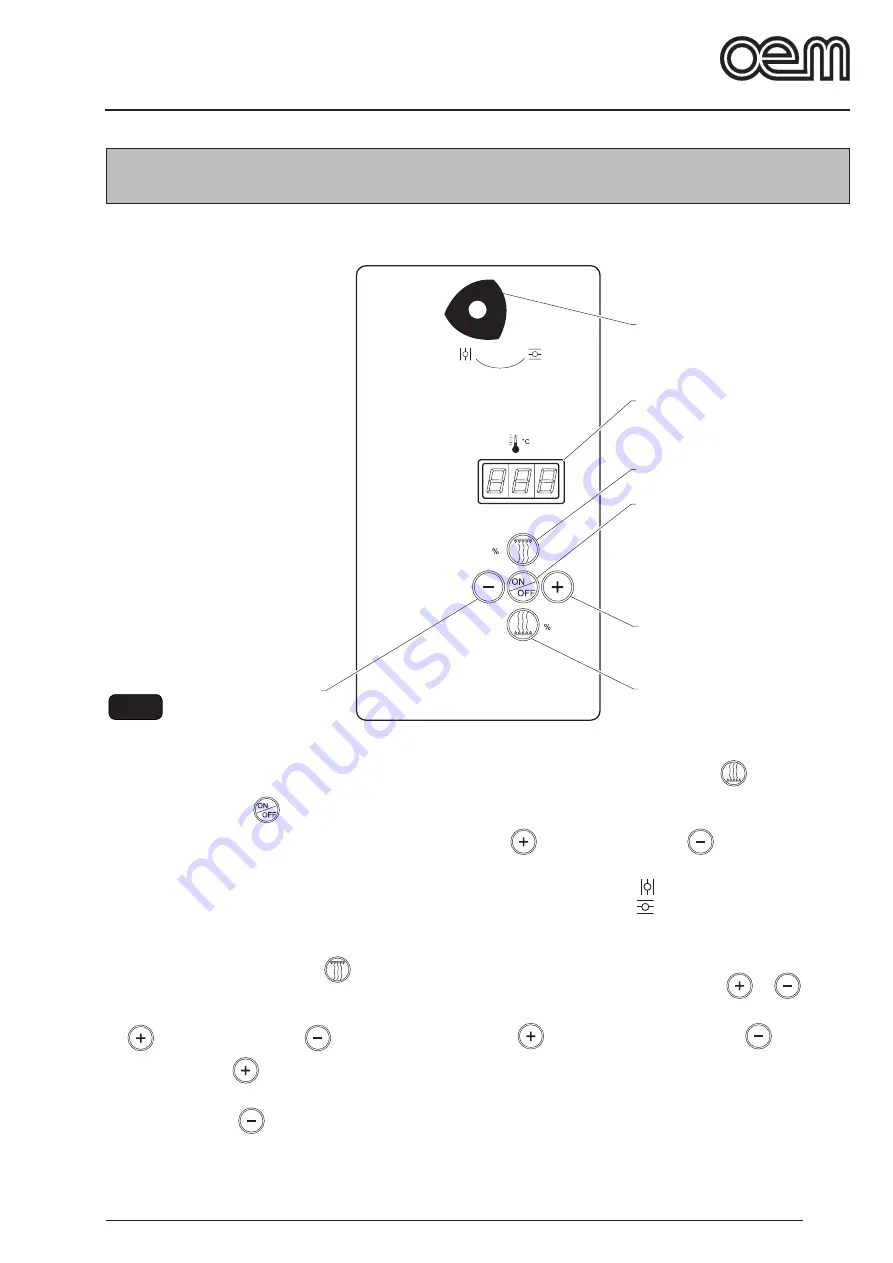
FIG. 1

5.1 - CONTROL BOARD AND PILOT LIGHTS ON DIGITALLY CONTROLLED OVENS (Fig 1)

On the oven, there are the following control elements:

1. Line key ON/OFF 

Pressing it, the display (2) lights up, the lamp inside
the chamber lights up and the control elements are
energized.

2. Display

The set and real temperature as well as the ceiling
and bedplate resistance functioning percentage are
displayed.

3. Ceiling resistance capacity 

Pressing it, the connection percentage value of the
upper resistances is displayed; to increase it press

 (4), to reduce it press 

 (5).

4. Increment key 

To increase the values to be set.

5. Decrement key 

To reduce the values to be set.

6. Bedplate resistance capacity 

Pressing it, the connection percentage value of the
lower resistances is displayed; to increase it press

 (4), to reduce it press 

 (5).

7. Handwheel opening/closing

By turning towards 

, the chimney damper opens;

by turning towards 

, the chimney damper closes.

Temperature setting
On the display (2) the real oven temperature is displayed,

to modify the set temperature press 

 or 

, on the

display the set temperature is displayed, then press the

key 

  within 5 seconds to raise or 

  reduce the

temperature. After approximately 10 seconds from the
temperature setting, a temperature self-entering occurs
and the real oven temperature is displayed.

Summary of Contents for MILLENNIUM 1235/E

Page 1: ...Installation and Operation Manual PIZZA OVEN MILLENNIUM ...

Page 2: ......

Page 3: ...l rules to bake on refractory surfaces Page GB 19 5 3 b General rules to bake in baking tin Page GB 19 5 3 c Oven starting Page GB 20 5 4 PIZZA BAKING Page GB 21 5 5 ALARM CONDITIONS DURING OVEN FUNCTIONING Page GB 21 5 5 a ATemperature feeler alarm is damaged or disconnected Page GB 21 5 6 SELF CLEANING CYCLE Page GB 22 5 7 CUTTING OFF Page GB 22 5 8 MALFUCTIONING CAUSE AND CURE Page GB 23 5 9 SA...

Page 4: ......

Page 5: ...nly suitable tools should be used in accordance with the local safety regulations Do not tamper the electric and pneumatic plant or any other mechanism for any reason The oven shall not be left unguarded Wear safety clothing only approved by the law in force In case of works to be done in a position that cannot be reached from the ground use safe ladders or lifting devices only in conformity with ...

Page 6: ...tes shall be read understood and observed To identify the safety messages included in this booklet following symbols have been used DANGER This symbol is used in the safety messages contained in the booklet in case of potential danger situations or possibility to cause serious injuries or dead ATTENTION This symbol is used in the safety messages of the booklet for any danger situation that if disr...

Page 7: ...conditions c Flue prearrangement It is necessary to prearrange a vapour flue whose features shall be in compliance with the rules being in force in the Country the oven shall be installed in b Neutral wire The machine is equipped with neutral wire therefore a special terminal being identified according to the relevant directions has been prearranged 1 6 EMERGENCY OPERATIONS IN CASE OF FIRE a In ca...

Page 8: ... Outside size Support L P A L1 P1 A1 H PC LP H1 P2 L2 435 D E 73 73 15 105 95 40 17 90 105 43 7 90 105 635S D S E 73 108 15 105 130 40 17 125 105 43 7 125 105 635L D L E 113 73 15 145 95 40 17 90 145 43 7 90 145 935 D E 113 108 15 145 130 40 17 125 145 43 7 125 145 835 D E 73 73 15 105 95 73 17 90 105 43 7 90 105 1235S D S E 73 108 15 105 130 73 17 125 105 43 7 125 105 1235L D L E 113 73 15 145 95...

Page 9: ... resistance Power N W CAD N W CAD Kw 435 D 1 Chamber 1 2900 1 Chamber 1 2900 6 435 E 2 Chambers 2 2900 2 Chambers 2 2900 12 EE281 3 Chambers 3 2900 3 Chambers 3 2900 18 635S D 1 Chamber 3 1650 1 Chamber 3 1650 9 9 635S E 2 Chambers 6 1650 2 Chambers 6 1650 19 8 EE292 3 Chambers 9 1650 3 Chambers 9 1650 29 7 635L D 1 Chamber 6 875 1 Chamber 6 875 10 5 635L E 2 Chambers 12 875 2 Chambers 12 875 21 E...

Page 10: ...ls on it 2 2 b Lifting of the packing Fig 2 The box should be handled with the most care To lift and to position the box use suitable lifting systems according to the weight of the machine The box should be lifted by using a crane or a hoist with appropriate belts or by means of a lift track by inserting the forks in the appropriate joints DANGER Any handling and lifting operation should be done b...

Page 11: ... installation the components are assembled 2 4 UNPACKING Fig 3 To remove the oven from its packing proceed as follows Cut the straps 1 that tie up the carton Open the carton 2 by removing the metallic clips Remove the cardboard packaging 2 Check if everything is complete Opentheovendoor 3 removetherefractorymaterial fastening carton and the loose components as well Check if the delivery is complyi...

Page 12: ...E 1235L D L E 2 5 IDENTIFICATION OF THE COMPONENTS Fig 4 1 Hood Optional 2 Oven 1 3 Oven 2 by request 4 Support 5 Wheels Optional 6 Control board 7 Data plate 2 6 OVEN IDENTIFICATION Fig 4 Both serial number and oven identification data are engraved on a plate 7 being fixed on the base of the oven IMPORTANT Should you need technical service or spare parts please always indicate the oven serial num...

Page 13: ... them with a hook 4 of a crane or a tackle ATTENTION To hoist the machine do not use steel belts as they may damage the outside body 3 2 ASSEMBLING OF THE COMPONENTS IMPORTANT Regarding the assembling of the support the hood and the relevant components please follow the instructions in the relevant handbooks Position the support 1 near the final oven installation area by positioning its possible b...

Page 14: ... second one and fixed as above Hood assembling Fig 5 The hood 10 shall be positioned on the last oven and fixed by the four existing screws 11 Chimney assembling Fig 5 Unpack the chimney 12 and place it on the back of the oven see figure by the screws 13 and relevant washers supplied with In case of two or three chamber ovens start assembling the chimney from the lowest oven then insert the other ...

Page 15: ......

Page 16: ...nd rear oven sides should be kept No inflammable flooring shall be utilized to install the oven on it The oven shall be positioned on the final area following the indications reported in figure 8 because they indi cate the minimum distances required to allow the oven correctly to function Fix the oven position by braking the rear wheels 3 4 a Chimney connection Fig 9 Place the fitting 2 on the chi...

Page 17: ... and customer will be debarred from a possible guarantee right 4 2 SAFETY PLATES Fig 1 The warning plates with explanatory symbols are to be found in all those areas that may be dangerous for operators or engineers DANGER On the oven there are plates reporting safety instructions which shall absolutely be followed by any oven user Manufacturer disclaims all responsibility in case of accidents to p...

Page 18: ...the baking chamber 4 4 USER S AREAS Fig 3 During the oven functioning user is in front of it in order to be able to easily insert and remove the pizza through the door 1 see Fig 3 O position To carry out maintenance operations technician s position may be on the rear or lateral side of the oven T position 4 5 RESIDUAL DANGER AREAS Fig 3 Remaining danger areas areas which cannot be protected due to...

Page 19: ... press 4 to reduce it press 5 4 Increment key To increase the values to be set 5 Decrement key To reduce the values to be set 6 Bedplate resistance capacity Pressing it the connection percentage value of the lower resistances is displayed to increase it press 4 to reduce it press 5 7 Handwheel opening closing By turning towards the chimney damper opens by turning towards the chimney damper closes ...

Page 20: ...ds the chimney damper opens by turning towards the chimney damper closes 4 Adjustment hand grip for bedplate resistance capacity By rotating the hand grip 4 clockwise the bedplate resistance percentage capacity is increased counterclockwise it is reduced 5 Adjustment hand grip for ceiling resistance capacity By rotating the hand grip 5 clockwise the ceiling resistance percentage capacity is increa...

Page 21: ...en adjust the bedplate resistances at 40 ATTENTION Do not salt the refractory surface do not make the surface cool using a wet cloth the cloth shall be moistened with cold water only use pizza dough in this way a refractory surface wear does not occur and pizza can correctly be baked as well 5 3 b General rules to bake in baking tin Heat up the oven at least one hour and fifteen minutes before sta...

Page 22: ...erate the key or to raise or reduce the temperature Adjust the ceiling resistance functioning percentage by operating the hand grip 3 or the key 4 as well as the key 5 or 6 in case of ovens with digital control elements and additionally the bedplate resistance functioning by operating the hand grip 7 or the key 8 as well as the key 5 or 6 in case of ovens with digital control elements Wait until t...

Page 23: ...rol elements and ovens with digital control elements by operating the relevant push buttons or hand grips as explained in the preceding paragraphs Once the pizza is baked open the oven access door and remove the baked pizza 5 5 ALARM CONDITIONS DURING OVEN FUNCTIONING During the oven functioning alarms due to breakage could occur such alarms are displayed 5 5 a Alarm for damaged or disconnected te...

Page 24: ...digital control elements Adjust the bedplate capacity at 100 by operating the hand grip 5 or the key 6 as well as the key 3 or 4 in case of ovens with digital control elements Leave the oven on for approximately twenty minutes then disconnect it to allow it to get cold 5 7 CUTTING OFF At the end of each working day cut off the oven by pressing the push button In the event the extractor hood is fun...

Page 25: ...Make sure the electric oven connection has properly been carried out Contact manufacturer s technical service DANGER For all other troubles do not hesitate to contact manufacturer s technical service 5 9 SAFETY THERMOSTAT RECHARGE Fig 6 DANGER This operation shall be carried out by manufacturer s technical service after eliminating the trouble The safety thermostat recharge shall manually be carri...

Page 26: ...IN CASE OF NEED Some operations to be carried out in case of need for instance the replacement of broken or worn components 6 1 b Ordinary maintenance 6 1 b a Outer cleaning to be carried out every day ATTENTION At the end of each working cycle carefully clean the oven To clean the oven NEITHER metallic objects such as steel wool brushes scrapers NOR corrosive products shall be used Do not utilize...

Page 27: ...ly handle the refractory surface DO NOT wash with water DO NOT wash in a dish washer DO NOT utilize detergents to clean the refractory surfaces only use a wet cloth 6 1 c b Every 2 years Contact manufacturer s technical service to carry out a comprehensive checking of the oven 6 1 d Maintenance in case of need 6 1 d a Lamp holder replacement Fig 3 DANGER This operation shall be carried out by a sk...

Page 28: ...ans The user shall place himself at the rear side of the oven and remove the rear panel 1 with chimney loosening the relevant screws Remove the oven covering mineral wool 2 loosen the resistance fixing screws 3 two per resistance Electrically disconnect the resistance then open the oven door Bedplate resistance After opening the oven door take off the refractory surface and the resistance to be re...

Page 29: ...t by skilled technicians Remove the right hand panel 1 by unscrewing the relevant screws Remove the control board 2 by unscrewing the relevant screws Release the spring 3 and replace it Insert the spring 3 in the pin 4 turn the spring rewinding it up then fasten the spring catch 5 in the milling 6 of the pin 4 Reassemble the panel 1 and 2 ...

Page 30: ...FIG 7 6 1 d e Door pane replacement Fig 7 DANGER This operation shall be carried out by skilled technicians Open the door 1 and remove the inner panel 2 loosening the relevant screws 3 Replace the pane 4 and mount all again proceeding in the reverse ...

Page 31: ...ban waste it must be disposed of according to the special EU directive for the recycling of electric and electronic equipment The electrical equipment is marked with a pictogram of a garbage can inside a barred circle This symbol means that the equipment was sold on the market after August 13 2005 and must be disposed of accordingly Due to the substances and materials it contains inappropriate or ...

Page 32: ...MILLENNIUM MM MB Wiring diagram GB 30 WIRING DIAGRAM MM D E 435 V400 230 Trifase V230 Single phase LOWER CHAMBER CONTROL BOARD FEELER ...

Page 33: ...MILLENNIUM MM MB Wiring diagram GB 31 WIRING DIAGRAM MB D E 835 V400 LOWER CHAMBER CONTROL BOARD UPPER CHAMBER CONTROL BOARD FEELER FEELER ...

Page 34: ...MILLENNIUM MM MB Wiring diagram GB 32 WIRING DIAGRAM MB D E 835 230V Three phase LOWER CHAMBER CONTROL BOARD FEELER UPPER CHAMBER CONTROL BOARD FEELER ...

Page 35: ... diagram GB 33 WIRING DIAGRAM MM MB E D 635S L 935 1235S L 230V Three phase BEDPLATE PHASE CROWN PLATE NEUTRAL CONDUCTOR CONTROL BOARD BEDPLATE PHASE CROWN PLATE NEUTRAL CONDUCTOR BEDPLATE PHASE CROWN PLATE NEUTRAL CONDUCTOR ...

Page 36: ...Wiring diagram GB 34 WIRING DIAGRAM MM MB E D 635S L 935 1235S L 400V BEDPLATE PHASE CROWN PLATE NEUTRAL CONDUCTOR CONTROL BOARD BEDPLATE PHASE CROWN PLATE NEUTRAL CONDUCTOR BEDPLATE PHASE CROWN PLATE NEUTRAL CONDUCTOR ...

Page 37: ...p R1 Lower oven ceiling resistance R2 Lower oven bedplate resistance D2 Upper oven card T2 Upper safety thermostat L2 Upper lamp R3 Upper oven ceiling resistance R4 Upper oven bedplate resistance Vdx Right hand fan OVEN CAPTION MM E D 635S 635L 935 MB E D 1235S 1235L KM1 System remote switch T1 Safety thermostat R1 R2 R3 R4 R5 R6 Crown plate bedplate resistances HL1 HL2 Crown plate bedplate lights...

Page 38: ......

Reviews: