5
Operating Instructions and Parts Manual
24820 / 24821
BODY REPAIR KIT
8/17
2017 OEMTOOLS
™
5. Aim the pushing end towards the damaged area and
slowly apply pressure with the pump.
6. Once contact is established at each end, keep
clear as well as practical and slowly apply
pressure to the damaged area until the desired
correction has been made.
CAUTION
:
KEEP HANDS AWAY FROM CONTACT
AREAS AND TIGHT SPACES IN CASE THE
COMPONENTS SHOULD SLIP AND CAUSE INJURY.
7. When the damaged area has been bent to the
desired position, slowly turn the release valve on the
pump unit in a counterclockwise direction to release
hydraulic pressure before removing the Ram.
USING THE SPREADER WEDGE
1. Determine the direction in which the metal needs
to be spread.
2. Remove any obstructions that are in the way and
could be damaged.
3. Place the Spreader Wedge so that the hinged arm
is resting against the part to be moved and the
stationary base is bearing against a rigid support.
Hold the Spreader Ram in position and apply the
pump pressure.
4. Once contact is established at each end, keep
clear as well as practical and slowly apply
pressure to the damaged area until the desired
correction has been made.
CAUTION
:
KEEP HANDS AWAY FROM CONTACT
AREAS AND TIGHT SPACES IN CASE THE
COMPONENTS SHOULD SLIP AND CAUSE INJURY.
5. When the damaged area has been bent to the
desired position, slowly turn the release valve on
the pump in a counterclockwise direction to release
hydraulic pressure before removing the wedge.
MAINTENANCE
If the pump has been stored for long periods, check
the oil level before use. Stand the pump on a level
surface and remove the breather valve on the oil
reservoir. If necessary, top up via the breather valve
which is then screwed on finger tight.
Note: Only unscrew this when the system is not under
pressure. The oil level should be near the bottom of
the opening. If required, oil can be Topped. Top using
high quality Hydraulic Oil.
After extensive use, the hydraulic oil should be
replaced to ensure longer equipment life. Do not overfill,
or the piston rod will be unable to move freely. Replace
the breather valve after re-filling. The required oil
volumes are as follows.
24820 - 250 ml + 5ml
24821 - 500 ml + 5ml
STORAGE
After use, screw the valve cover on to the pump
to keep the connection clear of dust and dirt and
cover the hydraulic hose end with the plastic cap.
When not in use, the pump should be stored with
the release valve open. Store all the equipment in its
moulded case in a clean, dry environment protected
from the weather.
ENVIRONMENTAL PROTECTION
If disposing of old oil or any damaged components, do
not dispose of them with general waste. Any escaping
oil should be captured with some absorbent material
which should then be disposed of appropriately.
This product and its packaging contain valuable raw
materials and should be taken to your local civic
amenity site for recycling.
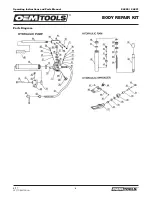
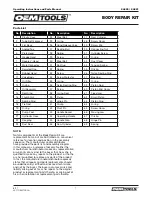
SPARE PARTS
In the event of lost or damaged components,
replacements are available from OEM Parts & Service.
Please refer to the following parts list and diagrams,
quoting the OEM part numbers:
4 Ton: 24820-01 to 69.
10 Ton: 24821-01 to 69.
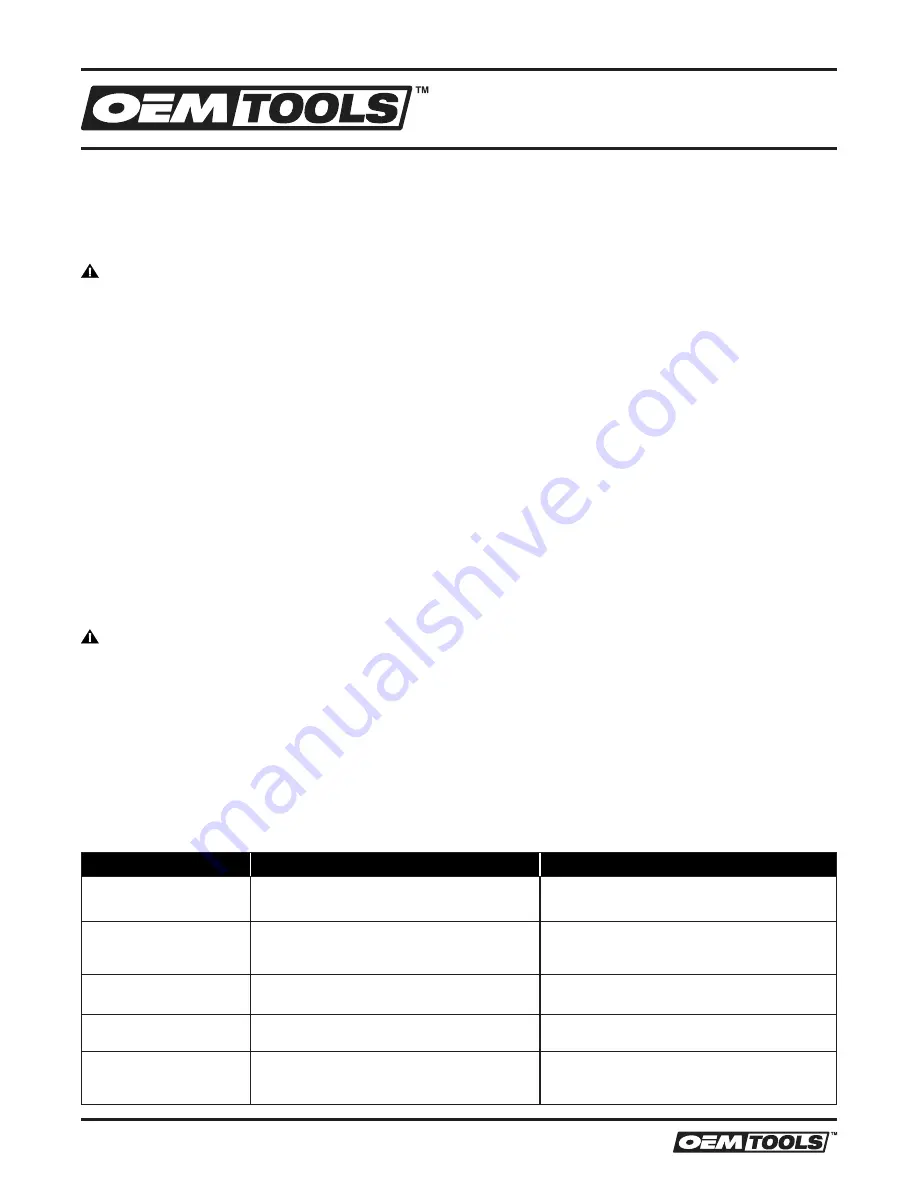
Problem
Possible Cause
Remedy
Ram does not operate
when handle is pumped.
Release valve not tightly closed. Air
trapped in system.
Firmly close the release valve. Purge air
from system by pumping operating handle.
Ram will not hold load.
Release valve not tightly closed.
Malfunction in pump such as dirt inside
valve mechanism.
Firmly close the release valve. Return
pump to dealer for overhaul.
Ram reluctant to lower
when load removed.
Oil reservoir overfilled. Piston binding.
Drain oil to correct level. Clean and
lubricate moving parts.
Ram will not extend to
full range of stroke.
Low oil level.
Add hydraulic oil to the reservoir.
Ram tries to tilt to
one side.
Poor positioning of the footing.
Stop work and re-position ram and base,
ensuring it is well supported and as close
to perpendicular to the repair as possible.
FAULT FINDING


