background image

9

PRIMING THE  ENGINE

We recommend that you prime your engine before starting it. While 
holding the throttle open, place your fi nger over the muffl er outlet 
on the tuned pipe and turn the engine over using a starter box for 
3–5 seconds or until fuel reaches the carburetor. DO NOT install 
your glow starter during priming. Turn your transmitter and receiver 
on, install your glow starter and then start your engine. Do not hold 
the throttle wide open while starting, use only 1/4-throttle. Allow the 
engine to idle for 10–15 seconds before increasing the throttle. If 
the engine does not start within 8–10 seconds, remove the glow 
plug and check that it and your glow ignitor are working properly.

Note: 

If you are having problems tuning your engine, we recommend 

that you return the needles to the factory settings and make small 
tuning adjustments until you achieve the optimal settings for the 
particular conditions. 

To reset the needles to factory settings, gently close (clockwise) the 
needles. Then open (counterclockwise) the needles the designated 
number of turns.

Important: 

Make sure when closing the needles you do not 

overtighten. Overtightening the needles can cause damage to 
the carburetor.

Summary of Contents for SS .21

Page 1: ...1 E N G I N E E N G I N E...

Page 2: ...cesses When properly used and maintained it will perform at the highest level of racing Carefully read through the entire instruction manual before starting your SS 21 engine Safety Precautions 3 Impo...

Page 3: ...nition source when fuel is near The engine emits harmful fumes just like a real vehicle Do not operate the engine indoors The engine and its exhaust can become very hot during operation Avoid touching...

Page 4: ...wrench and a 10mm socket DO NOT put something in the exhaust to prevent the engine from turning over Make sure you keep your vehicles fuel tank free of dirt and debris Make sure your vehicle s clutch...

Page 5: ...r to sit in direct sunlight or opened Always close the container promptly after each use Do not store on a concrete floor Doing so will decrease the quality of the fuel and could cause the engine to p...

Page 6: ...nnell 97T glow plug After extensive testing Steve O Donnell has found that this plug gives you maximum performance and superb durability We recommend that you always keep a spare O Donnell 97T ODOG049...

Page 7: ...ce install the included 8mm restrictor The engine will need to be re tuned after changing the carburetor restrictor richer mixture After extensive testing Steve O Donnell has developed the R2 tuned pi...

Page 8: ...eed needle affects your low end power Turning the low speed needle counterclockwise richer allows more fuel to enter the engine and turning the low speed needle clockwise leaner allows less fuel to en...

Page 9: ...engine to idle for 10 15 seconds before increasing the throttle If the engine does not start within 8 10 seconds remove the glow plug and check that it and your glow ignitor are working properly Note...

Page 10: ...allow the engine to run out of fuel during break in This will cause the engine to lean out possibly causeing engine damage We highly recommend the use of a quality temperature gauge like the O Donnell...

Page 11: ...l down Then restart the engine Tanks 7 8 You can now run the vehicle approximately 150 200 feet pulling the trigger to full throttle the last 50 feet of each pass Continue to temp the engine every 4 6...

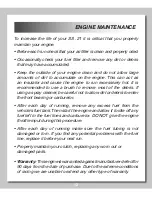
Page 12: ...eaner be careful not to allow dirt or debris to enter the front bearing or carburetor After each day of running remove any excess fuel from the vehicle s fuel tank Then start the engine and allow it t...

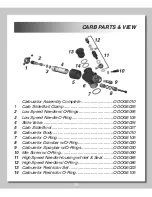
Page 13: ...e ODOG6024 5 Carb Slide Boot ODOG6027 6 Carburetor Body ODOG6010 7 Carburetor O Ring ODOG6105 8 Carburetor Drawbar w O Ring ODOG6020 9 Carburetor Spraybar w O Rings ODOG6030 10 Idle Screw w O Ring ODO...

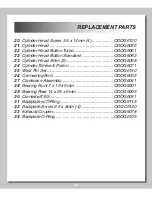
Page 14: ...linder Head Shim 2 ODOG6068 24 Cylinder Sleeve Piston ODOG6071 25 Wrist Pin Set ODOG6150 26 Connecting Rod ODOG6032 27 Crankcase Assembly ODOG6041 28 Bearing Front 7 x 19 x 6mm ODOG6001 29 Bearing Rea...

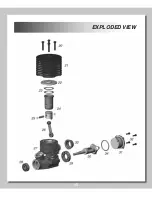
Page 15: ...15 EXPLODED VIEW...
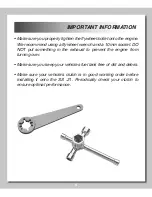
Page 16: ...of purchase and we must see it before we can honor the warranty Repair service is available anytime You can have your engine repaired for a small charge by the experts at O Donnell s authorized repair...

Reviews: