background image

Input Switch Controls


Note: 
<STX> denotes Start of Text (0x2) 
<ETX> denotes End of Text (0x3) 


Basic Quick Start: 
Use the remote control to select the Display that you wish to control 
followed by the Input (DVD, Settop) that you wish to watch. 


For example: 
-Pressing Display B, “2” will switch Input 2 to HDMI Out B. 
 
-To connect DIPLAY A to IN1 and DISPLAY B to IN3 you simply follow 
this sequence 


Step 1) Display A, 1 (this will set Display A to Input 1) 


Step 2) Display B, 3 (this will set Display B to Input 3) 


Here are some more examples: 
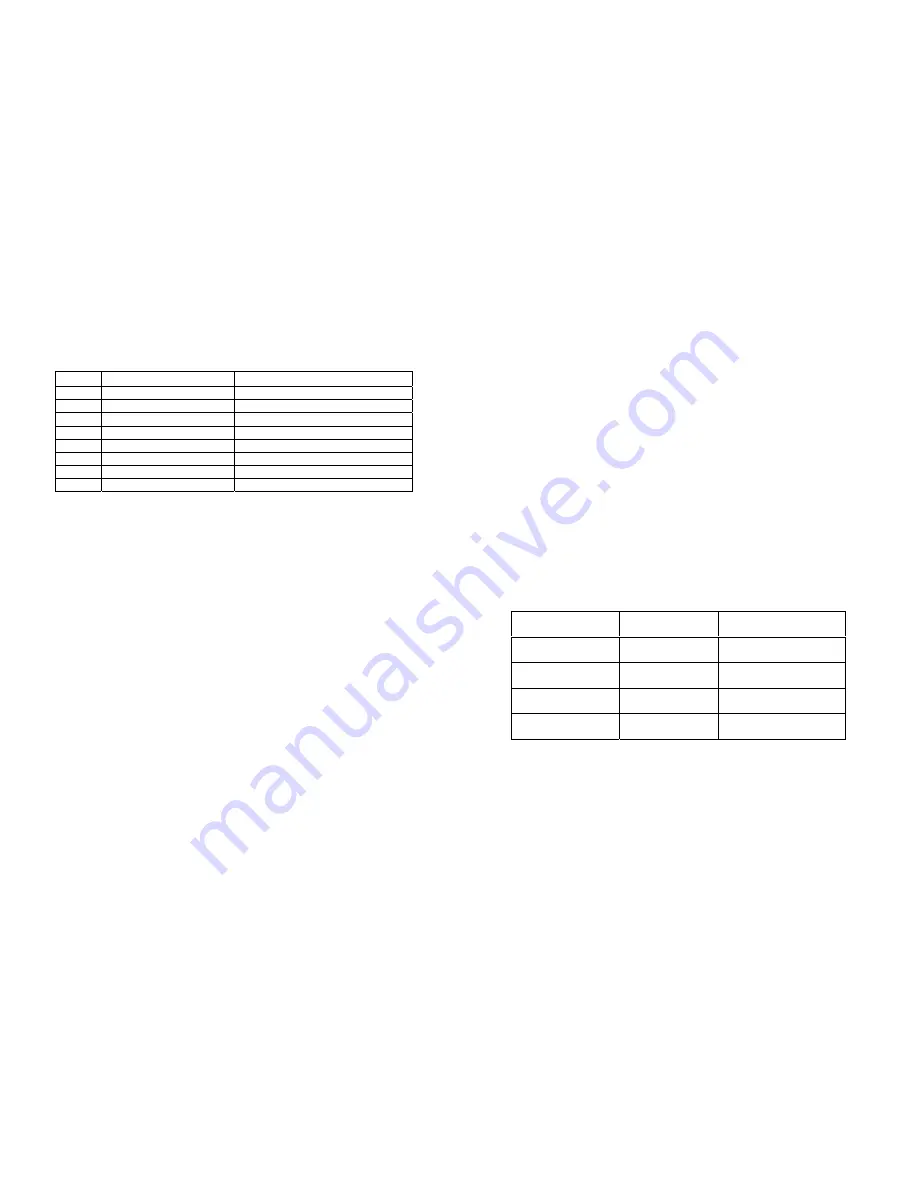


Input ASCII 

Function 

Selection 

A-1 

<STX>211<ETX> 

Select OUT A to Input port 1 

A-2 

<STX>212<ETX> 

Select OUT A to Input port 2 

A-3 

<STX>213<ETX> 

Select OUT A to Input port 3 

A-4 

<STX>214<ETX> 

Select OUT A to Input port 4 

B-1 

<STX>221<ETX> 

Select OUT B to Input port 1 

B-2 

<STX>222<ETX> 

Select OUT B to Input port 2 

B-3 

<STX>223<ETX> 

Select OUT B to Input port 3 

B-4 

<STX>224<ETX> 

Select OUT B to Input port 4 

Output Selection 

(Step 1) 

Input Selection 

(Step2) 

Result 

DISPLAY A 

“2” 

Display A switches to 
Input 2 

  DISPLAY  B 

“1” 

Display B switches to 
 Input 1 

DISPLAY A 

“+” 

Display A increments to 
next available Input  

DISPLAY B 

“-” 

Display B decrements 
to next available Input 

Summary of Contents for HDMX42-V1.3

Page 1: ...Dimension 12 08 x 4 1 x 1 67 inch 306 9 x 10⁴ 2 x 42 3mm DC adapter included 5VDC 2 5A Rackmount capable 1RU Rack mounts included Remote control IR Infrared discrete code For Questions and support Email info octavainc com URL www octavainc com Copyright 2010 Octava Inc All rights reserved HDMI the HDMI logo and High Definition Multimedia Interface are trademarks or registered trademarks of HDMI Li...

Page 2: ...ion 3 Features 4 Clear EYETM 5 Smart ScanTM 6 Installation 7 Remote Control Guide 8 Configuring Smart ScanTM 9 Short Cuts 10 RS232 Controls 11 EDID Configuration 12 Changing EDID mode 13 1 RU Rackmount 14 Disabling Enabling IR Remote Control Receiver 1 ...

Page 3: ...isplays You can create Picture By Picture or even have the SAME picture on both HD screens for the ultimate in HD viewing experience and flexibility The Octava 4x2 HDMI Matrix is Full 1080P V1 3 compatible An internal digital audio processor processes HDMI audio and converts to Optical Digital Audio Ouput for integration with your surround sound audio system Our proprietary Clear EYETM transmissio...

Page 4: ...ions Smart ScanTM Octava s HDMI switch with Smart ScanTM saves you the hassle of fumbling with multiple remote controls Simply power on the HDMI source you want to view and the HDMI switch will automatically switch to the correct port If no HDMI sources are on then the switch will go into standby mode Installation 1 Connect the Monitor to the HDMI OUT A 2 Connect the second monitor projector to HD...

Page 5: ...wn See page 10 for other EDID modes 5 Reset Power to the Matrix by disconnecting the power and reconnecting power 6 The LED will now indicate the EDID Mode that you will program mode 2 shown LED 2 will flash flashed Switch Number 1 2 3 4 Name Smart Scan Switch EDID switch EDID switch Programming LOCK switch Function Enable disable Smart Scan EDID MODE select EDID MODE select Programming LOCK Down ...

Page 6: ...OFF the LED light Turns ON OFF the HDMI switch Other Not used Mode Video Audio Description Switch settings 1 480I 720I P 1080I P PCM Bitstream Dolby Digital DTS Default Mode 2 480I 720I P 1080I P Reads EDID of all monitors and sets to Video min Resolution of displays connected PCM Bitstream Dolby Digital Dolby Tru HD DTS DTS Master Audio Read EDID from Monitor and AV receiver connected and set AUD...

Page 7: ...Input 3 Here are some more examples Input ASCII Function Selection A 1 STX 211 ETX Select OUT A to Input port 1 A 2 STX 212 ETX Select OUT A to Input port 2 A 3 STX 213 ETX Select OUT A to Input port 3 A 4 STX 214 ETX Select OUT A to Input port 4 B 1 STX 221 ETX Select OUT B to Input port 1 B 2 STX 222 ETX Select OUT B to Input port 2 B 3 STX 223 ETX Select OUT B to Input port 3 B 4 STX 224 ETX Se...

Page 8: ... HD video sources between Display A and B Press or 3 4 Cycle thru all the HD picture combinations on the display s Press or Press RS232 Controls The Octava HDMI Distribution Amp can be easily integrated with 3rd Party control systems via RS232 control The following shows the control protocol Baud rate 9600 Data bits 8 Parity check None Stop bits 1 Flow Control None Protocol STX Command to Execute ...

Reviews: