background image

The unit should be serviced by qualified service personnel if:


(a) The DC power supply cord or AC adaptor has been damaged


(b) Objects or liquids have gotten into the unit


(c) The unit has been exposed to rain


(d) The unit does not operate normally or exhibits a marked change in performance; The unit has been

dropped or the cabinet is damaged.


(2) Servicing Personnel: Do not attempt to service the unit beyond that described in these operating

instructions. Refer all other servicing to authorized servicing personnel.


(3) Replacement parts: When parts need replacing ensure the servicer uses parts specified by the

manufacturer. Unauthorized substitutes may result in fire, electric shock, or other hazards.


(4) Safety check: After repairs or service, ask the servicer to perform safety checks to confirm that the unit is

in proper working condition.

Damage requiring service:

PRODUCT SERVICE

 Always follow basic safety precautions to reduce the risk of fire, electrical shock and

injury to persons.

 To prevent fire or shock hazard, do not expose the unit to rain, moisture or install this

product near water.

 Never spill liquid of any kind on or into this product.

 Never push an object of any kind into this product through any openings or empty slots

in the unit, as you may damage parts inside the unit.

 Do not attach the power supply cabling to building surfaces.

 Use only the supplied power supply unit (PSU). Do not use the PSU if it is damaged.

 Do not allow anything to rest on the power cabling or allow any weight to be placed

upon it or any person walk on it.

 To protect the unit from overheating, do not block any vents or openings in the unit

housing that provide ventilation and allow for sufficient space for air to circulate around

the unit

Please read all instructions before attempting to unpack, install or operate this equipment

and before connecting the power supply.

Please keep the following in mind as you unpack and install the unit:

SAFETY PRECAUTIONS

812 Kings Highway | Saugerties, NY 12477 | 845-246-7500 | www.oceanmatrix.com

100% Employee Owned Division of Tower Products Incorporated

WARRANTY

1 Year

Summary of Contents for OMX-07MXMX0001

Page 1: ...OMX 07MXMX0001 Mixed Input Type C VGA HDMI 2 0 HDBaseT Switch...

Page 2: ...IR Routing RS232 TCP IP PC Tool Control Supports POC Receiver Powered by HDBaseT Switch The Ocean Matrix OMX 07MXMX0001 is a 4 port HDBaseT switch that allows switching between four sources 1x Type C...

Page 3: ...TL Bandwidth 18Gbit s Video Formats Supported 4K 60Hz YUV4 4 4 4k 30Hz 1080P 1080i 720P HDCP Compliance HDCP 2 2 HDCP 1 4 Output Video HDMI 2 0 and HDMI 1 4 HDBaseT and HDMI Audio Formats Supported PC...

Page 4: ...Switch left switch for 48V mode middle for Mic mode and right for line mode analog PCM2 0 audio embedded Video Input Type C 1 usb c in PC 2 VGA in HDMI 3 HDMI 4 Video Output HDMI HDBT POC HDBT out con...

Page 5: ...Connection Diagram...

Page 6: ...Operation Controls and Functions 4 6 7 HDMI Out 1 HDMI Out 2 IR Out IR In DC 12 24V Input Factory Use Only CAT5e 6 RS232 1 2 3 4 5 6 7 8 3 1 8 5 Receiver 2...

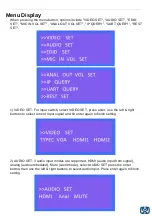
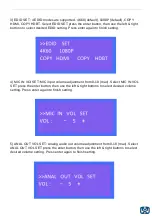
Page 7: ...itch select VIDEO SET press enter use the left right buttons to select current input signal and hit enter again to finish setting 2 AUDIO SET 3 audio input modes are supported HDMI audio input from si...

Page 8: ...4 MIC IN VOl SET MIC input volume adjustment from 0 10 max Select MIC IN VOL SET press the enter button then use the left right buttons to select desired volume setting Press enter again to finish se...

Page 9: ...lect desired DHCP status setting and press enter to finish setting 7 UART QUERY The device supports the following baudrates 9600 19200 38400 57600 and 115200 default To check current baudrate select U...

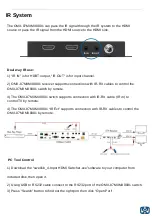
Page 10: ...ts connection with IR RX cables to control the OMX 07MXMX0001 by remote The OMX 07MXMX0001 can pass the IR signal through the IR system to the HDMI source or pass the IR signal from the HDMI source to...

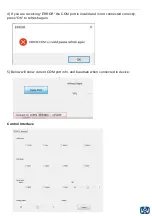
Page 11: ...swe01b_4 Input HDMI Switcher exe software in RS232 INFO select correct port communication port and baud should be same to baudrate in UART QUERY for connection 2 Click Search to refresh communication...

Page 12: ...f you are receiving ERROR the COM port is invalid and is not connected correctly press OK to refresh again Control Interface 5 Below will show current COM port info and baudrate when connected to devi...

Page 13: ...he current volume Please note you can only set the MIC VOL when choosing Analog for audio input 5 Analog Output VOL control the number 5 shows the current volume Please note you can not set VOL when a...

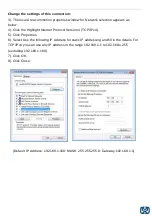
Page 14: ...the IP address of your PC 1 Connect the Ethernet port of HDBaseT switch to the Ethernet port on PC by a straight pin to pin cable with RJ45 connectors 2 Configure your PC as follows Click Start Contr...

Page 15: ...Internet Protocol Version 4 TCP IPv4 5 Click Properties 6 Select Use the following IP Address for static IP addressing and fill in the details For TCP IPv4 you can use any IP address in the range 192...

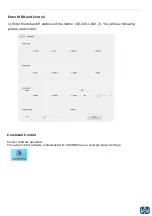
Page 16: ...er the default IP address of the matrix 192 168 1 168 2 You will see following picture and control Control software operation The serial control software is illustrated with SSCOM32 as an example Basi...

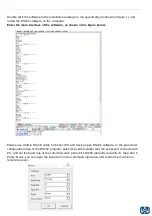
Page 17: ...e below Please use USB to RS232 cable to connect PC and device open RS232 software In the parameter configuration area of the RS232 program select the serial number that the serial port connects with...

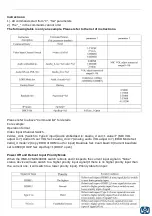
Page 18: ...MIC VOL adjust to 7 Audio IIS out VOL Set audio_d iis 7 Analog audio VOL adjust to 7 EDID Mode Set edid_d mode 2 Copy EDID of HDMI out for input Baudrate Set uart baud 0 Current baudrate set is 9600 D...

Page 19: ...stall software UART_ISP exe on PC 2 Connect unit to PC with USB cable from micro USB port click UART_ISP exe software REFRESH and choose correct COM port that connect to product and baudrate 115200 de...

Page 20: ...15200 default The baud rate setting is consistent with the host baud rate 2 Type in F0 01 in PORT and choose update program in PATH then click UPDATA wait for update until it prompt Succeed informatio...

Page 21: ...ical shock and injury to persons To prevent fire or shock hazard do not expose the unit to rain moisture or install this product near water Never spill liquid of any kind on or into this product Never...

Reviews: