


- 3 -
Step #3
continued
#2:
Slide two Handrails up through
the bottom of the Platform using the
openings nearest to the tabs.
#3:
Stand up the assembly and us-
ing a rubber mallet tap the Platform
down until seated on the lugs on
the Side Rails. IT MAY REQUIRE
SEVERAL HARD BLOWS WITH A
RUBBER MALLET TO SEAT THE
PLATFORM ALL THE WAY DOWN
ONTO LUGS.
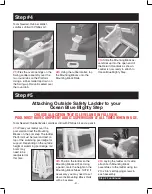
#4:
Laying the
assembly on its
side, insert the
Return Hand-
rails through the
bottom of the
remaining holes
in the Platform
until seated on the lugs.
#5:
Using two #10 x 3/4” self-tap-
ping screws, connect the Handrails
together by using one screw on
the outside and one screw on the
inside. Repeat for the remaining
handrails.
#6:
Using the rubber mallet, attach
the fixed ladder tread to the bottom
of the ladder as shown. NOTE: The
small groove should face the inside
of the ladder.


