background image

7.3.4.3 Replacing the transfer corotron (torn wire) (pinfed)

A29246-X20-X-4-7680 / fa702_pinfed.fm

277

Install new transfer corotron

7.3.4.8 Complete corotron replacement >>> page 290

Important

Observe the safety directives before replacing corotrons (

see section 7.3.4 Replacing 

corotrons, page 269)

.

Proceed as follows:

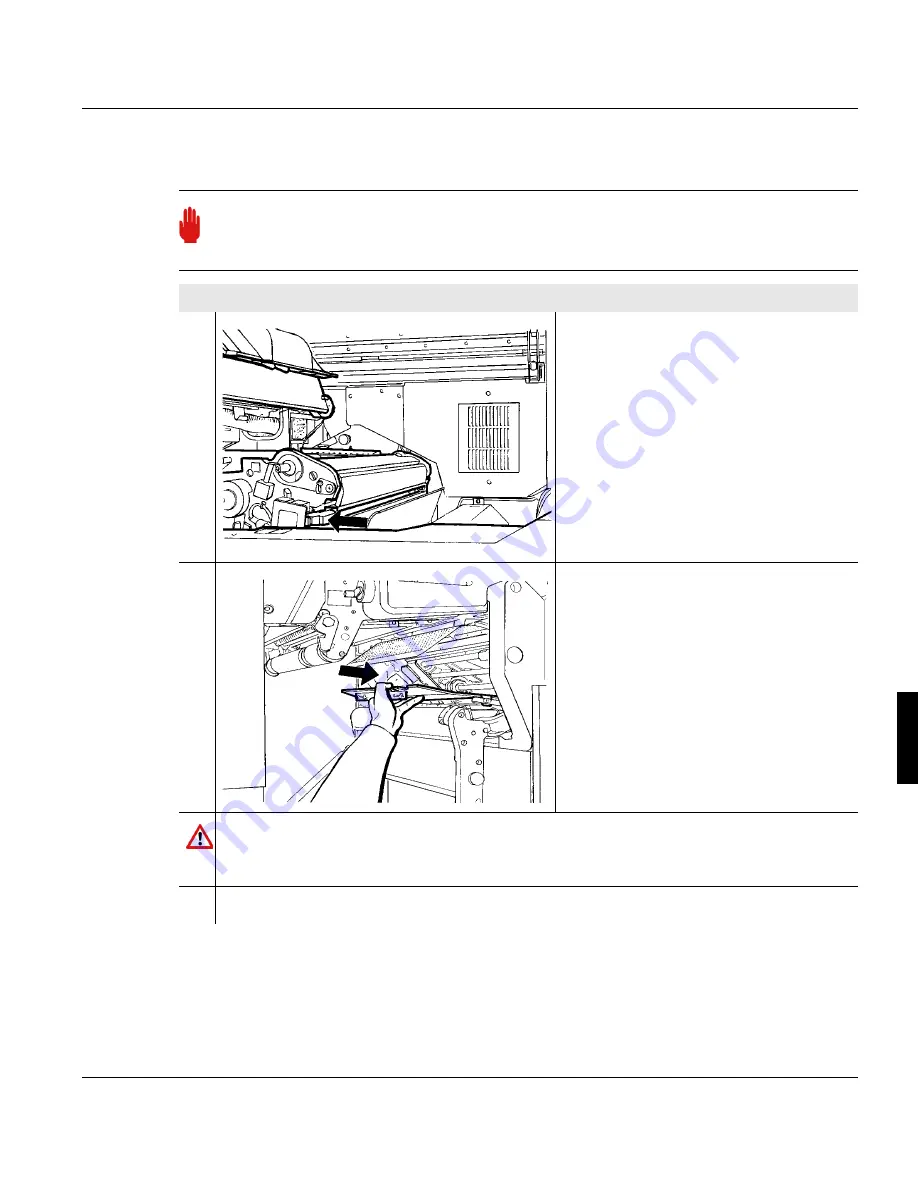
1.

Push in new corotron cartridge until the 
spring engages.

2.

Swivel down the paper transporter by 
the handle to the stop point and hold 
firmly. At the same time, raise the 
locking lever with your thumb to the 
point where it jumps back to its exit 
position.

Caution

Danger of pinching when swiveling the paper transporter back.

Always swivel the paper transporter back slowly and carefully.

3.

Swivel the paper transporter back again.

Summary of Contents for VarioStream 7000 SINGLE

Page 1: ...Oc Oc Operating Manual Oc VarioStream 7000 SINGLE Pinfed...

Page 2: ...Printing Systems GmbH 2004 2005 The product names Oc VarioStream Oc Web Buffer 9000 Oc VarioPrint and Oc CustomTone are subject to trademark All rights reserved including rights of translation reprint...

Page 3: ...system documentation 5 Operating the printing system 2 Safety 3 Description of the printing system 4 Operator panel 6 Cleaning the printing system 8 Correcting faults 7 Replacing consumables and expe...

Page 4: ......

Page 5: ...1 8 Statutory requirements 23 2 Safety 25 2 1 Overview 25 2 2 Intended Purpose 26 2 3 Operating and service clearance areas 27 2 4 Flagging of safety directives 28 2 5 Warning and Information signs 29...

Page 6: ...ements 50 3 3 1 Operator panel on paper transporter 50 3 3 2 Stacker operator panel 51 3 4 Paper specifications 55 3 4 1 General information 55 3 4 2 Paper types 55 3 4 3 Paper handling 56 3 5 Paper f...

Page 7: ...106 5 4 2 Manual paper insertion after a paper jam 112 5 5 Setting the external paper feed lever 120 5 6 Settings when changing paper pinfed 121 5 6 1 Settings on paper transporter 121 5 6 1 1 Setting...

Page 8: ...179 6 4 Cleaning plastic strips 188 6 5 Cleaning the fuser station 191 6 6 Cleaning the soft fuser roller 199 6 7 Cleaning the developer station 203 6 8 Cleaning sensors 207 6 8 1 Cleaning the toner m...

Page 9: ...ing the cleaning belt 297 7 3 7 Replacing the heater 302 7 3 8 Replacing the fuser roller 312 7 3 9 Replacing the pressure roller 320 7 3 10 Replacing the waste collector 326 7 3 11 Replacing the fine...

Page 10: ...rioStream 7450 VarioStream 7550 VarioStream 7650 362 Expendables for VarioStream 7450 CX VarioStream 7550 CX VarioStream 7650 CX 364 Cleaning materials and equipment 365 Technical data 367 Print speed...

Page 11: ...strictly observed Each section is divided into small easy to understand subject areas The beginning of each section contains an overview to help you quickly find the precise information you are lookin...

Page 12: ...aning the printing system explains the intervals to be followed for cleaning the different assemblies Section 7 Replacing consumables and expendables describes in detail all steps required to replace...

Page 13: ...Index see section 1 3 2 Index page 15 Search see section 1 3 3 Search page 16 When the navigation area is hidden there is more space available to view the help topics switches between the last help to...

Page 14: ...lp is divided into different main groups General VarioPrint 5000 or VarioStream 9000 or VarioStream 7000 Paper Path Manager Paper post processing devices if available In the Contents tab you can show...

Page 15: ...m 15 1 3 2 Index The Index tab provides quick access to the required information You can also search directly for a specific word within index entries Example Proceed as follows 1 Enter the text into...

Page 16: ...th the title of the corresponding help topic and are sorted by level of matches and the frequency in which the word appears in the help topic e g The circle in the first column indicates the degree of...

Page 17: ...all Menus Operating elements in menus Error messages and warnings If necessary all the requirements for a setting are also listed in the context sensitive help system Specified standard settings and v...

Page 18: ...1 3 4 Direct help 18 A29246 X20 X 4 7680 all102 fm 2 Press the F1 key The Direct Help is opened e g Proceed as follows 2 of 2...

Page 19: ...degree of danger Symbol Meaning Menu Sample The name of a button or menu on the operator panel is enclosed in angle brackets SAMPLE button Mechanical buttons are denoted in uppercase letters This symb...

Page 20: ...nents that are directly rele vant to the immediate context Arrows denote the positions where you have to perform an action or observe something in particular The color of the arrows denotes the type o...

Page 21: ...1 5 Symbols in diagrams and illustrations A29246 X20 X 4 7680 all102 fm 21 White arrow Note arrow An action should be performed in this area e g Symbol Meaning...

Page 22: ...ating manual 1 7 Manufacturer of the printing system The printing system was manufactured by Oc Printing Systems GmbH Postfach 1260 85581 Poing Germany Title Order number Safety Information on Oc Prin...

Page 23: ...strations and descriptions in this documentation cannot give rise to any claims for modifications or additions to printing sys tems that have already been shipped and accepted No liability is accepted...

Page 24: ...1 8 Statutory requirements 24 A29246 X20 X 4 7680 all103 fm...

Page 25: ...llowing topics 2 2 Intended Purpose page 26 2 3 Operating and service clearance areas page 27 2 4 Flagging of safety directives page 28 2 5 Warning and Information signs page 29 2 6 Accident and damag...

Page 26: ...ded solely for printing materials that comply with the paper specifications see section 1 6 Other documents page 22 The printing system may only be used with the recommended consumables see section Co...

Page 27: ...3 Operating and service clearance areas The operating and service clearance areas for the printing system depicted in the following diagram should not be obstructed in any way Dotted lines additional...

Page 28: ...ee of danger Example of a safety directive Alert word Type and or source of danger and consequences if the safety guideline is not observed Instructions on avoiding danger Caution Warns against danger...

Page 29: ...d long hair or loosely hanging items of clothing and jewelry e g ties necklaces belt ends can be crushed trapped or pulled into the printing system by the rotat ing mechanism in these areas Warning Ho...

Page 30: ...ouch the PC drum on the inside When working with the photoconductor drum only hold it on the inside Disposal The symbol the crossed out wheeled bin indicates that at the end of life of the equipment s...

Page 31: ...n instructed or commissioned by the agent to operate the printing system The requirements for operators are They are familiar with the contents of the documen tation They are aware of the potential da...

Page 32: ...2 1 Operator Only operators key operators and service personnel may operate the printing system The printing system must not be operated by persons under the influence of alcohol or drugs or by perso...

Page 33: ...l doors trims flaps and covers closed while the printing system is in operation This ensures that limit values for radio interference suppression are not exceeded Noise emission is also minimized 2 6...

Page 34: ...learance areas page 27 During print operation the fuser station in the printing system is very hot up to approx 230 C 446 F Always observe the cooling off periods before beginning work in the area of...

Page 35: ...lue without a smoke detector should be installed above the fuser module In very rare cases paper jammed in the fuser module could be damaged by the infrared fusing to the extent that smoke escapes How...

Page 36: ...N from a remote operator panel during repair work 2 6 6 Fire Observe the following instructions Fire in the printing system can cause toxic gaseous emissions Selfcontained breathing apparatus must be...

Page 37: ...nd flakes of coating for collection by ser vice or the contracted shipping company Keep the carton out of the reach of children Wash your hands afterwards 2 7 Safety regulations and standards The prin...

Page 38: ...1 the printing system should only be used on premises that have a network with a continuous current carrying capacity of 100 A per phase or are supplied by a distribution network of 400 230 V The agen...

Page 39: ...of the results of device inspections as per 23 Proof of these inspec tions as per 23 par 1 and 2 can be provided e g by entering the inspection results in an inspection log by maintaining a file inde...

Page 40: ...2 7 2 Accident prevention regulations for the replacement cart for developer stations optional 40 A29246 X20 X 4 7680 all203 fm...

Page 41: ...s paper handling and toner bottle identification You will find information on the following topics 3 2 Device overview page 41 3 3 Operating elements page 50 3 4 Paper specifications page 55 3 5 Paper...

Page 42: ...3 2 1 Doors and covers 42 A29246 X20 X 4 7680 fa301 fm 3 2 1 Doors and covers Front view Side door of fuser station Front door of fuser station Left door Right door...

Page 43: ...3 2 1 Doors and covers A29246 X20 X 4 7680 fa301 fm 43 Front door of fuser station Cover hood Left door Right door...

Page 44: ...3 2 1 Doors and covers 44 A29246 X20 X 4 7680 fa301 fm Rear view Left door Right door Center door...

Page 45: ...3 2 2 Internal view A29246 X20 X 4 7680 fa301 fm 45 3 2 2 Internal view Front side 1 2 3 4 6 7 9 10 11 12 5 8 13 16 14 15 17 18 19 20...

Page 46: ...Paper transporter 6 Cover hood 7 Transfer corotron cartridge 8 Photoconductor drum 9 Discharge corotron cartridge 10 Cleaning brush 11 Operator panel on paper transporter 12 Touchscreen operator pane...

Page 47: ...Back left door 2 Fuser oil container 3 Back center door 4 Fuser station 5 Back right door 6 Container for toner supply bottle 7 Container for fine filter 8 Toner dust indicator 9 Container for waste...

Page 48: ...er type is identified toner is sucked from the toner bottle into the developer station toner boxes To prevent soiling of the developer stations and damage to the printing system the printing process i...

Page 49: ...l in menu Replace consumables Toner bottle identification e g Display Description Toner Displays the ID of the toner used The message unknown indicates that the toner bottle is not equipped with a tra...

Page 50: ...paper web at print speed while the key is pressed The paper web is not printed Requirement This function can only be executed in Stop status ADVF ADVance Forward moves the paper slowly forwards while...

Page 51: ...3 3 2 Stacker operator panel A29246 X20 X 4 7680 fa301 fm 51 3 3 2 Stacker operator panel The stacker is only available as an option for the printing system 1 Stacker operator panel 2 Stacker 2 1...

Page 52: ...control are ready 2 EJECT moves the paper web at print speed while the key is pressed Depending on how long this key is pressed single or several pages can be advanced The yellow NPRO key light and th...

Page 53: ...h improves stacker behavior even for large stack heights The associated indicator lamp goes out 5 6 Raises and or lowers the stacker top Pressing the key again before the end position is reached stops...

Page 54: ...s present when the READY key is pressed 10 EJECT The yellow indicator lamp lights up while the paper is being advanced after pressing the EJECT or NPRO keys 11 The indicator lamp under this icon light...

Page 55: ...ent or have a detrimental effect on health Oc Printing Systems GmbH accepts no liability for such damages The printing system is designed to process a wide range of paper types However the operational...

Page 56: ...ied paper observe the following Store the paper in the supplied packaging until use Do not store paper on the floor or next to walls or in the vicinity of water pipes radiators ventilators windows sun...

Page 57: ...er feed options A29246 X20 X 4 7680 fa301 fm 57 3 5 Paper feed options 1 Photoconductor drum 2 LED print head 3 External paper feed 4 Paper feed from behind 5 Internal input tray 6 Paper feed from the...

Page 58: ...3 5 Paper feed options 58 A29246 X20 X 4 7680 fa301 fm...

Page 59: ...following topics 4 2 Operator panel description page 60 4 3 Using the operator panel page 80 Note Detailed information on all menus and operating elements is also available directly in the operator pa...

Page 60: ...29246 X20 X 4 7680 fa400 fm 4 2 Operator panel description The operator panel is divided into the following areas 1 see section 4 2 1 Toolbar page 61 2 see section 4 2 2 Menu tree page 71 3 see sectio...

Page 61: ...cess important functions in the printing system quickly and to switch directly to frequently used menus 1 see section 4 2 1 1 Buttons and displays in the left hand area page 62 2 see section 4 2 1 2 C...

Page 62: ...from Stop or Error status to operational status Requirements No errors present Controller and system control are ready switches the printing system to the Stop status or cancels current function Non P...

Page 63: ...from the host Indicates that the controller is performing a restart If this message is displayed print data transfer from the host must be repeated as it cannot be guaranteed that the last pages were...

Page 64: ...y to print Red error Gray all other printer states The most important status displays are described below Display Function The printing system is ready to print there are no error messages Normal prin...

Page 65: ...ystem is being initialized and is not yet ready for printing The printing system is stopping to clean the corotrons The printing system is being prepared for power off A shut down setup is being writt...

Page 66: ...also been transferred The complete message is displayed on the Job Preparation tab in the Setup menu The printing system is being prepared for restart and will then be rebooted The twin printing syst...

Page 67: ...in the page buffer is erased Requirement The printing system is in Stop status Only in PCL mode and only if the printing system is in Not ready status Cancels the current print job The data in the pag...

Page 68: ...ation When there is no error message warning or information this button is hidden Clicking this button switches to the Errors and warnings menu see section 8 2 Processing messages on the operator pane...

Page 69: ...displays the current counter values and the respective limit values for all consumables and expendables in the printing system Switches to the Service ticket menu This menu displays all the data requ...

Page 70: ...and off in this menu Displays the user currently logged on Powers down the printing system if the print is confirmed This button can be operated both with the mouse and from the touchscreen Switches...

Page 71: ...n these menus 02 VarioStream You can set the relevant parameters for the VarioStream printing system in these menus FF Paper Path Manager In these menus you can get an overview of all UP3I capable dev...

Page 72: ...se Further information 4 2 2 1 Menus General page 73 4 2 2 2 Menus VarioStream page 74 4 2 2 3 Menus Paper Path Manager page 78 Note The menus displayed in the menu tree depend on the respective autho...

Page 73: ...user settings relating to the Key Operator Add user Add new users or user templates Delete user Delete users or user templates Edit user Settings for Password authorization level User rights for menus...

Page 74: ...and warning messages and information General counters Displays page counter warm up time user counters and toner types Consumables counter Displays the current counter values and the relevant limit v...

Page 75: ...uality Contrast setting Color management Settings for colors in the printing system Emulations Displays emulations buttons for job control restarting and PCL settings General Select and enter general...

Page 76: ...menus contain the parameters for C E mode Properties Set general properties for C E mode specific parameters for the EFO values for 2 up and print orientation Channel extensions Settings for specific...

Page 77: ...edure for filling the developer in the developer station Replace heater Procedure for replacing the heater Replace fine filter Procedure for replacing the fine filter Replace fuser oil bottle Procedur...

Page 78: ...4 2 2 3 Menus Paper Path Manager 78 A29246 X20 X 4 7680 fa400 fm 4 2 2 3 Menus Paper Path Manager Note You can find information on the Paper Path Manager in the printing system operator panel in Help...

Page 79: ...l menus and operating elements is also available directly in the operator panel via the context sensitive Direct Help The context sensitive Direct Help can be called up by selecting the relevant menu...

Page 80: ...or panel This section contains information on the following topics 4 3 1 Managing user settings key operator page 81 4 3 2 Managing user settings operator page 84 4 3 3 Setting parameters page 87 4 3...

Page 81: ...user can only create delete or edit users who have a lower authorization level Users with the same or a higher authorization level are not listed in the selection lists Proceed as follows 1 Click the...

Page 82: ...r and Service Any changes made to their associated user profiles will be reset when a new opera tor panel version is installed However changes to profiles of individually created us ers will be unaffe...

Page 83: ...be changed to one level below that of the person editing the level Proceed as follows 1 Click on the User Rights tab 2 Under Menus activate the checkboxes for the menus which are to be displayed for...

Page 84: ...or As an operator you can normally make the following user settings 4 3 2 1 Logging on as user and requesting the access ticket page 85 4 3 2 2 Changing password page 86 4 3 2 3 Changing language page...

Page 85: ...cess ticket a message will be displayed From users with the same authorization level the access ticket can be requested directly Proceed as follows 1 Click the General User Change user menu 2 Select t...

Page 86: ...rofile menu 2 Click on the Password tab 3 Enter the old password and then enter the new password twice The password may consist of any characters 4 Click on the following button Proceed as follows 1 C...

Page 87: ...in the Edit user menu see section 4 3 1 3 Editing users page 82 The access ticket for this operator panel is requested see section 4 3 2 1 Logging on as user and requesting the access ticket page 85...

Page 88: ...ng elements such as selection lists option fields checkboxes slide controls etc You can also enter new values in input fields via the keyboard Example Entering the paper length Proceed as follows 1 Se...

Page 89: ...her menu without applying the changed parameters the following query is displayed Button Function The parameters are applied The parameters are not applied instead the previous parameters are restored...

Page 90: ...dividual working steps must be carried out on the operator panel Column Description Status The usage period for this consumable expendable is below the warning value No action required The warning val...

Page 91: ...ghts for replacing the developer are available the access ticket for this operator field is requested the printing system is in Stop or Error status i e does not print no other change function is exec...

Page 92: ...replacement of consumables and expendables 92 A29246 X20 X 4 7680 fa405 fm Proceed as follows 1 Click on the Replace consumables Replace cleaning brush menu 2 A menu window is opened which displays a...

Page 93: ...ndicate the progress This step is currently being executed The progress display is automatically moved forward for step types and The progress display is not automatically moved forward for step type...

Page 94: ...4 7680 fa405 fm 4 Complete replacement procedure As a result the following will occur automatically the message on the operator panel is deleted the replacement of the consumable expendable is documen...

Page 95: ...ll find information on the following topics 5 2 Powering on the printing system page 96 5 3 After print stop switch the printing system back to Ready page 99 5 4 Inserting paper pinfed page 100 5 5 Se...

Page 96: ...em must be powered on before powering on the printing system Proceed as follows 1 Turn the main circuit breaker on the right narrow side upwards to Position I 2 Press the POWER ON button After pressin...

Page 97: ...s current status information is displayed on the operator panel 5 Activate the desired channel on the operator panel To do this click the following button The Channels menu is displayed To activate th...

Page 98: ...5 2 Powering on the printing system 98 A29246 X20 X 4 7680 fa501 fm 8 Click on the following button The printing system is in Ready status Proceed as follows 3 of 3...

Page 99: ...in Stop status To switch the printing system back to Ready The printing system was stopped by an error message Information on switching to ready after a stop caused by an error see section 8 2 2 Conti...

Page 100: ...sition I and the POWER ON key is activated The paper can be fed either via the internal input tray or via the external central paper feed Proceed as follows 1 Lift up cover hood 2 Open the left and ri...

Page 101: ...aced in the stacker 6 Remove paper stack from the input tray 7 If the paper changes perform the corresponding actions see section 5 6 Settings when changing paper pinfed page 121 8 Only if changing th...

Page 102: ...ert the new paper stack in the input tray so that the paper points to the right i e the first paper fold is to the left 10 Push the paper stack and the carton tightly to the front feed edge 11 Tear of...

Page 103: ...fa502_pinfed fm 103 12 Only for external paper feed Pull out the external paper feed lever and turn to the right to the stop point 13 Position the start of the paper web with the fold line to the fron...

Page 104: ..._pinfed fm 14 Only if the paper width has changed Move the right guide washer so that the paper has some space to run between the two guide washers 15 Guide the paper between the tension rollers and p...

Page 105: ...46 X20 X 4 7680 fa502_pinfed fm 105 16 Continue to push in paper by hand until a few pages are in the printing system If the paper jams open the front left door and pull the paper into the printing sy...

Page 106: ...e printing systems the preheating saddle is not heated and does not have a cover The following diagrams illustrate the printing systems with heated preheating saddles and covers Proceed as follows 1 T...

Page 107: ...4 1 Semi automatic paper insertion A29246 X20 X 4 7680 fa502_pinfed fm 107 4 Open the two lower tractor doors 5 Only for external paper feed Guide the paper through the swing as shown Proceed as follo...

Page 108: ...e first fold to the right the first page lies underneath push it into the paper transporter until the fold lies in the area of the upper tractors 7 Pull the paper web until the fold reaches the mark a...

Page 109: ...nly if changing the paper width Adjust the rear tractors with the turning knob so that the pins are in the tractor holes The paper should not be tightly tensioned 9 Close the rear tractor door 10 Swiv...

Page 110: ...nting systems without heated preheating saddle When the front edge of the paper is in front of the fuser station swivel the lever to the right The lower tractor doors are now closed 12 Only for extern...

Page 111: ...Check paper position message is displayed in the P mode in the operator panel Important In P mode in order for printing to begin on the upper page at every job start there must be a positive fold at t...

Page 112: ...aper jam 112 A29246 X20 X 4 7680 fa502_pinfed fm 5 4 2 Manual paper insertion after a paper jam Proceed as follows 1 Turn the knob to the left and push the rocker downwards 2 Open the two upper tracto...

Page 113: ...r jam A29246 X20 X 4 7680 fa502_pinfed fm 113 4 Open the two lower tractor doors 5 Lower the stacker top by pressing the key 6 Only for printing systems with heated preheating saddle Open cover above...

Page 114: ...paper in the input tray in the paper stack area or at a negative fold for an external paper feed 8 Remove paper from the entire paper path including jammed paper from the stacker and the fuser station...

Page 115: ...the first fold and with the first and second page folded up i e with the first fold to the right first page underneath push it into the paper transporter 11 Push the paper web through the paper trans...

Page 116: ...sert the paper web in the upper tractors in such a way that the pins protrude from the paper tractor holes Close both tractor doors 13 Swivel the rocker upwards The paper is now automatically advanced...

Page 117: ...on after a paper jam A29246 X20 X 4 7680 fa502_pinfed fm 117 15 Place the lever for the distance of the tension rollers in the OFF position 16 Push the paper web through the stacker top and place in s...

Page 118: ...cleaning phase is now performed The message Cleaning cycle underway is displayed in the operator panel 20 When the message Cleaning cycle underway disappears adjust a fold perforation with the ADVF an...

Page 119: ...fa502_pinfed fm 119 21 Click on the following button The Check paper position message is displayed in the P mode in the operator panel 22 Click on the following button again 23 Close the doors on the...

Page 120: ...20o during printing In general the following applies For heavy papers the lever must be turned farther to the left than for light papers The following diagrams illustrate the relationship between the...

Page 121: ...t GAP lever to the appropriate position for the paper or printing media used Position NORMAL Normal position for paper weight 140 g m2 Position OFF Paper weight 140 g m2 labelpaper plastic cards Proce...

Page 122: ...gs on the stacker Proceed as follows 1 Set the lever for the contact force of the tension rollers to NORMAL The MAX position can be better for very heavy special papers The MIN position can be better...

Page 123: ...vide a better stacking result 3 Position the lever for the distance of the tension rollers to NORMAL The MAX position can be better for very heavy special papers e g label papers The MIN position can...

Page 124: ...5 6 2 2 Settings on the stacker 124 A29246 X20 X 4 7680 fa505 fm 4 Loosen the slide for setting the paper width and set to the width of the paper being used Proceed as follows 3 of 3...

Page 125: ...a predefined setup the printing system is automatically configured with the corresponding parameters for the print job Select various settings for paper change Enter the paper format length Proceed as...

Page 126: ...Dimensions 3 Under Paper length Set paper format length fold length with slide control or Enter paper format length fold length in the text field 4 Click on the following button Proceed as follows 1...

Page 127: ...tem has not yet stopped click the following button 2 On the operator panel select Menu VarioStream Configuration Paper Dimensions 3 Under Paper width Set the paper width with the slide control or Ente...

Page 128: ...r checkbox with a mouse click If using light or normal paper deactivate the Calibrator checkbox with a mouse click 4 Click on the following button Important The printing system needs a certain amount...

Page 129: ...his waiting period is too long you can instead press the EJECT key to advance blank pages for one minute Selecting fuser oil quantity Setting the paper brake Proceed as follows 1 If the printing syste...

Page 130: ...l 130 A29246 X20 X 4 7680 fa505 fm 2 On the operator panel select Menu VarioStream Configuration Printing system Paper path 3 Select the desired brake force under Paper brake 4 Click on the following...

Page 131: ...erted even when reinserting paper due to paper problems Removing a partial stack Proceed as follows 1 Click on the following button 2 Press the EJECT until the last printed page has been placed in the...

Page 132: ...fm 6 Position the rest of the paper stack in line with the fold and move the stack to the marking for the corresponding format length 7 Lower the stacker top by pressing the right key under this icon...

Page 133: ...rformed automatically Further information 5 8 1 Creating a new setup or changing a setup page 134 5 8 2 Importing a setup page 136 5 8 3 Exporting a setup page 137 Note When working with setups the pr...

Page 134: ...Proceed as follows 1 If the printing system has not yet stopped click the following button 2 On the operator panel select For universally valid print job setups VarioStream Setup menu For channel spe...

Page 135: ...5 7 Either overwrite setup under the same name not for default setup To do this Click on the following button or save setup under a new name To do this Click on the following button Enter the new name...

Page 136: ...b setups VarioStream Setup menu For channel specific setups VarioStream Setup channel A B C menu 3 Click on the following button 4 Select from where the setup is to be imported Floppy disk Transfer ar...

Page 137: ...t stopped click the following button 2 On the operator panel select For universally valid print job setups VarioStream Setup menu For channel specific setups VarioStream VarioStream menu 3 Select setu...

Page 138: ...ng toner feed page 142 5 9 2 Replacing the developer station page 145 5 9 2 1 Removing the developer station page 145 5 9 2 2 Installing the developer station page 154 5 9 1 Replacing the toner feed Y...

Page 139: ...n head is swiveled off Caution There can be a high build up of static charge when vacuuming the toner spill Always use an industrial vacuum cleaner with a grounded suction tube rubber nozzle and filte...

Page 140: ...e from the container If toner is still present in and around the container remove with a vacuum cleaner 6 Open cover Important Hoses can fall into the printing system Make sure that the hoses do not f...

Page 141: ...developer station and the air intake 8 Remove the pin and socket connector between the drain head and the toner bottle holder 9 Press back on the drain head mounting release and remove the drain head...

Page 142: ...ling toner feed Proceed as follows 1 Insert drain head into the mounting and press down until the you hear it engage 2 Reattach the pin and socket connector between the drain head and the toner bottle...

Page 143: ...to loosen the toner Important Possibility of mistaking fresh toner bottle for waste toner bottle Only refill with original sealed toner bottles secured by an intact banderole 6 Place new toner bottle...

Page 144: ...46 X20 X 4 7680 fa509 fm 9 Press locking lever of drain head down thus closing the toner bottle 10 Slowly swivel the toner bottle back into position by the handle 11 5 9 2 Replacing the developer stat...

Page 145: ...on here on the following topics 5 9 2 1 Removing the developer station page 145 5 9 2 2 Installing the developer station page 154 5 9 2 1 Removing the developer station You will find detailed informat...

Page 146: ...for removing the developer station Proceed as follows 1 Open the left and right doors at the front of the printing system 2 Open the door in front of the photoconductor drum Pull lever forward 3 Push...

Page 147: ...fa509 fm 147 5 Hold developer station by the handle and pull out approx 30 cm 6 Remove vacuum hose 7 Remove toner suction hose from toner box 8 Mount the toner suction hose and vacuum hose in the rubb...

Page 148: ...h into the printing system to the stop point 10 Removing the developer station page 148 Proceed as follows 1 Push the replacement cart towards the printing system and set the height of the support pre...

Page 149: ...nd pull backwards The replacement cart must not come away from the printing system now Caution Possibility of damage to the replacement cart Make absolutely sure that the replacement cart has engaged...

Page 150: ...handle 7 Hold the developer station at the black connection box and pull out to the next stop point Caution Danger of pinching Do not hold the developer station by the gear motor housing when you are...

Page 151: ...he same time hold the developerstation by the black contact box and pull out of the printing system until the replacement cart s locking bolt engages with the housing of the gear motor 9 Check whether...

Page 152: ...pull the replacement cart backwards Important Developer can become lumpy The developer station should not be subjected to strong heat For this reason do not put the replacement cart with the develope...

Page 153: ...he replacement cart can now no longer roll unintentionally 5 Cover developer station with the protective hood The protective hood prevents objects entering the developer station and protects the devel...

Page 154: ...Installing the developer station page 156 Final tasks for installing the developer station page 160 Preparations for installing the developer station Proceed as follows 1 Remove the protective hood a...

Page 155: ...pwards 4 Push the replacement cart with the developer station towards the printing system and set the height of the supports precisely Turn the setscrews so that the two pins are directly opposite the...

Page 156: ...ld the replacement cart by the handle and pull backwards The replacement cart must not come away from the printing system now Caution Danger of damage to the replacement cart Make absolutely sure that...

Page 157: ...Installing the developer station A29246 X20 X 4 7680 fa509 fm 157 4 Remove locking bolts from the trolley and at the same time push the developer station forwards to the stop point Proceed as follows...

Page 158: ...4 7680 fa509 fm 5 Remove the retention bolts from the printing system and at the same time hold the developer station by the handle and push into the printing system to the stop point 6 Push the leve...

Page 159: ...cking rod and remove the replacement cart from the printing system 8 Push the replacement cart to one side 9 Push the lever on both roller brakes downwards The replacement cart can now no longer roll...

Page 160: ...vacuum hose from the rubber mounting 2 Insert the toner suction hose to the stop point in the developer station 3 Push vacuum hose to the stop point on the developer station connecting pipe 4 Take th...

Page 161: ...int 7 Push in handle all the way 8 Move toner suction hose up Important The door of the photoconductor drum should close easily If not the developer station has not been pushed fully into the printing...

Page 162: ...stomTone 300 dpi 350 550 pages minute Normal quality toner MICR 300 dpi 350 550 pages minute 9 Close the photoconductor drum door Important Print problems possible Clean the toner mark sensor before y...

Page 163: ...y toner MICR High quality toner Black Normal quality toner MICR High quality toner Black Normal quality toner Black Normal quality toner CustomTone High quality toner Black Normal quality toner Black...

Page 164: ...29246 X20 X 4 7680 fa509 fm 5 10 1 Selecting a configuration Proceed as follows 1 Click on the VarioStream Configuration Printing system Conversion menu 2 The Conversion menu page opens e g Select the...

Page 165: ...tion 5 10 2 1 Start conversion page 165 5 10 2 2 Replacing the toner feed page 166 5 10 2 3 Replacing the developer station page 168 5 10 2 4 Replacing the photoconductor drum page 169 5 10 2 5 Replac...

Page 166: ...ner feed 2 Click on the the following button to start the printing system conversion to the selected configuration Proceed as follows Note Depending on the selected configuration only toner bottles pe...

Page 167: ...e window The worksteps in the list must be followed in order Detailed information on replacing the toner bottle see section 7 2 1 Replacing the toner bottle page 226 Information on the icons displayed...

Page 168: ...tion 1 The list with the worksteps for replacing the developer station is displayed in the right half of the window The worksteps in the list must be followed in order Detailed information on replacin...

Page 169: ...or installation 1 The list with the worksteps for replacing the PC drum is displayed in the right half of the window The worksteps in the list must be followed in order Detailed information on replaci...

Page 170: ...lation 1 The list with the worksteps for replacing the fuser roller is displayed in the right half of the window The worksteps in the list must be followed in order Detailed information on replacing t...

Page 171: ...e fuser roller the values entered during conversion of the printing system are applied and checked for validity This takes approx 2 minutes and cannot be cancelled Information on the icons displayed o...

Page 172: ...optional The condensation water that accumulates when using the High Temperature Kit must be collected in a suitable container Proceed as follows 1 Open the slide in unit with the condensation water...

Page 173: ...eactivate the active channel links on the operator panel To do this click the following button The Channels menu is displayed To deactivate the channel click the following button and confirm During th...

Page 174: ...tor panel click the following button and confirm Important Observe waiting period The controller requires this time to back up the data Powering off prematurely via the main circuit breaker can lead t...

Page 175: ...the toner spill Always use an industrial vacuum cleaner with a grounded suction tube rubber nozzle and filter set for fine dust For draining large quantities of toner spill such as a full bottle the...

Page 176: ...188 6 5 Cleaning the fuser station page 191 6 6 Cleaning the soft fuser roller page 199 6 7 Cleaning the developer station page 203 6 8 Cleaning sensors page 207 6 10 Cleaning the toner suction syste...

Page 177: ...n replacing consumables Oiling unit in the fuser station 6 5 Cleaning the fuser station page 191 Toner dust indicator 7 3 11 Replacing the fine filter page 330 Toner supply bin surrounding area 7 2 1...

Page 178: ...6 11 Cleaning the corotrons page 218 Cleaning the LED print head 6 12 Cleaning the LED print head page 219 Cleaning the operator panel 6 14 Cleaning the operator panel page 223 General cleaning 6 15...

Page 179: ...e an industrial vacuum cleaner with a grounded suction tube rubber nozzle and filter set for fine dust For larger quantities of toner spill e g full bottle the industrial vacuum cleaner must be explos...

Page 180: ...6 3 Cleaning the paper path 180 A29246 X20 X 4 7680 fa602_pinfed fm 5 Remove the paper stack and vacuum the stacker if it is accessible Proceed as follows...

Page 181: ...46 X20 X 4 7680 fa602_pinfed fm 181 6 Turn the knob to the left and open the rocker 7 Vacuum the paper dust and paper particles in the input tray and along the paper path 8 Swivel up the locking lever...

Page 182: ...Swivel down the paper transporter by the handle to the stop point 10 When doing so ensure that the locking lever is engaged on the conveyor 11 With the vacuum cleaner vacuum the toner dust and paper p...

Page 183: ...with your thumb to the point where it jumps back to its exit position Caution Danger of pinching when swiveling up the paper transporter In the next step swivel the paper transporter upwards slowly an...

Page 184: ...leaning the paper path 184 A29246 X20 X 4 7680 fa602_pinfed fm 16 Press the two pressure pins inwards 17 Turn the knob to the left and open the rocker 18 Remove the paper insertion plate Proceed as fo...

Page 185: ...A29246 X20 X 4 7680 fa602_pinfed fm 185 19 Affix vacuum cleaner nozzle as shown in the diagram and vacuum paper dust and confetti in the entire area 20 Reinsert the paper insertion plate 21 Close the...

Page 186: ...23 Only for printing systems with heated preheating saddle Open cover above the preheating saddle Caution Danger of burning when touching the hot preheating saddle Do not touch the hot preheating sadd...

Page 187: ...ddle Close cover above the preheating saddle again 26 Clean the two fold sensors and the associated reflectors on the stacker with a soft cloth 27 Close cover hood 28 Close the left door at the front...

Page 188: ...ic strips Proceed as follows 1 If the printing system has not yet stopped click the following button 2 Open the right door at the front of the printing system 3 Pull the lever forwards to open the doo...

Page 189: ...6 4 Cleaning plastic strips A29246 X20 X 4 7680 fa603 fm 189 5 Pull plastic strips out of the mounting 6 Clean plastic strips with a soft paper towel Proceed as follows 2 of 2...

Page 190: ...lastic strips Proceed as follows 7 Push plastic strips back into the mounting 8 Close the door in front of the photoconductor drum 9 Close the right door at the front of the printing system 10 Click t...

Page 191: ...ities of toner spill e g full bottle the industrial vacuum cleaner must be explosion proof Proceed as follows 1 If the printing system has not yet stopped click the following button 2 Open the front a...

Page 192: ...s with an open fuser station and put on heat protection gloves 6 Allow the printing system to cool down in this state for at least 30 minutes 7 Put on heat protection gloves Caution There can be a hig...

Page 193: ...the toner spill Always use an industrial vacuum cleaner with a grounded suction tube rubber nozzle and filter set for fine dust For larger quantities of toner spill e g full bottle the industrial vac...

Page 194: ...t the waste collector 13 Check the waste collector Important Do not damage the cleaning plate 14 Remove dirt from the cleaning plate with the paper cutter 15 If it is over half filled with dirt insert...

Page 195: ...oller if damaged see section 7 3 8 Replacing the fuser roller page 312 17 Only if a soft fuser roller is installed Also check whether the fuser roller is soiled with toner If so clean the fuser roller...

Page 196: ...d check visually whether visible damage such as scratches loosened coating or blistering is present on the surface Replace the pressure roller if damaged see section 7 3 9 Replacing the pressure rolle...

Page 197: ...or and lock by pressing knob 24 Wipe off traces of oil in and around the waste collector and around the stacker cover area with a paper towel or cloth 25 Swivel on oiling unit and tighten knob 26 Clos...

Page 198: ...6 5 Cleaning the fuser station 198 A29246 X20 X 4 7680 fa603 fm 28 Click the following button to switch the printing system to the Ready status Proceed as follows 8 of 8...

Page 199: ...es In the event of contact with eyes rinse eyes out with plenty of water and seek medical help Do not breathe in the cleaning agent vapors If you experience unpleasant symptoms after inhaling immediat...

Page 200: ...ly 230 oC If you touch them you may burn yourself Allow the printing system to cool down for at least 30 minutes with an open fuser station and put on heat protection gloves 5 Allow the printing syste...

Page 201: ...to the fuser roller and remove all toner residue with circular movements 10 Swivel the waste collector back into position and lock with the knob 11 Swivel on cleaning station again and tighten knob 12...

Page 202: ...6 6 Cleaning the soft fuser roller 202 A29246 X20 X 4 7680 fa603 fm 14 Click the following button to switch the printing system to the Ready status Proceed as follows 4 of 4...

Page 203: ...not yet stopped click the following button 2 Open the right door at the front of the printing system 3 Pull the lever forwards to open the door in front of the photoconductor door 4 Push the locking...

Page 204: ...0 fa603 fm 6 Turn the knob to the left to open the door in front of the developer station 7 Open the door in front of the developer station 8 Pull the vacuum hose from the toner box and hang in the ru...

Page 205: ...dust For larger quantities of toner spill e g full bottle the industrial vacuum cleaner must be explosion proof Important Do not vacuum around the developer roller as you might vacuum up developer mix...

Page 206: ...toner box until it reaches the stop point 13 Close the center and left door at the back of the printing system 14 Close the door in front of the photoconductor drum 15 Close the right door at the fron...

Page 207: ...as follows 1 If the printing system has not yet stopped click the following button 2 Remove the photoconductor drum see section 7 3 1 Replacing the photoconductor drum page 257 3 Clean the toner mark...

Page 208: ...6 8 1 Cleaning the toner mark sensor 208 A29246 X20 X 4 7680 fa603 fm...

Page 209: ...fa604_pinfed fm 209 6 9 Cleaning the paper motion sensor and mirror Proceed as follows 1 If the printing system has not yet stopped click the following button 2 Lift up cover hood 3 Open front upper t...

Page 210: ...aper motion sensor and mirror 210 A29246 X20 X 4 7680 fa604_pinfed fm 5 Close the tractor door again 6 Close cover hood 7 Click the following button to switch the printing system to the Ready status P...

Page 211: ...et stopped click the following button 2 Lift up cover hood 3 Only for printing systems with heated preheating saddle Open cover above the preheating saddle Caution The preheating saddle can be very ho...

Page 212: ...12 A29246 X20 X 4 7680 fa604_pinfed fm 5 Only for printing systems with heated preheating saddle Close cover above the preheating saddle again 6 Close cover hood 7 Click the following button to switch...

Page 213: ...ube rubber nozzle and filter set for fine dust For larger quantities of toner spill e g full bottle the industrial vacuum cleaner must be explosion proof There is a danger of slipping on toner or deve...

Page 214: ...Cleaning the toner suction system 214 A29246 X20 X 4 7680 fa605 fm 4 Move the lever upwards to swivel off the drain head 5 Remove the toner bottle from the container 6 Open cover Proceed as follows 2...

Page 215: ...unded suction tube rubber nozzle and filter set for fine dust For larger quantities of toner spill e g full bottle the industrial vacuum cleaner must be explosion proof 7 Pull the hose off the develop...

Page 216: ...toner suction system 216 A29246 X20 X 4 7680 fa605 fm 9 Stick the hose back on 10 Reinsert toner bottle in the container 11 Press locking lever of drain head down thus closing the toner bottle Proceed...

Page 217: ...X20 X 4 7680 fa605 fm 217 12 Use the handle to turn the container upwards slowly 13 Close the center door at the back of the printing system 14 Click the following button to switch the printing system...

Page 218: ...on the operator panel 3 Click on the following button to start corotron cleaning Corotron cleaning is started The corotrons are run in and then lowered again The process takes approx 1 minute Informat...

Page 219: ...the printing system page 175 Proceed as follows Important You can only carry out LED print head cleaning when in the Stop or Operator intervention necessary status 1 If the printing system has not ye...

Page 220: ...t for fine dust For larger quantities of toner spill e g full bottle the industrial vacuum cleaner must be explosion proof Before cleaning the filter please observe the other safety directives in sect...

Page 221: ...an be a high build up of static charge when vacuuming the toner spill Always use an industrial vacuum cleaner with a grounded suction tube rubber nozzle and filter set for fine dust For larger quantit...

Page 222: ...605 fm 6 Reattach the filter cover 7 Close the quick lock on the filter cover 8 Close the cover and both doors at the front of the printing system 9 Click the following button to switch the printing s...

Page 223: ...rator panel Cleaning when the printing system is shut off Cleaning during printing Proceed as follows 1 Clean screen with a moist cloth Proceed as follows 1 Click on the General Tools menu 2 Click on...

Page 224: ...be explosion proof Proceed as follows 1 Vacuum clean the floor around the printing system Caution Fluid can get inside the printing system This could cause irreparable damage to the electrical and me...

Page 225: ...25 7 Replacing consumables and expendables 7 1 Overview This section describes in detail all the steps required to replace consumables or expendables You will find information on the following topics...

Page 226: ...eplacing the developer page 238 Fuser oil bottle 7 2 5 Replacing the fuser oil bottle page 252 Caution Do not allow toner to get into eyes In the event of contact with eyes rinse eyes out with plenty...

Page 227: ...iginal sealed toner bottles secured by an intact seal Do not re use toner Always store toner in a cool 35 o C dry and well ventilated room Never expose toner to direct heat sunlight heaters etc Cautio...

Page 228: ...tle replacement Information on the icons displayed on the operator panel under Worksteps see section Icons page 93 4 Open the center door at the back of the printing system 5 Swivel toner bottle holde...

Page 229: ...e container If toner is still present in and around the container remove with a vacuum cleaner Important Keep the empty toner bottle This is used as the replacement for a full waste toner bottle Cauti...

Page 230: ...01 fm 2 Place new toner bottle in the toner bottle holder 3 Wait a few seconds until the toner has settled in the toner bottle 4 Remove the lid of the toner bottle 5 Press locking lever of drain head...

Page 231: ...ttle is recorded in the Consumables history menu and the consumable counter is reset The consumable counter is not reset 9 Click the following button on the operator panel to complete toner bottle rep...

Page 232: ...n to start filling the toner box The toner is fed into the toner box Information on the icons displayed on the operator panel under Worksteps see section Icons page 93 4 Click the following button on...

Page 233: ...ale toner Avoid accumulation of dust If after inhaling toner you experience symptoms such as nausea headaches or dizziness immediately go out into the fresh air Do not spill toner You can slip on spil...

Page 234: ...mables Replace waste toner bottle 3 Click on the following button to start the waste toner bottle replacement Information on the icons displayed on the operator panel under Worksteps see section Icons...

Page 235: ...build up of static charge when vacuuming the toner spill Always use an industrial vacuum cleaner with a grounded suction tube rubber nozzle and filter set for fine dust For larger quantities of toner...

Page 236: ...le see section 7 2 3 Replacing the waste toner bottle page 233 Proceed as follows 1 Take an empty toner bottle and insert into the waste toner bottle holder so that its handle is to the right 2 Remove...

Page 237: ...acement All printing system assemblies are checked duration approx 2 3 minutes before the printing system is switched to the Ready status In both cases the message on the operator panel is automatical...

Page 238: ...ly go out into the fresh air Do not spill developer There is a danger of slipping on spilled developer Clean up developer spill immediately Always use an industrial vacuum cleaner with a grounded suct...

Page 239: ...consumables Replace developer 3 Click on the following button to start the developer replacement Information on the icons displayed on the operator panel under Worksteps see section Icons page 93 4 O...

Page 240: ...ft and swivel off the fan from the developer station 8 Pull out the lid from the developer station vacuum opening 9 Remove vacuum hose from the toner box and insert in developer station vacuum opening...

Page 241: ...n the following button to start the developer replacement The developer is automatically extracted 12 Repeat as needed Click the following button on the operator panel If the developer has already bee...

Page 242: ...246 X20 X 4 7680 fa701 fm 14 Remove the vacuum hose from the vacuum opening and place in the toner box 15 Close the vacuum opening of the developer station with the lid 16 Set rotary switch to the PRI...

Page 243: ...printing system is switched to the Ready status 18 Swivel on the fan to the developer station and turn the turning knob to the right 19 Close the left and center door at the back of the printing syst...

Page 244: ...e already been carried out then continue with step 7 page 245 Proceed as follows 1 If the printing system has not yet stopped click the following button 2 On the operator panel select Menu Replace con...

Page 245: ...fm 245 5 Set rotary switch to PRINT 6 Turn the turning knob to the left and swivel off the fan from the developer station Important Only use an original sealed developer bottle for filling 7 Remove l...

Page 246: ...6 A29246 X20 X 4 7680 fa701 fm 8 Place developer bottle in the cage 9 Insert the cast in hook of the funnel into the horizontal gap of the cage 10 Place funnel together with the hose on the developer...

Page 247: ...0 X 4 7680 fa701 fm 247 11 Use the metal clamp on the opposite side to fasten the funnel to the cage 12 Open lid on the developer station refill pipe and insert the hose 13 Ensure that the hose is aff...

Page 248: ...g system frame Make sure that there is no bend in the hose 15 Shake bottle carefully 16 In the dialog window of the operator panel still displayed confirm the filling process by pressing the Refill bu...

Page 249: ...pletely empty If the developer bottle was not completely emptied restart process Do this by clicking on the following button in the operator panel If the developer bottle has already been completely e...

Page 250: ...er door at the back of the printing system 23 Click the following button on the operator panel to complete refilling the developer All printing system assemblies are checked duration approx 2 3 minute...

Page 251: ...fa701 fm 251 Important Only when using CustomTone After a print job is started a procedure for mixing the developer begins automatically This procedure takes approx 5 minutes The print job will then...

Page 252: ...edical help Avoid contact with the skin In the event of contact with the skin wash fuser oil off with plenty of water Do not spill fuser oil There is a danger of slipping on spilled fuser oil If you d...

Page 253: ...nd ready the fuser oil bottle 6 Swivel out fuser oil bottle holder with the empty fuser oil bottle 7 Open flap and remove oil suction tube from the fuser oil bottle Wipe away any residual oil from the...

Page 254: ...ttle page 252 Proceed as follows 1 Insert the new fuser oil container so that the handle points outwards 2 Wipe away any spilled oil with a paper towel Important The hose can bend The fuser oil cannot...

Page 255: ...lete filling the developer at the operator panel All printing system assemblies are checked duration approx 2 3 minutes before the printing system is switched to the Ready status In both cases the mes...

Page 256: ...r corotron 7 3 4 2 Replacing the transfer corotron 1 cartridge pinfed page 271 Transfer corotron wire is torn 7 3 4 2 Replacing the transfer corotron 1 cartridge pinfed page 271 Replace charge corotro...

Page 257: ...m touching the photoconductor drum If you touch the drum wash skin thoroughly with soap and water Keep photoconductor drums out of the reach of children Important If pieces of the photoconductor drum...

Page 258: ...button 2 On the operator panel select Menu Replace consumables Replace photoconductor drum 3 Click on the following button to start the PC drum replacement Information on the icons displayed on the op...

Page 259: ...nd the photoconductor drum surface may result in skin ailments Wear the gloves provided with the photoconductor drum 8 Wear the protective gloves provided with the photoconductor drum Caution The surf...

Page 260: ...kly pull out of the printing system in a horizontal direction 10 Put down photoconductor drum 11 Clean the toner mark sensor left with a soft cloth Clean the lower charge sensor with a clean soft brus...

Page 261: ...e handle frame and carefully remove from the packaging 2 Note the DRUM TYPE number specified on the photoconductor drum packaging Caution Danger of damage to the cleaning blade When inserting the phot...

Page 262: ...or example the process is documented in the Consumables history menu Status display in the Consumables history 11 Click the following button on the operator panel to complete PC drum replacement All p...

Page 263: ...d 1 If the printing system has not yet stopped click the following button 2 Select the Replace consumables Run in photoconductor drum menu on the operator panel 3 Click the following button to run in...

Page 264: ...t with the skin wash toner off with plenty of water Do not inhale toner Avoid accumulation of dust If after inhaling toner you experience symptoms such as nausea headaches or dizziness immediately go...

Page 265: ...over and both doors at the front of the printing system Important Put on the protective gloves provided in the packaging Do not touch the exterior of the cleaning brush hold exclusively by the interio...

Page 266: ...fa701 fm 8 Loosen both knurled screws of the brush cover cap 9 Slowly remove cover cap with the cleaning brush sitting on the insert taper and put to the side 10 If the insert taper is not secured re...

Page 267: ...ng brush see section 7 3 3 Replacing the cleaning brush page 263 Proceed as follows 1 Hold the new brush at the end that has no slit 2 Insert the new cleaning brush into the opening push to the back o...

Page 268: ...r panel is deleted automatically the replacement of the cleaning brush is recorded in the Consumables history menu and the consumable counter is reset The consumable counter is not reset 10 Click the...

Page 269: ...orotron always wear the gloves provided Ensure that you do not touch or damage the corotron wires Expendable See section Prepare corotron replacement 7 3 4 1 Preparing corotron replacement page 270 Re...

Page 270: ...ace corotrons is displayed All corotrons must now be replaced When a corotron wire has torn the replacement is carried out according to Abschnitt 7 3 5 3 Abschnitt 7 3 4 7 or Abschnitt 7 3 4 5 1 If th...

Page 271: ...ng on the operator panel The following procedure is for replacing the transfer corotron Remove transfer corotron page 271 Install transfer corotron page 273 Remove transfer corotron Important Observe...

Page 272: ...e pinfed 272 A29246 X20 X 4 7680 fa702_pinfed fm 3 Swivel up the locking lever and release 4 Swivel down the paper transporter by the handle to the stop point 5 When doing so ensure that the locking l...

Page 273: ...sh it slightly to the right Pull out corotron cartridge only a few millimeters so that the spring is held 7 Carefully pull out the corotron cartridge Important Observe the safety directives before rep...

Page 274: ...he paper transporter by the handle to the stop point and hold firmly At the same time raise the locking lever with your thumb to the point where it jumps back to its exit position Caution Danger of pi...

Page 275: ...n Remove torn transfer corotron page 275 Install new transfer corotron page 277 Remove torn transfer corotron Important Observe the safety directives before replacing corotrons see section 7 3 4 Repla...

Page 276: ...transporter by the handle to the stop point 5 When doing so ensure that the locking lever is engaged on the conveyor 6 Lift spring and simultaneously push it slightly to the right Pull out corotron ca...

Page 277: ...ng corotrons page 269 Proceed as follows 1 Push in new corotron cartridge until the spring engages 2 Swivel down the paper transporter by the handle to the stop point and hold firmly At the same time...

Page 278: ...rocedure is for replacing the charge corotron Remove charge corotrons page 278 Install charge corotrons page 279 Remove charge corotrons Important Observe the safety directives before replacing corotr...

Page 279: ...otrons 2 Remove corotron cartridges individually Important Observe the safety directives before replacing corotrons see section 7 3 4 Replacing corotrons page 269 Proceed as follows 1 Individually ins...

Page 280: ...corotrons 5 cartridges 280 A29246 X20 X 4 7680 fa703 fm 7 3 4 6 Replacing discharge corotrons 2 cartridges page 284 2 Pull out handle of corotron mounting and push towards PC drum until it engages Pr...

Page 281: ...is for replacing the charge corotron Remove torn charge corotron page 281 Install new charge corotron page 282 Remove torn charge corotron Important Observe the safety directives before replacing cor...

Page 282: ...corotron cartridge always check if the nipple is still on the corotron wire If the nipple is missing search for and find it 3 Check whether the nipple is still in on the corotron wire If the nipple is...

Page 283: ...X 4 7680 fa703 fm 283 7 3 4 8 Complete corotron replacement page 290 Proceed as follows 1 Individually insert the new corotron cartridges into the opening until they engage 2 Pull out handle of corot...

Page 284: ...dure is for replacing the discharge corotron Remove discharge corotrons page 284 Install discharge corotrons page 285 Remove discharge corotrons Important Observe the safety directives before replacin...

Page 285: ...stall discharge corotrons 2 Remove corotron cartridges Important Observe the safety directives before replacing corotrons see section 7 3 4 Replacing corotrons page 269 Proceed as follows 1 Push new c...

Page 286: ...ischarge corotrons 2 cartridges 286 A29246 X20 X 4 7680 fa703 fm 7 3 4 8 Complete corotron replacement page 290 2 Pull out handle of corotron mounting and push towards PC drum until it engages Proceed...

Page 287: ...ge corotron page 287 Install new discharge corotron page 288 Remove torn discharge corotron Important Observe the safety directives before replacing corotrons see section 7 3 4 Replacing corotrons pag...

Page 288: ...corotron cartridge always check if the nipple is still on the corotron wire If the nipple is missing search for and find it 3 Check whether the nipple is still in on the corotron wire If the nipple i...

Page 289: ...re A29246 X20 X 4 7680 fa703 fm 289 7 3 4 8 Complete corotron replacement page 290 Proceed as follows 1 Push new corotron cartridge into the opening to the stop point 2 Pull out handle of corotron mou...

Page 290: ...was fitted The message on the operator panel is deleted automatically the replacement of the corotrons is recorded in the Consumables history menu and the consumable counter is reset The consumable co...

Page 291: ...e filter page 294 Remove active filter Caution The components in the fuser station reach a surface temperature of approximately 230 o C during operation Danger of burning if touched Do not touch any p...

Page 292: ...pproximately 230 o C in operation If you touch them you may burn yourself Do not touch any parts behind the safety covers identified with the icon 4 Open side door of fuser station 5 Turn the knob of...

Page 293: ...X 4 7680 fa703 fm 293 7 Lift up the active filter unit on the right side using the handle and swivel out by the rotary axle 8 Turn the two knobs to the left and swivel down filter frame 9 Remove both...

Page 294: ...ety directives before installing the active filter see section 7 3 5 Replacing the active filter page 291 Proceed as follows 1 Insert the two new active filters so that the slanted surfaces meet in th...

Page 295: ...it turning knob to the right 5 Close side door of fuser station 6 Enter on the operator panel whether a new active filter has been fitted The message on the operator panel is deleted automatically the...

Page 296: ...ment All printing system assemblies are checked duration approx 2 3 minutes before the printing system is switched to the Ready status In both cases the message on the operator panel is automatically...

Page 297: ...llows 1 If the printing system has not yet stopped click the following button 2 Select the Replace consumables Replace cleaning belt menu on the operator panel 3 Click the following button to start cl...

Page 298: ...e fuser station reach a surface temperature of approximately 230 o C in operation If you touch them you may burn yourself Put on heat protection gloves before you continue 6 Put on heat protection glo...

Page 299: ...o that there is only one way to fit them The upper roll new full roll is longer than the lower roll 1 Place the new full roll on the spring bearing at top right press to the right and slide onto the l...

Page 300: ...nit turning knob to the right 5 Close side door of fuser station 6 Enter on the operator panel whether a new cleaning belt was fitted The message is automatically deleted on the operator panel and the...

Page 301: ...ing belt replacement All printing system assemblies are checked duration approx 2 3 minutes before the printing system is switched to the Ready status In both cases the message on the operator panel i...

Page 302: ...nstructions from service personnel Proceed as follows 1 If the printing system has not yet stopped click the following button 2 Select the Replace consumables Replace heater menu on the operator panel...

Page 303: ...r station reach a surface temperature of approximately 230 o C in operation If you touch them you may burn yourself Allow the printing system to cool down for at least 30 minutes 6 Allow printing syst...

Page 304: ...the temperature sensor to the left The temperature sensor bar is now swiveled up 9 Loosen the heater connector plug on the front side of the printing system and straighten the cable 10 Open the right...

Page 305: ...at the back of the printing system 12 Remove cable from the cable clamp Caution The components in the fuser station reach a surface temperature of approximately 230 o C in operation If you touch them...

Page 306: ...r by the handle and if necessary support it at the other end 14 Carefully remove the heater from the roller opening If the front heater connector plug begins to catch slightly turn the heater back and...

Page 307: ...n The heater glass may be damaged Grasp the heater by the handle only 1 Open packaging of the new heater Only grasp the heater by the handle and carefully remove from the packaging If required hold th...

Page 308: ...7 3 7 Replacing the heater 308 A29246 X20 X 4 7680 fa703 fm 3 Reinsert the heater connector plug on the rear side 4 Hang cable in the cable clamp Proceed as follows 2 of 5...

Page 309: ...on If you touch them you may burn yourself Put on heat protection gloves to continue working 5 Put on heat protection gloves 6 Carefully remove the faulty heater from the storage opening 7 Place the f...

Page 310: ...tem again Lay the cable so that the cover on the handle does not rub against the cable when subsequently swiveling off the temperature sensor bar 10 Move the temperature sensor lever to the right The...

Page 311: ...If the heater was not replaced but only removed and then re inserted for control purposes for example the process is documented in the Consumables history menu Status display in the Consumables histor...

Page 312: ...Proceed as follows 1 If the printing system has not yet stopped click the following button 2 Select the Replace consumables Replace fuser roller menu on the operator panel 3 Click on the following but...

Page 313: ...n operation If you touch them you may burn yourself Put on heat protection gloves to continue working 6 Put on heat protection gloves 7 Press against the pressure pin and swivel the waste collector ou...

Page 314: ...em you may burn yourself Put on heat protection gloves to continue working 11 Put on heat protection gloves again if you have removed them 12 Evenly loosen the three wing screws that secure the fuser...

Page 315: ...e holder claws on the fuser roller insert Remove the fuser roller insert from the old fuser roller 15 Insert the cooled fuser roller in the carton and make ready for collection Caution Observe the saf...

Page 316: ...roceed as follows 1 Place the fuser roller insert on the new fuser roller Note If you encounter a lot of resistance when placing the new fuser roller on the fuser roller insert allow the fuser roller...

Page 317: ...ve the plastic cover from the new fuser roller 3 Insert the new fuser roller into the opening and push towards the fuser roller drive Note If you encounter a lot of resistance when pushing the new fus...

Page 318: ...use a max of three turns for each screw Proceed from one wing screw to the next until the flange of the fuser roller insert is secure against the side plate 5 Swivel on the waste collector and lock w...

Page 319: ...and the replacement of the fuser roller is recorded in the Consumables history menu If the fuser roller has not been replaced but only cleaned for example the process is documented in the Consumables...

Page 320: ...printing system has not yet stopped click the following button 2 Select the Replace consumables Replace pressure roller menu on the operator panel 3 Click on the following button to start pressure ro...

Page 321: ...any parts behind the safety covers identified with the icon 7 Turn the knob of the oiling unit to the left and swivel on oiling unit Caution The components in the fuser station reach a surface temper...

Page 322: ...r to the left and carefully swivel down roller saddle Note Allow the printing system to cool down in this state for approximately 30 minutes 12 Grasp pressure roller from below and hold in the center...

Page 323: ...from the packaging Caution The components in the fuser station reach a surface temperature of approximately 230 oC in operation If you touch them you may burn yourself Put on heat protection gloves to...

Page 324: ...nderneath the fuser station 6 Swivel in waste collector and lock with the pressure pin 7 Swivel on oiling unit and turn the oiling unit turning knob to the right 8 Close side door of fuser station 9 R...

Page 325: ...menu If the pressure roller was not replaced but only cleaned for example the process is documented in the Consumables history menu Status display in the Consumables history 11 Click the following but...

Page 326: ...ste collector Proceed as follows 1 If the printing system has not yet stopped click the following button 2 Open side door of fuser station Caution The components in the fuser station reach a surface t...

Page 327: ...el out the waste collector 5 Open the packaging of the new waste collector taking care not to damage it 6 Remove new waste collector from the packaging and place on surface Caution The components in t...

Page 328: ...old waste collector filled with oil and dirt insert into the packaging close and make ready for collection Remove soaked felt strip 9 Remove visible oil traces on the swiveled oiling unit with a paper...

Page 329: ...X 4 7680 fa703 fm 329 2 Swivel in waste collector and lock with the pressure pin 3 Swivel on oiling unit and turn the oiling unit turning knob to the right 4 Close side door of fuser station 5 Click o...

Page 330: ...eyes In the event of contact with eyes rinse eyes out with plenty of water and seek medical help Avoid contact between skin and toner In the event of contact with the skin wash toner off with plenty o...

Page 331: ...button to start fine filter replacement Information on the icons displayed on the operator panel under Worksteps see section Icons page 93 4 Open the left and center door at the back of the printing...

Page 332: ...to ensure that no toner falls out 7 Grasp fine filter by both handles remove from the fine filter housing and place to the side Do not tilt fine filter to ensure that no toner falls out Caution Obser...

Page 333: ...placing the fine filter A29246 X20 X 4 7680 fa703 fm 333 Proceed as follows 1 Take new fine filter from the packaging and fit into the fine filter housing 2 Reinsert fine filter housing with both hand...

Page 334: ...fm Clean toner dust indicator 3 Push lever to the left of the fine filter housing up to lock the filter housing Note When replacing the fine filter toner can enter the toner dust indicator Proceed as...

Page 335: ...go off when it is removed 3 Tighten the plastic screw again 4 Close the left and center door at the back of the printing system 5 Enter on the operator panel whether a new fine filter has been fitted...

Page 336: ...e filter replacement All printing system assemblies are checked duration approx 2 3 minutes before the printing system is switched to the Ready status In both cases the message on the operator panel i...

Page 337: ...how to locate messages and continue printing after troubleshooting and how to enable remote access for remote diagnosis by service during printing You will find information on the following topics 8 2...

Page 338: ...ough the context sensitive Help You can call up this context sensitive Help by clicking the message and then pressing the F1 key Icon Meaning Error message When an error occurs the printer stops and t...

Page 339: ...in the toolbar The Errors and warnings menu is displayed All error messages warnings and information messages that have occurred are listed in the upper area sorted by priority and time 2 Click messag...

Page 340: ...visible cutout in the direction of the arrow Resets a message Changes from the printer view to the service ticket The service ticket displays all the data required to notify the service center Return...

Page 341: ...inting the printing system stops with loss of information Proceed as follows 1 Eliminate the reason why printing stopped as indicated by the information in the error message 2 Click on the following b...

Page 342: ...the printing system by pressing the EJECT button 3 Restart print job Note Notify service in accordance with the information in the Special functions Service ticket menu if the error cannot be eliminat...

Page 343: ...use an industrial vacuum cleaner with a grounded suction tube rubber nozzle and filter set for fine dust For larger quantities of toner spill e g full bottle the industrial vacuum cleaner must be exp...

Page 344: ...from the toner feed hose Proceed as follows 1 If the printing system has not yet stopped click the following button 2 Open the center door at the back of the printing system 3 Pull the container downw...

Page 345: ...small cross section from the toner box which is connected to the developer station Caution There can be a high build up of static charge when vacuuming the toner spill Always use an industrial vacuum...

Page 346: ...d toner from the hose you have just removed Also carefully vacuum accumulated toner from the underside of the drain head above the toner bottle 8 Re affix the toner feed hose to the toner box 9 Close...

Page 347: ...ever downwards to swivel on the drain head 11 Use the handle to turn the container upwards slowly 12 Close the left and center door at the back of the printing system 13 Click the following button to...

Page 348: ...ces that lie within the minimum permissible character contours and are as bright as the unprinted areas Spots are printed areas found outside the character contours They are as dark as normal print ch...

Page 349: ...cleaning brush Photoconductor drum Photoconductor drum exposed to light for too long It recovers after several hundred pages Possibly replace With grooves possibly replace Photoconductor drum soiled...

Page 350: ...the carton or to deviations Open up carton correct error Fuser station Possible offset if there is not enough oil check oil level Printing not fused possible operator error call service Optimize Fuse...

Page 351: ...ore notifying Service according to the information in the Configuration Special functions Service ticket menu Does the paper meet the paper specification regulations see section 1 6 Other documents pa...

Page 352: ...e a remote diagnosis during printing using remote access if this has been agreed beforehand Permitting remote access Proceed as follows 1 Click on the following button in the icon bar or click on the...

Page 353: ...ote access A29246 X20 X 4 7680 fa805 fm 353 Blocking remote access Proceed as follows 1 Click on the following button in the icon bar or click on the following button in the Configuration Special func...

Page 354: ...8 6 Permitting or blocking remote access 354 A29246 X20 X 4 7680 fa805 fm...

Page 355: ...A29246 X20 X 4 7680 faA01 fm 355 Appendix Overview You will find information on the following topics Consumables page 356 Expendables page 361 Cleaning materials and equipment page 365 Technical data...

Page 356: ...Order number Packaging unit Monthly requirement VarioStream 7200 VarioStream 7300 VarioStream 7400 Toner for VarioStream 7000 Standard OCP KK01 D25 M10 3 x 4kg 6 bottles 24 kg 12 bottles 48 kg 24 bot...

Page 357: ...operating conditions can lead to shorter life cycles i e higher usage roughly 20 30 Toner and developer storage Always store in a cool 35 o C dry and well ventilated room Never expose toner to direct...

Page 358: ...printing time per month 200 hours Maximum stop rate per 200 forms 1 stop of 10 s duration Coverage is 16 of the maximum printable characters at 1 10 column spacing and 1 6 line spacing Degree of prin...

Page 359: ...ed by up to 50 Average power on per month 600 hours Consumable Order number Packaging unit Monthly requirement VarioStream 7450 CX VarioStream 7550 CX VarioStream 7650 CX Toner for VarioStream 7000 St...

Page 360: ...6 of the maximum printable characters at 1 10 column spacing and 1 6 line spacing Degree of printing surface coverage 4 Different operating conditions can lead to shorter life cycles i e higher usage...

Page 361: ...hours Average printing time per month 200 hours Expendable Order number Packaging unit Monthly requirement VarioStream 7200 VarioStream 7300 VarioStream 7400 Photoconductor drum S26312 F190 V110 240 3...

Page 362: ...am 7550 3 500 000 pages for VarioStream 7650 Expendable Order number Packaging unit Monthly requirement VarioStream 7450 VarioStream 7550 VarioStream 7650 Photoconductor drum S26312 F190 V110 240 300...

Page 363: ...ner consumption can be reduced by up to 50 Average power on per month 600 hours Average printing time per month 200 hours Maximum stop rate per 200 forms 1 stop of 10 s duration Coverage is 16 of the...

Page 364: ...per month 200 hours Maximum stop rate per 200 forms 1 stop of 10 s duration Expendable Order number Packaging unit Monthly requirement VarioStream 7450 CX VarioStream 7550 CX VarioStream 7650 CX Phot...

Page 365: ...nd filter set for fine dust For vacuuming large quantities of toner spill e g full bottle the industrial vacuum cleaner must be explosion proof Cleaning materials equipment Purpose Remarks Methylated...

Page 366: ...ve paper dust and residue toner and developer residue spill Caution Always use an industrial vacuum cleaner with a grounded suction tube rubber nozzle and filter set for fine dust For larger quantitie...

Page 367: ...180 pages per minute 126 pages per minute Oc VarioStream 7300 Pinfed Pinless 260 pages per minute 183 pages per minute Oc VarioStream 7400 Pinfed Pinless 350 pages per minute 245 pages per minute Oc...

Page 368: ...documents page 22 The most important paper requirements are listed below Paper dimensions and weight Format width 165 mm to 457 2 mm 6 5 to 18 Form height I mode for 300dpi 76 2 mm to 711 2 mm 3 to 28...

Page 369: ...ered the coverage must be less than 50 Coated papers Coated papers must not contain components that could be released when heated 240 C and higher Self adhesive labels Continuous forms for labels Weig...

Page 370: ...use A 4 x 63 3 x 100 VarioStream Unit 7200 7300 7400 7450 7550 7650 Effective power PE KW 7 3 1 9 8 4 1 9 10 0 2 0 11 4 2 0 12 5 2 1 14 1 2 1 Apparent power PA kVA 8 8 2 6 9 7 2 6 11 1 2 6 12 5 2 6 13...

Page 371: ...Ozone concentration 0 01ppm The maximum work place concentration MAK defined by the German Research Council is 0 1 ppm Mechanical conditions Performance factor 1 0 94 0 88 0 95 0 88 0 95 0 88 0 96 0...

Page 372: ...imit of operation Limit value with High Temperature Kit optional Temperature 18 C to 24 C 10 C to 32 C up to 35 C 95 F max Relative humidity 38 to 60 Paper 45 7 5 10 to 80 up to 45 max Lowest absolute...

Page 373: ...Technical data A29246 X20 X 4 7680 faA01 fm 373 Weight Approx 1 260 kg simplex printing system...

Page 374: ...Technical data 374 A29246 X20 X 4 7680 faA01 fm...

Page 375: ...Channel control 67 Clear buffer 67 Clear printer 67 Consumable counter 69 Display errors 68 Display information 68 Display warnings 68 Help 69 Job control 67 Left Right 67 NPRO 62 Oc 70 Off 70 Print o...

Page 376: ...2 Consumable replacing 226 Consumable counter Button 69 Consumables Overview 356 Consumables and expendables 90 Context sensitive help 17 Continuing printing after errors have been corrected 341 Conve...

Page 377: ...Setting 122 Front view of the printing system 42 Full text search 16 Fuser oil Replacing bottle 252 Fuser oil bottle installing 254 removing 252 Fuser oil quantity changing menu 129 Fuser roller Chec...

Page 378: ...int head cleaning 219 Left Right Button 67 Lever for tension roller distance 123 Lever for tension rollers 122 Logging on as user 85 Logical page length entering 126 Lower Stacker top 53 Lower stacker...

Page 379: ...ification 22 Paper stack replacement before paper end 100 Paper types 55 Paper width entering 127 setting with slide 101 124 Paper width setting slide 101 124 Parameters Applying 89 Resetting 89 Setti...

Page 380: ...Cleaning brush 264 Fine filter 330 Fuser oil bottle 252 Fuser roller 312 Heater 302 Photoconductor drum 258 Pressure roller 320 Toner bottle 227 Waste collector 326 Waste toner bottle 233 Removing the...

Page 381: ...Settings for the paper width 124 of air nozzles 123 of tension rollers 122 of the tension roller distance 123 on paper transporter 121 when changing paper 121 Setup changing 134 creating new 134 expo...

Page 382: ...lling 229 removing 227 replacing 226 Toner bottle identification 48 Toner box filling 232 Toner dust indicator cleaning 334 Toner feed replacing 138 Toner mark sensor cleaning 207 Toner suction system...

Page 383: ...________________________________________________ _______________________________________________________________________ _______________________________________________________________________ _______...

Page 384: ......

Reviews: