Wide
Format
March 8, 2009
Océ Arizona 350 GT Printer
www.bertl.com
Copyright © 2008 BERTL, Inc.
March 8, 2009
All Rights Reserved. The license under which this document is made available and applicable law prohibit any reproduction or further transmission of any portion of this document. This
document may only be viewed electronically through the www.BERTL.com Web site and may not be stored in electronic or hard copy format. Any reproduction of trademarks is strictly
prohibited. BERTL accepts no responsibility for any inaccuracies or omissions contained in this document.
Page 15
Oc
é
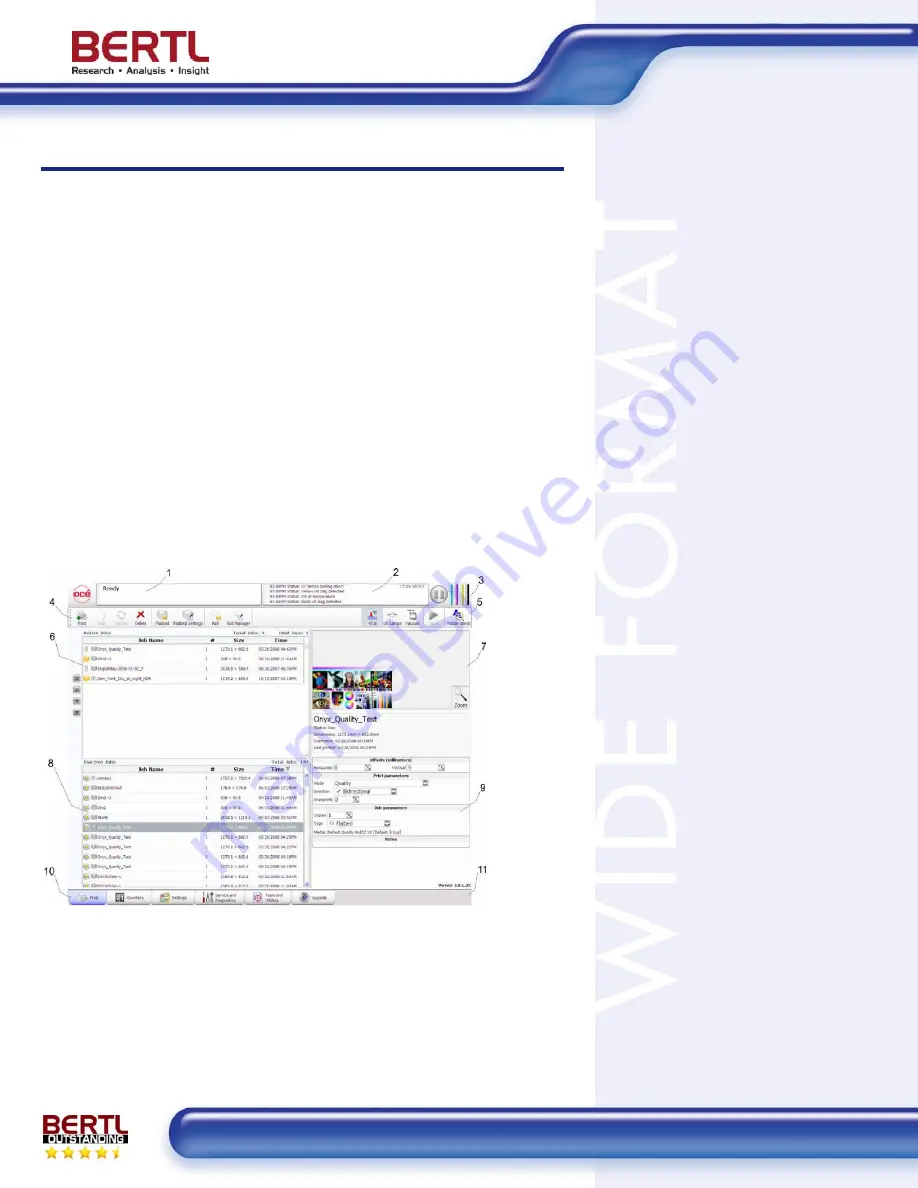
Arizona 350 GT Console Application
The ONYX ProductionHouse RIP does not print directly to the Oc
é
Arizona
350 GT printer. Instead it sends the job to a printer console and the print
operator then manually starts the print job. The reason is quite simply that the
print operator first has to stage the media for printing on the printer’s 98.4” x
49.2” print board unless the Roll Media Option is installed, in which case the
print can start automatically.
However, we expect that most end users will use the printer for its flatbed
sheet-fed capability. The main screen looks similar to the RIP. It has 11
areas:
1)
Job and Printer Status
2) Printer
Messages
3)
Ink System Status
4)
Left Command Tool Bar
5)
Right Command Tool Bar
6)
Active Job List
7)
Job Placement Preview
8) Inactive
Jobs
9)
Job Information & Parameters
10) Interface
Tabs
11) Image
Upload
The Console application is structured logical in blocks.
The Active Job list awaits the submission by the print operator. He can select
a job for printing and reposition it using the Layout Preview window (7) and
set final print parameter like bi-directional, uni-directional, and job parameters
like number of copies, etc. The list of parameters to set and control is limited
to avoid unnecessary duplication of identical parameters set on the ONYX
ProductionHouse RIP application. The Print Submission area controls the
submission and is done in five sequential steps. Before a print can
commence, the correct ink temperature
must be obtained and the UV lamps and
vacuum must be started and ready to go.
Furthermore you would have the option to
disable white ink printing if you were
printing on a white media. The system
automatically goes to a standby mode
after a period of inactivity and would need
warm-up time to resume printing. When
all prerequisite conditions are reached,
the Start button lights up and the operator
can activate the print. The system is
failsafe in preventing incorrect use with
one exception and that is the manual
setting of the media thickness. It has to be
correct or the print heads will hit the
media and force an abortion of the current
print. To avoid damaging the print heads,
there is a protective box around the print
heads. If the print heads are incorrectly
lowered to less than the media thickness,
the guard rail will hit the media and force
the protective box to move in upward
direction. The movement is detected, and
the print will abort immediately to protect
the print head from damage.


