background image

— 67 —

— 66 —

REMOTE ACCESS

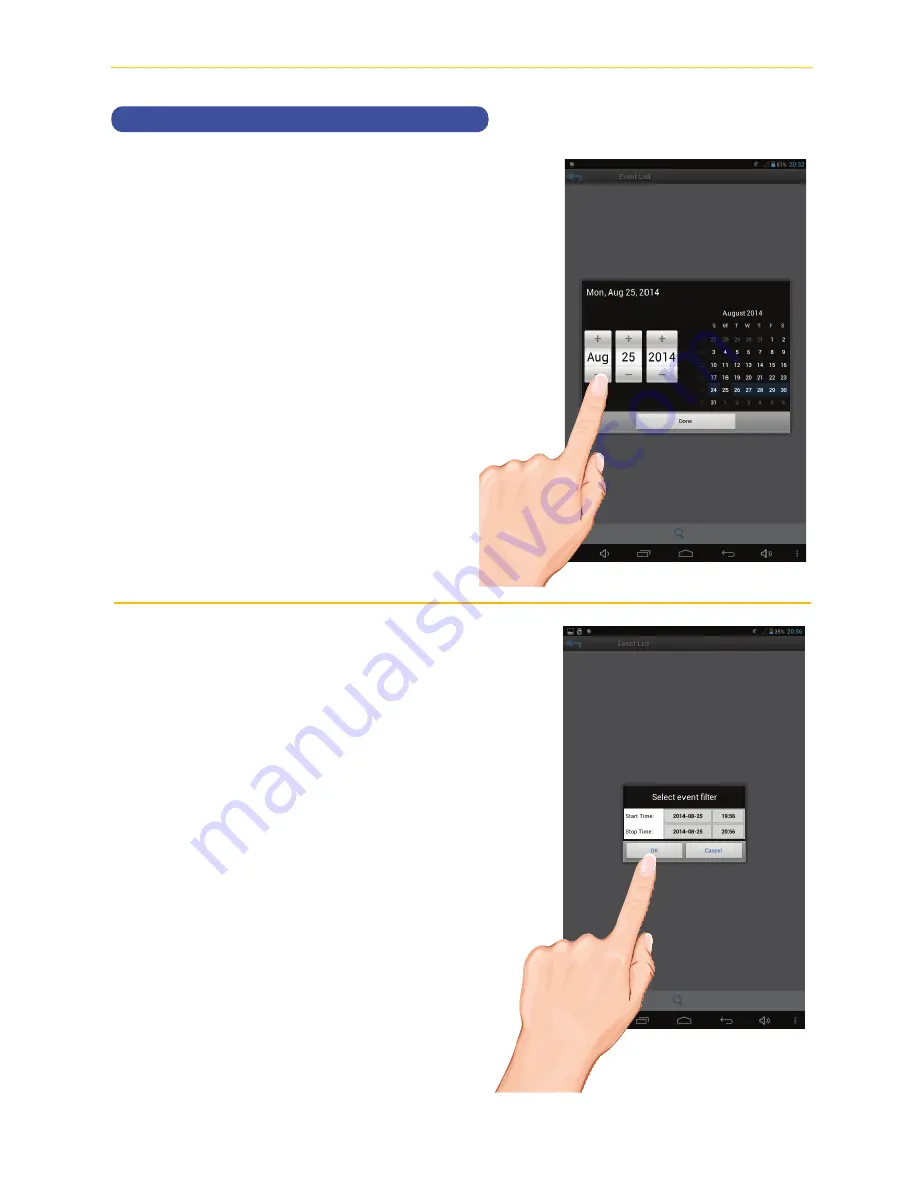
To Play Videos

w


 Select the desired Start Time/Date of 

the videos you want to view by tapping 
on the respective option (date or time) 
and then tapping “

+

” or “

-

” to adjust. 

When finished, tap 

Done

.

x


 Repeat for Stop Time/Date, then Tap 

OK

; the Event List will appear.

Summary of Contents for AWS3155

Page 1: ...Touch Screen Wireless Surveillance System Wireless Made Simple Remote Monitoring Anytime from Anywhere User Guide Please read these instructions completely before operating this product Model AWS3155...

Page 2: ......

Page 3: ...8 Zoom Feature 19 Recording Live Video 20 Playing Back a Recorded Video 21 Deleting a Recorded Video 23 SYSTEM MENU 24 Camera Pairing 25 Turning the Camera On or Off 26 Adjusting Brightness 27 Motion...

Page 4: ...he Internet 52 Connecting to the Intranet Home Network 54 Downloading the ALC Observer App 55 ALC Observer Android Setup Wizard 56 ALC Observer Apple Setup Wizard 57 ALC Observer App Icons 59 To Take...

Page 5: ...NIT TO RAIN OR MOISTURE CAUTION RISK OF ELECTRIC SHOCK DO NOT OPEN FCC Compliance Statement This device complies with Part 15 of the FCC rules Operation is subjected to the following two conditions 1...

Page 6: ...ors It is highly recommended that the video equipment be connected to a surge protector Doing so will protect the equipment from damage caused by power surges Surge protectors should bear the UL listi...

Page 7: ...away from heat sources such as radiators heat registers stoves or other products including amplifiers that produce heat 13 Accessories Do not place this video equipment on an unstable cart stand tripo...

Page 8: ...x 3 Quick Start Guide x 1 Internet Cable x 1 Monitor x 1 Camera Bracket x 2 Antenna x 2 Wireless Made Simple Please read these instructions completely before operating this product 7 Connected Touch S...

Page 9: ...now Your LCD Touch Screen Monitor INTRODUCTION Monitor Touch Screen Microphone Signal Indicator Power Indicator Antenna Micro SD Card Slot Stand Reset Button Internet Jack Power Jack Speaker Power But...

Page 10: ...8 INTRODUCTION Getting to Know Your Camera Cover FRONT REAR Mounting Socket Power Status LED Antenna Connector Mounting Socket Link Status LED Power Pigtail...

Page 11: ...ntly reduce signal range If the signal will have to pass through a wall placing the Monitor or camera next to a window will improve the signal strength Do not install the camera pointing out of a wind...

Page 12: ...internet connect to your router using the rear Internet jack vPut the Antenna up wInsert the included micro SD Card or another SD Card up to 32GB into the micro SD Card Slot This will allow you to re...

Page 13: ...hold the Power button on the top of the monitor for 3 4 seconds to power it up The monitor displays the Welcome screen for a few seconds and then transitions to the Live Quad view If two camera are co...

Page 14: ...th T Bolt and screw camera onto the T Bolt until it is in the desired position v Tighten the Brace against the camera to secure it in place w Set the desired camera angle and then tighten the Thumb Sc...

Page 15: ...VMake sure the Power status LED turns red and the Link Status LED turns green If it doesn t try reconnecting the AC adapter and make sure the power outlet is not controlled by a wall switch You shoul...

Page 16: ...t also lets you set up your screen display and make adjustments to it Icons on the screen itself let you monitor power and camera status See the following page for descriptions of the icons Pop up men...

Page 17: ...ween cameras 5 seconds QUAD Quad view all paired cameras display Cam1 Cam4 Full view 1 camera displays on full screen Adjust the volume level See page 50 for details Tap to access the System Software...

Page 18: ...viewing is in progress If no Internet Intranet icon appears then it is not set up or not set up properly Details of this icon start on page 34 Appears in LIVE view Indicates the intranet connection is...

Page 19: ...tion detection recording in progress See page 28 for more details System indicates scheduled recording in progress See page 31 for more details Tap this icon to open and close the pop up menu display...

Page 20: ...onnected and on only those cameras videos will display on the Live screen The other sections of the screen where no camera is connected will be blank Full view displays a single camera s video on the...

Page 21: ...desired Quad section to go to the Full View vTap the icon to activate the Zoom mode wSelect the desired zone to zoom into by tapping the zone area xWhen done tap the icon to zoom back out REC REC 2 RE...

Page 22: ...quadrant to start recording Repeat for up to all four cameras if desired wThe videos will record for two minutes as indicated by the blinking REC icon To stop recording before two minutes tap the REC...

Page 23: ...ecific camera to view only that camera s recordings If you tap on a day that is not highlighted a folder displays with no recordings listed xTap on a recording to play it back REC REC 2 REC 4 REC 3 08...

Page 24: ...that does not have control icons to remove the scroll bar UThe bottom control buttons will control the following 7 Tap to go back to a previous recording 4 Tap to play back the recording Tap to pause...

Page 25: ...p on the day that contains the recording you want to delete wTap the X on the right hand side of the entry If you are deleting a folder a confirmation screen displays If you are deleting a single reco...

Page 26: ...the icon to access the System Setup screen See the following pages for the System settings xWhen on a Setting screen tap to return to the previous screen or tap to return to the Live Quad view REC RE...

Page 27: ...s is complete When paired the camera s Link Status LED will blink green If a camera is already assigned to the selected channel the monitor overwrites that camera link with the new one Your cameras ar...

Page 28: ...ap the camera you want to turn on or off Although the camera is turned off it is still powered but the monitor will not receive video signals from that camera After adding a camera it will automatical...

Page 29: ...tup to access the Camera Setup screen vTap Brightness wTap the camera whose brightness level you want to change The default brightness is 0 Tap on the camera to cycle through a range of settings To ad...

Page 30: ...p the desired camera to cycle through the motion sensitivity options Off Turns sensitivity off Low Sets sensitivity to low High Sets sensitivity to high This setting will allow you to set the Sensitiv...

Page 31: ...e email notification to tell users when the system detects motion from any camera Motion Detection must be activated The incoming email server Email To receives the email notification sent from the SM...

Page 32: ...s to numbers symbols and back again by tapping the field to the left of the space bar Tap Enter The Email Alert screen displays again Repeat the previous step for the following settings Check Enable B...

Page 33: ...want to record 1 4 You can select up to all four cameras to record You can schedule up to five recording sessions The total recording time available is limited to the size of your SD card A higher ca...

Page 34: ...times Tap the AM PM block to toggle between them UTap on the blank Date box the Recorder Setup calendar screen will appear Tap on the date you want the recording the previous screen will appear VTap S...

Page 35: ...heduled Recording uFollow steps 1 through 3 on page 24 to access the System Setup Tap Recorder Setup to access the Recorder Setup screen vTap Schedule Record wTap the program you want to delete xTap C...

Page 36: ...at have the ability to specify an IP address for the system If this option is selected you will be able to input the IP Address Subnet Mask Default Gateway and DNS server xTap OK at the prompt to fini...

Page 37: ...default code of 123456 will appear To change the code tap the Change Code field xEnter a new security code You can switch the keyboard from alphabetical characters to numbers symbols and back by tappi...

Page 38: ...Setup screen vTap Network Information wThe Network information will appear on the screen xTap to return to the previous screen or to return to the Live Quad view The Network Information page will disp...

Page 39: ...he Alarm Setup screen vTap Period wThis screen will show the alarm s siren duration To change tap the duration you want the siren to last You can choose 2 10 or 30 seconds or select None to turn the s...

Page 40: ...Alarm Setup to access the Alarm Setup screen vTap Melody wThis screen will show the selected siren melody To change tap one of the three melodies a brief sample will play and the melody will be selec...

Page 41: ...Enable Disable Enable wTap the desired Power Saving Mode Enable Will turn the screen off after two minutes of no activity Motion Detection or pressing the Power button will turn the monitor back on Di...

Page 42: ...iew When you turn on Auto Lock mode the monitor will automatically enter Screen Lock mode after it has been idle for two minutes Auto Lock disables the touch screen and removes the icons from the disp...

Page 43: ...ap System Setup to access the System Setup screen vTap Time wTap Time Setting xTap of the desired setting Month Day Hour etc and set using the Up and Down arrows If in Daylight Savings Time tap the Da...

Page 44: ...3 on page 24 to access the System Setup Tap System Setup to access the System Setup screen vTap Time wTap Clock Alarm xTap on a desired alarm to set The alarm is independent of the system operation r...

Page 45: ...pping the X next to the alarm a check mark will appear to show the alarm is set When the alarm time matches the actual time the alarm s siren will sound Tap OK to stop the siren and have it set for th...

Page 46: ...llow steps 1 through 3 on page 24 to access the System Setup Tap System Setup to access the System Setup screen vTap Time wTap Time Zone xTap the arrows to set the desired time zone you are in Tap SAV...

Page 47: ...m performance xActivating Overwrite will allow the system to delete the oldest recordings in order to record new files when the micro SD card is full To Overwrite tap this icon until the check mark ap...

Page 48: ...getting the updated firmware insert back in this monitor and follow steps 1 through 3 on page 24 to access the System Setup Tap System Setup to access the System Setup screen vTap System Upgrade wTap...

Page 49: ...ore Default Settings screen will appear Tap OK to continue The system will shut down in about five seconds When it restarts you will be asked to perform touch screen calibration Follow the instruction...

Page 50: ...System Setup Tap Default to access the Default screen vTap 50Hz or 60Hz USA Canada frequency is 60Hz and Europe is 50Hz wTap to return to the previous screen or to return to the Live Quad view It is...

Page 51: ...p Tap Quick Tips to access the Quick Tips screen vTap the desired tip to view it Tap to return to the previous screen or to return to the Live Quad view The Quick Tips screen provides additional detai...

Page 52: ...tab to access the Menu options vTap the icon to enter the screen as shown at right wTap the icon to increase the volume or the icon to decrease the volume of the respective setting Tap the Pop Up Men...

Page 53: ...hone or tablet version 2 3X or above Recommended Minimum Internet Upload Speed 512Kbps upload speed or bandwidth to achieve up to an average of 2FPS viewing speed Average viewing speed will depend on...

Page 54: ...only charge the monitor Tap Connect to the Internet the Internet Connection Status Indicator appears on the upper left of the live screen indicating that the system is connected to the internet You ca...

Page 55: ...OTES While the system is connected to the internet the live screen display rate may reduce to 2 3 frames per second When you connect remotely to the monitor the Internet Connection Status Indicator wi...

Page 56: ...harge Only is selected you can still access your live video from a PC or smartphone as long as those devices are also connected to the same network as the monitor For example your smartphone is connec...

Page 57: ...view live camera video First you need to download the free App as follows Observer APPLE DEVICE From your iPhone or iPad go to the App Store and search for ALC Observer See page 57 ANDROID DEVICE Fro...

Page 58: ...home network Also make sure the camera and monitor is connected to the internet see page 52 or intranet see page 54 Launch the ALC Observer App and the Setup Wizard screen will appear Tap to start the...

Page 59: ...ection process Tap Live View to connect REMOTE ACCESS ALC Observer Apple Setup Wizard uMake sure the monitor is connected to the internet see page 52 or intranet see page 54 Launch the ALC Observer Ap...

Page 60: ...58 REMOTE ACCESS ALC Observer Apple Setup Wizard vThe Apple Device will now search for the camera wOnce the screen indicates the camera is connected Tap Live View HD 000011 has been connected...

Page 61: ...access the video again simply tap on the still picture and it will show the live video screen again See page 60 for icon descriptions LIVE VIEW SCREEN The following icons appear when on the Live View...

Page 62: ...Tap this icon to access the App s options See below Tap this icon to refresh the camera s connection Tap this icon to enter the Setup PIN Lock Set the Notify Setting or check the APP API version infor...

Page 63: ...Return Icon Description Tap to capture screen images The snapshots will be saved into the camera roll of your mobile device See page 62 for more details Tap to return to the main screen Tap to record...

Page 64: ...62 REMOTE ACCESS To Take Snapshots uFrom the main screen tap to remote view your camera system vSelect a camera by tapping the Camera pull down menu then select the desired camera...

Page 65: ...snapshots will be named with the time stamp and saved into the Camera Roll snapshot folder on your mobile device For Android Your snapshots will be named with the time stamp and saved into the Photo...

Page 66: ...64 REMOTE ACCESS To View and or Take Videos uFrom the main screen tap to remote view your camera system vSelect a camera by tapping the Camera pull down menu Camera 1 4...

Page 67: ...5 REMOTE ACCESS To View and or Take Videos wTap the Record icon to start recording The App will record for 2 minutes xPINCH AND ZOOM To zoom in or out use the simple pinch and zoom gesture with this a...

Page 68: ...66 REMOTE ACCESS To Play Videos uFrom the main screen tap the Settings icon vTap the Events icon the Select Event Filter pop up will appear...

Page 69: ...Select the desired Start Time Date of the videos you want to view by tapping on the respective option date or time and then tapping or to adjust When finished tap Done xRepeat for Stop Time Date then...

Page 70: ...OOM To zoom in or out use the simple pinch and zoom gesture with this app see page 65 UTo Set Display Filter To filter the date time again simply tap the Magnifying glass while in the Events list TIP...

Page 71: ...will appear in the box to the right of the selected file then tap the Delete Selected icon A pop up box will appear asking you to confirm tap Yes TIPS To Delete Several Files at the same time select...

Page 72: ...70 REMOTE ACCESS To Delete Videos wTo Delete All Files tap the Delete All icon A pop up box will appear asking you to confirm tap Yes...

Page 73: ...71 REMOTE ACCESS Information Screen Options uFrom the main screen tap the Information icon a pop up will appear vTo view information Version etc tap About...

Page 74: ...is detected you will receive a message APPLE DEVICES u Launch Settings System Preferences from your Home screen on the Apple device v Tap Notification Center a list of Apps will appear w Scroll down t...

Page 75: ...To Setup the Pin Lock tap Setup PIN Lock yTap the Enable Lock When Starting switch to enable will be blue or disable will be white the PIN Lock TIP Setting a PIN Lock code will prevent others from act...

Page 76: ...REMOTE ACCESS Information Screen Options UUsing the keyboard enter a four digit code Then confirm this exact code VNow that the pin is set and enabled whenever the App is opened you must enter this c...

Page 77: ...75 REMOTE ACCESS DID Setting Screen uFrom the main screen tap the Settings icon vTap the Settings icon the System Information Screen will appear...

Page 78: ...OTE ACCESS DID Setting Screen wSimply tap on a field to change it To enable Email Alert which will email your Gmail account whenever motion is detected simply tap the Enable Email Alert switch so it i...

Page 79: ...It is not recommended to use any chemicals or harsh detergents on the touch screen When dust and grime builds up on the camera lens and glass it will affect the night vision capability The infrared l...

Page 80: ...ensor for details see page 28 Check the settings on the Record screen see page 28 Ensure the correct Date and Time have been set for details see page 31 Ensure the Record Schedule has been setup corre...

Page 81: ...ree player from www apple com Make sure the camera is plugged in and the red LED is on see page 13 Make sure the camera is paired to the correct channel see page 25 Re pair the camera to the monitor M...

Page 82: ...25 m Dimensions 6 3 x 2 5 x 2 5 in 161 x 64 x 64 mm Maximum Channels 4 Communication Range 164 yd 150 m in open space LCD Resolution Single Camera 800 x 480 Operating Temperature 15 F 122 F 10 C 50 C...

Page 83: ...ANY DAMAGE LOSS OR THEFT RELATED TO THE PRODUCT OR TO ITS USE FOR ANY HARM WHETHER PHYSICAL OR MENTAL RELATED THERETO ANY AND ALL CLAIMS OR STATEMENTS WHETHER WRITTEN OR VERBAL BY SALESPEOPLE RETAILER...

Page 84: ...y ALC will either at its option repair or replace the defective unit return it to you without charge for parts service or any other cost ALC at its option may replace the unit with a new or refurbishe...

Page 85: ...Wireless Made Simple ALCWireless com 040416_v3 0...

Page 86: ...Wireless Made Simple ALCWireless com...

Reviews: