background image


Menu Operation 

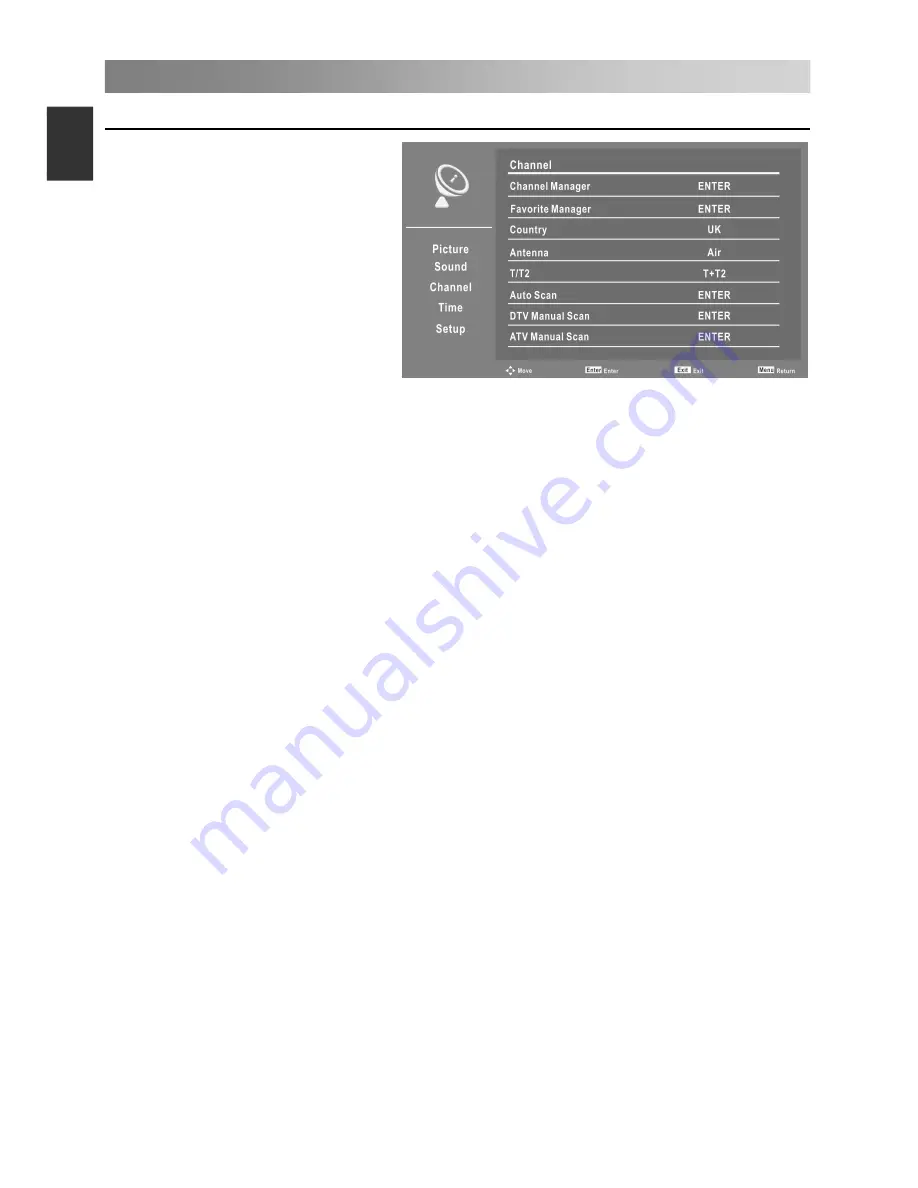
Configuring the Channel Menu                                                                                                 
• Channel Manager 

Press the 

ENTER

 button to 

access the submenu. 
First press the 

/

 button to 

highlight the channel you want to 
delete, lock, skip or swap.   
Then press the red button to 
delete the channel. 
Press the green button to lock the 
channel. 
Press the yellow button to skip the 
select channel. (Your TV set will 
skip the channel automatically when using CH+/CH- to view the channels.) 
Press the blue button to set the channel to swap, then press the 

/

 button to move 

it to the position you want to put. 

• Favorite Manager 

Press the 

ENTER

 button to access the submenu. 

Press the 

/

 button to select the items.


  Press the CH+/CH- button to page up or down the Favorite list. 

Press red, green, yellow, blue button to select the desired favorite group. 

• Country 

Select the country you want. 

• Antenna 

Select an antenna source. 


• Auto Scan


Press the 

ENTER

 button to access the submenu. 

When TV signals is Air. 

All: Press the 

ENTER

 button to search the digital channels and analog channels. 

DTV: Press the 

ENTER

 button to search the digital channels. 

ATV: Press the 

ENTER

 button to search the analog channels. 

 NOTE: 

  The TV will begin memorizing all of the available Channels. Once the 

progress bar is full, the found channels will be stored and the unit will proceed to the 
search for ATV, DTV, Radio and Date. 


When TV signals is Cable.


All: Press the 

ENTER

 button to access the submenu. 

– Scan Mode: Press the 

/

 button to select scan mode: Blind Scan or Quick Scan. 

Network ID and Frequency (KHz) can be adjusted when the Scan Mode is set to 
Quick Scan. 

– Network ID: Press the 

/

 button to select Network ID: Auto or enter digital 

numbers. 

– Frequency (KHz): Press the 

/

 button to select Frequency (KHz): Auto or enter 

digital numbers. 

– Start: Press the

 ENTER

 button to start search channels. 


 • T/T2 ( In Air mode)

T,T2,T+T2. 


Select the

 signal

 type

15

E

ngli

sh

Summary of Contents for LS22D1000

Page 1: ...l 0042 0 242408849 Fax 0042 0 220951190 Service E mail info changhongeurope cz Web site www changhongeurope com CHANGHONG EUROPE ELECTRIC S R O Argentinsk 286 38 170 00 Praha 7 Czech Republic EN DE CH...

Page 2: ......

Page 3: ...urce 11 QUICK START GUIDE 12 Menu Operation 12 How to Navigate Menus 12 Configuring the Picture Menu 13 Configuring the Sound Menu 14 Important Unique Buttons 24 EPG Weekly Mode 24 Channel List 24 Usi...

Page 4: ...attempt to modify this product in any way without written authorization from supplier Unauthorized modification could void the user s authority to operate this product It is not recommended to keep a...

Page 5: ...umed by power off and power on again CAUTION connecting the Power Cord Most appliances recommend they be placed upon a dedicated circuit that is a single outlet circuit which powers only that applianc...

Page 6: ...t source such as radiators heat registers stoves or other apparatus including amplifiers that produce heat 6 Clean only with a dry cloth 9 Do not defeat the safety purpose of the polarized or groundin...

Page 7: ...d or plug is damaged liquid has been spilled or objects have fallen into the apparatus the apparatus has been exposed to rain or moisture does not operate normally or has been dropped ON DISPOSAL The...

Page 8: ...1 CH CH Changes the channels 2 VOL VOL Adjust the volume 3 MENU Open the menu 4 To switch among the signal source 5 Turns the unit on and off 6 Power Sensor Power Indicator and Infrared sensor 6 Engli...

Page 9: ...iption 8 HDMI Scart input output 10 AV AV audio video signal input 11 YPbPr YPbPr input 12 PC input 13 ANT1 2 Antenna input 14 Ear phone output 15 USB Connector for USB Play 16 COMMON INTERFACE Insert...

Page 10: ...nd you will need to replace the batteries Notes on Using Batteries The use of the wrong type of batteries may cause chemical leakage and or explosion Please note the following Always ensure that the b...

Page 11: ...supply NOTE The range of power input for the TV is 100 240V 50 60Hz do not connect the TV power input port with the power cable out of the above range not touch directly the metallic part of the cabl...

Page 12: ...Go to the index page 8 Next in USB mode Reveal the hidden information of some teletext pages 9 Fast reverse in USB mode Enter subtitle mode or subpage 10 Fast forward in USB mode Cancel the teletext b...

Page 13: ...nal source 22 VOL VOL Press to adjust the volume level up or down 23 LIST Press to call up the channel list Press again to exit it 24 CH CH Press to select channels in ascending or descending order 25...

Page 14: ...ase channel number Press CH to decrease channel number Using 0 9 digital buttons You can select the channel number by pressing 0 to 9 In DTV ATV mode Example To select channel e g Channel 5 Press 5 To...

Page 15: ...or couldn t work you may use the buttons on the TV to select menus This manual focuses on operation of the remote control Some items in the menus may be hidden depending on modes or signal sources us...

Page 16: ...utton to access the submenu Select the color temperature of the picture and press the button to select the Standard Cool Warm and User R Gain G Gain and B Gain can be adjusted when the Mode is set to...

Page 17: ...own signal conditions volume adjustment may be needed every time when the channel is changed This feature allows users to enjoy stable volume levels by making automatic adjustments for each program S...

Page 18: ...na Select an antenna source Auto Scan Press the ENTER button to access the submenu When TV signals is Air All Press the ENTER button to search the digital channels and analog channels DTV Press the EN...

Page 19: ...ls DTV Press the ENTER button to search the digital channels Scan Mode Press the button to select scan mode Default Network Search or Blind Scan Satellite Press the button to select satellite names Se...

Page 20: ...analog scan Fine Tune Press the ENTER button to enter fine tune and then press button to select fine tune Color System Press the button to select Color System Sound System Press the button to select S...

Page 21: ...ect the Auto Sleep time you want OSD Timer Select On Screen Menu displaying time Configuring the Setup Menu Language Press the ENTER button to access the submenu OSD Language Press the button to selec...

Page 22: ...password If the new password has been input twice the setting is finished successfully Blue Screen Press the button to select Blue Screen On or Off NOTE In the DTV and USB mode are not available Demo...

Page 23: ...Auto Standby Press the button to select Auto Standby On or Off When the user turns off the TV all active CEC enabled devices on the HDMI input will go to Standby Add Press yellow button to add a timer...

Page 24: ...nts may not be or well be supported by the USB The USB supports the format mentioned above if the file format is not supported change it to the given format Main Operating Interface Use the button to...

Page 25: ...nd Effect and then press the button to set you want 9 Playlists Display the playlists Press green button to delete a photo and press red button to delete all photos in the list Music Play Console 1 Pl...

Page 26: ...ovie information 11 Movie Setup Press the button to select the Program Subtitle Audio Encode Type and Repeat Mode and then press the button to set you want 12 Goto Time Select the settings time to pla...

Page 27: ...e button to view the next date s guide Channel List Press LIST button to display the Channel List Press button to select the DTV Radio and Others data Press to select the items Press the ENTER button...

Page 28: ...en a page is displayed you can double the size of the text to make it easier to read 1 Press the button to enlarge the top half of the page 2 Press the button again to enlarge the bottom half of the p...

Page 29: ...et Check the power control settings Power interrupted No broadcast on station tuned with auto activated Picture appears slowly after switching on This is normal the image is muted during the product s...

Page 30: ...lightning or power surges Disposal of old electrical appliances The European directive 2012 19 EU on Waste Electrical and Electronic Equipment WEEE requires that old household electrical appliances m...

Page 31: ...is R ckseite und Seitenfl chen 6 Vorderes Bedienfeld Anschlie en von Kabeln 8 Lautst rkeregelung 11 ndern der Eingangsquelle 11 Men bedienung 12 Konfiguration des Bild Men s 13 Konfiguration des Ton M...

Page 32: ...hmen ergreifen Versetzen Sie die Empfangsantenne Erh hen Sie den Abstand zwischen dem Ger t und dem Empf nger Schlie en Sie das Ger t und den Empf nger an einen jeweils unterschiedlichen Stromkreises...

Page 33: ...gen und Risse der Kabelisolierung stellen eine Gefahr dar Sie k nnen einen Stromschlag oder einen Brand verursachen Untersuchen Sie deshalb in regelm igen Abst nden das Kabel Ihres Ger ts Sollten Sie...

Page 34: ...ie Heizk rpern fen oder anderen W rme erzeugenden Ger ten z B Verst rkern auf 6 Nur mit einem trockenen Tuch reinigen 9 Manipulieren Sie nicht den gepolten Stecker oder den Schutzkontaktstecker Ein ge...

Page 35: ...er t besch digt wurde z B Besch digungen des Stromkabels oder des Steckers wenn Wasser oder Gegenst nde in das Ger t eingedrungen sind das Ger t Regen oder Feuchtigkeit ausgesetzt war das Ger t nicht...

Page 36: ...1 CH CH 2 VOL VOL 3 MENU 4 5 6 Power Sensor Hiermit wechseln Sie die Kan le Hiermit regeln Sie die Lautst rke Hiermit ffnen Sie das Men Hiermit k nnen Sie die Signalquelle wechseln Hiermit schalten Si...

Page 37: ...NT1 2 14 15 USB 16 COMMON INTERFACE DIGITAL AUDIO OUT PC AUDIO PC 9 Scart 7 PC Eingang SCART Eingang Ausgang Kopfh rerausgang Antennenausgang Digitaler Audioausgang HDMI Eingang Anschluss f r USB Play...

Page 38: ...e falsche Verwendung von Batterien kann zu einem chemischem Leck und oder zur Explosion f hren Achten Sie auf folgendes Gehen Sie sicher dass die Batterien richtig eingesetzt wurden und die Pole und a...

Page 39: ...es TV Ger ts an ziehen Sie die Schrauben an beiden Enden des VGA Kabels im Uhrzeigersinn fest HINWEIS Achten Sie beim Anschluss des 15 poligen VGA Kabels darauf dass kein berm iger Druck ausge bt wird...

Page 40: ...und wenn Sie die Taste ein drittes Mal dr cken k nnen Sie den Modus beenden 6 ndern der Gr e des Videotextbildschirms im Anzeigemodus 7 Zur ck im USB Modus i Aufrufen der Indexseite 8 Weiter im USB M...

Page 41: ...men s 18 Auswahl der Richtung 19 ENTER Ausf hren des im Men bildschirm markierten Punktes 20 R ckkehr zum zuletzt angesehenen Programm 21 SOURCE Auswahl einer Signalquelle 22 VOL VOL Erh hen oder Redu...

Page 42: ...der CH CH Tasten auf dem Bedienfeld des Fernsehers oder auf der Fernbedienung Dr cken Sie CH um die Kanalnummer zu erh hen Dr cken Sie CH um die Kanalnummer zu verringern Verwendung der 0 bis 9 Digit...

Page 43: ...her Men s ausw hlen Diese Bedienungsanleitung erkl rt schwerpunktm ig die Benutzung der Fernbedienung Einige Punkte in den Men s k nnen je nach Modus oder benutzter Signalquelle ausgeblendet sein 12 D...

Page 44: ...K hl Warm und Benutzerdefiniert auszuw hlen R Gain G Gain und B Gain k nnen angepasst werden wenn der Modus auf Benutzerdefiniert eingestellt ist Seitenverh ltnis Sie k nnen die Bildgr e ausw hlen di...

Page 45: ...Mal angepasst werden wenn der Kanal gewechselt wird Diese Funktion erm glicht Ihnen eine gleichbleibende Lautst rke beizubehalten da die Anpassungen f r jedes Programm automatisch vorgenommen werden S...

Page 46: ...cken Sie Tasten um die Punkte auszuw hlen Dr cken Sie die CH CH Tasten um die Favoritenliste nach oben oder unten zu scrollen Dr cken Sie die rote gr ne gelbe blaue Taste um die gew nschte Favoriteng...

Page 47: ...ern eingeben Starten Dr cken Sie die ENTER Taste um die Kanalsuche zu starten ATV Dr cken Sie die ENTER Taste um die analogen Kan le zu suchen Wenn die TV Signale ber Satellit empfangen werden Alle Dr...

Page 48: ...Aktueller Kanal Dr cken Sie die Tasten um den aktuellen Kanal auszuw hlen Frequenz Anzeige der Frequenz des aktuellen Fernsehsignals Suche Dr cken Sie die ENTER Taste um die Suche zu ffnen Dr cken Sie...

Page 49: ...che Dr cken Sie die Tasten um Bildschirmmen Sprache auszuw hlen 1 bevorzugter Untertitel im DTV Modus Dr cken Sie die Tasten um Prim re bevorz Untertitelsprache auszuw hlen 2 bevorzugter Untertitel im...

Page 50: ...len Bluescreen Dr cken Sie die Tasten um Bluescreen Ein oder Aus zu w hlen HINWEIS In the DTV and USB mode are not available Demo Modus Dr cken Sie die Tasten um Demo Modus Ein oder Aus zu w hlen H rg...

Page 51: ...terst tzen m glicherweise keine HDMI CEC Funktionen HDMI CEC Dr cken Sie die Tasten um HDMI CEC Ein oder Aus zu w hlen Wenn HDMI CEC aktiviert ist k nnen Automatisches Einschalten und Automatisches St...

Page 52: ...Text formate TXT HINWEIS Dokumente mit speziellen Algorithmen werden m glicherweise nicht oder nicht einwandfrei unterst tzt Die USB Funktion unterst tzt die oben aufgef hrten Formate Wenn das Dateif...

Page 53: ...en 9 Wiedergabelisten Anzeige der Wiedergabelisten Dr cken Sie die gr ne Taste um ein Foto zu l schen und dr cken Sie die rote Taste um alle Fotos in der Liste zu l schen Musik Wiedergabekonsole 1 Wie...

Page 54: ...die Tasten um die gew nschten Einstellungen vorzunehmen 12 Gehe zu Zeit Auswahl der voreingestellten Zeit f r die Filmwiedergabe Text Wiedergabekonsole 1 Dr cken Sie die ENTER Taste um das Schnellmen...

Page 55: ...aten auszuw hlen Dr cken Sie um die Punkte auszuw hlen Dr cken Sie die ENTER Taste um den Kanal aufzurufen Dr cken Sie die CH CH Tasten um die Kanalliste nach oben oder unten zu scrollen Dr cken Sie d...

Page 56: ...k nnen 1 Dr cken Sie um die obere H lfte der Seite zu vergr ern 2 Dr cken Sie erneut um die untere H lfte der Seite zu vergr ern 3 Dr cken Sie noch einmal um zur normalen Anzeige zur ckzuwechseln Auf...

Page 57: ...llten Sender Der Fernseher schaltet nach einer bestimmten Zeit automatisch in den Standby Modus Bild erscheint nach dem Einschalten langsam Dies ist ein normaler Vorgang Das Bild ist w hrend des Einsc...

Page 58: ...schirm zur ck bleiben Lassen Sie den Bildschirm dann an der Luft komplett abtrocknen bevor Sie Ihren Fernseher einschalten Geh use reinigen Reinigen Sie das Geh use mit einem weichen trockenen faserfr...

Page 59: ......

Reviews: