


19
OBH Nordica juice extractor
Instruction manual
Before using the juice extractor for the first time, read the instruction manual carefully and
save it for future use.
Always check that the filter and plastic parts do not have any cracks or damage. In order to
avoid any hazard, never use a defective grater.
The juice extractor is assembled when delivered, but we recommend that you clean the
appliance before use – see the paragraph ”Mounting”.
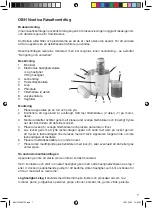
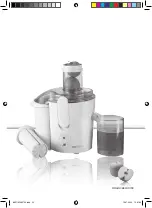
Description
1. Motor unit
2. Electronic switch
I Low speed
II High sped
3. Locking handles
4. Fruit pulp/pulp container
5. Lid
6. Pusher
7. Grater holder (2 parts)
8. Juice container
9. Suction feet
Mounting
1. Place the appliance on a dry, even surface.
2. Make sure that the appliance is switched off. Place the assembled grater holder (7) on
the motor unit.
3. Mount the grater by placing it on top of the grater holder and carefully pressing the grater
in its place. Check the positioning.
4. Put the lid (5) on top of the grater holder and insert the pusher into the chute.
5. Lock the lid by lifting the locking handles and secure them on the lid by pressing the
handles until they engage – you will hear a click. The appliance only works with the
handles locked.
6. Place the fruit pulp/the pulp container (4) under the lid.
7. Place the delivered juice container with lid (8), or may-be a mug or a glass, under the
spout.
How to use the juice extractor
The juice extractor can only operate, if the appliance has been assembled correctly.
Connect the plug to a socket and set the required speed by positioning the switch at level I or
II. Consult the following guide to see what speed level to use in order to obtain the optimum
of the raw materials:
Low speed – level I - in particular for juicy fruits and vegetables, such as:
Tomatoes, pears, peaches, strawberries, oranges, plums, grapefruits, lemons, cherries,
currants, gooseberries, onions, cucumbers, garlic and parsley.
1
2
4
3
9
8
7
6
5
6841 IM 090709.indd 19
10-07-2009 12:31:39


