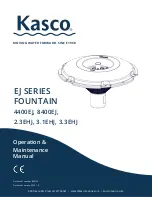
background image

-  English  -

4


B

C

D


Installation

WARNING

Risk of electric shock – This pump is supplied with a grounding conductor and grounding-type attachment plug. To 

reduce the risk of electric shock, be certain that it is connected only to a properly grounded, grounding-type 

receptacle. Do not remove the grounding pin from the power cord plug. 

Inspect cord for damage before installation and/or maintenance. Replace the entire fountain assembly if damage is 

found. 

Always disconnect fountain from the power source before beginning any maintenance or work on the pump.

1.   

Remove assembled fountain from packaging and connect 

pump to floating attachment assembly.

○ 

For 1/4 HP, use the coupler to connect the pump.

2.

   Choose a fountain head for the desired water effect, and 

assemble your choice.

○ 

For 1/4 HP, use the nozzle adapter.

3.

   Connect the light to the cord (Part I) by pushing the plug 

into the light socket until it is firmly seated. Hand tighten 

the nut from the plug to the socket.

4.

   Connect the cord for LED light to the sensor by pushing 

the plug into the sensor socket until it is firmly seated. 

Hand tighten the nut from the plug to the socket.

2.

1.

Important:


  Do not lift the pump by its power cord. 

Use the handle to lift and maneuver the pump.

4.

1/2 HP

1/4 HP

Coupler

3.

Sensor

cord for LED


B

C

D


B

C

D


B

C

D


B

C

D

E

E

1/2 HP

1/4 HP

Summary of Contents for Floating Fountain with Lights 1/4 HP

Page 1: ...1 1 Floating Fountain with Lights 1 4 HP 1 2 HP Operating instructions Notice d emploi Instrucciones de uso...

Page 2: ...ructions Welcome to OASE Living Water You made a great choice with the purchase of this product Floating Fountain with Lights 1 4 HP 1 2 HP Prior to operating the unit please read the instructions of...

Page 3: ...ights 1 4 HP 1 2 HP referred to in the following as unit may only be used as specified in the following For creating a water fountain in lakes or large ponds with or without fish For aeration and supp...

Page 4: ...emove assembled fountain from packaging and connect pump to floating attachment assembly For 1 4 HP use the coupler to connect the pump 2 Choose a fountain head for the desired water effect and assemb...

Page 5: ...he unit so that it is not exposed to direct sun radiation max 104 F 40 C Important The unit switches on automatically when power connection is established The light is designed to turn on when it gets...

Page 6: ...ing the impeller assembly Cleaning the unit Regular cleaning of the pump may be necessary depending upon the environment in which it is operated Clean the fountain when a drop in visual performance is...

Page 7: ...not broken or jammed by debris Also check to make sure that the ceramic shaft or bearings are not broken Pump is not completely submerged Place the unit bellow water make sure it is floating Insuffici...

Page 8: ...W 2300 GPH 20 ft 14 3 x 18 9 in 14 96 lbs 1 2 HP 45393 230 W 5150 GPH 23 ft 22 8 x 16 73 in 19 25 lbs Floating Fountain with Lights EN Model trumpet single tier 3 Tier 1 4 HP Adjustable 15 75 x 3 6 f...

Page 9: ...Pump with cord for LED light 9 Tether Line 10 Ground Anchor 11 LED light set 12 Light cord Extension 13 Float 14 Bolt 15 Washer 1 16 Washer 2 17 Screw 1 18 Fountain Support 19 Nut 20 Adapter 21 Lockin...

Page 10: ...6 Pump with cord for LED light 7 Tether Line 8 Ground Anchor 9 LED light set 10 Light cord Extension 11 Float 12 Bolt 13 Washer 1 14 Screw 1 15 Fountain Support 16 Adapter 17 Locking ring 18 Screw 2...

Page 11: ...28 OASE North America INC www oase livingwater com 47877 08 16...

Reviews: