background image

Specification

Page 2-1

Section 2

SPECIFICATION

Mainboard Specification

Processor

Š

Supports 462-pin SocketA for AMD Athlon XP and Barton processors
with 266/333/400MHz Front Side Bus

- Athlon XP (1500+ to 3000+) with 266/333MHz Front Side Bus,

- Barton (2500+ to 3200+) with 333/400MHz Front Side Bus

Chipset

Š

nVidia AGPset :  nForce2 Ultra 400 + RAID MCP

Main Memory

Š

Three

 184-pin DDR DIMM sockets for 64-bit, Unbuffered, Single/Double-

side and DDR-266/333/400 DIMMs

Š

Supports

 128

-bit 

dual

 channel memory architecture

Š

Supports up to 

3

GB memory size

BIOS

Š

Flash EEPROM with Award BIOS
- ACPI v2.0 compliant
- S3 (Suspend to DRAM) sleep-state support
- SMBIOS (System Management BIOS)


v2.2 compliant

- Supports Power failure recovery
- Able to wake the computer from specific states by LAN, Power switch,

PME#, RTC alarm, USB,  PS2 K/B, PS2 Mouse, Modem Ring-in  COM#1…

Onboard PCI Devices

Š

1394 -->

Integrated 

VIA VT6307 

1394 controller with 2 ports solution

- IEEE-1394a compliant with up to 400Mbps bandwidth

Š

LAN -->

10/100Mbps Fast Ethernet with onboard

 Realtek RTL8201CL

LAN PHY

(Optional)

Summary of Contents for nForce2 Ultra 400

Page 1: ...4 nVIDIA nVIDIA nVIDIA nVIDIA nVIDIA nForce nForce nForce nForce nForce2 2 2 2 2 Ultra 400 Ultra 400 Ultra 400 Ultra 400 Ultra 400 mainboard mainboard mainboard mainboard mainboard for AMD Socket for AMD Socket for AMD Socket for AMD Socket for AMD Socket A A A A A processor processor processor processor processor User User User User User s s s s s Manual Manual Manual Manual Manual 60000028RDP10 ...

Page 2: ... EXCLUDES ALL OTHER WARRANTIES EXPRESS OR IMPLIED REGARDING ITS PRODUCTS INCLUDING ANY IMPLIED WARRANTIES OF MERCHANTABILITY FITNESS FOR A PARTICULAR PURPOSE OR NONINFRINGEMENT THIS DISCLAIMER OF WARRANTIES SHALL APPLY TO THE EXTENT ALLOWED UNDER LOCAL LAWS IN THE COUNTRY PURCHASED IN WHICH LOCAL LAWS DO NOT ALLOW OR LIMIT THE EXCLUSION OF THE IMPLIED WARRANTIES ...

Page 3: ...te from the manufacturer s Web site 3 Replace mainboard 4 Remove and replace the add on card C1h C5h 1 M emory module inserted incorrectly 2 M emory compatibility problem 3 M emory module damaged 1 Reinsert memory module 2 Replace memory with correct type 3 Replace memory module 2Dh 1 Error occured in VGA BIOS 2 VGA card inserted incorrectly 1 Replace VGA card 2 Reinsert the VGA card 26h Overclock...

Page 4: ...Insertion 3 2 Jumper Settings 3 4 System Memory Configuration 3 5 Expansion Slots 3 6 Device Connectors 3 7 Power On Off Remote 3 14 External Modem Ring in Power ON and Keyboard Power ON Function KBPO 3 14 STR Suspend To RAM Function 3 15 CPU Overheating Protection 3 16 Section 4 BIOS Setup Main Menu 4 1 Standard CMOS Setup 4 2 Advanced BIOS Features 4 3 Advanced Chipset Features 4 4 Integrated Pe...

Page 5: ...itSelecting 4 22 Section 5 S ATA RAID Configuration Introduction 5 1 NVidia SATA RAID Features 5 3 Enable RAID Function 5 4 Section 6 Driver Installation Easy Driver Installation 6 1 Realtek Sound Manager Quick User guide 6 2 Appendix Appendix A Update Your System BIOS A 1 Appendix B NVidiaRAIDBIOSUtility B 1 Appendix C POST Codes C 1 ...

Page 6: ...vi Page Left Blank ...

Page 7: ...ive cable D HDD drive cable E CD drivers and utilities F I O Shield G S ATA data and power cable Optional Items H Game COM bracket cable I IEEE 1394 two ports bracket J Extra USB2 0 port cable K S PDIF Module B A C D USER S MANUAL E F G J H K If you need the optional item please contact your dealer for assistance I ...

Page 8: ...ndustry standard power management specifications such as ACPI 2 0 and PCI Power Management Interface PMI Spec 1 1 For more details about the NVIDIA nForce2 MCPs please visit the NVIDIA Web site at http www nvidia com Accelerated Graphics Port AGP The AGP slot on the board is compliant with the new AGP 3 0 specification This new specification enhances the functionality of the original AGP specifica...

Page 9: ...g platform IEEE 1394 Optional The IEEE 1394a standard provides transfer rates up to 400Mbits sec IEEE 1394 provides enhanced PC connectivity for consumer electronics audio video appliances storage peripherals portable devices such as digital cameras and inter PC communications USB2 0 A popular USB standard for plugging in peripherals with up to 480Mbps transfer speed while maintaining backward com...

Page 10: ...y DVD movies and games with crystal clear sound Magic Health Reports your system hardware status for every boot up to help detect faults early Monitor hardware status including CPU temperature CPU Memory AGP voltage fan RPM speed for chassis fan CPU fan Power supply fan EZ Boot Simply press ESC to select your bootable device No more hassle to search the BIOS menu change and re start PowerBIOS Supp...

Page 11: ...Introduction Page 1 5 1 3 System Block Diagram ...

Page 12: ...Introduction Page 1 6 ...

Page 13: ...side and DDR 266 333 400 DIMMs Supports 128 bit dual channel memory architecture Supports up to 3GB memory size BIOS Flash EEPROM with Award BIOS ACPI v2 0 compliant S3 Suspend to DRAM sleep state support SMBIOS System Management BIOS v2 2 compliant Supports Power failure recovery Able to wake the computer from specific states by LAN Power switch PME RTC alarm USB PS2 K B PS2 Mouse Modem Ring in C...

Page 14: ...sensing Rear panel audio jacks configuration Supports S PDIF out from nForce2 RAID MCP south bridge Peripheral Interfaces At Rear Panel PS 2 keyboard and mouse ports One Parallel printer port One S PDIF Out Coaxial jack One Serial port One RJ45 LAN connector Four USB2 0 ports Three Audio jacks Onboardconnectorandpin header One floppy drive connector Two ATA 133 IDE connectors r o l o C k c a J o i...

Page 15: ...el Audio connector Expansion Slots One AGP slot supporting 1 5v 4X 8X AGP card AGP v3 0 compliant Six PCI slots with Bus Master support PCI v2 2 compliant Other Features Magic Health A quick dashboard display at POST to show hardware status Helps to detect faults early EZ Boot An easy way let end user can choose to boot from hard drive CD ROM floppy KBPO Keyboard power on turn on the computer from...

Page 16: ...Specification Page 2 4 Supports complete Asynchronous FSB Memory and Asynchronous FSB AGP PCI scheme for overclocking CPU Overheating Protection P80P for system debugging Form Factor 305mmx245mmATXsize ...

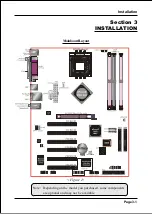
Page 17: ...Installation Page 3 1 MainboardLayout Figure 1 Note Depending on the model you purchased some components are optional and may not be available Section 3 INSTALLATION ...

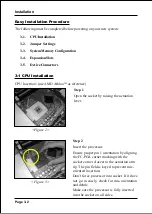
Page 18: ...thlonTM as reference Step 1 Open the socket by raising the actuation lever Figure 2 Step 2 Insert the processor Ensure proper pin 1 orientation by aligning the FC PGA corner marking with the socket corner closest to the actuation arm tip The pin field is keyed to prevent mis oriented insertion Don t force processor into socket If it does not go in easily check for mis orientation and debris Make s...

Page 19: ...ure 5 Step 4 Thermal compound and qualified heatsink recommended by AMD are a must to avoid CPU overheat damage For more information about installing your CPU please refer to the AMD website article Socket A AMD processor and Heatsink Installation Guide http www amd com products cpg athlon pdf 23986 pdf ...

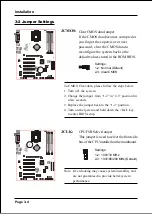
Page 20: ... Select Jumper This jumper is used to select the front side bus of the CPU installed on the mainboard Settings 1 2 100 133 MHz 2 3 133 166 200 MHz Default Note Overclocking may cause system instability and are not guaranteed to provide better system performance To CMOS Clear data please follow the steps below 1 Turn off the system 2 Change the jumper from 1 2 to 2 3 position for a few seconds 3 Re...

Page 21: ...er bus speeds overclocking may severely compromise the integrity of the system Figure 6 Table 1 DDR DIMM 2 DDR DIMM 1 DDR DIMM 3 Bank 0 Bank 1 3 3 System Memory Configuration Memory Layout The mainboard accommodates three PC1600 2100 2700 3200 184 pin DIMMs Dual In line Memory Modules Supports up to 3 0GB of 200 266 333 400MHz DDR SDRAM Supports up to 3 DDR DIMMs refer to Table 1 Supports 64 128 2...

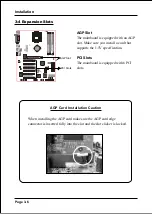
Page 22: ...is equipped with an AGP slot Make sure you install a card that supports the 1 5V specification PCI Slots The mainboard is equipped with 6 PCI slots PCI Slots AGP Slot When installing the AGP card make sure the AGP card edge connector is inserted fully into the slot and the slot clicker is locked ...

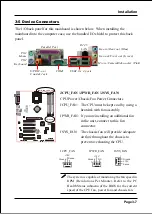
Page 23: ...nnect to this fan connector JSYS_FAN The chassis fan will provide adequate airflow throughout the chassis to prevent overheating the CPU JPWR_FAN Ground 12V Sense 1 JCPU_FAN Ground 12V NC 1 JPWR_FAN Ground 1 12V Sence JSYS_FAN JCPU_FAN JSYS_FAN The system is capable of monitoring the fan speed in RPM Revolutions Per Minute Refer to the PC Health Status submenu of the BIOS for the current speed of ...

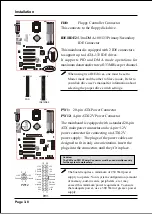
Page 24: ...one orientation Insert the plugs into the connectors until they fit in place Caution The PW1 and PW12 Power Connector must be used simultaneously for the system to work safely 40 39 2 1 IDE1 IDE2 34 33 2 1 FDD When using two IDE drives one must be set to Master mode and the other to Slave mode Refer to your disk drive user s manual for information about selecting the proper drive switch settings T...

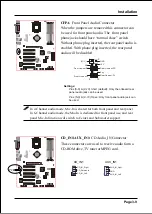
Page 25: ...With phone plug inserted the rear panel audio will be disabled In 2 Channel audio mode Mic In is shared for both front panel and rear panel In 6 Channel audio mode the Mic In is dedicated for front panel use and rear panel Mic In function will switch to Center and Subwoofer support 1 Rear Line out FR Front Line out R Rear Line out FL Front Line out L MIC_In NC 5V Key 9 2 10 GND CD_IN1 AUX_IN1 CD_I...

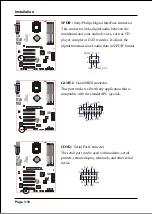
Page 26: ... terminals and other serial device 1 9 2 10 NC CTS Ground TXD RI RTS RXD DTR DCD DSR SPDIF Sony Philips Digital InterFace connector This connector links digital audio between the mainboard and your audio devices such as CD player sampler or DAT recorder It allows the digital transmission of audio data in S PDIF format 1 5 2 6 VCC NC GND SPDIF_IN SPDIF_OUT 16 2 15 1 J1B1 J1CX 5V 5V 5V J2CX J2B1 MID...

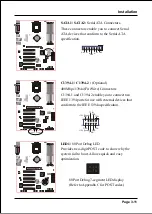
Page 27: ...PA TPB TPA TPB GND 12V Fused 12V Fused GND GND Key C1394 1 C1394 2 LED1 80 Port Debug LED Provides two digit POST code to show why the system fail to boot Allows quick and easy optimization 80 Port Debug 7 segment LED display Refer to Appendix C for POST codes SATA1 SATA2 Serial ATA Connectors These connectors enable you to connect Serial ATA devices that conform to the Serial ATA specification SA...

Page 28: ... by two 10 pin connector If you wish to use the additional USB ports install the card edge bracket to the system chassis then insert its cables to this 10 pin connector CUSB3 CAUTION Please make sure the USB cable has the same pin assignment A different pin assignment may cause damage to the system If you need the USB cable please contact our retailer CUSB4 ...

Page 29: ...switch allows you to reboot without having to power off the system thus prolonging the life of the power supply or system PW_ON This is connected to the power button on the case To use the Soft Off by PWR BTTN feature refer to the Power Management Setup in the BIOS setup section of this manual CIR IR connector Connect the IrDA cable if available to this IR connector CSPK Speaker Connect to the cas...

Page 30: ...wer supplies with Remote On Off feature The 4 pin ATX12V connector must be plugged in for the system to operate safely The chassis power button should be connected to the mainboard front panel PW_ON header Figure 7 You can turn off the system in two ways by pressing the front panel power On Off button or using the Soft Off function that can be controlled by an operating system such as Windows XP M...

Page 31: ... select ACPI Suspend Type S3 STR c When in Windows open the Control Panel Power Management application and click the Advanced tab In the Power buttons section select Stand By from the drop down lists 2 To activate the STR function a Click the START button and choose Shut Down b In the Shut Down Windows dialog box select the Stand By option to enter STR mode The following are the differences betwee...

Page 32: ...o power on This protection is designed through hardware and no BIOS setup is required To power on your system again Step 1 Unplug the ATX power cord or turn off the ATX power supply switch Step 2 Wait a few minutes for the CPU to cool Step 3 Check that the CPU heatsink and cooling fan assembly is properly installed Be careful when touching the heatsink as it may be hot Step 4 Plug back the ATX pow...

Page 33: ...the system such as hard drive replacement or a device is added It is possible for the CMOS battery to fail causing CMOS data loss If this happens you will need install a new CMOS battery and reconfigure your BIOS settings To enter the Setup Program Power on the computer and press the Del key during the POST Power On Self Test The BIOS CMOS SETUP UTILITY opens Figure 1 Figure1 CMOSSetupUtility The ...

Page 34: ... STANDARD CMOS FEATURES in the CMOS SETUP UTILITY Menu Figure 2 Standard CMOS Features Setup allows the user to configure system settings such as the current date and time type of hard disk drive installed floppy drive type and display type Memory size is auto detected by the BIOS and displayed for your reference When a field is highlighted use direction keys to move the cursor and the Enter key t...

Page 35: ...ice Hard Disk CD ROM Network Boot Priority This item allows you to select the removable device hard disk CD ROM network boot priority First Second Third Boot Device The BIOS attempts to load the operating system from the devices in the sequence selected in these items Options Floppy LS120 Hard Disk CDROM ZIP100 USB FDD USB ZIP LAN Disabled Boot Other Device When enabled the system searches all oth...

Page 36: ...up The default is Setup System The system will not boot and access to Setup will be denied unless the correct password is entered at the prompt Setup The system will boot but access to Setup will be denied unless the correct password is entered at the prompt Full Screen LOGO Show This item allows you determine Full Screen LOGO display during POST Options Enabled Disabled 4 3 Advanced Chipset Featu...

Page 37: ... switch on again Restart the system press and hold Insert key This will revert the BIOS to default or initial setting CPU Interface Allows you to set CPU FSB parameters for CPU most stable or overclocked Options Optimal Aggressive Memory Frequency Enables you to select the memory frequency Options By SPD 50 60 66 75 80 83 100 120 125 133 150 166 200 Auto Below is a list of Auto mode table for refe...

Page 38: ...l location to close the bank or the number of cycles required to page memory before the next bank activate command can be issued Options 1 7 CAS Latency This item specifies the number of clock cycles needed after a Column Address Strobe CAS signal before data can be read The default is by DRAM SPD Options 2 0 2 5 3 0 Memory Auto Precharge Enables Memory Auto Precharge function Options Enabled Disa...

Page 39: ...90MHz 93MHz 95MHz 97MHz 100MHz 50MHz 87MHzin1MHz increments AGP 8X Support Enables AGP 8X supports Options Disabled Enabled AGP Fast Write Capability This item allows you to use Fast Write transfer for CPU write to graphics adapter s memory Options Disabled Enabled System BIOS Cacheable This item allows the system BIOS to be cached in memory for faster execution Options Disabled Enabled Video RAM ...

Page 40: ...tegratedPeripherals Init Display First This item is used to select whether to initialize the AGP or PCI first when the system boots Options PCI Slot Onboard AGP IDE Function Setup Scroll to IDE Function Setup and press Enter The following screen appears ...

Page 41: ...tency between each drive read write cycle but may cause instability in IDE subsystems that cannot support such fast performance If you are getting disk drive errors try setting this value to Disabled This field does not appear when the Internal PCI IDE field above is Disabled Options Enabled Disabled OnChip Serial ATA This item enables disables the S ATA ports IDERAID This item allows you to enabl...

Page 42: ... Enabled Disabled USB Mouse Support Enable Disable support for USB mouse under DOS Options Enabled Disabled AC97 Audio This item allows you disable the chipset on chip AC97 Audio Options Auto Disabled NV Lan Enables the onboard LAN feature Options Auto Disabled NV Lan MAC Address Machine MAC NV address selection Options Enabled Disabled NV Lan Address Input Allows you to input the MAC NV address C...

Page 43: ...B Power ON Password HotKEY Enables you to use a hot key combination to power on the computer Set the hot key combination in the Hot Key Power ON field AnyKEY Enables you to set any keyboard activity to power on the computer ButtonOnly Requires you to push the computer power button to power on the system Keyboard98 Enables you to set the Windows 98 key to power on the system KB Power ON Password Pr...

Page 44: ... 2nd serial port for IR application Select the required IR protocol or select Normal to disable IR mode Options Normal IrDA and ASKIR RxD TxD Active When the above UART Mode Select is in IR mode this field configures the receive and transmit signals generated from the IR port Options Hi Hi Hi Lo Lo Hi and Lo Lo IR Transmission delay This item allows you to enabled disable IR transmission delay Opt...

Page 45: ...PP mode for parallel port mode Options EPP1 9 EPP1 7 ECP Mode USE DMA This field allows the user to select DMA1 or DMA3 for the ECP mode Options DMA1 DMA3 Game Port Address Select an address for the Game port Options 201 209 Disabled Midi Port Address Select an address for the Midi port Options 290 300 330 Disabled Midi Port IRQ Select an interrupt for the Midi port Options 5 10 ...

Page 46: ...Function Options Enabled Disabled ACPI Suspend Type This item allows you to select S1 Power On Suspend or S3 Suspend To RAM function When set to S3 STR or S1 S3 the following two fields become available Options S1 POS S3 STR S1 S3 Power Management Use this to select your Power Management selection The default is User define Max saving Maximum power savings Inactivity period is 1 minute in each mod...

Page 47: ...y Options Disabled 1min 15min HDD Down In Suspend Lets you enable the HDD to power off in suspend mode Options Enabled Disabled Soft Off by PBTN Use this to select your soft off function The default is Instant Off InstantOff Turns off the system instantly Delay 4 Second Turns off the system after a 4 second delay If momentary press of button the system will go into Suspend Mode Press the power but...

Page 48: ...tion This page lets the user to modify the PCI IRQ signals when various PCI cards are inserted WARNING Conflicting IRQ s may cause system unable to locate certain devices Figure7 PNP PCIConfigurationSetup Resources Controlled By Determines what controls system PNP PCI resources The default is Auto ESCD Manual PNP Card s resources are controlled manually The IRQ Resources field becomes available an...

Page 49: ... IRQ slots make sure its drivers support Shared IRQ or that the cards do not need IRQ assignments IRQ conflicts between the two PCI groups will make the system unstable or cards inoperable A T N I B T N I C T N I D T N I E T N I t o l S P G A V 7 9 C A V 1 t o l S V 2 t o l S V t o l S 3 V t o l S 4 V t o l S 5 V 6 t o l S V 4 9 3 1 d r a o b n O V N A L d r a o b n O V B S U d r a o b n O V B S U...

Page 50: ...fects of an overheating system requires ACPI to be enabled in Power Manage ment BIOS and ACPI compliant operating system The default is Disabled Options available are 60o C 140o F to 75o C 167o F in increments of 5o C Current System CPU Temperature Displays the current system CPU temperature Current CPU Chassis Power FAN Speed Displays the current speed of the CPU chassis and power fan speed in RP...

Page 51: ...tandby The voltage level of the switching power supply 4 8 POWER BIOS Features This page lets you adjust various parameters to obtain improved performance for overclocking Warning Overclocking requires expert knowledge and risks permanent damage to system components We recommend you leave these parameters at their default values for proper operation Figure9 PowerBIOSFeatures ...

Page 52: ...oltage is 1 6V Setting higher voltage may cause damage to chipset Please ensure proper cooling for Northbridge and Southbridge 4 9 Defaults Menu Selecting Defaults from the main menu shows you two options which are de scribed below Load Fail Safe Defaults When you press Enter on this item you get a confirmation dialog box LoadFail SafeDefaults Y N N Pressing Y loads the BIOS default values for the...

Page 53: ... to abort the selection and not enter a password To disable a password just press Enter when you are prompted to enter the password A message will confirm the password will be disabled Once the password is disabled the system will boot and you can enter Setup freely PASSWORD DISABLED When a password has been enabled you will be prompted to key in each time you enter Setup This prevents an unauthor...

Page 54: ...your system off The next time you boot your computer the BIOS configures your system according to the Setup selections stored in CMOS After saving the values the system is restarted again Exit Without Saving Pressing Enter on this item asks for confirmation Quit without saving Y N Y This allows you to exit Setup without storing in CMOS any change The previous selections remain in effect This exits...

Page 55: ...disk drives in an array are called members All disk members in a formed disk array are recognized as a single physical drive to the operating system Hard disk drives can be combined together through a few different methods The different methods are referred to as different RAID levels Different RAID levels represent different performance levels security levels and implementation costs The table be...

Page 56: ...y is the capacity of the smallest drive Under a RAID 1 setup an extra drive called the spare drive can be attached Such a drive will be activated to replace a failed drive that is part of a mirrored array Due to the fault tolerance if any RAID 1 drive fails data access will not be affected as long as there are other working drives in the array JBOD Spanning A spanning disk array is equal to the su...

Page 57: ...A free disk can be used by any available mirrored array while a dedicated disk can be used only by the array to which it is assigned RAID Across PATA and SATA NVRAID can span across both Parallel ATA as well as Serial ATA controllers RAID operations can be performed on Parallel ATA hard drives Serial ATA hard drives or both Parallel and Serial ATA hard drives Bootable RAID NVRAID can be configured...

Page 58: ...sing the RAID controller s BIOS utility NVIDIA nForce2 MCP Power on the system and wait for the following screen to appear Press the F10 key to enter its BIOS configuration utility Refer to Appendix B 1 for details about creating RAID array using this utility After the RAID array is created press F10 to exit Note If you are not installing O S into the RAID disks you may skip Step 2 Step3 ...

Page 59: ...arious RAID controllers will appear 4 Insert a blank floppy into the A drive 5 Select the appropriate RAID controller to begin copy into the floppy Method 2 1 Locate another computer and insert the bundled CD into its CD ROM drive 2 A main menu screen will appear Autorun feature 3 Select the page RAID floppy as shown below 4 Insert a blank floppy into the A drive 5 Click on the required driver to ...

Page 60: ...y with graphical user interface that provides an easy operating tool to configure and manage RAID arrays 1 Insert the bundled CD into the CD ROM drive 2 When the main menu appears click on the RAID driver corresponding to the controller you have configured in Step 1 See driver installation in section 6 for more details Note For information on using the software utility refer to the user guide in t...

Page 61: ... CD disk the main menu screen will appear The main menu displays buttons that link you to the supported drivers utilities and software Step 1 Click NVIDIA NFORCE Driver to install chipset driver Step 2 Click AC 97 AUDIO Driver to install audio driver Step 3 Click USB 2 0 Driver to install USB 2 0 driver ...

Page 62: ... For more detailed information refer to Sound Manager manual in the CD Sound Effect 1 Right click Sound Effect button on the task bar and select Sound Manager 2 Select Sound Effect page to set the desired audio environment from the pull down menu There are in total 23 kinds of sound effect a For Karaoke function Voice Cancellation only for 2 channels mode removes the human voice Key lets you adjus...

Page 63: ... There are 10 bands of equalizer control check ON when you want to adjust the equalizer Figure 4 4 This page displays the mainboards s phone jack function when a corresponding audio mode no of speaker is selected Figure 4 above shows the phone jack setup for 2 channel mode ...

Page 64: ...age 6 4 Figure 5 5 For 6 channel mode the audio combination is shown above Figure 6 6 To test the speaker select the Speaker Test page and click directly on the speakers shown on the screen Speaker Test Speaker Configuration ...

Page 65: ...ur system a Click Auto Lock to detect S PDIF input and display its information b Check Real time S PDIF In monitor to listen to the S PDIF IN signal through Line out connector Figure 8 SPDIF Out 8 This page lets you choose the type of audio source that will appear on the S PDIF out connector ...

Page 66: ...ensing 9 Push Start button to start the sensing Please remember to terminate all audio applications before starting the sensing 10 EZ Connection shows the result of the detection Audio Connector column reflects the settings used in the Speaker Configuration page Current Connection column shows the type of device detected If the results do not match an exclamation mark will appear on the right side...

Page 67: ... After closing EZ Connector this page will show the latest connector status as above Figure 12 12 This page displays information regarding the audio hardware and software To remove Sound Manager icon from Windows Task bar uncheck Show icon in system tray General ...

Page 68: ...Drivers Installation Page 6 8 ...

Page 69: ...ile and it will self extract Copy these extracted files to a bootable floppy disk Note The floppy disk should contain NO device drivers or other programs 1 Type A AWDFLASH and press Enter Key 2 You will see the following setup screen 3 Please key in the xxxxx bin BIOS file name 4 If you want to save the previous BIOS data to the diskette please key in Y otherwise please key in N xxxxx bin XXXX XXX...

Page 70: ...ame to save previous BIOS to file 6 To confirm and proceed please key in Y to start the programming 7 The BIOS update is finished xxxxx bin F1 Reset F10 Exit XXXXX XXXX xxxxx bin xxxxx bin XXXXX XXXX xxxxx bin xxxxx bin XXXXX XXXX ...

Page 71: ...rrow key until the mode that you want appears in the RAID Mode box either Mirroring Striping Spanning or Stripe Mirroring Selecting the Striping Block Size Striping block size is given in kilobytes and affects how data is arranged on the disk It is recommended to leave this value at the default Optimal which is 32KB but the values can be between 4 KB and 128 KB Assigning the Disks The disks that y...

Page 72: ...d and ready to be moved 3 Continue pressing the right arrow key until all the disks that you want to use as RAID array disks appear in the Array Disks block Completing the RAID BIOS Setup After assigning your RAID array disks press F7 The Clear disk data prompt appears Press Y if you want to wipe out all the data from the RAID array otherwise press N You must choose Yes if the drives were previous...

Page 73: ...ion about the array that you selected such as Striping Block used RAID Mode Striping Width Disk Model Name and disk capacity If you want to mark this disk as empty and wipe out all its contents then press C At the prompt press Y to wipe out all the data otherwise press N Press Enter again to go back to the previous window and then press F10 to exit the RAID setup ...

Page 74: ...Appendix B 4 ...

Page 75: ...ecial keyboard controller for Winbond 977 series Super I O chips 2 Enable keyboard interface 09h Reserved 0Ah 1 Disable PS 2 mouse interface optional 2 Auto detect ports for keyboard mouse followed by a port interface swap optional 3 Reset keyboard for Winbond 977 series Super I O chips 0B 0Dh Reserved 0Eh Test F000h segment shadow to see whether it is R W able or not If test fails keep beeping th...

Page 76: ...y information 4 Onboard clock generator initialization Disable respective clock resource to empty PCI DIMM slots 5 Early PCI initialization Enumerate PCI bus number Assign memory I O resource Search for a valid VGA device VGA BIOS and put it into C000 0 24 26h Reserved 27h Initialize INT 09 buffer 28h Reserved 29h 1 Program CPU internal MTRR P6 PII for 0 640K memory address 2 Initialize the APIC f...

Page 77: ...56h Reserved 57h 1 Display PnP logo 2 Early ISA PnP initialization Assign CSN to every ISA PnP device 58h Reserved 59h Initialize the combined Trend Anti Virus code 5Ah Reserved 5Bh Optional Feature Show message for entering AWDFLASH EXE from FDD optional 5Ch Reserved 5Dh 1 Initialize Init_Onboard_Super_IO switch 2 Initialize Init_Onbaord_AUDIO switch 5E 5Fh Reserved 60h Okay to enter Setup utilit...

Page 78: ... not for full screen logo 3 If password is set ask for password 83h Save all data in stack back to CMOS 84h Initialize ISA PnP boot devices 85h 1 USB final Initialization 2 NET PC Build SYSID structure 3 Switch screen back to text mode 4 Set up ACPI table at top of memory 5 Invoke ISA adapter ROMs 6 Assign IRQs to PCI devices 7 Initialize APM 8 Clear noise of IRQs 86 92h Reserved 93h Read HDD boot...

Reviews: