background image

Redfish APIs Support


DGX A100 System 

DU-09821-001_v06

   |   88 

3.


Configure apt to use the NVIDIA DGX OS packages in the file /etc/apt/sources.list.d/ 

dgx.list. 

deb 

file:///media/usb/repository/mirror/repo.download.nvidia.com/baseos/ubuntu/fo

cal/ x86_64/ focal main dgx 

deb 

file:///media/usb/repository/mirror/repo.download.nvidia.com/baseos/ubuntu/fo

cal/ x86_64/ focal-updates main dgx 

4.


Configure apt to use the NVIDIA CUDA packages in the /etc/apt/sources.list.d/ cuda-

compute-repo.list file. 

deb 

file:///media/usb/repository/mirror/developer.download.nvidia.com/compute/cud

a/ repos/ubuntu2004/x86_64/ / 

5.


Update the apt repository and confirm there are no errors. 

$ sudo apt update 


Output from this command is similar to the following example. 

Get:1 file:/media/usb/repository/mirror/security.ubuntu.com/ubuntu focal-

security InRelease [107 kB] 

Get:2 file:/media/usb/repository/mirror/archive.ubuntu.com/ubuntu focal 

InRelease [265 kB] 

Get:3 file:/media/usb/repository/mirror/archive.ubuntu.com/ubuntu focal-

updates InRelease [111 kB] 

Get:4 

file:/media/usb/repository/mirror/developer.download.nvidia.com/compute/cuda/ 

repos/ubuntu2004/x86_64 InRelease 

Get:5 

file:/media/usb/repository/mirror/repo.download.nvidia.com/baseos/ubuntu/foca

l/ 


x86_64 focal InRelease [12.5 kB] 

Get:6 

file:/media/usb/repository/mirror/repo.download.nvidia.com/baseos/ubuntu/foca

l/ x86_64 focal-updates InRelease [12.4 kB] 

Get:7 

file:/media/usb/repository/mirror/developer.download.nvidia.com/compute/cuda/ 

repos/ubuntu2004/x86_64 Release [697 B] 

Get:8 

file:/media/usb/repository/mirror/developer.download.nvidia.com/compute/cuda/ 

repos/ubuntu2004/x86_64 Release.gpg [836 B] 

Reading package lists... Done$ 

6.


Upgrade the system using the newly configured local repositories. 

$ sudo apt full-upgrade 

Summary of Contents for DGX A100

Page 1: ...DU 09821 001_v06 May 2022 DGX A100 System User Guide ...

Page 2: ... 1 5 Front Panel Connections and Controls 7 1 1 5 1 With a Bezel 7 1 1 5 2 With the Bezel Removed 8 1 1 6 Rear Panel Modules 8 1 1 7 Motherboard Connections and Controls 9 1 1 8 Motherboard Tray Components 9 1 1 9 GPU Tray Components 10 1 2 Network Connections Cables and Adaptors 10 1 2 1 Network Ports 10 1 2 2 Supported Network Cables and Adaptors 12 1 3 DGX A100 System Topology 12 1 4 DGX OS Sof...

Page 3: ...the DGX Crash Dump Feature 30 5 1 1 Using the Script 30 5 1 2 Connecting to Serial Over LAN to View the Console 31 Chapter 6 Managing the DGX A100 Self Encrypting Drives 32 6 1 Overview 32 6 2 Installing the Software 33 6 3 Configuring Trusted Computing 33 6 3 1 How to Tell if Drives Support Block SID 34 6 3 2 Enabling the TPM and Preventing the BIOS from Sending Block SID Requests 34 6 4 Initiali...

Page 4: ... 8 Configuring Storage 49 8 1 Setting Filesystem Quotas 50 8 2 Switching Between RAID 0 and RAID 5 50 8 3 Configuring Support for Custom Drive Partitioning 51 Chapter 9 Updating and Restoring the Software 52 9 1 Updating the DGX A100 Software 52 9 1 1 Connectivity Requirements for Software Updates 52 9 1 2 Update Instructions 53 9 2 Restoring the DGX A100 Software Image 53 9 2 1 Obtaining the DGX ...

Page 5: ...L Certificate 68 10 3 5 4 Updating the SBIOS Certificate 68 Chapter 11 SBIOS Settings 72 11 1 Accessing the SBIOS Setup 72 11 2 Configuring Boot Order 73 Chapter 12 Multi Instance GPU 74 Chapter 13 Security 75 13 1 User Security Measures 75 13 1 1 Securing the BMC Port 75 13 2 System Security Measures 75 13 2 1 Secure Flash of DGX A100 Firmware 75 13 2 1 1 Encryption 75 13 2 1 2 Signing 76 13 2 1 ...

Page 6: ...IDIA DGX A100 system is the universal system purpose built for all AI infrastructure and workloads from analytics to training to inference The system is built on eight NVIDIA A100 Tensor Core GPUs This document is for users and administrators of the DGX A100 system ...

Page 7: ...ty 6 Second generation 2x faster than first generation Qty 6 Second generation 2x faster than first generation Networking Qty 10 Factory ship config Mellanox ConnectX 6 VPI HDR InfiniBand 200 Gb s Ethernet Qty 9 Factory ship config Mellanox ConnectX 6 VPI HDR IB 200 Gb s Optional Add on Second dual port 200 Gb s Ethernet CPU 2 AMD Rome 128 cores total 2 AMD Rome 128 cores total System Memory 2 TB ...

Page 8: ...0 EDR Ethernet 200GbE 100GbE 50GbE 40GbE 25GbE and 10GbE Network Storage card Mellanox ConnectX 6 Dual Port VPI Ethernet default 200GbE 100GbE 50GbE 40GbE 25GbE and 10GbE InfiniBand HDR HDR100 EDR System Memory DIMM 1 TB per 16 DIMMs BMC out of band system management 1 GbE RJ45 interface Supports IPMI SNMP KVM and Web UI and the Redfish APIs In band system management 1 GbE RJ45 interface Power Sup...

Page 9: ... logs If only one PSU is working troubleshoot the cause for the loss of power from the other PSUs and correct If faulty PSUs need to be replaced shut the system down and install working PSUs 1 1 3 2 DGX A100 Locking Power Cord Specification The DGX A100 is shipped with a set of six 6 locking power cords that have been qualified for use with the DGX A100 to ensure regulatory compliance Two locking ...

Page 10: ...t To REMOVE press the clips together and pull the cord out of the socket 1 1 3 3 2 Locking Unlocking the PSU Side Cords with Switch Lock Mechanism Power Supply System side Switch locking To INSERT or REMOVE make sure the cable is UNLOCKED and push pull into out of the socket To UNLOCK the power cord move the switch to the unlocked position indicator will show GREEN To LOCK the power cord move the ...

Page 11: ...4 Environmental Specifications Table 1 6 Environmental Specifications Feature Specification Operating Temperature 5 C to 30 C 41 F to 86 F Relative Humidity 20 to 80 non condensing Airflow 840 CFM 80 fan PWM Heat Output 22 179 BTU hr To UNLOCK the power cord twist the gray locking ring to the unlocked indicator will show an unlocked padlock To LOCK the power cord twist the gray locking ring to the...

Page 12: ... the DGX A100 system On or Off Green flashing 1 Hz Standby BMC booted Green flashing 4 Hz POST in progress Green solid On Power On ID Button Press to cause the button blue LED to turn On or blink configurable through the BMC as an identifier during servicing Also causes an LED on the back of the unit to flash as an identifier during servicing Fault LED Amber On System or component faulted ...

Page 13: ...roduction DGX A100 System DU 09821 001_v06 8 1 1 5 2 With the Bezel Removed Important See Turning DGX A100 On and Off for instructions on how to properly turn the system on or off 1 1 6 Rear Panel Modules ...

Page 14: ...n Power Button Press to turn the system On or Off ID LED Button Blinks when ID button is pressed from the front of the unit as an aid in identifying the unit needing servicing BMC Reset button Press to manually reset the BMC See Network Connections Cables and Adaptors for details on the network connections 1 1 8 Motherboard Tray Components ...

Page 15: ...Introduction DGX A100 System DU 09821 001_v06 10 1 1 9 GPU Tray Components 1 2 Network Connections Cables and Adaptors 1 2 1 Network Ports ...

Page 16: ...e mlx5_5 6 0c 00 0 ib0 enp12s0 mlx5_0 mlx5_0 7 12 00 0 ib1 enp18s0 mlx5_1 mlx5_1 8 8d 00 1 ib4 enp141s0 mlx5_6 mlx5_6 9 94 00 0 ib5 enp148s0 mlx5_7 mlx5_7 LAN e2 00 0 enp226s0 N A Note The interface enp37s0f3u1u3c2 or bmc_redfish0 is recognized by the OS and may be listed in response to such commands as ifconfig or ip addr This interface supports BMC communication using Redfish APIs Note The Optio...

Page 17: ... Visit the Mellanox Firmware Release page 2 From the left navigation menu select the ConnectX model and corresponding firmware included in the DGX A100 3 Select Firmware Compatible Products 1 3 DGX A100 System Topology 1 4 DGX OS Software The DGX A100 system comes pre installed with a DGX software stack incorporating the following An Ubuntu server distribution with supporting packages The followin...

Page 18: ...registry for using containerized deep learning GPU accelerated applications on your DGX A100 system NVSM Software User Guide Contains instructions for using the NVIDIA System Management software DCGM Software User Guide Contains instructions for using the Data Center GPU Manager software 1 6 Customer Support Contact NVIDIA Enterprise Support for assistance in reporting troubleshooting or diagnosin...

Page 19: ... installs Docker Engine which uses the 172 17 xx xx sub net by default for Docker containers If the DGX A100 system is on the same subnet you will not be able to establish a network connection to the DGX A100 system Refer to Configuring Docker IP Addresses for instructions about how to change the default Docker network settings 2 1 1 Direct Connection At either the front or the back of the DGX A10...

Page 20: ...Connecting to the DGX A100 DGX A100 System DU 09821 001_v06 15 Figure 2 1 DGX A100 Server Front View Figure 2 2 DGX A100 Server Rear View ...

Page 21: ...at you have the BMC login credentials These credentials depend on the following conditions Before the first boot setup The default credentials are Username admin Password dgxluna admin CAUTION When you create a BMC admin user we strongly recommend that you change the default password for this user Do not use the default password After first boot setup During the first boot procedure you were promp...

Page 22: ...igation menu click Remote Control The Remote Control page allows you to open a virtual Keyboard Video Mouse KVM on the DGX A100 system as if you were using a physical monitor and keyboard connected to the front of the system 5 Click Launch KVM The DGX A100 console appears in your browser ...

Page 23: ...to the OS After the system has been configured you can also establish an SSH connection to the DGX A100 OS through the network port See Network Ports to identify the port to use and Configuring a BMC Static IP Address for the Network Ports if you need to configure a static IP address ...

Page 24: ...p These instructions describe the setup process that occurs the first time the DGX A100 system is powered on after delivery or after the server is re imaged Be prepared to accept all End User License Agreements EULAs and to set up your username and password To preview the EULA visit https www nvidia com en us data center dgx systems support and click the DGX EULA link 1 Connect to the DGX A100 con...

Page 25: ...he DGX A100 software a Select your language and locale preferences b Select the country for your keyboard c Select your time zone d Confirm the UTC clock setting e Create an administrative user account with your name username and password Note The BMC software will not accept sysadmin for a username If you create this username for the system log in sysadmin will not be available for logging in to ...

Page 26: ...erver addresses If no DHCP is available then click OK at the Network autoconfiguration failed dialog and configure the network manually If you want to configure a static address then click Cancel at the dialog after the DHCP configuration completes to restart the network configuration steps If you need to select a different network interface then click Cancel at the dialog after the DHCP configura...

Page 27: ...updates The Ubuntu Security Notice site https usn ubuntu com lists known Common Vulnerabilities and Exposures CVEs including those that can be resolved by updating the DGX OS software 1 Run the package manager sudo apt update 2 Upgrade to the latest version sudo apt full upgrade 3 2 2 Enabling the srp_daemon The srp_daemon comes with the Mellanox drivers and is disabled by default It is needed onl...

Page 28: ... be voided Before installation make sure you have given all relevant site information to your Installation Partner 4 2 Registration To obtain support for your DGX A100 system follow the instructions for registration in the Entitlement Certification email that was sent as part of the purchase Registration allows you access to the NVIDIA Enterprise Support Portal technical support software updates a...

Page 29: ...minute of idle time after reaching the login prompt This ensures that all components can complete their initialization 4 4 2 Shutdown Considerations WARNING Risk of Danger Removing power cables or using Power Distribution Units PDUs to shut off the system while the Operating System is running may cause damage to sensitive components in the DGX A100 server When shutting down DGX A100 always initiat...

Page 30: ...ection to the NVIDIA repository and that the NVIDIA Driver is installed sudo docker run gpus all rm nvcr io nvidia cuda 11 0 base nvidia smi Docker pulls the nvidia cuda container image layer by layer then runs nvidia smi When completed the output should show the NVIDIA Driver version and a description of each installed GPU 4 6 Running a Preflight Stress Test NVIDIA recommends running the pre flig...

Page 31: ...The method implemented in your system depends on the DGX OS version installed DGX OS Releases Method included 5 0 Native GPU support NVIDIA Container Runtime for Docker deprecated availability to be removed in a future DGX OS release Each method is invoked by using specific Docker commands described as follows 4 7 1 Using Native GPU Support Use docker run gpus to run GPU enabled containers Example...

Page 32: ...time You can set nvidia as the default runtime for example by adding the following line to the etc docker daemon json configuration file as the first entry default runtime nvidia The following is an example of how the added line appears in the JSON file Do not remove any pre existing content when making this change default runtime nvidia runtimes nvidia path usr bin nvidia container runtime runtim...

Page 33: ...m cpu vulnerabilities CPU mitigations are enabled if the output consists of multiple lines prefixed with Mitigation Example KVM Mitigation Split huge pages Mitigation PTE Inversion VMX conditional cache flushes SMT vulnerable Mitigation Clear CPU buffers SMT vulnerable Mitigation PTI Mitigation Speculative Store Bypass disabled via prctl and seccomp Mitigation usercopy swapgs barriers and user poi...

Page 34: ...itigations are disabled cat sys devices system cpu vulnerabilities The output should include several Vulnerable lines See Determining the CPU Mitigation State of the DGX System for example output 4 8 3 Re enabling CPU Mitigations 1 Remove the nv mitigations off package sudo apt purge nv mitigations off 2 Reboot the system 3 Verify CPU mitigations are enabled cat sys devices system cpu vulnerabilit...

Page 35: ...g the Script To enable only dmesg crash dumps enter the following command usr sbin dgx kdump config enable dmesg dump This option reserves memory for the crash kernel To enable both dmesg and vmcore crash dumps enter the following command usr sbin dgx kdump config enable vmcore dump This option reserves memory for the crash kernel To disable crash dumps enter usr sbin dgx kdump config disable This...

Page 36: ...er LAN to View the Console While dumping vmcore the BMC screen console goes blank approximately 11 minutes after the crash dump is started To view the console output during the crash dump connect to serial over LAN as follows ipmitool I lanplus H bmc ip address U BMC USERNAME P BMC PASSWORD sol activate ...

Page 37: ...data drives are self encrypting drives Only SEDs used as data drives are supported The software will not manage SEDs that are OS drives The software provides the following functionality Identifies eligible drives on the system Allows you to you assign Authentication Keys passwords for each SED as part of the initialization process Alternatively the software can generate random passwords for each d...

Page 38: ...e following Trusted Computing TC features Trusted Platform Module The NVIDIA DGX A100 incorporates Trusted Platform Module 2 0 TPM 2 0 which can be enabled from the system BIOS and used in conjunction with the nv disk encrypt tool Once enabled the nv disk encrypt tool uses the TPM for encryption and then stores the vault and SED authentication keys on the TPM instead of on the file system Using th...

Page 39: ...r two tasks enabling the TPM and preventing the SBIOS from sending Block SID request but you can select which task to perform as each task is independent of the other 1 Reboot the DGX A100 then press Del or F2 at the NVIDIA splash screen to enter the BIOS Setup 2 Navigate to the Advanced tab on the top menu then scroll to Trusted Computing and press Enter To enable TPM scroll to Security Device an...

Page 40: ... for drive encryption using the nv disk encrypt command Syntax sudo nv disk encrypt init k your vault password f path to json file g r Options k Lets you create the vault password in the command Otherwise the software will prompt you to create a password before proceeding f Lets you specify a JSON file that contains a mapping of passwords to drives See Refer to Example 1 Passing in the JSON File f...

Page 41: ...s describe a method for specifying the drive password mapping ahead of time This method is useful for initializing several drives at a time and avoids the need to enter the password for each drive after issuing the initialization command or if you want control of the passwords 6 6 1 1 Determining Which Drives Can be Managed as Self Encrypting Review the storage layout of the DGX system to determin...

Page 42: ... j option sudo nv disk encrypt info j In this case drives that can be used for encryption are indicate by the following sed_capable true used_for_boot false And drives that cannot be used for encryption are indicated by one of the following sed_capable true used_for_boot true Or sed_capable false 6 6 1 2 Creating the Drive Password Mapping JSON Files and Using it to Initialize the System 1 Create ...

Page 43: ...ool to generate random passwords for each drive The vault password must consist of only upper case letters lower case letters digits and or the following special characters _ sudo nv disk encrypt init k your vault password g r sudo nv disk encrypt lock 6 6 3 Example 3 Specifying Passwords One at a Time When Prompted If there are a small number of drives or you do not want to create a JSON file iss...

Page 44: ...chefilesd and unmounting the RAID array as follows 1 Fully stop the RAID systemctl stop cachefilesd sudo umount raid sudo mdadm stop dev md1 2 Perform the erase sudo nv disk encrypt erase This command does the following Sets the drives in an unlocked state Disables locking on the drives Removes the RAID 0 array configuration To rebuild the RAID array issue the following command sudo usr bin config...

Page 45: ... Service Manual for instructions 3 Enable SED management and assign passwords per the instructions in Initializing the System for Drive Encryption 6 12 Recovering From Lost Keys NVIDIA recommends backing up your keys and storing them in a secure location If you ve lost the key used to initialize and lock your drives you will not be able to unlock the drive again If this happens the only way to rec...

Page 46: ... https_proxy https username password host port no_proxy localhost 127 0 0 1 localaddress localdomain com HTTP_PROXY http username password host port FTP_PROXY ftp username password host port HTTPS_PROXY https username password host port NO_PROXY localhost 127 0 0 1 localaddress localdomain com Where username and password are optional Example http_proxy http myproxy server com 8080 ftp_proxy ftp my...

Page 47: ...kip this section However if your network uses the addresses within this range for the DGX A100 system you should change the default Docker network addresses You can change the default Docker network addresses by either modifying the etc docker daemon json file or modifying the etc systemd system docker service d docker override conf file These instructions provide an example of modifying the etc s...

Page 48: ...TP HTTPS connection to NVIDIA GPU Cloud If port 443 is proxied through a corporate firewall then WebSocket protocol traffic must be supported 443 TCP Inbound For BMC web services remote console services cd media service and Redfish If port 443 is proxied through a corporate firewall WebSocket protocol traffic must be supported 7 4 Connectivity Requirements for NGC Containers To run NVIDIA NGC cont...

Page 49: ...escribed in the following sections Configuring a BMC Static IP Address Using ipmitool Configuring a BMC Static IP Address Using the System BIOS 7 5 1 Configuring a BMC Static IP Address Using ipmitool This section describes how to set a static IP address for the BMC from the Ubuntu command line Note If you cannot access the DGX A100 System remotely then connect a display 1440x900 or lower resoluti...

Page 50: ...onfiguration Address Source and press Enter then at the Configuration Address source pop up select Static and then press Enter 5 Set the addresses for the Station IP address Subnet mask and Router IP address as needed by performing the following for each a Scroll to the specific item and press Enter b Enter the appropriate information at the pop up then press Enter 6 When finished making all your ...

Page 51: ...es and use the port designations that you determined in step 1 3 When finished with your edits press ESC to switch to command mode then save the file to the disk and exit the editor 4 Apply the changes sudo netplan apply Note If you are not returned to the command line prompt after a minute then reboot the system For additional information see https help ubuntu com lts serverguide network configur...

Page 52: ... Tools and Determining the Current Port Configuration Make sure that the Mellanox Software Tools services are started sudo mst start To determine the current port configuration enter the following sudo mlxconfig e query egrep e Device LINK_TYPE The following example shows the output for one of the port devices showing the device path and the default current and next boot configuration Device 2 Dev...

Page 53: ...th set LINK_TYPE_P1 config number where device path corresponds to the port you want to configure config number is 1 for InfiniBand and 2 for Ethernet Example setting slot 0 to Ethernet sudo mlxconfig y d dev mst mt4123_pciconf2 set LINK_TYPE_P1 2 Example setting slot 1 to InfiniBand sudo mlxconfig y d dev mst mt4123_pciconf3 set LINK_TYPE_P1 1 ...

Page 54: ...unt the NFS onto the DGX A100 system and how to cache the NFS using the DGX A100 SSDs for improved performance Make sure that you have an NFS server with one or more exports with data to be accessed by the DGX A100 System and that there is network access between the DGX A100 System and the NFS server 1 Configure an NFS mount for the DGX A100 System a Edit the filesystem tables configuration sudo v...

Page 55: ... 0 RAID 0 provides the maximum storage capacity but does not provide any redundancy If a single SSD in the array fails all data stored on the array is lost If you are willing to accept reduced capacity in return for some level of protection against failure of a single SSD you can change the level of the RAID array to RAID 5 If you change the RAID level from RAID 0 to RAID 5 the total storage capac...

Page 56: ...tems incorporate data drives configured as RAID 0 by default You can alter the default configuration by adding or removing drives or by switching between a RAID 0 configuration and a RAID 5 configuration If you alter the default configuration you must let NVSM know so that the utility does not flag the configuration as an error and so that NVSM can continue to monitor the health of the drives To c...

Page 57: ...erform the update verify that the DGX A100 system network connection can access the public repositories and that the connection is not blocked by a firewall or proxy Enter the following on the DGX A100 system wget O f1 changelogs http changelogs ubuntu com meta release lts wget O f1 changelogs http changelogs ubuntu com meta release lts wget O f2 archive http archive ubuntu com ubuntu dists bionic...

Page 58: ...t the grub configuration to use select the current one on the system Other questions will depend on what other packages were installed before the update and how those packages interact with the update Typically you can accept the default option when prompted 5 Reboot the system 9 2 Restoring the DGX A100 Software Image If the DGX A100 software image becomes corrupted or the OS NVMe drives are repl...

Page 59: ...he latest DGX OS 5 release for your system in the DGX Software Firmware Download Matrix which requires an NVIDIA Enterprise Support account 2 Download the ISO image and its checksum file and save them to your local disk Run a checksum or hash utility on the ISO image and compare the resulting value to the value in the checksum file to validate the ISO file 9 2 2 Remotely Reimaging the System These...

Page 60: ...as cache and want to keep data on the RAID disks then select one of the Without Reformatting Data RAID options See the section Retaining the RAID Partition While Installing the OS for more information f Press Enter The DGX A100 system will reboot from ISO image and proceed to install the image This can take approximately 15 minutes Note The Mellanox InfiniBand driver installation can take up to 30...

Page 61: ...e image the resulting flash drive might not be bootable Ensure that the following prerequisites are met The correct DGX A100 software image is saved to your local disk For more information see Obtaining the DGX A100 Software ISO Image and Checksum File The USB flash drive capacity is at least 8 GB 1 Plug the USB flash drive into one of the USB ports of your Linux system 2 Obtain the device name of...

Page 62: ... your Windows system 2 Download and launch the Akeo Reliable USB Formatting Utility Rufus 3 Under Drive Properties select the following options a In Device Selection select your USB flash drive b In Boot selection click SELECT and then locate and select the DGX OS ISO image You can leave the other settings at the default 4 Click Start Because the image is a hybrid ISO file you are prompted to sele...

Page 63: ...ions Select if you want to install with an encrypted root filesystem then select one of the following options Install DGX OS version With Encrypted Root Install DGX OS version With Encrypted Root and Without Reformatting Data RAID If you are an advanced user who is not using the RAID disks as cache and want to keep data on the RAID disks select one of the Without Reformatting Data RAID options See...

Page 64: ... the RAID disks When the installation is completed you can repeat any configurations steps that you had performed to use the RAID disks as other than cache disks You can always choose to use the RAID disks as cache disks later by enabling cachefilesd and adding raid to the file system table as follows 1 Uncomment the RUN yes line in etc default cachefiled 2 Uncomment the raid line in etc fstab 3 R...

Page 65: ...ol for debugging a system if the disks on the system are not accessible or otherwise should not be touched When booting into the live environment log in as root a password is not needed In normal operation this option should not be selected 9 2 5 4 Check Disc for Defects DGX OS 5 or later If you are experiencing oddities when installing DGX OS and suspect the installation media has an issue select...

Page 66: ...tem It monitors system sensors and other parameters 10 1 1 Connecting to the BMC Make sure you have connected the BMC port on the DGX A100 system to your LAN 1 Open a browser within your LAN and go to https bmc ip address The BMC is supported on the following browsers Internet Explorer 11 and later Firefox 29 0 64 bit and later Google Chrome 7 0 3396 87 64 bit and later 2 Log in The BMC dashboard ...

Page 67: ...ks Provides quick access to several tasks Dashboard Displays the overall information about the status of the device Sensor Provides status and readings for system sensors such as SSD PSUs voltages CPU temperatures DIMM temperatures and fan speeds System Inventory Displays inventory information of system modules FRU Information System Processor Memory Controller BaseBoard Power Thermal PCIE Device ...

Page 68: ...tem Firewall User Management Video Recording Remote Control Opens the KVM Launch page for accessing the DGX A100 console remotely Power Control Perform the following power actions Power On Power Off Power Cycle Hard Reset ACP Shutdown Chassis ID LED Control Lets you to change the chassis ID LED behavior Off Solid On Blinking On select from 5 to 255 second blinking intervals Maintenance Perform the...

Page 69: ...nformation about configuring users and creating a password 4 Log out and then log back in with the new credentials 10 3 2 Using the Remote Console 1 Click Remote Control from the left side navigation menu 2 Click Launch KVM to start the remote KVM and access the DGX A100 console ...

Page 70: ...ow the instructions 10 3 4 Configuring Platform Event Filters From the side navigation menu click Settings and click Platform Event Filters The Event Filters page shows all configured event filters and available slots You can modify or add new event filter entry on this page To view available configured and unconfigured slots click All in the upper left corner of the page To view available configu...

Page 71: ...ample to use a Trusted CA signed certificate From the side navigation menu click Settings and click External User Services Refer to the following sections for instructions on Viewing the SSL Certificate Generating an SSL Certificate Uploading an SSL Certificate 10 3 5 1 Viewing the SSL Certificate From the SSL Setting page click View SSL Certificate The View SSL Certificate page displays the basic...

Page 72: ... allowed Organization Unit OU Overall organization section unit name for which the certificate is generated Maximum length of 64 alpha numeric characters Special characters and are not allowed City or Locality L City or Locality of the organization mandatory Maximum length of 64 alpha numeric characters Special characters and are not allowed State or Province ST State or Province of the organizati...

Page 73: ...3 Click the New Private Key folder icon then browse and locate the appropriate file and select it 4 Click Save 10 3 5 4 Updating the SBIOS Certificate The CA Certificate for the trusted CA that was used to sign the SSL certificate must be uploaded to allow the SBIOS to authenticate the certificate 1 Obtain the CA certificate from the signing authority that was used to sign the SSL certificate 2 Co...

Page 74: ...Using the BMC DGX A100 System DU 09821 001_v06 69 7 Select Server CA Configuration 8 Select Enroll Cert ...

Page 75: ...Using the BMC DGX A100 System DU 09821 001_v06 70 9 Select Enroll Cert Using File 10 Select the device where you stored the certificate 11 Navigate the file structure and select the certificate ...

Page 76: ...Using the BMC DGX A100 System DU 09821 001_v06 71 ...

Page 77: ...C network settings Instructions for these use cases are provided in this document Do not change settings in the SBIOS other than those described in this or other DGX A100 user documents Contact NVIDIA Enterprise Services before making other changes 11 1 Accessing the SBIOS Setup 1 Access the DGX A100 console either from a locally connected keyboard and mouse or through the BMC remote console 2 Reb...

Page 78: ...lock SID Requests Clearing the TPM 11 2 Configuring Boot Order The following instructions describe how to set the boot order at boot time You can also set the boot order from the SBIOS setup Boot screen 1 Access the DGX A100 console either from a locally connected keyboard and mouse or through the BMC remote console 2 Reboot the DGX A100 3 Press F11 at the NVIDIA splash screen 4 Select the boot de...

Page 79: ...ment of MIG instances is accomplished using the NVIDIA Management Library NVML APIs or its command line utility nvidia smi Enablement of MIG requires a GPU reset and hence some system services that manage GPUs should be terminated before enabling MIG To enable MIG on all eight GPUs in the system issue the following 1 Stop the NVSM and DCGM services sudo systemctl stop nvsm dcgm 2 Enable MIG on all...

Page 80: ... that the BMC port of the DGX A100 system be connected to a dedicated management network with firewall protection If remote access to the BMC is required such as for a system hosted at a co location provider it should be accessed through a secure method that provides isolation from the internet such as through a VPN server 13 2 System Security Measures The NVIDIA DGX A100 system incorporates the f...

Page 81: ... SSDs to permanently destroy all the data that was stored there This performs a more secure SSD data deletion than merely deleting files or reformatting the SSDs 13 3 1 Prerequisite Prepare a bootable installation medium that contains the current DGX OS Server ISO image See Obtaining the DGX A100 Software ISO Image and Checksum File Creating a Bootable Installation Medium 13 3 2 Instructions 1 Boo...

Page 82: ... then run nvme list DGX OS 4 dpkg i cdrom extras pool main n nvme cli nvme cli_1 5 1ubuntu1_amd64 deb DGX OS 5 dpkg i usr lib live mount rootfs filesystem squashfs curtin repo nvme cli_1 9 1ubuntu0 1_amd64 deb 6 Run nvme format s1 on all storage devices listed Syntax nvme format s1 device path where device path is the specific storage node as listed in the previous step For example dev nvme0n1 ...

Page 83: ...l through a web based user interface Redfish provides information that is categorized under a specific resource end point and Redfish clients can use the end points by using following HTTP methods GET POST PATCH PUT DELETE Not all endpoints support all these operations Refer to the Redfish JSON Schema for more information about the operations The Redfish server follows the DSP0266 1 7 0 Specificat...

Page 84: ...vent log advanced system event log Logging Service which provides critical informational severity events Event Services SSE Refer to the following documentation for more information DMTF Redfish specification DSP0266 1 7 0 Specification Redfish Schema 2019 1 For a list of the known issues and limitations with Redfish support that are specific to the firmware version you are running refer to the DG...

Page 85: ...e the DGX A100 System from the media This method is available only for software versions that are available as ISO images for download Alternately you can update the DGX A100 software by performing a network update from a local repository This method is available only for software versions that are available for over the network updates A 2 Re imaging the System CAUTION This process destroys all d...

Page 86: ...S 4 x see Creating the Mirror in a DGX OS 4 System If you are running DGX OS 5 see Creating the Mirror in a DGX OS 5 System 3 Update the sources that provide updates to the DGX system to use your private repository mirror instead of the public repositories For detailed instructions see which provides examples for DGX OS Desktop 4 releases To update these sources modify the etc apt sources list fil...

Page 87: ...t of repositories below to retrieve the packages for both Ubuntu base OS and the NVIDIA DGX OS packages config set base_path media usb repository your path here set mirror_path base_path mirror set skel_path base_path skel set var_path base_path var set cleanscript var_path clean sh set defaultarch running host architecture set postmirror_script var_path postmirror sh set run_postmirror 0 set nthr...

Page 88: ...or it to finish downloading content This will take a long time depending on the network connection speed sudo apt mirror 6 Eject the removable storage with all packages sudo eject media usb repository A 3 2 Configuring the Target Air Gapped DGX OS 4 System The instructions in this section are to be performed on the target air gapped DGX system Prerequisites The target DGX A100 system is installed ...

Page 89: ...ate the apt repository and confirm there are no errors sudo apt update Get 1 file media usb repository mirror security ubuntu com ubuntu bionic security InRelease 88 7 kB Get 1 file media usb repository mirror security ubuntu com ubuntu bionic security InRelease 88 7 kB Get 2 file media usb repository mirror archive ubuntu com ubuntu bionic InRelease 242 kB Get 2 file media usb repository mirror a...

Page 90: ...rror international download nvidia com dgx repos bionic bionic universe amd64 Packages 2 946 B Get 15 file media usb repository mirror international download nvidia com dgx repos bionic bionic universe i386 Packages 496 B Reading package lists Done Building dependency tree Reading state information Done 249 packages can be upgraded Run apt list upgradable to see them 8 Upgrade the system using the...

Page 91: ...IDIA DGX OS packages config set base_path media usb repository your path here set mirror_path base_path mirror set skel_path base_path skel set var_path base_path var set cleanscript var_path clean sh set defaultarch running host architecture set postmirror_script var_path postmirror sh set run_postmirror 0 set nthreads 20 set _tilde 0 end config Standard Canonical package repositories deb http se...

Page 92: ...gapped DGX system Prerequisites The target DGX A100 system is installed has gone through the first boot process and is ready to be updated with the latest packages The USB storage device on which the mirrors were created is attached to the target DGX A100 system There are other ways to transfer the data that are not covered in this document as they will depend on the data center policies for the a...

Page 93: ...security ubuntu com ubuntu focal security InRelease 107 kB Get 2 file media usb repository mirror archive ubuntu com ubuntu focal InRelease 265 kB Get 3 file media usb repository mirror archive ubuntu com ubuntu focal updates InRelease 111 kB Get 4 file media usb repository mirror developer download nvidia com compute cuda repos ubuntu2004 x86_64 InRelease Get 5 file media usb repository mirror re...

Page 94: ...name This is a special username that enables API key authentication In place of apikey paste in the API Key text that you obtained from the NGC website 1 Enter the docker pull command specifying the image registry image repository and tag docker pull nvcr io nvidia repository tag 2 Verify the image is on your system using docker images docker images 3 Save the Docker image as an archive docker sav...

Page 95: ...components specified in this guide Use of other products I components will void the UL Listing and other regulatory approvals of the product and may result in noncompliance with product regulations in the region s in which the product is sold B 2 Safety Information To avoid personal injury or property damage before you begin installing the product read observe and adhere to all of the following sa...

Page 96: ...e installed in offices schools computer rooms and similar commercial type locations The suitability of this product for other product categories and environments such as medical industrial residential alarm systems and test equipment other than an ITE application may require further evaluation B 4 Intended Application Uses Choose a site that is Clean dry and free of airborne particles other than n...

Page 97: ...lugged before you open the chassis or add or remove any non hot plug components Do not attempt to modify or use an AC power cord if it is not the exact type required A separate AC cord is required for each system power supply Some power supplies in servers use Neutral Pole Fusing To avoid risk of shock use caution when working with power supplies that use Neutral Pole Fusing The power supply in th...

Page 98: ...ugged into socket outlet s that is are provided with a suitable earth ground B 8 System Access Warnings CAUTION To avoid personal injury or property damage the following safety instructions apply whenever accessing the inside of the product Turn off all peripheral devices connected to this product Turn off the system by pressing the power button to off Disconnect the AC power by unplugging all AC ...

Page 99: ...a time You are responsible for installing a main power disconnect for the entire rack unit This main disconnect must be readily accessible and it must be labeled as controlling power to the entire unit not just to the server s To avoid risk of potential electric shock a proper safety ground must be implemented for the rack and each piece of equipment installed in it Elevated Operating Ambient If i...

Page 100: ... is not intended for direct and prolonged skin contact Please use the handles to remove attach or carry the bezel While nickel exposure is unlikely to be a problem you should be aware of the possibility in case you re susceptible to nickel related reactions B 12 Battery Replacement CAUTION There is the danger of explosion if the battery is incorrectly replaced When replacing the battery use only t...

Page 101: ...ach the covers to the chassis according to the product instructions The equipment is intended for installation only in a Server Room Computer Room where both these conditions apply Access can only be gained by SERVICE PERSONS or by USERS who have been instructed about the reasons for the restrictions applied to the location and about any precautions that shall be taken Access is through the use of...

Page 102: ...ference when the equipment is operated in a commercial environment This equipment generates uses and can radiate radio frequency energy and if not installed and used in accordance with the instruction manual may cause harmful interference to radio communications Operation of this equipment in a residential area is likely to cause harmful interference in which case the user will be required to corr...

Page 103: ...required to take adequate measures This device bears the CE mark in accordance with Directive 2014 53 EU This device complies with the following Directives EMC Directive A I T E Equipment Low Voltage Directive for electrical safety RoHS Directive for hazardous substances Energy related Products Directive ErP The full text of EU declaration of conformity is available at the following internet addre...

Page 104: ...ired to take corrective actions VCCI A 2008年 日本における製品含有表示方法 JISC0950が公示さ れま し た 製造事業者は 2006年7月1日以降に販売さ れる電気 電子機器 の特定化学物質の含有に付きまし て情報提供を義務付けら れまし た 製品の部材表示に付きまし ては 以下をご覧く ださ い A Japanese regulatory requirement defined by specification JIS C 0950 2008 mandates that manufacturers provide Material Content Declarations for certain categories of electronic products offered for sale after July 1 2006 To ...

Page 105: ... 特定化学物質の含有率が日本工業規格 JIS C 0950 2008 に記載されている含有率基準値より低いことを示します 2 除外項目 は 特定化学物質が含有マークの除外項目に該当するため 特定化学物質について 日本工業規格 JIS C 0950 2008 に基づく含有マークの表示が不要であることを示します 3 0 1wt 超 または 0 01wt 超 は 特定化学物質の含有率が日本工業規格JIS C 0950 2008 に記載されている含有率基準値を超え ていることを示します A Japanese regulatory requirement defined by specification JIS C 0950 2008 mandates that manufacturers provide Material Content Declarations for certain categ...

Page 106: ...hat the specified chemical substance is exempt from marking and it is not required to display the marking for that specified chemical substance per the standard JIS C 0950 2008 3 Exceeding 0 1wt or Exceeding 0 01wt is entered in the table if the level of the specified chemical substance exceeds the threshold level specified in the standard JIS C 0950 2008 C 8 South Korea Korean Agency for Technolo...

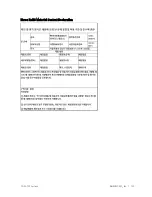
Page 107: ...Redfish APIs Support DGX A100 System DU 09821 001_v06 102 Korea RoHS Material Content Declaration ...

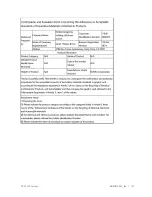
Page 108: ...Redfish APIs Support DGX A100 System DU 09821 001_v06 103 ...

Page 109: ...Table of Hazardous Substances and their Content 根据中国 电器电子产品有害物质限制使用管理办法 as required by China s Management Methods for Restricted of Hazardous Substances Used in Electrical and Electronic Products 部件名称 Parts 有害物质 Hazardous Substances 铅 Pb 汞 Hg 镉 Cd 六价铬 Cr VI 多溴联 苯 PBB 多溴联苯 醚 PBDE 机箱 Chassis X O O O O O 印刷电路部件 PCA X O O O O O 处理器 Processor X O O O O O 主板 Motherboard X O O O O O 电源设备 Power supply X O...

Page 110: ...ance contained in all of the homogeneous materials for this part is below the limit requirement in GB T 26572 2011 X 表示该有害物质至少在该部件的某一均质材料中的含量超出GB T 26572 2011 标准规定的限量要求 X Indicates that this hazardous substance contained in at least one of the homogeneous materials used for this part is above the limit requirement in GB T 26572 2011 此表中所有名称中含 X 的部件均符合欧盟 RoHS 立法 All parts named in this table with a...

Page 111: ...Redfish APIs Support DGX A100 System DU 09821 001_v06 106 C 10 Taiwan Bureau of Standards Metrology Inspection BSMI Taiwan RoHS Material Content Declaration ...

Page 112: ...011 ТЕХНИЧЕСКИЙ РЕГЛАМЕНТ ТАМОЖЕННОГО СОЮЗА Электромагнитная совместимость технических средств ТР ТС 020 2011 Технический регламент Евразийского экономического союза Об ограничении применения опасных веществ в изделиях электротехники и радиоэлектроники ТР ЕАЭС 037 2016 Federal Agency of communication FAC This device complies with the rules set forth by Federal Agency of Communications and the Mini...

Page 113: ... not contain lead mercury hexavalent chromium polybrominated biphenyls or polybrominated diphenyl ethers in concentrations exceeding 0 1 weight and 0 01 weight for cadmium except for where allowed pursuant to the exemptions set in Schedule 2 of the Rule C 14 South Africa South African Bureau of Standards SABS This device complies with the following SABS Standards SANS 2332 2017 CISPR 32 2015 SANS ...

Page 114: ... SI 2016 1101 The Low Voltage Electrical Equipment Safety SI 2012 3032 The Restriction of the Use of Certain Hazardous Substances in Electrical and Electronic Equipment As Amended A copy of the Declaration of Conformity to the essential requirements may be obtained directly from NVIDIA Ltd 100 Brook Drive 3rd Floor Green Park Reading RG2 6UJ United Kingdom ...

Page 115: ...trary to this document or ii customer product designs No license either expressed or implied is granted under any NVIDIA patent right copyright or other NVIDIA intellectual property right under this document Information published by NVIDIA regarding third party products or services does not constitute a license from NVIDIA to use such products or services or a warranty or endorsement thereof Use o...

Reviews: