background image

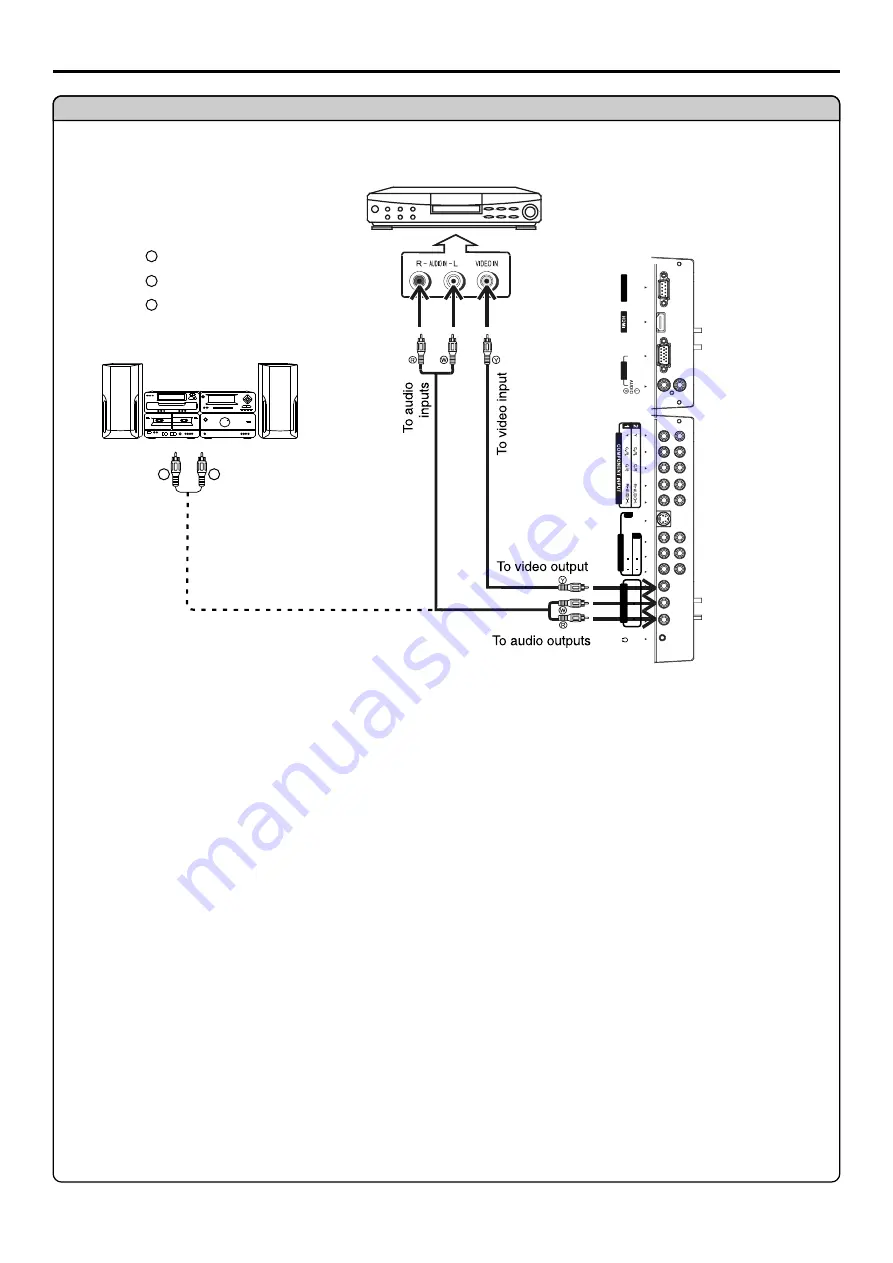
VCR for recording

Yellow (VIDEO)
White (AUDIO L)

Red (AUDIO R )

W

W

Y

Y

R

R

W

W

R

R

Audio amplifier 

To audio inputs

V

ID

E

O

A

V

  I

N

P

U

T


L

L

R

R

A

U

D

IO

A

U

D

IO

V

ID

E

O

V

ID

E

O

S

-V

ID

E

O

1

2

V

G

A

Connect a VCR for Recording

Connections 

(continued)

Connect the Audio/Video cables between the Audio (L/R)/Video jacks on the unit and VCR.
Or connect the Audio cable between the Audio (L/R) jacks on the unit and Audio amplifier. 

How to connect:

1. Turn on your LCD monitor, select a program you wish to record.
2. Turn on your VCR, insert a videotape for recording.
3. Press the Record button to begin recording.

How to record program

4

The AV output terminals only can output


 AV signal.

4

To fully enjoy sound effects from  Audio Amplifier you can enter into Audio menu and set Line 
Output menu item to a proper setting. For details information, please refer to page19 

Setting 

the Line Output

 section.

Note:

14

1. Turn on your LCD monitor, select a program source.
2. Turn on your audio amplifier and adjust for a proper volume.

How to enjoy high quality sound by Audio amplifier

N

u

C

o

n

tr

o

l

A

V

  O

U

T

P

U

T

L

R

A

U

D

IO

V

ID

E

O

Summary of Contents for NVX37HDU2

Page 1: ...NVX37HDU2...

Page 2: ...and Off 15 Viewing the Menus and Displays 15 Displaying Status Information 15 Adjusting the Volume 15 Using the Mute 15 Basic Operations 16 Selecting Input Source Signal 16 Editing Input Label 16 Sele...

Page 3: ...wing Picture out Picture 23 Adjustment in VGA HDMI Component Mode 24 Selecting the Preset Color Warmth Mode 24 Adjusting the Picture Automatically 24 Adjusting the Clock 24 Adjusting the Phase 25 Chan...

Page 4: ...formation please contact your local authorities or the Electronic IndustriesAlliance www eia org FCC STATEMENT FCC Notice LCD Monitor A CLASS B digital device Thisequipmenthasbeentestedandfoundtocompl...

Page 5: ...fore cleaning Donotuseliquidcleanersoraerosolcleaners Useadampclothforcleaning 7 Ventilation Do not block any ventilation openings Install in accordance with the manufacturer instructions The vents an...

Page 6: ...ufacturer or those with the same characteristics and performance as the originalparts Useofunauthorizedpartscanresultinfire electricshockand orotherdanger 17 Overloading Do not overload wall outlets e...

Page 7: ...label Ifyouarenotsureofthe type of power supply to your home consult your product dealer or local power company For added protection for this product during a lightning storm or when it is left unatte...

Page 8: ...thebatteriesfromtheremotecontrol Using the Remote Control Usetheremotecontrolbypointingittowardstheremotesensorwindowoftheset Objectsbetween theremotecontrolandsensorwindowmaypreventproperoperation Ca...

Page 9: ...to access the Menu main page 3 4 Press the VOL or VOL button to directly increase or decrease the sound volume level In OSD Menu press these buttons to adjust the value or setting of each item 5 POWER...

Page 10: ...s of a DVD player or Set Top Box 5 S VIDEO input Receive an S Video signal from external source such as VCR or DVD player 6 AV inputs Video Audio L R Receive video audio signals from external sources...

Page 11: ...o select menu item in menu operation VOL 3 4 Use to adjust volume or adjust selected item in menu operation Sound mute To select Day Mode or Night Mode for panel backlight To activate picture in pictu...

Page 12: ...Theillustrationoftheexternalequipmentmaybedifferentdependingonyourmodel Looseconnectorscanresultinimageorcolorproblems Makesurethatallconnectorsaresecurelyinsertedintotheirterminals Refertotheoperati...

Page 13: ...camcorder How to connect 1 Turn on your LCD monitor press AV2 button on the remote control 2 Turn on your camcorder and set it to output mode For details refer to your camcorder owner s manual 3 Inse...

Page 14: ...LCD monitor press Comp1 button or Comp2 button on the remote control 2 Turn on your DVD player To play DVD How to connect a DVD Player using Component Video Connections DVD player W W R R G G B B whi...

Page 15: ...of a passive cable converter So you may connect product with DVI output jack to the unit Connect a passive cable converter between the HDMI input jack on the unit and DVI output jack on the product Co...

Page 16: ...en resolution to 1024x768 or 1280x768 To Watch the PC screen Connect a VGA cable between the VGA jack on the PC and the VGA input jack on the unit Connect an Audio cable between the AUDIO output on th...

Page 17: ...LCD monitor select a program you wish to record 2 Turn on your VCR insert a videotape for recording 3 Press the Record button to begin recording How to record program 4TheAVoutputterminalsonlycanoutpu...

Page 18: ...pressthePower buttonontheremotecontroltoturnoffthe unit Viewing the Menus and Displays Viewing the Menus YourLCDmonitorhasa easy to usemenusystemthatappearsonthescreen Thissystemmakesitconvenientandfa...

Page 19: ...to select Settings menu or 4 Preferences 2 3 Press 5or6to select among English and Fran ais Espa ol 5 16 4 Selecting Input Signal Youcandirectlyselectinputsourcebyusingbuttonsontheremotecontrol Editi...

Page 20: ...r paler Using the Preset Picture Mode Therearethreepresetpicturemodes Soft NormalandBright andone user setpicturemode User Eachpresetmodehasitsownpicturesettings Soft Selectforafinelydetailedpicture N...

Page 21: ...4 Press6repeatedlytoselectColorWarmthitem 2 Press4accessthesubmenu Contrast Color Tint Sharpness Picture Mode Auto Color Color Warmth Black Level Normal Cool Warm Contrast Color Tint Sharpness Pictur...

Page 22: ...musicprogram Movie Selectforamovieprogram News Selectforaspeechorconversationprogram ThisitemwillbesettoUserautomaticallywhenyoucustomizethesound Movie News User Music Treble Balance EQ Mode Line Outp...

Page 23: ...s 5or6to select a proper time ThissettingallowsyoutosetthetimeforthemainOSDmenutobedisplayedonthescreen Adjusting OSD Transparency Press MENUtodisplaythemenumainpage 1 Press 3 repeatedly to select Set...

Page 24: ...repeatedly to select Settings menu or4 Preferences 2 Press repeatedly to select item 6 Information 3 Thissettingallowsyoutoobtainthedetailedinformationabouttheinputsourcesignal Press MENUtodisplaythe...

Page 25: ...emenumainpage 1 Press 3 repeatedly to select PIP Mode menu or4 2 Press to 6repeatedly select a desired size of PIP frame You may select between Small Medium and Large 3 4 Press 4toconfirm Small Medium...

Page 26: ...OP Window Selecting Speaker Output Source 1 2 3 You may directly use the MODE button to activate the Split PBP or Outside POP function 4 Press MENUtodisplaythemenumainpage Press 3 repeatedly to select...

Page 27: ...ess to select Auto VGA item 6 3 4 Press 4repeatedlytoselectYes Press 4tostartadjusting 5 Clock VGA Phase Position Auto VGA No Yes Adjusting the Clock for VGA mode only Press MENUtodisplaythemenumainpa...

Page 28: ...Screen Settings menu or4 2 Press o select Over Scan item 6repeatedly t 3 4 Press 4toaccessthesubmenu Press 5or6toselect 5 This function is designed for you to adjust the reproduction ratio you may ac...

Page 29: ...eforwhichBBEHighDefinitionSoundisnoted Setting Sleep Timer PresstheSleepbuttonrepeatedlytosetasleeptimetoautomaticallyturnoffthunit Witheachpressof thebutton thevaluechangesasbelow Sleep Timer 10 Min...

Page 30: ...y closed caption when you mutethesound Setting Closed Caption Press MENUtodisplaythemenumainpage 1 Press 6 to select CC Mode item 3 Press 4 to access the submenu 4 Press 5or6 to select a desired item...

Page 31: ...ation about the program the MPAA rating and the TV Parental Guidelines TheMPAAratingisrestrictedbyage TVParentalGuidelinesarerestrictedbyageandcontent SinceavideoprogrammayuseeithertheMPAAratingortheT...

Page 32: ...erage basedratingsregardlessofcontentratingssettings TV Y All children TV Y7 Direct to Older Children TV G General Audience TV PG Parental Guidance Suggested TV 14 Parents Strongly Cautioned TV MA Mat...

Page 33: ...item 1 Press5or6repeatedlytoselectadesiredratingyouwanttoblock 3 Press4toaccess ifyouwanttosetcontent basedratings 4 This will automatically block the higher age based ratings You may set the individu...

Page 34: ...toblock 3 PresstheMENU buttonrepeatedlytoexit 4 CANADIAN ENGLISH RATING CHART Exempt Exempt programming Programming intended for children under age 8 No offensive language nudity or sexual content Pro...

Page 35: ...c Turn off the equipment Check whether the batteries are working Replace if necessary Clean the remote control sensor lens on the unit Do not use the remote control under strong or fluorescent lightin...

Page 36: ...kground image is viewable on normal programs in the form of a stationary fixed image This type of irreversible LCD panel deteriorationcanbelimitedbyobservingthefollowingsteps A Reducethebrightness con...

Page 37: ...sign and specifications are subject to change without notice Type LCD Monitor Display Size diagonal 37 Power Supply AC100 240V 50 60Hz Power Consumption 200W Dimensions inch 44 7 W X 25 7 H X 9 8 D Un...

Page 38: ...ation on obtaining warranty service visit www nuvision com or call NuVision NuVision s Customer Support telephone numbers are 800 605 8022 in the U S or Canada From outside the U S 480 970 1466 or ple...

Page 39: ...PRINTED ON RECYCLED PAPER Ver 1 0 604 LM37R73 01...

Reviews: